User Manual
Oracle and/or its affiliates
Copyright © 2004-2024 Oracle and/or its affiliates
Table of Contents
- Preface
- 1. First Steps
- 1.1. Why is Virtualization Useful?
- 1.2. Some Terminology
- 1.3. Features Overview
- 1.4. Supported Host Operating Systems
- 1.5. Installing Oracle VM VirtualBox and Extension Packs
- 1.6. Starting Oracle VM VirtualBox
- 1.7. VirtualBox Manager
- 1.8. Creating Your First Virtual Machine
- 1.8.1. Create Virtual Machine Wizard: Name and Operating System
- 1.8.2. (Optional) Create Virtual Machine Wizard: Unattended Guest OS Install
- 1.8.3. Create Virtual Machine Wizard: Hardware
- 1.8.4. Create Virtual Machine Wizard: Virtual Hard Disk
- 1.8.5. Create Virtual Machine Wizard: Summary
- 1.8.6. Some Examples of Unattended Installation
- 1.9. Running Your Virtual Machine
- 1.10. Using VM Groups
- 1.11. Snapshots
- 1.12. Virtual Machine Configuration
- 1.13. Removing and Moving Virtual Machines
- 1.14. Cloning Virtual Machines
- 1.15. Importing and Exporting Virtual Machines
- 1.16. Integrating with Oracle Cloud Infrastructure
- 1.16.1. Preparing for Oracle Cloud Infrastructure Integration
- 1.16.2. Creating an API Signing Key Pair
- 1.16.3. Uploading the Public Key to Oracle Cloud Infrastructure
- 1.16.4. Creating a Cloud Profile
- 1.16.5. Using the Cloud Profile Manager
- 1.16.6. Using Oracle VM VirtualBox With Oracle Cloud Infrastructure
- 1.16.7. Using Cloud Virtual Machines
- 1.16.8. Exporting an Appliance to Oracle Cloud Infrastructure
- 1.16.9. Importing an Instance from Oracle Cloud Infrastructure
- 1.16.10. Using a Cloud Network
- 1.16.11. Using VBoxManage Commands With Oracle Cloud Infrastructure
- 1.17. Preferences
- 1.18. Alternative Front-Ends
- 1.19. Soft Keyboard
- 1.20. Monitoring of Virtual Machines
- 1.21. The Log Viewer
- 2. Installation Details
- 3. Configuring Virtual Machines
- 3.1. Supported Guest Operating Systems
- 3.2. Unattended Guest Installation
- 3.3. Emulated Hardware
- 3.4. General Settings
- 3.5. System Settings
- 3.6. Display Settings
- 3.7. Storage Settings
- 3.8. Audio Settings
- 3.9. Network Settings
- 3.10. Serial Ports
- 3.11. USB Support
- 3.12. Shared Folders
- 3.13. User Interface
- 3.14. Alternative Firmware (EFI)
- 4. Guest Additions
- 4.1. Introduction to Guest Additions
- 4.2. Installing and Maintaining Guest Additions
- 4.3. Shared Folders
- 4.4. Drag and Drop
- 4.5. Hardware-Accelerated Graphics
- 4.6. Seamless Windows
- 4.7. Guest Properties
- 4.8. Guest Control File Manager
- 4.9. Guest Control of Applications
- 4.10. Memory Overcommitment
- 4.11. Controlling Virtual Monitor Topology
- 5. Virtual Storage
- 5.1. Hard Disk Controllers
- 5.2. Disk Image Files (VDI, VMDK, VHD, HDD)
- 5.3. The Virtual Media Manager
- 5.4. Special Image Write Modes
- 5.5. Differencing Images
- 5.6. Cloning Disk Images
- 5.7. Host Input/Output Caching
- 5.8. Limiting Bandwidth for Disk Images
- 5.9. CD/DVD Support
- 5.10. iSCSI Servers
- 5.11. vboximg-mount: A Utility for FUSE Mounting a Virtual Disk Image
- 6. Virtual Networking
- 6.1. Virtual Networking Hardware
- 6.2. Introduction to Networking Modes
- 6.3. Network Address Translation (NAT)
- 6.4. Network Address Translation Service
- 6.5. Bridged Networking
- 6.6. Internal Networking
- 6.7. Host-Only Networking
- 6.8. UDP Tunnel Networking
- 6.9. VDE Networking
- 6.10. Cloud Networks
- 6.11. Network Manager
- 6.12. Limiting Bandwidth for Network Input/Output
- 6.13. Improving Network Performance
- 7. Remote Virtual Machines
- 7.1. Remote Display (VRDP Support)
- 7.1.1. Common Third-Party RDP Viewers
- 7.1.2. VBoxHeadless, the Remote Desktop Server
- 7.1.3. Step by Step: Creating a Virtual Machine on a Headless Server
- 7.1.4. Remote USB
- 7.1.5. RDP Authentication
- 7.1.6. RDP Encryption
- 7.1.7. Multiple Connections to the VRDP Server
- 7.1.8. Multiple Remote Monitors
- 7.1.9. VRDP Video Redirection
- 7.1.10. VRDP Customization
- 7.2. Teleporting
- 7.3. VBoxHeadless
- 8. VBoxManage
- 8.1. Introduction
- 8.2. Commands Overview
- 8.3. General Options
- 8.4. VBoxManage
- 8.5. VBoxManage list
- 8.6. VBoxManage showvminfo
- 8.7. VBoxManage registervm
- 8.8. VBoxManage unregistervm
- 8.9. VBoxManage createvm
- 8.10. VBoxManage modifyvm
- 8.11. VBoxManage clonevm
- 8.12. VBoxManage movevm
- 8.13. VBoxManage encryptvm
- 8.14. VBoxManage cloud
- 8.15. VBoxManage cloudprofile
- 8.16. VBoxManage import
- 8.17. VBoxManage export
- 8.18. VBoxManage signova
- 8.19. VBoxManage startvm
- 8.20. VBoxManage controlvm
- 8.21. VBoxManage unattended
- 8.22. VBoxManage discardstate
- 8.23. VBoxManage adoptstate
- 8.24. VBoxManage snapshot
- 8.25. VBoxManage closemedium
- 8.26. VBoxManage storageattach
- 8.27. VBoxManage storagectl
- 8.28. VBoxManage bandwidthctl
- 8.29. VBoxManage showmediuminfo
- 8.30. VBoxManage createmedium
- 8.31. VBoxManage modifymedium
- 8.32. VBoxManage clonemedium
- 8.33. VBoxManage mediumproperty
- 8.34. VBoxManage encryptmedium
- 8.35. VBoxManage checkmediumpwd
- 8.36. VBoxManage convertfromraw
- 8.37. VBoxManage mediumio
- 8.38. VBoxManage setextradata
- 8.39. VBoxManage getextradata
- 8.40. VBoxManage setproperty
- 8.41. VBoxManage usbfilter
- 8.42. VBoxManage sharedfolder
- 8.43. VBoxManage guestproperty
- 8.44. VBoxManage guestcontrol
- 8.45. VBoxManage debugvm
- 8.46. VBoxManage metrics
- 8.47. VBoxManage natnetwork
- 8.48. VBoxManage hostonlyif
- 8.49. VBoxManage hostonlynet
- 8.50. VBoxManage dhcpserver
- 8.51. VBoxManage usbdevsource
- 8.52. VBoxManage extpack
- 8.53. VBoxManage updatecheck
- 8.54. VBoxManage modifynvram
- 8.55. vboximg-mount
- 9. Advanced Topics
- 9.1. Automated Guest Logins
- 9.2. Advanced Configuration for Windows Guests
- 9.3. Advanced Configuration for Linux and Oracle Solaris Guests
- 9.4. CPU Hot-Plugging
- 9.5. Webcam Passthrough
- 9.6. Advanced Display Configuration
- 9.7. Advanced Storage Configuration
- 9.8. Fine Tuning the Oracle VM VirtualBox NAT Engine
- 9.8.1. Configuring the Address of a NAT Network Interface
- 9.8.2. Configuring the Boot Server (Next Server) of a NAT Network Interface
- 9.8.3. Tuning TCP/IP Buffers for NAT
- 9.8.4. Binding NAT Sockets to a Specific Interface
- 9.8.5. Enabling DNS Proxy in NAT Mode
- 9.8.6. Using the Host's Resolver as a DNS Proxy in NAT Mode
- 9.8.7. Configuring Aliasing of the NAT Engine
- 9.9. Configuring the BIOS DMI Information
- 9.10. Configuring Custom ACPI Tables
- 9.11. Fine Tuning Timers and Time Synchronization
- 9.12. Installing the Alternate Bridged Networking Driver on Oracle Solaris 11 Hosts
- 9.13. Oracle VM VirtualBox VNIC Templates for VLANs on Oracle Solaris 11 Hosts
- 9.14. Configuring Multiple Host-Only Network Interfaces on Oracle Solaris Hosts
- 9.15. Configuring the Oracle VM VirtualBox CoreDumper on Oracle Solaris Hosts
- 9.16. Oracle VM VirtualBox and Oracle Solaris Kernel Zones
- 9.17. Locking Down VirtualBox Manager
- 9.17.1. Customizing VirtualBox Manager
- 9.17.2. VM Selector Customization
- 9.17.3. Configure VM Selector Menu Entries
- 9.17.4. Configure VM Window Menu Entries
- 9.17.5. Configure VM Window Status Bar Entries
- 9.17.6. Configure VM Window Visual Modes
- 9.17.7. Host Key Customization
- 9.17.8. Action when Terminating the VM
- 9.17.9. Default Action when Terminating the VM
- 9.17.10. Action for Handling a Guru Meditation
- 9.17.11. Configuring Automatic Mouse Capturing
- 9.17.12. Requesting Legacy Full-Screen Mode
- 9.17.13. Removing Certain Modes of Networking From the GUI
- 9.18. Starting the Oracle VM VirtualBox Web Service Automatically
- 9.19. Oracle VM VirtualBox Watchdog
- 9.20. Other Extension Packs
- 9.21. Starting Virtual Machines During System Boot
- 9.22. Encryption of VMs
- 9.23. Oracle VM VirtualBox Expert Storage Management
- 9.24. Handling of Host Power Management Events
- 9.25. Passing Through SSE4.1/SSE4.2 Instructions
- 9.26. Support for Keyboard Indicator Synchronization
- 9.27. Capturing USB Traffic for Selected Devices
- 9.28. Configuring the Heartbeat Service
- 9.29. Encryption of Disk Images
- 9.30. Paravirtualized Debugging
- 9.31. PC Speaker Passthrough
- 9.32. Accessing USB devices Exposed Over the Network with USB/IP
- 9.33. Using Hyper-V with Oracle VM VirtualBox
- 9.34. Nested Virtualization
- 9.35. VBoxSVC running in Windows Session 0
- 9.36. VISO file format / RTIsoMaker
- 10. Technical Background
- 11. Oracle VM VirtualBox Programming Interfaces
- 12. Troubleshooting
- 12.1. Procedures and Tools
- 12.2. General Troubleshooting
- 12.2.1. Guest Shows IDE/SATA Errors for File-Based Images on Slow Host File System
- 12.2.2. Responding to Guest IDE/SATA Flush Requests
- 12.2.3. Performance Variation with Frequency Boosting
- 12.2.4. Frequency Scaling Effect on CPU Usage
- 12.2.5. Inaccurate Windows CPU Usage Reporting
- 12.2.6. Poor Performance Caused by Host Power Management
- 12.2.7. GUI: 2D Video Acceleration Option is Grayed Out
- 12.3. Windows Guests
- 12.3.1. No USB 3.0 Support in Windows 7 Guests
- 12.3.2. Windows Bluescreens After Changing VM Configuration
- 12.3.3. Windows 0x101 Bluescreens with SMP Enabled (IPI Timeout)
- 12.3.4. Windows 2000 Installation Failures
- 12.3.5. How to Record Bluescreen Information from Windows Guests
- 12.3.6. No Networking in Windows Vista Guests
- 12.3.7. Windows Guests may Cause a High CPU Load
- 12.3.8. Long Delays When Accessing Shared Folders
- 12.3.9. USB Tablet Coordinates Wrong in Windows 98 Guests
- 12.3.10. Windows Guests are Removed From an Active Directory Domain After Restoring a Snapshot
- 12.3.11. Windows 3.x Limited to 64 MB RAM
- 12.4. Linux and X11 Guests
- 12.5. Oracle Solaris Guests
- 12.6. Windows Hosts
- 12.6.1. Drag'n Drop not Working
- 12.6.2. VBoxSVC Out-of-Process COM Server Issues
- 12.6.3. CD and DVD Changes Not Recognized
- 12.6.4. Sluggish Response When Using Microsoft RDP Client
- 12.6.5. Running an iSCSI Initiator and Target on a Single System
- 12.6.6. Bridged Networking Adapters Missing
- 12.6.7. Host-Only Networking Adapters Cannot be Created
- 12.7. Linux Hosts
- 12.8. Oracle Solaris Hosts
- 13. Security Guide
- 14. Known Limitations
- 15. Change Log
- 15.1. Version 7.0.18 (2024-05-07)
- 15.2. Version 7.0.16 (2024-04-16)
- 15.3. Version 7.0.14 (2024-01-16)
- 15.4. Version 7.0.12 (2023-10-17)
- 15.5. Version 7.0.10 (2023-07-18)
- 15.6. Version 7.0.8 (2023-04-18)
- 15.7. Version 7.0.6 (2023-01-17)
- 15.8. Version 7.0.4 (2022-11-18)
- 15.9. Version 7.0.2 (2022-10-20)
- 15.10. Version 7.0.0 (2022-10-10)
- 15.11. Change Logs for Legacy Versions
- A. Third-Party Materials and Licenses
- A.1. Third-Party Materials
- A.2. Third-Party Licenses
- A.2.1. GNU General Public License (GPL)
- A.2.2. GNU Lesser General Public License (LGPL)
- A.2.3. Mozilla Public License (MPL)
- A.2.4. MIT License
- A.2.5. X Consortium License (X11) (variant 1)
- A.2.6. X Consortium License (X11) (variant 2)
- A.2.7. zlib License
- A.2.8. Apache License v2
- A.2.9. OpenSSL License
- A.2.10. Slirp License
- A.2.11. liblzf License
- A.2.12. libpng License
- A.2.13. lwIP License
- A.2.14. libxml License
- A.2.15. gSOAP Public License Version 1.3a
- A.2.16. curl License
- A.2.17. libgd License
- A.2.18. BSD License from Intel
- A.2.19. IJG (Independent JPEG Group) License
- A.2.20. libjpeg-turbo Modified (3-clause) BSD License
- A.2.21. FreeBSD License
- A.2.22. NetBSD License
- A.2.23. VPX License
- A.2.24. Vorbis License
- A.2.25. curl License
- A.2.26. DocBook XML DTD License
- A.2.27. DocBook XSL Stylesheets License
- A.2.28. Intel ACPI Component Architecture (ACPICA) License
- A.2.29. Khronos License
- A.2.30. SGI Free Software License B
- A.2.31. Boost Software License
- A.2.32. Default Mesa 3D Graphics Library License
- A.2.33. Microsoft Software License
- A.2.34. Python License
- A.2.35. License for Berkeley SoftFloat Release 3e
- A.2.36. BSD 3-Clause License for Glslang
- A.2.37. BSD 2-Clause License for Glslang
- A.2.38. GNU General Public License (GPL) License with Bison Exception for Glslang
- A.2.39. WiX Toolset License
- A.2.40. XFree86 License (variant 1)
- A.2.41. XFree86 License (variant 2)
- A.2.42. Cereal License
- A.2.43. Keith Packard License
- A.2.44. X Direct Rendering Infrastructure (DRI) 2 Extension License
- A.2.45. Network Computing Devices and DEC License
- A.2.46. MIT Open Group Variant License
- A.2.47. Digital Equipment Corporation License (variant 1)
- A.2.48. Digital Equipment Corporation License (variant 2)
- A.2.49. Digital Equipment Corporation License (variant 3)
- A.2.50. Digital Equipment Corporation and QuarterDeck Office Systems License
- A.2.51. Hewlett-Packard License (variant 1)
- A.2.52. Hewlett-Packard License (variant 2)
- A.2.53. Hewlett-Packard License (variant 3)
- A.2.54. Hewlett-Packard License (variant 4)
- A.2.55. Silicon Graphics License
- A.2.56. X Resize and Rotate Extension (RandR) License
- A.2.57. SuSE License
- A.2.58. Network Computing Devices (NCD) License (variant 1)
- A.2.59. Network Computing Devices (NCD) License (variant 2)
- A.2.60. Network Computing Devices (NCD) License (variant 3)
- A.2.61. Digital Equipment Corporation and Olivetti Research Limited License
- A.2.62. X Consortium, DEC, Intergraph, Silicon Graphics, and Hewlett-Packard License
- A.2.63. Sun Microsystems License
- A.2.64. X libpciaccess Library License
- A.2.65. X libxshmfence License
- A.2.66. X xf86-input-mouse driver License
- A.2.67. Kazutaka YOKOTA License
- A.2.68. Conectiva License
- A.2.69. Red Hat and SuSE License
- A.2.70. Red Hat License
- A.2.71. X Consortium and Red Hat License
- A.2.72. Precision Insight License
- A.2.73. VA Linux and IBM License
- A.2.74. IBM License
- A.2.75. Metro Link License (variant 1)
- A.2.76. Metro Link License (variant 2)
- A.2.77. Metro Link License (variant 3)
- A.2.78. NVIDIA License
- A.2.79. Vrije Universiteit License
- A.2.80. Concurrent Computer Corporation License
- A.2.81. Nokia License
- A.2.82. Adobe License
- A.2.83. University of California License (variant 1)
- A.2.84. University of California License (variant 2)
- A.2.85. OMRON Corporation and Data General Corporation License
- A.2.86. X11 Legacy License (variant 1)
- A.2.87. X11 Legacy License (variant 2)
- A.2.88. X11 Legacy License (variant 3)
- A.2.89. X11 Legacy License (variant 4)
- A.2.90. X11 Legacy License (variant 5)
- A.2.91. X11 Legacy License (variant 6)
- A.2.92. X11 Legacy License (variant 7)
- A.2.93. X11 Legacy License (variant 8)
- A.2.94. X11 Legacy License (variant 9)
- A.2.95. X11 Legacy License (variant 10)
- A.2.96. X11 Legacy License (variant 11)
- A.2.97. X11 Legacy License (variant 12)
- A.2.98. X11 Legacy License (variant 13)
- A.2.99. X11 Legacy License (variant 14)
- A.2.100. Davor Matic License
- A.2.101. Harold L Hunt II License
- A.2.102. Thomas Roell License
- A.2.103. Thomas Roell and David Wexelblat License
- A.2.104. Thomas Roell and SGCS (Snitily Graphics Consulting Services) License
- A.2.105. Alan Hourihane License
- A.2.106. Kaleb S. Keithley License
- A.2.107. Matthieu Herrb License
- A.2.108. Egbert Eich License
- A.2.109. David Wexelblat License
- A.2.110. Orest Zborowski and David Wexelblat License
- A.2.111. Orest Zborowski and David Dawes License
- A.2.112. Frederic Lepied License
- A.2.113. Rich Murphey and David Wexelblat License
- A.2.114. Rich Murphey and David Dawes License
- A.2.115. Anders Carlsson License
- A.2.116. Eric Anholt License
- A.2.117. Todd C. Miller License
- A.2.118. Philip Blundell License
- A.2.119. Marc Aurele La France License
- A.2.120. J. Kean Johnston License
- A.2.121. Jakub Jelinek License
- A.2.122. UCHIYAMA Yasushi License
- A.2.123. OpenedHand Ltd License
- A.2.124. Oracle License
- A.2.125. NVIDIA License for Glslang
- A.2.126. The Khronos Group Inc. License for Glslang
- A.2.127. The Khronos Group Inc. License for the EGL Registry Repository
- A.2.128. The IBM Corporation License for the libtpms library
- B. Oracle VM VirtualBox Privacy Information
- Glossary
List of Figures
- 1.1. Windows Server 2016 Virtual Machine, Displayed on a macOS Host
- 1.2. VirtualBox Manager, Showing Welcome Screen After Initial Startup
- 1.3. VirtualBox Manager Window, After Creating Virtual Machines
- 1.4. VirtualBox Manager Details Pane, Including Toolbar
- 1.5. Global Tools Menu
- 1.6. Machine Tools Menu
- 1.7. Creating a Virtual Machine: Name and Operating System
- 1.8. Creating a Virtual Machine: Unattended Guest OS Installation
- 1.9. Creating a Virtual Machine: Hardware
- 1.10. Creating a New Virtual Machine: Virtual Hard Disk
- 1.11. Host Key Setting on the Virtual Machine Taskbar
- 1.12. Closing Down a Virtual Machine
- 1.13. Groups of Virtual Machines
- 1.14. Snapshots Tool, Showing Snapshot Properties
- 1.15. Snapshots List For a Virtual Machine
- 1.16. Clone Virtual Machine Wizard: New Machine Name and Path
- 1.17. Clone Virtual Machine Wizard: Clone Type
- 1.18. Clone Virtual Machine Wizard: Snapshots
- 1.19. Import Virtual Appliance Wizard: Appliance Settings
- 1.20. Upload Public Key Dialog in Oracle Cloud Infrastructure Console
- 1.21. The Cloud Profile Manager
- 1.22. Cloud VMs, Shown in VirtualBox Manager
- 1.23. OCI Group, Containing Cloud VMs
- 1.24. Create Cloud Virtual Machine Wizard
- 1.25. Add Cloud Virtual Machine Wizard
- 1.26. Export Virtual Appliance Wizard: Format Settings
- 1.27. Import Cloud Instance Wizard: Appliance Settings
- 1.28. Soft Keyboard in a Guest Virtual Machine
- 1.29. VM Activity Overview Tool
- 1.30. Session Information Dialog, Showing VM Activity Tab
- 1.31. Log Viewer Tool, Showing System Events
- 3.1. Storage Settings for a Virtual Machine
- 4.1. Drag and Drop Menu Options
- 4.2. Seamless Windows on a Host Desktop
- 4.3. Guest Control File Manager
- 5.1. The Virtual Media Manager, Showing Hard Disk Images
- 5.2. Create Virtual Hard Disk Wizard
- 5.3. Differencing Images, Shown in Virtual Media Manager
List of Tables
- 3.1. Guest Operating Systems With Full Support
- 3.2. Legacy Guest Operating Systems With Limited Support
- 6.1. Overview of Networking Modes
- 9.1. Host Key Customization
- 9.2. Web Service Configuration Parameters
- 9.3. Oracle VM VirtualBox Watchdog Configuration Parameters
- 9.4. PC Speaker Configuration Options
- 10.1. Configuration File Locations
- A.1. Mesa Component Licenses
- A.2. Python releases
The Oracle VM VirtualBox User Manual provides an introduction to using Oracle VM VirtualBox. The manual provides information on how to install Oracle VM VirtualBox and use it to create and configure virtual machines.
This document is intended for both new and existing users of Oracle VM VirtualBox. It is assumed that readers are familiar with Web technologies and have a general understanding of Windows and UNIX platforms.
The documentation for this product is available at:
https://docs.oracle.com/en/virtualization/virtualbox/index.html
The following text conventions are used in this document:
boldface: Boldface type indicates graphical user interface elements associated with an action, or terms defined in text or the glossary.
italic: Italic type indicates book titles, emphasis, or placeholder variables for which you supply particular values.
monospace: Monospace type indicates commands within a paragraph, URLs, code in examples, text that appears on the screen, or text that you enter.
For information about Oracle's commitment to accessibility, visit the Oracle Accessibility Program website at https://www.oracle.com/corporate/accessibility/.
For information about the accessibility of the Oracle Help Center, see the Oracle Accessibility Conformance Report at https://www.oracle.com/corporate/accessibility/templates/t2-11535.html.
Oracle customers that have purchased support have access to electronic support through My Oracle Support. For information, visit http://www.oracle.com/pls/topic/lookup?ctx=acc&id=info or visit http://www.oracle.com/pls/topic/lookup?ctx=acc&id=trs if you are hearing impaired.
Oracle is fully committed to diversity and inclusion. Oracle respects and values having a diverse workforce that increases thought leadership and innovation. As part of our initiative to build a more inclusive culture that positively impacts our employees, customers, and partners, we are working to remove insensitive terms from our products and documentation. We are also mindful of the necessity to maintain compatibility with our customers' existing technologies and the need to ensure continuity of service as Oracle's offerings and industry standards evolve. Because of these technical constraints, our effort to remove insensitive terms is ongoing and will take time and external cooperation.
Table of Contents
- 1.1. Why is Virtualization Useful?
- 1.2. Some Terminology
- 1.3. Features Overview
- 1.4. Supported Host Operating Systems
- 1.5. Installing Oracle VM VirtualBox and Extension Packs
- 1.6. Starting Oracle VM VirtualBox
- 1.7. VirtualBox Manager
- 1.8. Creating Your First Virtual Machine
- 1.8.1. Create Virtual Machine Wizard: Name and Operating System
- 1.8.2. (Optional) Create Virtual Machine Wizard: Unattended Guest OS Install
- 1.8.3. Create Virtual Machine Wizard: Hardware
- 1.8.4. Create Virtual Machine Wizard: Virtual Hard Disk
- 1.8.5. Create Virtual Machine Wizard: Summary
- 1.8.6. Some Examples of Unattended Installation
- 1.9. Running Your Virtual Machine
- 1.10. Using VM Groups
- 1.11. Snapshots
- 1.12. Virtual Machine Configuration
- 1.13. Removing and Moving Virtual Machines
- 1.14. Cloning Virtual Machines
- 1.15. Importing and Exporting Virtual Machines
- 1.16. Integrating with Oracle Cloud Infrastructure
- 1.16.1. Preparing for Oracle Cloud Infrastructure Integration
- 1.16.2. Creating an API Signing Key Pair
- 1.16.3. Uploading the Public Key to Oracle Cloud Infrastructure
- 1.16.4. Creating a Cloud Profile
- 1.16.5. Using the Cloud Profile Manager
- 1.16.6. Using Oracle VM VirtualBox With Oracle Cloud Infrastructure
- 1.16.7. Using Cloud Virtual Machines
- 1.16.8. Exporting an Appliance to Oracle Cloud Infrastructure
- 1.16.9. Importing an Instance from Oracle Cloud Infrastructure
- 1.16.10. Using a Cloud Network
- 1.16.11. Using VBoxManage Commands With Oracle Cloud Infrastructure
- 1.17. Preferences
- 1.18. Alternative Front-Ends
- 1.19. Soft Keyboard
- 1.20. Monitoring of Virtual Machines
- 1.21. The Log Viewer
Welcome to Oracle VM VirtualBox.
Oracle VM VirtualBox is a cross-platform virtualization application. What does that mean? For one thing, it installs on your existing Intel or AMD-based computers, whether they are running Windows, macOS, Linux, or Oracle Solaris operating systems (OSes). Secondly, it extends the capabilities of your existing computer so that it can run multiple OSes, inside multiple virtual machines, at the same time. As an example, you can run Windows and Linux on your Mac, run Windows Server on your Linux server, run Linux on your Windows PC, and so on, all alongside your existing applications. You can install and run as many virtual machines as you like. The only practical limits are disk space and memory.
Oracle VM VirtualBox is deceptively simple yet also very powerful. It can run everywhere from small embedded systems or desktop class machines all the way up to datacenter deployments and even Cloud environments.
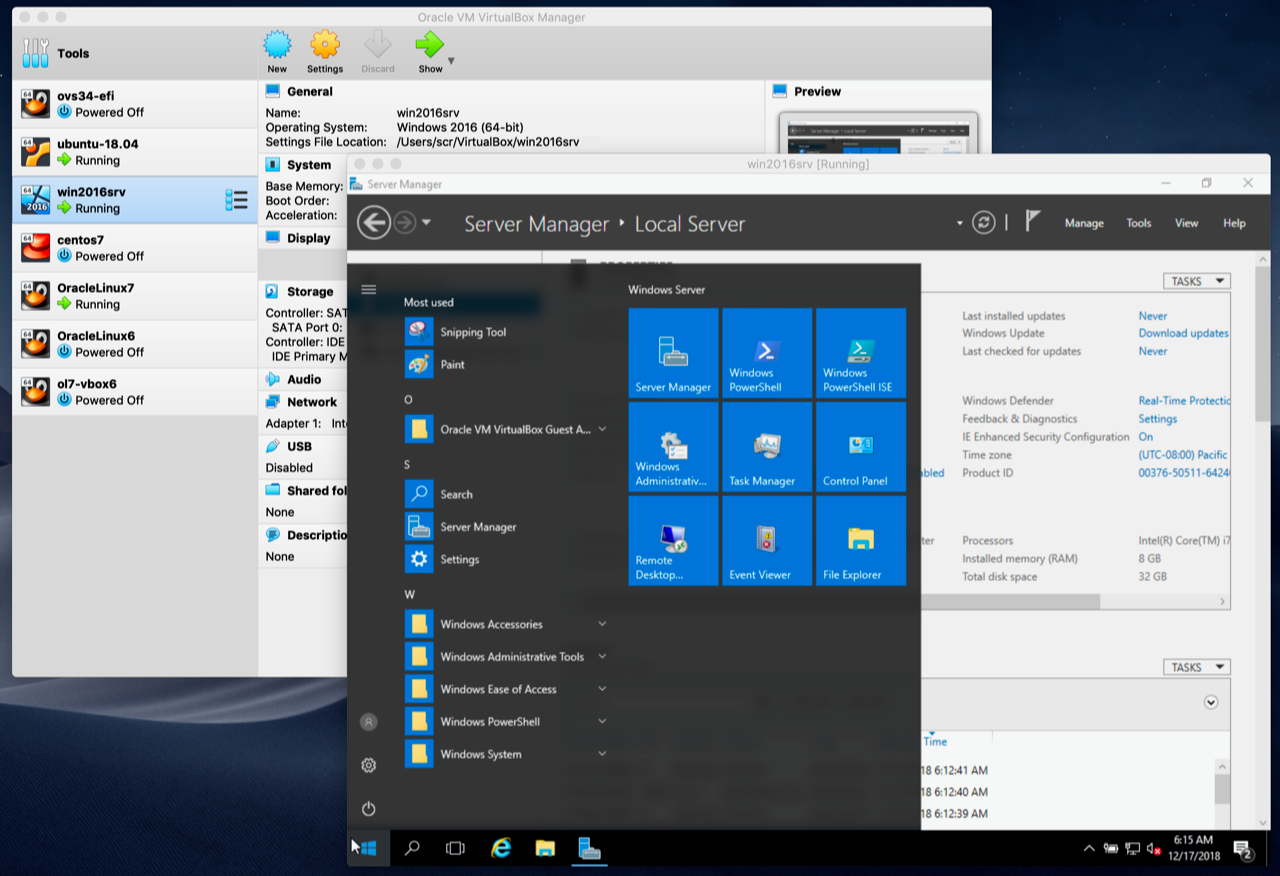
The following screenshot shows how Oracle VM VirtualBox, installed on an Apple Mac computer, is running Windows Server 2016 in a virtual machine window.
In this User Manual, we will begin simply with a quick introduction to virtualization and how to get your first virtual machine running with the easy-to-use Oracle VM VirtualBox graphical user interface. Subsequent chapters will go into much more detail covering more powerful tools and features, but fortunately, it is not necessary to read the entire User Manual before you can use Oracle VM VirtualBox.
You can find a summary of Oracle VM VirtualBox's capabilities in Section 1.3, “Features Overview”. For existing Oracle VM VirtualBox users who just want to find out what is new in this release, see the Chapter 15, Change Log.
The techniques and features that Oracle VM VirtualBox provides are useful in the following scenarios:
Running multiple operating systems simultaneously. Oracle VM VirtualBox enables you to run more than one OS at a time. This way, you can run software written for one OS on another, such as Windows software on Linux or a Mac, without having to reboot to use it. Since you can configure what kinds of virtual hardware should be presented to each such OS, you can install an old OS such as DOS or OS/2 even if your real computer's hardware is no longer supported by that OS.
Easier software installations. Software vendors can use virtual machines to ship entire software configurations. For example, installing a complete mail server solution on a real machine can be a tedious task. With Oracle VM VirtualBox, such a complex setup, often called an appliance, can be packed into a virtual machine. Installing and running a mail server becomes as easy as importing such an appliance into Oracle VM VirtualBox.
Testing and disaster recovery. Once installed, a virtual machine and its virtual hard disks can be considered a container that can be arbitrarily frozen, woken up, copied, backed up, and transported between hosts.
Using virtual machines enables you to build and test a multi-node networked service, for example. Issues with networking, operating system, and software configuration can be investigated easily.
In addition to that, with the use of another Oracle VM VirtualBox feature called snapshots, one can save a particular state of a virtual machine and revert back to that state, if necessary. This way, one can freely experiment with a computing environment. If something goes wrong, such as problems after installing software or infecting the guest with a virus, you can easily switch back to a previous snapshot and avoid the need of frequent backups and restores.
Any number of snapshots can be created, allowing you to travel back and forward in virtual machine time. You can delete snapshots while a VM is running to reclaim disk space.
Infrastructure consolidation. Virtualization can significantly reduce hardware and electricity costs. Most of the time, computers today only use a fraction of their potential power and run with low average system loads. A lot of hardware resources as well as electricity is thereby wasted. So, instead of running many such physical computers that are only partially used, one can pack many virtual machines onto a few powerful hosts and balance the loads between them.
When dealing with virtualization, and also for understanding the following chapters of this documentation, it helps to acquaint oneself with a bit of crucial terminology, especially the following terms:
Host operating system (host OS). This is the OS of the physical computer on which Oracle VM VirtualBox was installed. There are versions of Oracle VM VirtualBox for Windows, macOS, Linux, and Oracle Solaris hosts. See Section 1.4, “Supported Host Operating Systems”.
Most of the time, this manual discusses all Oracle VM VirtualBox versions together. There may be platform-specific differences which we will point out where appropriate.
Guest operating system (guest OS). This is the OS that is running inside the virtual machine. Theoretically, Oracle VM VirtualBox can run any x86 OS such as DOS, Windows, OS/2, FreeBSD, and OpenBSD. But to achieve near-native performance of the guest code on your machine, we had to go through a lot of optimizations that are specific to certain OSes. So while your favorite OS may run as a guest, we officially support and optimize for a select few, which include the most common OSes.
Virtual machine (VM). This is the special environment that Oracle VM VirtualBox creates for your guest OS while it is running. In other words, you run your guest OS in a VM. Normally, a VM is shown as a window on your computer's desktop. Depending on which of the various frontends of Oracle VM VirtualBox you use, the VM might be shown in full screen mode or remotely on another computer.
Internally, Oracle VM VirtualBox treats a VM as a set of parameters that specify its behavior. Some parameters describe hardware settings, such as the amount of memory and number of CPUs assigned. Other parameters describe the state information, such as whether the VM is running or saved.
You can view these VM settings in VirtualBox Manager, in the Settings window, and by running the VBoxManage command. See Chapter 8, VBoxManage.
Guest Additions. This refers to special software packages which are shipped with Oracle VM VirtualBox but designed to be installed inside a VM to improve performance of the guest OS and to add extra features. See Chapter 4, Guest Additions.
The following is a brief outline of Oracle VM VirtualBox's main features:
Portability. Oracle VM VirtualBox runs on a large number of 64-bit host operating systems. See Section 1.4, “Supported Host Operating Systems”.
Oracle VM VirtualBox is a so-called hosted hypervisor, sometimes referred to as a type 2 hypervisor. Whereas a bare-metal or type 1 hypervisor runs directly on the hardware, Oracle VM VirtualBox requires an existing OS to be installed. It can thus run alongside existing applications on that host.
To a very large degree, Oracle VM VirtualBox is functionally identical on all of the host platforms, and the same file and image formats are used. This enables you to run virtual machines created on one host on another host with a different host OS. For example, you can create a virtual machine on Windows and then run it on Linux.
In addition, virtual machines can easily be imported and exported using the Open Virtualization Format (OVF), an industry standard created for this purpose. You can even import OVFs that were created with a different virtualization software. See Section 1.15, “Importing and Exporting Virtual Machines”.
For users of Oracle Cloud Infrastructure the functionality extends to exporting and importing virtual machines to and from the cloud. This simplifies development of applications and deployment to the production environment. See Section 1.16.8, “Exporting an Appliance to Oracle Cloud Infrastructure”.
Guest Additions: shared folders, seamless windows, 3D virtualization. The Oracle VM VirtualBox Guest Additions are software packages which can be installed inside of supported guest systems to improve their performance and to provide additional integration and communication with the host system. After installing the Guest Additions, a virtual machine will support automatic adjustment of video resolutions, seamless windows, accelerated 3D graphics and more. See Chapter 4, Guest Additions.
In particular, Guest Additions provide for shared folders, which let you access files on the host system from within a guest machine. See Section 4.3, “Shared Folders”.
Comprehensive hardware support. Among other features, Oracle VM VirtualBox supports the following:
Guest multiprocessing (SMP). Oracle VM VirtualBox can present up to 32 virtual CPUs to each virtual machine, irrespective of how many CPU cores are physically present on your host.
USB device support. Oracle VM VirtualBox implements a virtual USB controller and enables you to connect arbitrary USB devices to your virtual machines without having to install device-specific drivers on the host. USB support is not limited to certain device categories. See Section 3.11.1, “USB Settings”.
Hardware compatibility. Oracle VM VirtualBox virtualizes a vast array of virtual devices, among them many devices that are typically provided by other virtualization platforms. That includes IDE, SCSI, and SATA hard disk controllers, several virtual network cards and sound cards, virtual serial ports and an Input/Output Advanced Programmable Interrupt Controller (I/O APIC), which is found in many computer systems. This enables easy cloning of disk images from real machines and importing of third-party virtual machines into Oracle VM VirtualBox.
Full ACPI support. The Advanced Configuration and Power Interface (ACPI) is fully supported by Oracle VM VirtualBox. This enables easy cloning of disk images from real machines or third-party virtual machines into Oracle VM VirtualBox. With its unique ACPI power status support, Oracle VM VirtualBox can even report to ACPI-aware guest OSes the power status of the host. For mobile systems running on battery, the guest can thus enable energy saving and notify the user of the remaining power, for example in full screen modes.
Multiscreen resolutions. Oracle VM VirtualBox virtual machines support screen resolutions many times that of a physical screen, allowing them to be spread over a large number of screens attached to the host system.
Built-in iSCSI support. This unique feature enables you to connect a virtual machine directly to an iSCSI storage server without going through the host system. The VM accesses the iSCSI target directly without the extra overhead that is required for virtualizing hard disks in container files. See Section 5.10, “iSCSI Servers”.
PXE Network boot. The integrated virtual network cards of Oracle VM VirtualBox fully support remote booting using the Preboot Execution Environment (PXE).
Multigeneration branched snapshots. Oracle VM VirtualBox can save arbitrary snapshots of the state of the virtual machine. You can go back in time and revert the virtual machine to any such snapshot and start an alternative VM configuration from there, effectively creating a whole snapshot tree. See Section 1.11, “Snapshots”. You can create and delete snapshots while the virtual machine is running.
VM groups. Oracle VM VirtualBox provides a groups feature that enables the user to organize and control virtual machines collectively, as well as individually. In addition to basic groups, it is also possible for any VM to be in more than one group, and for groups to be nested in a hierarchy. This means you can have groups of groups. In general, the operations that can be performed on groups are the same as those that can be applied to individual VMs: Start, Pause, Reset, Close (Save state, Send Shutdown, Poweroff), Discard Saved State, Show in File System, Sort.
Clean architecture and unprecedented modularity. Oracle VM VirtualBox has an extremely modular design with well-defined internal programming interfaces and a clean separation of client and server code. This makes it easy to control it from several interfaces at once. For example, you can start a VM simply by clicking on a button in the Oracle VM VirtualBox graphical user interface and then control that machine from the command line, or even remotely. See Section 1.18, “Alternative Front-Ends”.
Due to its modular architecture, Oracle VM VirtualBox can also expose its full functionality and configurability through a comprehensive software development kit (SDK), which enables integration of Oracle VM VirtualBox with other software systems. See Chapter 11, Oracle VM VirtualBox Programming Interfaces.
Remote machine display. The VirtualBox Remote Desktop Extension (VRDE) enables high-performance remote access to any running virtual machine. This extension supports the Remote Desktop Protocol (RDP) originally built into Microsoft Windows, with special additions for full client USB support.
The VRDE does not rely on the RDP server that is built into Microsoft Windows. Instead, the VRDE is plugged directly into the virtualization layer. As a result, it works with guest OSes other than Windows, even in text mode, and does not require application support in the virtual machine either. The VRDE is described in detail in Section 7.1, “Remote Display (VRDP Support)”.
On top of this special capacity, Oracle VM VirtualBox offers you more unique features:
Extensible RDP authentication. Oracle VM VirtualBox already supports Winlogon on Windows and PAM on Linux for RDP authentication. In addition, it includes an easy-to-use SDK which enables you to create arbitrary interfaces for other methods of authentication. See Section 7.1.5, “RDP Authentication”.
USB over RDP. Using RDP virtual channel support, Oracle VM VirtualBox also enables you to connect arbitrary USB devices locally to a virtual machine which is running remotely on an Oracle VM VirtualBox RDP server. See Section 7.1.4, “Remote USB”.
Currently, Oracle VM VirtualBox runs on the following host OSes:
Windows hosts (64-bit):
Windows 8.1
Windows 10
Windows 11 21H2
Windows Server 2012
Windows Server 2012 R2
Windows Server 2016
Windows Server 2019
Windows Server 2022
macOS hosts (64-bit):
10.15 (Catalina)
11 (Big Sur)
12 (Monterey)
Intel hardware is required. See also Chapter 14, Known Limitations.
An installer package is available for macOS/Arm64, for systems using an Apple silicon CPU. With this package, you can run some guest operating systems for Intel x86/x64 CPUs in an emulation.
The macOS/Arm64 installer package for Apple silicon platform is available as a Developer Preview release. This package represents a work in progress project and the performance is very modest.
Note
Developer Preview is a public release for developers, which provides early access to unsupported software release and features.
Linux hosts (64-bit). Includes the following:
Ubuntu 18.04 LTS, 20.04 LTS and 22.04
Debian GNU/Linux 10 ("Buster") and 11 ("Bullseye")
Oracle Linux 7, 8 and 9
CentOS/Red Hat Enterprise Linux 7, 8 and 9
Fedora 35 and 36
Gentoo Linux
SUSE Linux Enterprise server 12 and 15
openSUSE Leap 15.3
It should be possible to use Oracle VM VirtualBox on most systems based on Linux kernel 2.6, 3.x, 4.x or 5.x using either the Oracle VM VirtualBox installer or by doing a manual installation. See Section 2.3, “Installing on Linux Hosts”. However, the formally tested and supported Linux distributions are those for which we offer a dedicated package.
Note that Linux 2.4-based host OSes are no longer supported.
Oracle Solaris hosts (64-bit only). The following versions are supported with the restrictions listed in Chapter 14, Known Limitations:
Oracle Solaris 11.4
Note that any feature which is marked as experimental is not supported. Feedback and suggestions about such features are welcome.
Oracle VM VirtualBox comes in many different packages, and installation depends on your host OS. If you have installed software before, installation should be straightforward. On each host platform, Oracle VM VirtualBox uses the installation method that is most common and easy to use. If you run into trouble or have special requirements, see Chapter 2, Installation Details for details about the various installation methods.
Oracle VM VirtualBox is split into the following components:
Base package. The base package consists of all open source components and is licensed under the GNU General Public License V2.
Extension packs. Additional extension packs can be downloaded which extend the functionality of the Oracle VM VirtualBox base package. Currently, Oracle provides a single extension pack, available from: http://www.virtualbox.org. The extension pack provides the following added functionality:
VirtualBox Remote Desktop Protocol (VRDP) support. See Section 7.1, “Remote Display (VRDP Support)”.
Host webcam passthrough. See Section 9.5, “Webcam Passthrough”.
Intel PXE boot ROM.
Disk image encryption with AES algorithm. See Section 9.29, “Encryption of Disk Images”.
Cloud integration features. See Section 1.16, “Integrating with Oracle Cloud Infrastructure”.
For details of how to install an extension pack, see Section 2.5, “Installing an Extension Pack”.
After installation, you can start Oracle VM VirtualBox as follows:
Windows hosts. In the Programs menu, click on the item in the VirtualBox group. On some Windows platforms, you can also enter VirtualBox in the search box of the Start menu.
macOS hosts. In the Finder, double-click on the VirtualBox item in the Applications folder. You may want to drag this item onto your Dock.
Linux or Oracle Solaris hosts. Depending on your desktop environment, an Oracle VM VirtualBox item may have been placed in either the System or System Tools group of your Applications menu. Alternatively, you can enter VirtualBox in a terminal window.
When you start Oracle VM VirtualBox, the VirtualBox Manager interface is shown. See Section 1.7, “VirtualBox Manager”.
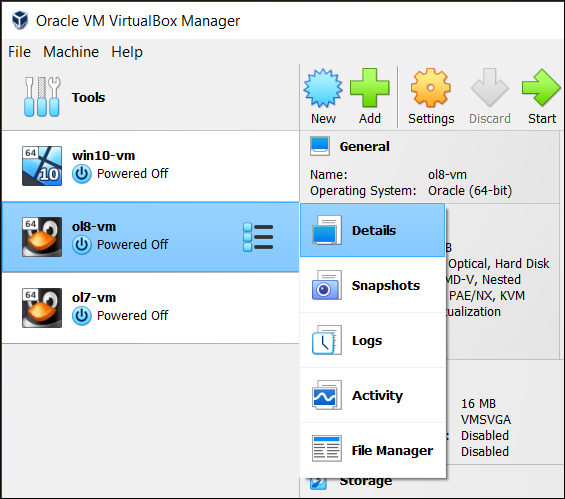
VirtualBox Manager is the user interface for Oracle VM VirtualBox. You can use VirtualBox Manager to create, configure, and manage your virtual machines.
This section describes the main features of the VirtualBox Manager user interface. Subsequent sections and chapters describe how to use VirtualBox Manager to perform tasks in Oracle VM VirtualBox.
When you start Oracle VM VirtualBox, the VirtualBox Manager window is displayed.
Figure 1.2, “VirtualBox Manager, Showing Welcome Screen After Initial Startup” shows VirtualBox Manager the first time you start Oracle VM VirtualBox, before you have created any virtual machines.
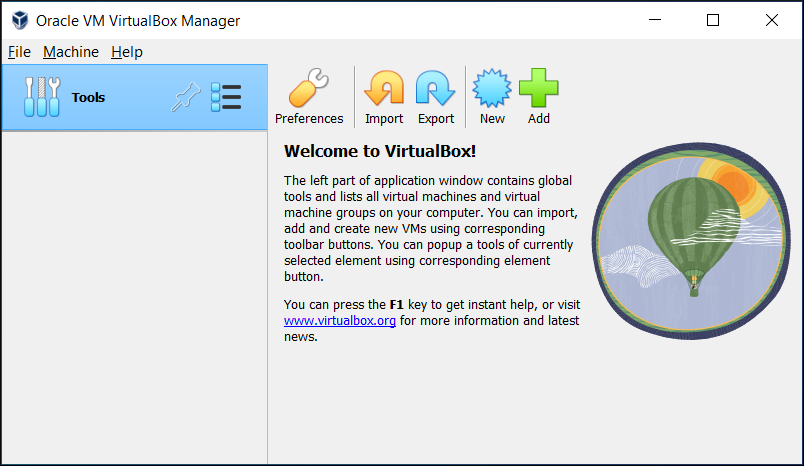
Figure 1.3, “VirtualBox Manager Window, After Creating Virtual Machines” shows how VirtualBox Manager might look after you have created some virtual machines.
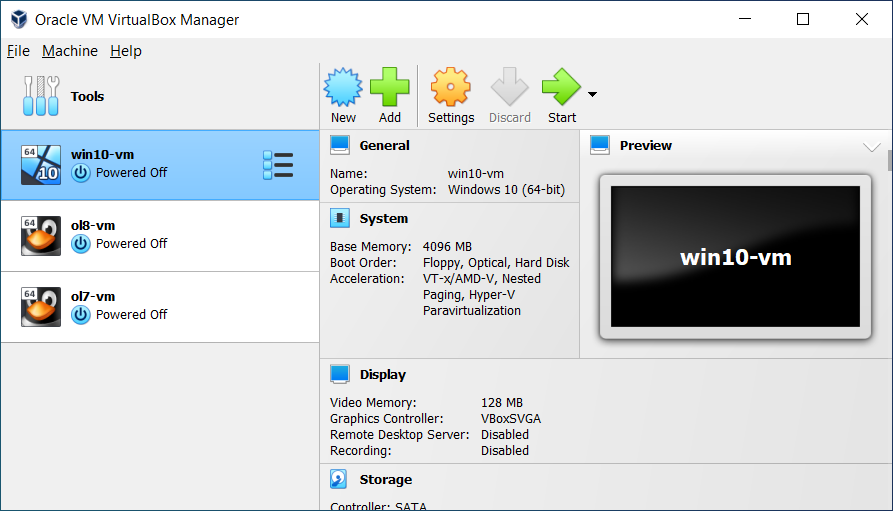
The main components of the VirtualBox Manager window are as follows:
The machine list. The left pane of the VirtualBox Manager window lists all your virtual machines. If you have not yet created any virtual machines, this list is empty. See Section 1.7.1, “The Machine List”.
The Details pane. The pane on the right displays the properties of the currently selected virtual machine. If you do not have any machines yet, the pane displays a welcome message.
The toolbar buttons on the Details pane can be used to create and work with virtual machines. See Section 1.7.2, “The Details Pane”.
Help Viewer. A window that displays context-sensitive help topics for VirtualBox Manager tasks. See Section 1.7.4, “Help Viewer”.
The list of virtual machines in the left pane is called the machine list.
The following methods can be used to control and configure virtual machines in the machine list:
Right-click on the virtual machine name, to display menu options.
Click on the Machine Tools menu, to the right of the virtual machine name. See the section called “Machine Tools”.
Click a button in the toolbar in the Details pane. See Section 1.7.2, “The Details Pane”.
The Details pane shows configuration information for a virtual machine that is selected in the machine list. The pane also includes a toolbar for performing tasks.

The Details pane includes the following:
A toolbar at the top of the Details pane contains buttons that enable you to configure the selected virtual machine, or to create a new virtual machine.
The toolbar includes the following buttons:
New. Creates a new virtual machine, and adds it to the machine list.
Add. Adds an existing virtual machine to the machine list.
Settings. Displays the Settings window for the virtual machine, enabling you to make configuration changes.
Discard. For a running virtual machine, discards the saved state for the virtual machine and closes it down.
Show/Start. For a running virtual machine, Show displays the virtual machine window. For a stopped virtual machine, Start displays options for powering up the virtual machine.
A summary of settings is shown for the virtual machine.
You can change some virtual machine settings, by clicking on the setting in the Details pane.
Note
If a virtual machine is running, some settings cannot be altered. You must stop the virtual machine first in order to change the setting.
Virtual machine settings can also be changed using the Settings button on the VirtualBox Manager toolbar.
The virtual machine settings on the Details pane are organized in sections that correspond to those used in the Settings window. See Chapter 3, Configuring Virtual Machines.
Click the arrow icon to hide or show each section.
The virtual machine display is shown in a small window.
You can use the Preview window to check if your virtual machine has finished booting up.
Click the arrow icon to hide or show the Preview window.
Notification messages may be shown in a sliding panel on the right of the Details pane, called the Notification Center. Click the warning triangle to show the notification messages.
Most system messages that do not require user interaction are displayed in the Notification Center, including task failure alerts.
The progress of some tasks can be observed and stopped using the Notification Center.
VirtualBox Manager provides two types of user tools, to enable you to perform common tasks easily.
Global Tools. These tools apply to all virtual machines. See the section called “Global Tools”.
Machine Tools. These tools apply to a specific virtual machine. See the section called “Machine Tools”.
In the left pane of the VirtualBox Manager window, click the Menu icon in the Tools banner located above the machine list. The Global Tools menu is displayed.
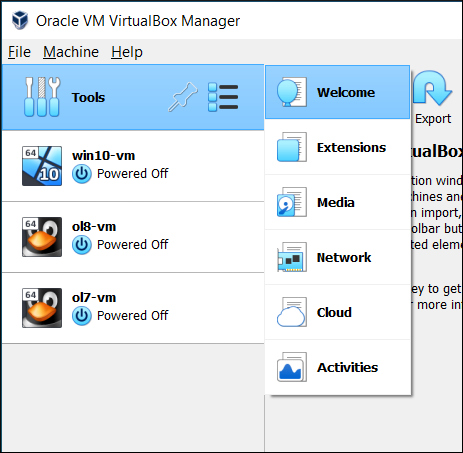
A drop-down list enables you to select from the following global tools:
Welcome. Displays the VirtualBox Manager welcome message. The VirtualBox Manager toolbar is also included, to enable you to get started with using Oracle VM VirtualBox. See Figure 1.2, “VirtualBox Manager, Showing Welcome Screen After Initial Startup”.
Extensions. Displays the Extension Pack Manager tool. This tool is used to install and uninstall Oracle VM VirtualBox Extension Packs. See Section 2.5.1, “The Extension Pack Manager”.
Media. Displays the Virtual Media Manager tool. This tool is used to manage the disk images used by Oracle VM VirtualBox. See Section 5.3, “The Virtual Media Manager”.
Network. Displays the Network Manager tool. This tool is used to create and configure some types of networks used by Oracle VM VirtualBox. See Section 6.11, “Network Manager”.
Cloud. Displays the Cloud Profile Editor tool. This tool is used to configure connections to a cloud service, such as Oracle Cloud Infrastructure. See Section 1.16.5, “Using the Cloud Profile Manager”.
Activities. Displays the VM Activity Overview tool. This tool is used to monitor performance and resource usage of virtual machines. See Section 1.20, “Monitoring of Virtual Machines”.
The Pin icon is used to keep the Tools banner visible as you scroll down the entries in the machine list.
In the machine list in the left pane of the VirtualBox Manager window, select a virtual machine.
Click the Menu icon to the right of the virtual machine name. The Machine Tools menu is displayed.
A drop-down list enables you to select from the following machine tools:
Details. Displays the Details pane for the selected virtual machine. See Section 1.7.2, “The Details Pane”.
Snapshots. Displays the Snapshots tool. This tool enables you to view and manage snapshots for the virtual machine. See Section 1.11, “Snapshots”.
Logs. Displays the Log Viewer tool. This tool enables you to view and search system logs for the virtual machine. See Section 1.21, “The Log Viewer”.
Activity. Displays the VM Activity page of the Session Information dialog. This dialog enables you to view and analyze performance metrics for the virtual machine. See Section 1.20, “Monitoring of Virtual Machines”.
File Manager. Displays the Guest Control File Manager tool. This tool enables you to manage files on the guest system. See Section 4.8, “Guest Control File Manager”.
The Help Viewer is a window that displays context-sensitive help to assist you in completing common VirtualBox Manager tasks. You can display the Help Viewer in the following ways:
In a VirtualBox Manager wizard or dialog, click Help to display the relevant help topic.
In VirtualBox Manager or from a guest VM, do either of the following:
Select the Help, Contents menu option.
Press the F1 button.
The keyboard shortcut used to access the Help Viewer can be configured in the Preferences window.
The Help Viewer has the following features:
Navigation tools. The left hand pane contains the following navigation tools:
Contents. Displays the help topic location in the Oracle VM VirtualBox documentation.
Search. Enables you to search the documentation for help topics.
Bookmarks. Enables you to bookmark useful help topics.
Tabbed browsing. Help topics that you have visited are displayed in tabs in the main window pane.
Zoomable topics. Zoom controls enable you to enlarge help topic details.
Printing. Help topics can be printed to PDF file or to a local printer.
VirtualBox Manager includes wizards that enable you to complete tasks easily. Examples of such tasks are when you create a new virtual machine or use the cloud integration features of Oracle VM VirtualBox.
To display a help topic for the wizard, click the Help button.
Some wizards can be displayed in either of the following modes:
Guided mode. This is the default display mode. Wizards are shown in the conventional manner, using a series of pages with descriptions to guide the user through the steps for a task.
Expert mode. This display mode is designed for more advanced users of Oracle VM VirtualBox. All settings are displayed on a single page, enabling quicker completion of tasks.
Click the button at the bottom of the wizard window to switch between Guided mode and Expert mode.
Click New in the VirtualBox Manager window. The Create Virtual Machine wizard is shown, to guide you through the required steps for setting up a new virtual machine (VM).
The Create Virtual Machine wizard pages are described in the following sections.
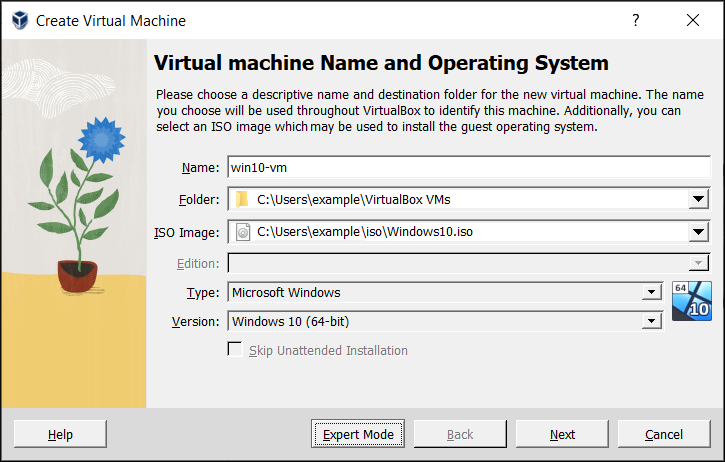
Use this page to specify a name and operating system (OS) for the virtual machine and to change the storage location used for VMs.
You can also choose to disable the unattended guest operating system install feature. See also Section 1.8.2, “(Optional) Create Virtual Machine Wizard: Unattended Guest OS Install”.
The following fields are available on this wizard page:
Name. A name for the new VM. The name you enter is shown in the machine list of VirtualBox Manager and is also used for the virtual machine's files on disk.
Be sure to assign each VM an informative name that describes the OS and software running on the VM. For example, a name such as
Windows 10 with Visio.Folder. The location where VMs are stored on your computer, called the machine folder. The default folder location is shown.
Ensure that the folder location has enough free space, especially if you intend to use the snapshots feature. See also Section 10.1.1, “The Machine Folder”.
ISO Image. Select an ISO image file. The image file can be used to install an OS on the new virtual machine or it can be attached to a DVD drive on the new virtual machine.
Type and Version. These fields are used to select the OS that you want to install on the new virtual machine.
The supported OSes are grouped into types. If you want to install something very unusual that is not listed, select the Other type. Depending on your selection, Oracle VM VirtualBox will enable or disable certain VM settings that your guest OS may require. This is particularly important for 64-bit guests. See Section 3.1.2, “64-bit Guests”. It is therefore recommended to always set this field to the correct value.
If an ISO image is selected and Oracle VM VirtualBox detects the operating system for the ISO, the Type and Version fields are populated automatically and are disabled.
Skip Unattended Installation. Disables unattended guest OS installation, even if an ISO image is selected that supports unattended installation. In that case, the selected ISO image is mounted automatically on the DVD drive of the new virtual machine and user interaction is required to complete the OS installation.
The unattended installation step in the wizard is skipped.
Note
This option is disabled if you do not select an installation medium in the ISO Image field.
Click Next to go to the next wizard page.
Unattended guest OS installation enables you to install the OS on a virtual machine automatically.
Note
This page is optional. It is not displayed if you have selected the Skip Unattended Installation option on the initial wizard page.
Use this page to set up the required parameters for unattended guest OS installation and to configure automatic installation of the Oracle VM VirtualBox Guest Additions. See also Section 1.8.6, “Some Examples of Unattended Installation” for some typical scenarios when using automated installation.
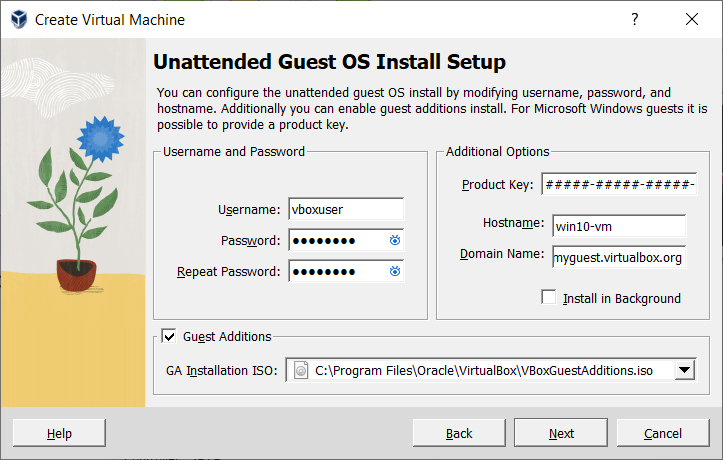
The following fields are available on this wizard page:
Username and Password. Enter the credentials for a default user on the guest OS.
Guest Additions. Enables automatic installation of the Guest Additions, following installation of the guest OS. Use the drop-down list to select the location of the ISO image file for the Guest Additions.
Additional Options. The following options enable you to perform extra configuration of the guest OS:
Product Key. For Windows guests only. Enter the product key required for Windows installation.
Hostname. Host name for the guest. By default, this is the same as the VM name.
Domain Name. Domain name for the guest.
Install in Background. Enable headless mode for the VM, where a graphical user interface is not shown.
Click Next to go to the next wizard page.
Use this page to configure hardware settings for the virtual machine.
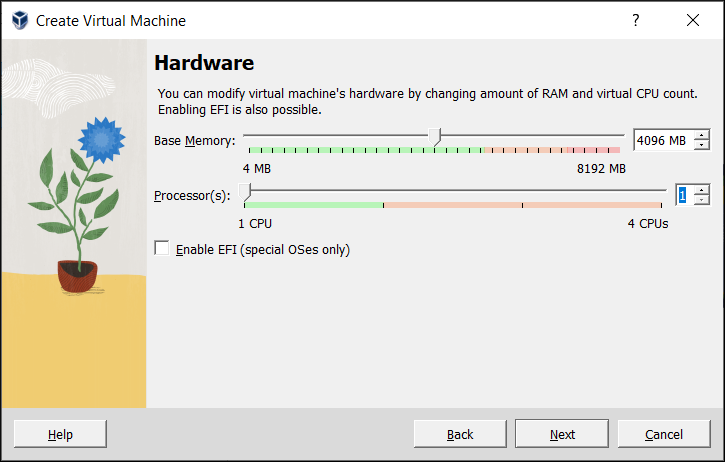
The following fields are available on this wizard page:
Base Memory. Select the amount of RAM that Oracle VM VirtualBox should allocate every time the virtual machine is started. The amount of memory selected here will be taken away from your host machine and presented to the guest OS, which will report this size as the virtual machines installed RAM.
Caution
Choose this setting carefully. The memory you give to the VM will not be available to your host OS while the VM is running, so do not specify more than you can spare.
For example, if your host machine has 4 GB of RAM and you enter 2048 MB as the amount of RAM for a particular virtual machine, you will only have 2 GB left for all the other software on your host while the VM is running. If you run two VMs at the same time, even more memory will be allocated for the second VM, which may not even be able to start if that memory is not available.
On the other hand, you should specify as much as your guest OS and your applications will require to run properly. A guest OS may require at least 1 or 2 GB of memory to install and boot up. For best performance, more memory than that may be required.
Always ensure that the host OS has enough RAM remaining. If insufficient RAM remains, the system might excessively swap memory to the hard disk, which effectively brings the host system to a standstill.
As with other Create Virtual Machine wizard settings, you can change this setting later, after you have created the VM.
Processor(s). Select the number of virtual processors to assign to the VM.
It is not advised to assign more than half of the total processor threads from the host machine.
Enable EFI. Enables Extensible Firware Interface (EFI) booting for the guest OS.
Click Next to go to the next wizard page.
Use this page to specify a virtual hard disk for the virtual machine.
There are many ways in which Oracle VM VirtualBox can provide hard disk space to a VM, see Chapter 5, Virtual Storage. The most common way is to use a large image file on your physical hard disk, whose contents Oracle VM VirtualBox presents to your VM as if it were a complete hard disk. This file then represents an entire hard disk, so you can even copy it to another host and use it with another Oracle VM VirtualBox installation.
The following fields are available on this wizard page:
Create a Virtual Hard Disk Now. Creates a new empty virtual hard disk image, located in the VM's machine folder.
Enter the following settings:
Disk Size. Use the slider to select a maximum size for the hard disk in the new VM.
Pre-Allocate Full Size. This setting determines the type of image file used for the disk image. Select this setting to use a fixed-size file for the disk image. Deselect this setting to use a dynamically allocated file for the disk image.
The different types of image file behave as follows:
Dynamically allocated file. This type of image file only grows in size when the guest actually stores data on its virtual hard disk. Therefore, this file is small initially. As the drive is filled with data, the file grows to the specified size.
Fixed-size file. This type of image file immediately occupies the file specified, even if only a fraction of that virtual hard disk space is actually in use. While occupying much more space, a fixed-size file incurs less overhead and is therefore slightly faster than a dynamically allocated file.
For more details about the differences, see Section 5.2, “Disk Image Files (VDI, VMDK, VHD, HDD)”.
Use an Existing Hard Disk File. Enables you to select an existing disk image file to use with the new VM.
The drop-down list presented in the window lists all disk images which are known by Oracle VM VirtualBox. These disk images are currently attached to a virtual machine, or have been attached to a virtual machine.
Alternatively, click on the small folder icon next to the drop-down list. In the Hard Disk Selector window that is displayed, click Add to select a disk image file on your host disk.
Do Not Add a Virtual Hard Disk. The new VM is created without a hard disk.
To prevent your physical hard disk on the host OS from filling up, Oracle VM VirtualBox limits the size of the image file. But the image file must be large enough to hold the contents of the guest OS and the applications you want to install. For a Windows or Linux guest, you will probably need several gigabytes for any serious use. The limit of the image file size can be changed later, see Section 8.31, “VBoxManage modifymedium”.
Note
You can skip attaching a virtual hard disk file to the new virtual machine you are creating. But you will then need to attach an hard disk later on, in order to install a guest operating system.
After having selected or created your image file, click Next to go to the next wizard page.
This page displays a summary of the configuration for the virtual machine.
If you are not happy with any of the settings, use the Back button to return to the corresponding page and modify the setting.
Click Finish to create your new virtual machine. The virtual machine is displayed in the machine list on the left side of the VirtualBox Manager window, with the name that you entered on the first page of the wizard.
To configure unattended installation, you typically just need to specify an ISO image in the Create Virtual Machine wizard. Oracle VM VirtualBox then detects the OS type and the unattended installation process is done automatically when the wizard is completed. However, in some situations the installation may need be completed manually.
The following list describes some common scenarios for unattended installation:
OS type is detected automatically. The following outcomes are possible:
If unattended installation is supported for the selected ISO, the guest OS is installed automatically. No user input is required.
If unattended installation is not supported for the selected ISO, the ISO image is inserted automatically into the DVD drive of the new VM. The guest OS installation must then be completed manually.
OS type is not detected automatically. You must configure Type and Version settings in the wizard.
The ISO image is inserted automatically into the DVD drive of the new VM. The guest OS installation must then be completed manually.
Unattended Installation is disabled. Users can disable unattended installation, by selecting the Skip Unattended Installation check box on the initial wizard page.
The ISO image is inserted automatically into the DVD drive of the new VM. The guest OS installation must then be completed manually.
See also Section 3.2, “Unattended Guest Installation” for details of how to perform unattended installation from the command line.
To start a virtual machine, you have the following options:
Double-click on the VM's entry in the machine list in VirtualBox Manager.
Select the VM's entry in the machine list in VirtualBox Manager, and click Start in the toolbar the top of the window.
Go to the
VirtualBox VMsfolder in your system user's home directory. Find the subdirectory of the machine you want to start and double-click on the machine settings file. This file has a.vboxfile extension.
Starting a virtual machine displays a new window, and the virtual machine which you selected will boot up. Everything which would normally be seen on the virtual system's monitor is shown in the window. See Figure 1.1, “Windows Server 2016 Virtual Machine, Displayed on a macOS Host”.
In general, you can use the virtual machine as you would use a real computer. The following topics describe a few points to note when running a VM.
When you start a VM for the first time the OS installation process is started automatically, using the ISO image file specified in the Create Virtual Machine wizard.
Follow the onscreen instructions to install your OS.
Oracle VM VirtualBox provides a virtual USB tablet device to new virtual machines through which mouse events are communicated to the guest OS. If you are running a modern guest OS that can handle such devices, mouse support may work out of the box without the mouse being captured as described below. See Section 3.5.1, “Motherboard Tab”.
Otherwise, if the virtual machine detects only standard PS/2 mouse and keyboard devices, since the OS in the virtual machine does not know that it is not running on a real computer, it expects to have exclusive control over your keyboard and mouse. But unless you are running the VM in full screen mode, your VM needs to share keyboard and mouse with other applications and possibly other VMs on your host.
After installing a guest OS and before you install the Guest Additions, described in Chapter 4, Guest Additions, either your VM or the rest of your computer can own the keyboard and the mouse. Both cannot own the keyboard and mouse at the same time. You will see a second mouse pointer which is always confined to the limits of the VM window. You activate the VM by clicking inside it.
To return ownership of keyboard and mouse to your host OS, Oracle VM VirtualBox reserves a special key on your keyboard: the Host key. By default, this is the right Ctrl key on your keyboard. On a Mac host, the default Host key is the left Command key. You can change this default using the Preferences window. See Section 1.17, “Preferences”. The current setting for the Host key is always displayed at the bottom right of your VM window.

This means the following:
Your keyboard is owned by the VM if the VM window on your host desktop has the keyboard focus. If you have many windows open in your guest OS, the window that has the focus in your VM is used. This means that if you want to enter text within your VM, click on the title bar of your VM window first.
To release keyboard ownership, press the Host key. As explained above, this is typically the right Ctrl key.
Note that while the VM owns the keyboard, some key sequences, such as Alt+Tab, will no longer be seen by the host, but will go to the guest instead. After you press the Host key to reenable the host keyboard, all key presses will go through the host again, so that sequences such as Alt+Tab will no longer reach the guest. For technical reasons it may not be possible for the VM to get all keyboard input even when it does own the keyboard. Examples of this are the Ctrl+Alt+Del sequence on Windows hosts or single keys grabbed by other applications on X11 hosts such as the GNOME desktop Locate Pointer feature.
Your mouse is owned by the VM only after you have clicked in the VM window. The host mouse pointer will disappear, and your mouse will drive the guest's pointer instead of your normal mouse pointer.
Note that mouse ownership is independent of that of the keyboard. Even after you have clicked on a titlebar to be able to enter text into the VM window, your mouse is not necessarily owned by the VM yet.
To release ownership of your mouse by the VM, press the Host key.
As this behavior is inconvenient, Oracle VM VirtualBox provides a set of tools and device drivers for guest systems called the Oracle VM VirtualBox Guest Additions. These tools make VM keyboard and mouse operations much more seamless. Most importantly, the Guest Additions suppress the second "guest" mouse pointer and make your host mouse pointer work directly in the guest. See Chapter 4, Guest Additions.
Some OSes expect certain key combinations to initiate certain procedures. The key combinations that you type into a VM might target the host OS, the Oracle VM VirtualBox software, or the guest OS. The recipient of these keypresses depends on a number of factors, including the key combination itself.
Host OSes reserve certain key combinations for themselves. For example, you cannot use the Ctrl+Alt+Delete combination to reboot the guest OS in your VM, because this key combination is reserved by the host OS. Even though both Windows and Linux OSes can intercept this key combination, the host OS is rebooted automatically.
On Linux and Oracle Solaris hosts, which use the X Window System, the key combination Ctrl+Alt+Backspace normally resets the X server and restarts the entire graphical user interface. As the X server intercepts this combination, pressing it will usually restart your host graphical user interface and kill all running programs, including Oracle VM VirtualBox, in the process.
On Linux hosts supporting virtual terminals, the key combination Ctrl+Alt+Fx, where Fx is one of the function keys from F1 to F12, normally enables you to switch between virtual terminals. As with Ctrl+Alt+Delete, these combinations are intercepted by the host OS and therefore always switch terminals on the host.
If, instead, you want to send these key combinations to the guest OS in the virtual machine, you will need to use one of the following methods:
Use the items in the Input, Keyboard menu of the virtual machine window. This menu includes the settings Insert Ctrl+Alt+Delete and Insert Ctrl+Alt+Backspace. However, the latter setting affects only Linux guests or Oracle Solaris guests.
This menu also includes an option for inserting the Host key combination.
Use special key combinations with the Host key, which is normally the right Control key. Oracle VM VirtualBox then translates the following key combinations for the VM:
Host key + Del sends Ctrl+Alt+Del to reboot the guest OS.
Host key + Backspace sends Ctrl+Alt+Backspace to restart the graphical user interface of a Linux or Oracle Solaris guest.
Host key + Function key. For example, use this key combination to simulate Ctrl+Alt+Fx to switch between virtual terminals in a Linux guest.
For some other keyboard combinations such as Alt+Tab to switch between open windows, Oracle VM VirtualBox enables you to configure whether these combinations will affect the host or the guest, if a virtual machine currently has the focus. This is a global setting for all virtual machines and can be found under File, Preferences, Input.
A soft keyboard can be used to input key combinations in the guest. See Section 1.19, “Soft Keyboard”.
While a virtual machine is running, you can change removable media in the Devices menu of the VM's window. Here you can select in detail what Oracle VM VirtualBox presents to your VM as a CD, DVD, or floppy drive.
The settings are the same as those available for the VM in the Settings window of VirtualBox Manager. But as the Settings window is disabled while the VM is in the Running or Saved state, the Devices menu saves you from having to shut down and restart the VM every time you want to change media.
Using the Devices menu, you can attach the host drive to the guest or select a floppy or DVD image, as described in Section 3.7, “Storage Settings”.
The Devices menu also includes an option for creating a virtual ISO (VISO) from selected files on the host.
You can resize the VM's window while that VM is running. When you do, the window is scaled as follows:
If you have scaled mode enabled, then the virtual machine's screen will be scaled to the size of the window. This can be useful if you have many machines running and want to have a look at one of them while it is running in the background. Alternatively, it might be useful to enlarge a window if the VM's output screen is very small, for example because you are running an old OS in it.
To enable scaled mode, press Host key + C, or select Scaled Mode from the View menu in the VM window. To leave scaled mode, press Host key + C again.
The aspect ratio of the guest screen is preserved when resizing the window. To ignore the aspect ratio, press Shift during the resize operation.
See Chapter 14, Known Limitations for additional remarks.
If you have the Guest Additions installed and they support automatic resizing, the Guest Additions will automatically adjust the screen resolution of the guest OS. For example, if you are running a Windows guest with a resolution of 1024x768 pixels and you then resize the VM window to make it 100 pixels wider, the Guest Additions will change the Windows display resolution to 1124x768.
Otherwise, if the window is bigger than the VM's screen, the screen will be centered. If it is smaller, then scroll bars will be added to the machine window.
When you click on the Close button of your virtual machine window, at the top right of the window, just like you would close any other window on your system, Oracle VM VirtualBox asks you whether you want to save or power off the VM. As a shortcut, you can also press Host key + Q.
The difference between the three options is crucial. They mean the following:
Save the machine state: With this option, Oracle VM VirtualBox freezes the virtual machine by completely saving its state to your local disk.
When you start the VM again later, you will find that the VM continues exactly where it was left off. All your programs will still be open, and your computer resumes operation. Saving the state of a virtual machine is thus in some ways similar to suspending a laptop computer by closing its lid.
Send the shutdown signal. This will send an ACPI shutdown signal to the virtual machine, which has the same effect as if you had pressed the power button on a real computer. This should trigger a proper shutdown mechanism from within the VM.
Power off the machine: With this option, Oracle VM VirtualBox also stops running the virtual machine, but without saving its state.
Warning
This is equivalent to pulling the power plug on a real computer without shutting it down properly. If you start the machine again after powering it off, your OS will have to reboot completely and may begin a lengthy check of its virtual system disks. As a result, this should not normally be done, since it can potentially cause data loss or an inconsistent state of the guest system on disk.
As an exception, if your virtual machine has any snapshots, see Section 1.11, “Snapshots”, you can use this option to quickly restore the current snapshot of the virtual machine. In that case, powering off the machine will discard the current state and any changes made since the previous snapshot was taken will be lost.
The Discard button in the VirtualBox Manager window discards a virtual machine's saved state. This has the same effect as powering it off, and the same warnings apply.
VM groups are groups of VMs that you can create as and when required. You can manage and perform functions on them collectively, as well as individually.
The following figure shows VM groups displayed in VirtualBox Manager.
The following features are available for groups:
Create a group using VirtualBox Manager. Do one of the following:
Drag a VM on top of another VM.
Select multiple VMs and select Group from the right-click menu.
Create and manage a group using the command line. Do one of the following:
Create a group and assign a VM. For example:
VBoxManage modifyvm "vm01" --groups "/TestGroup"
This command creates a group
TestGroupand attaches the VMvm01to that group.Detach a VM from the group, and delete the group if empty. For example:
VBoxManage modifyvm "vm01" --groups ""
This command detaches all groups from the VM
vm01and deletes the empty group.
Create multiple groups. For example:
VBoxManage modifyvm "vm01" --groups "/TestGroup,/TestGroup2"
This command creates the groups
TestGroupandTestGroup2, if they do not exist, and attaches the VMvm01to both of them.Create nested groups, having a group hierarchy. For example:
VBoxManage modifyvm "vm01" --groups "/TestGroup/TestGroup2"
This command attaches the VM
vm01to the subgroupTestGroup2of theTestGroupgroup.Use VirtualBox Manager menu options to control and manage all the VMs in a group. For example: Start, Pause, Reset, Close (save state, send shutdown signal, poweroff), Discard Saved State, Show in Explorer, Sort.
With snapshots, you can save a particular state of a virtual machine for later use. At any later time, you can revert to that state, even though you may have changed the VM considerably since then. A snapshot of a virtual machine is thus similar to a machine in Saved state, but there can be many of them, and these saved states are preserved.
To see the snapshots of a virtual machine, click on the machine name in VirtualBox Manager. In the machine tools menu for the VM, click Snapshots. The Snapshots tool is displayed.
If you select multiple VMs in the machine list, all snapshots are listed for each VM.
Until you take a snapshot of the virtual machine, the list of snapshots will be empty, except for the Current State item. This item represents the current point in the lifetime of the virtual machine.
The Snapshots window includes a toolbar, enabling you to perform the following snapshot operations:
Take. Takes a snapshot of the selected VM. See Section 1.11.1, “Taking, Restoring, and Deleting Snapshots”.
Delete. Removes a snapshot from the list of snapshots. See Section 1.11.1, “Taking, Restoring, and Deleting Snapshots”.
Restore. Restores the VM state to be the same as the selected snapshot. See Section 1.11.1, “Taking, Restoring, and Deleting Snapshots”.
Properties. Displays the properties for the selected snapshot. The Attributes tab is used to specify a Name and Description for the snapshot. The Information tab shows VM settings for the snapshot.
Clone. Displays the Clone Virtual Machine wizard. This enables you to create a clone of the VM, based on the selected snapshot.
Settings. Available for the Current State snapshot only. Displays the Settings window for the VM, enabling you to make configuration changes.
Discard. For a running VM, discards the saved state for the VM and closes it down.
Start. Start the VM. This operation is available for the Current State item.
There are three operations related to snapshots, as follows:
Take a snapshot. This makes a copy of the machine's current state, to which you can go back at any given time later.
If your VM is running:
Select Take Snapshot from the Machine menu in the VM window.
The VM is paused while the snapshot is being created. After snapshot creation, the VM continues to run as normal.
If your VM is in either the Saved or the Powered Off state, as displayed next to the VM name in the machine list:
Display the Snapshots window and do one of the following:
Click Take in the Snapshots window toolbar.
Right-click on the Current State item in the list and select Take.
A dialog is displayed, prompting you for a snapshot name. This name is purely for reference purposes, to help you remember the state of the snapshot. For example, a useful name would be "Fresh installation from scratch, no Guest Additions", or "Service Pack 3 just installed". You can also add a longer text description in the Snapshot Description field.
Your new snapshot will then appear in the snapshots list. Underneath your new snapshot, you will see an item called Current State, signifying that the current state of your VM is a variation based on the snapshot you took earlier. If you later take another snapshot, you will see that they are displayed in sequence, and that each subsequent snapshot is derived from an earlier one.
Oracle VM VirtualBox imposes no limits on the number of snapshots you can take. The only practical limitation is disk space on your host. Each snapshot stores the state of the virtual machine and thus occupies some disk space. See Section 1.11.2, “Snapshot Contents” for details on what is stored in a snapshot.
Restore a snapshot. In the Snapshots window, select the snapshot you have taken and click Restore in the toolbar. By restoring a snapshot, you go back or forward in time. The current state of the machine is lost, and the machine is restored to the exact state it was in when the snapshot was taken.
Note
Restoring a snapshot will affect the virtual hard drives that are connected to your VM, as the entire state of the virtual hard drive will be reverted as well. This means also that all files that have been created since the snapshot and all other file changes will be lost. In order to prevent such data loss while still making use of the snapshot feature, it is possible to add a second hard drive in write-through mode using the VBoxManage interface and use it to store your data. As write-through hard drives are not included in snapshots, they remain unaltered when a machine is reverted. See Section 5.4, “Special Image Write Modes”.
To avoid losing the current state when restoring a snapshot, you can create a new snapshot before the restore operation.
By restoring an earlier snapshot and taking more snapshots from there, it is even possible to create a kind of alternate reality and to switch between these different histories of the virtual machine. This can result in a whole tree of virtual machine snapshots.
Delete a snapshot. This does not affect the state of the virtual machine, but only releases the files on disk that Oracle VM VirtualBox used to store the snapshot data, thus freeing disk space. To delete a snapshot, select the snapshot name in the Snapshots window and click Delete in the toolbar. Snapshots can be deleted even while a machine is running.
Note
Whereas taking and restoring snapshots are fairly quick operations, deleting a snapshot can take a considerable amount of time since large amounts of data may need to be copied between several disk image files. Temporary disk files may also need large amounts of disk space while the operation is in progress.
There are some situations which cannot be handled while a VM is running, and you will get an appropriate message that you need to perform this snapshot deletion when the VM is shut down.
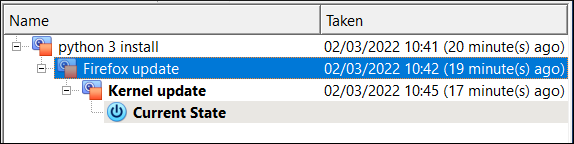
Think of a snapshot as a point in time that you have preserved. More formally, a snapshot consists of the following:
The snapshot contains a complete copy of the VM settings, including the hardware configuration, so that when you restore a snapshot, the VM settings are restored as well. For example, if you changed the hard disk configuration or the VM's system settings, that change is undone when you restore the snapshot.
The copy of the settings is stored in the machine configuration, an XML text file, and thus occupies very little space.
The complete state of all the virtual disks attached to the machine is preserved. Going back to a snapshot means that all changes that had been made to the machine's disks, file by file and bit by bit, will be undone as well. Files that were since created will disappear, files that were deleted will be restored, changes to files will be reverted.
Strictly speaking, this is only true for virtual hard disks in "normal" mode. You can configure disks to behave differently with snapshots, see Section 5.4, “Special Image Write Modes”. In technical terms, it is not the virtual disk itself that is restored when a snapshot is restored. Instead, when a snapshot is taken, Oracle VM VirtualBox creates differencing images which contain only the changes since the snapshot were taken. When the snapshot is restored, Oracle VM VirtualBox throws away that differencing image, thus going back to the previous state. This is both faster and uses less disk space. For the details, which can be complex, see Section 5.5, “Differencing Images”.
Creating the differencing image as such does not occupy much space on the host disk initially, since the differencing image will initially be empty and grow dynamically later with each write operation to the disk. The longer you use the machine after having created the snapshot, however, the more the differencing image will grow in size.
If you took a snapshot while the machine was running, the memory state of the machine is also saved in the snapshot. This is in the same way that memory can be saved when you close a VM window. When you restore such a snapshot, execution resumes at exactly the point when the snapshot was taken.
The memory state file can be as large as the memory size of the VM and will therefore occupy considerable disk space.
When you select a virtual machine from the list in the VirtualBox Manager window, you will see a summary of that machine's settings on the right.
Clicking on Settings displays a window, where you can configure many of the properties of the selected VM. But be careful when changing VM settings. It is possible to change all VM settings after installing a guest OS, but certain changes might prevent a guest OS from functioning correctly if done after installation.
Note
The Settings button is disabled while a VM is either in the Running or Saved state. This is because the Settings window enables you to change fundamental characteristics of the virtual machine that is created for your guest OS. For example, the guest OS may not perform well if half of its memory is taken away. As a result, if the Settings button is disabled, shut down the current VM first.
Oracle VM VirtualBox provides a wide range of parameters that can be changed for a virtual machine. The various settings that can be changed in the Settings window are described in detail in Chapter 3, Configuring Virtual Machines. Even more parameters are available when using the VBoxManage command line interface. See Chapter 8, VBoxManage.
You can remove a VM from Oracle VM VirtualBox or move the VM and its associated files, such as disk images, to another location on the host.
Removing a VM. To remove a VM, right-click on the VM in the VirtualBox Manager machine list and select Remove.
The confirmation dialog enables you to specify whether to only remove the VM from the list of machines or to remove the files associated with the VM.
Note that the Remove menu item is disabled while a VM is running.
Moving a VM. To move a VM to a new location on the host, right-click on the VM in the VirtualBox Manager's machine list and select Move.
The file dialog prompts you to specify a new location for the VM.
When you move a VM, Oracle VM VirtualBox configuration files are updated automatically to use the new location on the host.
Note that the Move menu item is disabled while a VM is running.
You can also use the VBoxManage movevm command to move a VM. See Section 8.12, “VBoxManage movevm”.
For information about removing or moving a disk image file from Oracle VM VirtualBox, see Section 5.3, “The Virtual Media Manager”.
You can create a full copy or a linked copy of an existing VM. This copy is called a clone. You might use a cloned VM to experiment with a VM configuration, to test different guest OS levels, or to back up a VM.
The Clone Virtual Machine wizard guides you through the cloning process.
You can start the Clone Virtual Machine wizard in one of the following ways:
Click the VM name in the machine list and then select Clone from the Machine menu.
Click Clone in the Snapshots window for the selected VM.
Note
The Clone menu item is disabled while a virtual machine is running.
The New Machine Name and Path page is displayed.
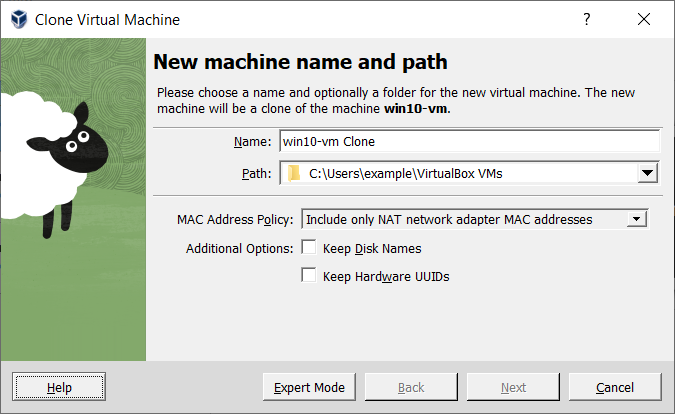
The following clone options are available:
Name: A name for the cloned machine.
Path: Choose a location for the cloned virtual machine, otherwise Oracle VM VirtualBox uses the default machines folder.
MAC Address Policy: Specifies whether to retain network card MAC addresses when cloning the VM.
For example, the Generate New MAC Addresses For All Network Adapters value assigns a new MAC address to each network card during cloning. This is the default setting. This is the best option when both the source VM and the cloned VM must operate on the same network. Other values enable you to retain the existing MAC addresses in the cloned VM.
Keep Disk Names: Retains the disk image names when cloning the VM.
Keep Hardware UUIDs: Retains the hardware universally unique identifiers (UUIDs) when cloning the VM.
Click Next. The Clone Type page is displayed.
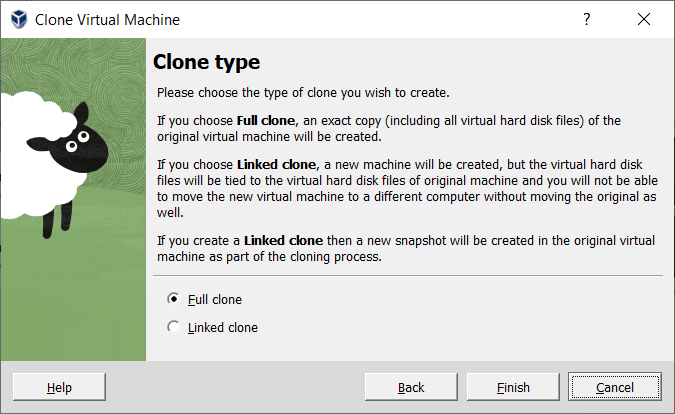
The Clone Type option specifies whether to create a clone that is linked to the source VM or to create a fully independent clone:
Full Clone: Copies all dependent disk images to the new VM folder. A full clone can operate fully without the source VM.
Linked Clone: Creates new differencing disk images based on the source VM disk images. If you select the current state of the source VM as the clone point, Oracle VM VirtualBox creates a new snapshot.
(Optional) Click Next. The Snapshots page is displayed.
Note
The Snapshots page is only displayed for machines that have snapshots and the selected clone type is Full Clone.
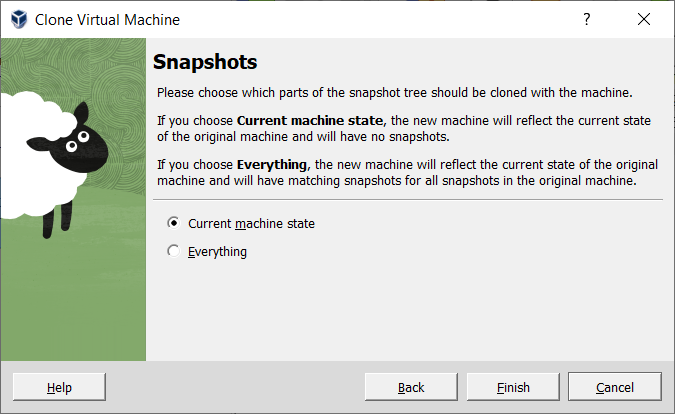
You use this page to select which parts of the snapshot tree to include in the clone. The available options are as follows:
Current Machine State: Clones the current state of the VM. Snapshots are not included.
Everything: Clones the current machine state and all its snapshots.
Click Finish to start the clone operation.
The duration of the clone operation depends on the size and number of attached disk images. In addition, the clone operation saves all the differencing disk images of a snapshot.
You can also use the VBoxManage clonevm command to clone a VM. See Section 8.11, “VBoxManage clonevm”.
Oracle VM VirtualBox can import and export virtual machines in the following formats:
Open Virtualization Format (OVF). This is the industry-standard format. See Section 1.15.1, “About the OVF Format”.
Cloud service formats. Export to and import from cloud services such as Oracle Cloud Infrastructure is supported. See Section 1.16, “Integrating with Oracle Cloud Infrastructure”.
OVF is a cross-platform standard supported by many virtualization products which enables the creation of ready-made virtual machines that can then be imported into a hypervisor such as Oracle VM VirtualBox. Oracle VM VirtualBox makes OVF import and export easy to do, using VirtualBox Manager or the command-line interface.
Using OVF enables packaging of virtual appliances. These are disk images, together with configuration settings that can be distributed easily. This way one can offer complete ready-to-use software packages, including OSes with applications, that need no configuration or installation except for importing into Oracle VM VirtualBox.
Note
The OVF standard is complex, and support in Oracle VM VirtualBox is an ongoing process. In particular, no guarantee is made that Oracle VM VirtualBox supports all appliances created by other virtualization software. For a list of known limitations, see Chapter 14, Known Limitations.
Appliances in OVF format can appear in the following variants:
They can come in several files, as one or several disk images, typically in the widely-used VMDK format. See Section 5.2, “Disk Image Files (VDI, VMDK, VHD, HDD)”. They also include a textual description file in an XML dialect with an
.ovfextension. These files must then reside in the same directory for Oracle VM VirtualBox to be able to import them.Alternatively, the above files can be packed together into a single archive file, typically with an
.ovaextension. Such archive files use a variant of the TAR archive format and can therefore be unpacked outside of Oracle VM VirtualBox with any utility that can unpack standard TAR files.
Note
OVF cannot describe snapshots that were taken for a virtual machine. As a result, when you export a virtual machine that has snapshots, only the current state of the machine will be exported. The disk images in the export will have a flattened state identical to the current state of the virtual machine.
The following steps show how to import an appliance in OVF format.
Double-click on the OVF or OVA file.
Oracle VM VirtualBox creates file type associations automatically for any OVF and OVA files on your host OS.
The Appliance Settings page of the Import Virtual Appliance wizard is shown.
The Appliance Settings page shows the VMs described in the OVF or OVA file and enables you to change the VM settings.
By default, membership of VM groups is preserved on import for VMs that were initially exported from Oracle VM VirtualBox. You can change this behavior by using the Primary Group setting for the VM.
The following global settings apply to all of the VMs that you import:
Base Folder: Specifies the directory on the host in which to store the imported VMs.
If an appliance has multiple VMs, you can specify a different directory for each VM by editing the Base Folder setting for the VM.
MAC Address Policy: Reinitializes the MAC addresses of network cards in your VMs prior to import, by default. You can override the default behavior and preserve the MAC addresses on import.
Import Hard Drives as VDI: Imports hard drives in the VDI format rather than in the default VMDK format.
Click Finish to import the appliance.
Oracle VM VirtualBox copies the disk images and creates local VMs with the settings described on the Appliance Settings page. The imported VMs are shown in the list of VMs in VirtualBox Manager.
Because disk images are large, the VMDK images that are included with virtual appliances are shipped in a compressed format that cannot be used directly by VMs. So, the images are first unpacked and copied, which might take several minutes.
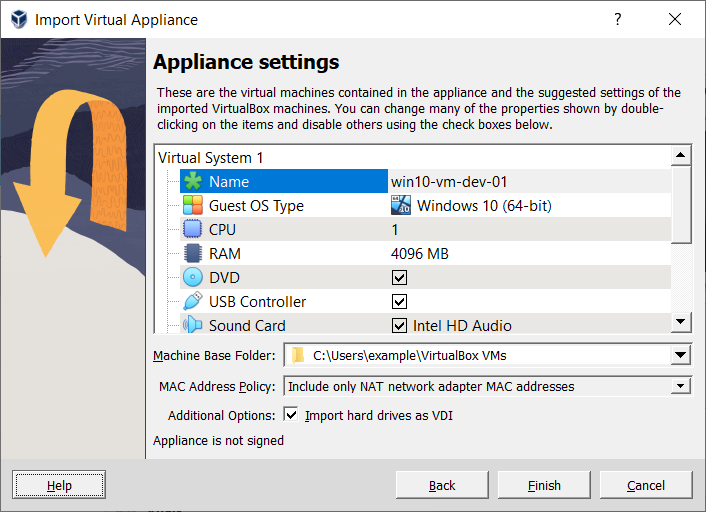
You can use the VBoxManage import command to import an appliance. See Section 8.16, “VBoxManage import”.
The following steps show how to export an appliance in OVF format.
Select File, Export Appliance to display the Export Virtual Appliance wizard.
On the initial Virtual Machines page, you can combine several VMs into an OVF appliance.
Select one or more VMs to export, and click Next.
The Format Settings page enables you to configure the following settings:
Format: Selects the Open Virtualization Format value for the output files.
The Oracle Cloud Infrastructure value exports the appliance to Oracle Cloud Infrastructure. See Section 1.16.8, “Exporting an Appliance to Oracle Cloud Infrastructure”.
File: Selects the location in which to store the exported files.
MAC Address Policy: Specifies whether to retain or reassign network card MAC addresses on export.
Write Manifest File: Enables you to include a manifest file in the exported archive file.
Include ISO Image Files: Enables you to include ISO image files in the exported archive file.
Click Next to show the Appliance Settings page.
You can edit settings for the virtual appliance. For example, you can change the name of the virtual appliance or add product information, such as vendor details or license text.
Double-click the appropriate field to change its value.
Click Finish to begin the export process. Note that this operation might take several minutes.
You can use the VBoxManage export command to export an appliance. See Section 8.17, “VBoxManage export”.
This section describes how to use the features of Oracle VM VirtualBox to integrate with Oracle Cloud Infrastructure.
Integrating with Oracle Cloud Infrastructure involves the following steps:
Prepare for Oracle Cloud Infrastructure Integration. Before using Oracle VM VirtualBox with Oracle Cloud Infrastructure there are some initial configuration steps you may need to do. See Section 1.16.1, “Preparing for Oracle Cloud Infrastructure Integration”.
Use Oracle VM VirtualBox with Oracle Cloud Infrastructure. Section 1.16.6, “Using Oracle VM VirtualBox With Oracle Cloud Infrastructure” describes how you can use Oracle VM VirtualBox with Oracle Cloud Infrastructure.
Perform the following configuration steps before using Oracle VM VirtualBox to integrate with your Oracle Cloud Infrastructure account.
Install the Extension Pack. Cloud integration features are only available when you install the Oracle VM VirtualBox Extension Pack. See Section 1.5, “Installing Oracle VM VirtualBox and Extension Packs”.
Create a key pair. Generate an API signing key pair that is used for API requests to Oracle Cloud Infrastructure. See Section 1.16.2, “Creating an API Signing Key Pair”.
Upload the public key of the key pair from your client device to the cloud service. See Section 1.16.3, “Uploading the Public Key to Oracle Cloud Infrastructure”.
Create a cloud profile. The cloud profile contains resource identifiers for your cloud account, such as your user OCID, and details of your key pair. See Section 1.16.4, “Creating a Cloud Profile”.
To use the cloud integration features of Oracle VM VirtualBox, you must generate an API signing key pair that is used for API requests to Oracle Cloud Infrastructure.
Your API requests are signed with your private key, and Oracle Cloud Infrastructure uses the public key to verify the authenticity of the request. You must upload the public key to the Oracle Cloud Infrastructure Console.
Note
This key pair is not the same SSH key that you use to access compute instances on Oracle Cloud Infrastructure.
(Optional) Create a
.ocidirectory to store the key pair.$ mkdir ~/.oci
The key pair is usually installed in the
.ocifolder in your home directory. For example,~/.ocion a Linux system.Generate the private key.
Use the openssl command.
To generate a private key with a passphrase:
$ openssl genrsa -out ~/.oci/oci_api_key.pem -aes128 2048
To generate a private key without a passphrase:
$ openssl genrsa -out ~/.oci/oci_api_key.pem 2048
Change permissions for the private key.
$ chmod 600 ~/.oci/oci_api_key.pem
Generate the public key.
$ openssl rsa -pubout -in ~/.oci/oci_api_key.pem -out ~/.oci/oci_api_key_public.pem
Use the following steps to upload your public key to Oracle Cloud Infrastructure.
Log in to the Oracle Cloud Infrastructure Console.
Display the User Settings page.
Click Profile, User Settings.
Display your current API signing keys.
Click Resources, API Keys.
Upload the public key.
Click Add Public Key.
The Add Public Key dialog is displayed.
Select one of the following options:
Choose Public Key File. This option enables you to browse to the public key file on your local hard disk.
Paste Public Keys. This option enables you to paste the contents of the public key file into the window in the dialog box.
Click Add to upload the public key.
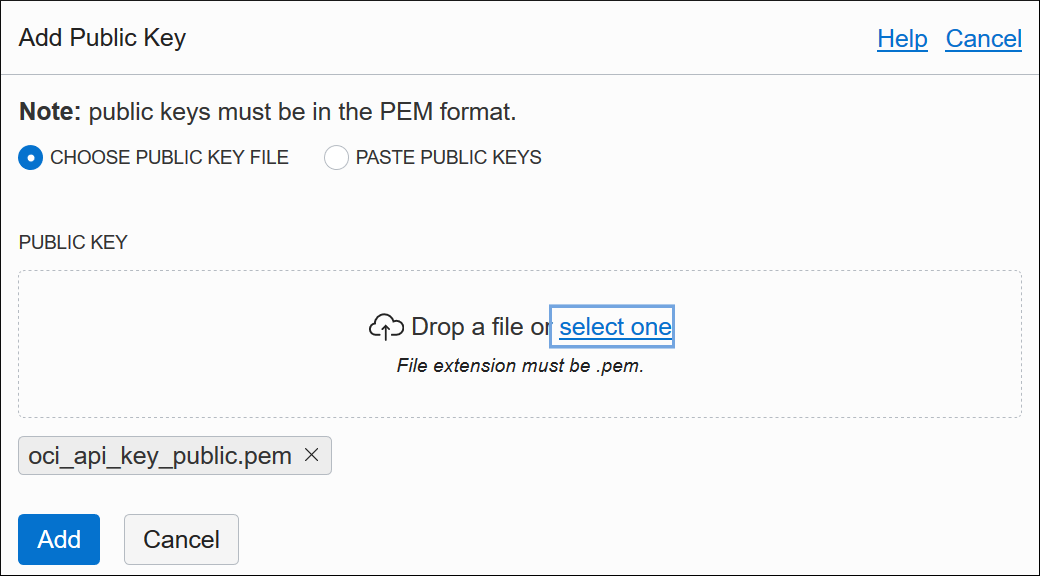
Oracle VM VirtualBox uses a cloud profile to connect to Oracle Cloud Infrastructure. A cloud profile is a text file that contains details of your key files and Oracle Cloud Identifier (OCID) resource identifiers for your cloud account, such as the following:
Fingerprint of the public key. To obtain the fingerprint, you can use the openssl command:
$ openssl rsa -pubout -outform DER -in ~/.oci/oci_api_key.pem | openssl md5 -c
Location of the private key on the client device. Specify the full path to the private key.
(Optional) Passphrase for the private key. This is only required if the key is encrypted.
Region. Shown on the Oracle Cloud Infrastructure Console. Click Administration, Tenancy Details.
Tenancy OCID. Shown on the Oracle Cloud Infrastructure Console. Click Administration, Tenancy Details.
A link enables you to copy the Tenancy OCID.
Compartment OCID. Shown on the Oracle Cloud Infrastructure Console. Click Identity, Compartments.
A link enables you to copy the Compartment OCID.
User OCID. Shown on the Oracle Cloud Infrastructure Console. Click Profile, User Settings.
A link enables you to copy the User OCID.
You can create a cloud profile in the following ways:
Automatically, by using the Cloud Profile Manager. See Section 1.16.5, “Using the Cloud Profile Manager”.
The Cloud Profile Manager is a VirtualBox Manager tool that enables you to create, edit, and manage cloud profiles for your cloud service accounts.
Automatically, by using the VBoxManage cloudprofile command. See Section 8.15, “VBoxManage cloudprofile”.
Manually, by creating an
oci_configfile in your Oracle VM VirtualBox global configuration directory. For example, this is$HOME/.config/VirtualBox/oci_configon a Linux host.Manually, by creating a
configfile in your Oracle Cloud Infrastructure configuration directory. For example, this is$HOME/.oci/configon a Linux host.This is the same file that is used by the Oracle Cloud Infrastructure command line interface.
Oracle VM VirtualBox automatically uses the
configfile if no cloud profile file is present in your global configuration directory. Alternatively, you can import this file manually into the Cloud Profile Manager.
This section describes how to use the Cloud Profile Manager to create a cloud profile.
To open the Cloud Profile Manager click File, Cloud Profile Manager in VirtualBox Manager.
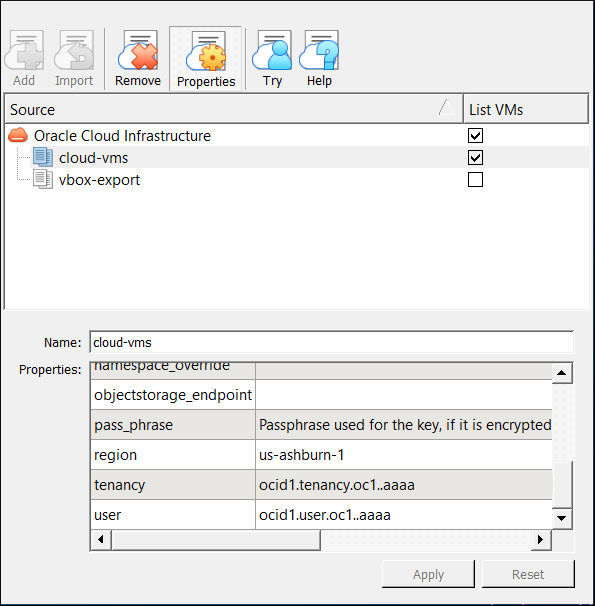
You can use the Cloud Profile Manager in the following ways:
To create a new cloud profile automatically
To create a cloud profile by importing settings from your Oracle Cloud Infrastructure configuration file.
Perform the following steps to create a new cloud profile automatically, using the Cloud Profile Manager:
Click the Add icon and specify a Name for the profile.
Click Properties and specify the following property values for the profile:
Compartment OCID
Fingerprint of the public key
Location of the private key on the client device
Region OCID
Tenancy OCID
User OCID
Some of these are settings for your Oracle Cloud Infrastructure account, which you can view from the Oracle Cloud Infrastructure Console.
(Optional) If you are using the cloud profile to connect to cloud virtual machines, select the Show VMs check box.
This creates a new subgroup of the OCI group in VirtualBox Manager. See Section 1.16.7.1, “About the OCI VM Group”.
Click Apply to save your changes.
The cloud profile settings are saved to the
oci_configfile in your Oracle VM VirtualBox global settings directory.
Perform the following steps to import an existing Oracle Cloud Infrastructure configuration file into the Cloud Profile Manager:
Ensure that a
configfile is present in your Oracle Cloud Infrastructure configuration directory. For example, this is$HOME/.oci/configon a Linux host.Click the Import icon to open a dialog that prompts you to import cloud profiles from external files.
Warning
This action overwrites any cloud profiles that are in your Oracle VM VirtualBox global settings directory.
Click Import.
Your cloud profile settings are saved to the
oci_configfile in your Oracle VM VirtualBox global settings directory.Click Properties to show the cloud profile settings.
Double-click on the appropriate field to change the value.
Click Apply to save your changes.
This section describes how you can use Oracle VM VirtualBox with Oracle Cloud Infrastructure to do the following tasks:
Create, add, and manage Oracle Cloud Infrastructure cloud instances using VirtualBox Manager. See Section 1.16.7, “Using Cloud Virtual Machines”.
Export an Oracle VM VirtualBox VM to Oracle Cloud Infrastructure. See Section 1.16.8, “Exporting an Appliance to Oracle Cloud Infrastructure”.
Import a cloud instance into Oracle VM VirtualBox. See Section 1.16.9, “Importing an Instance from Oracle Cloud Infrastructure”.
Connect from a local VM to an Oracle Cloud Infrastructure cloud subnet. See Section 1.16.10, “Using a Cloud Network”.
Use the VBoxManage commands to integrate with Oracle Cloud Infrastructure and perform cloud operations. See Section 1.16.11, “Using VBoxManage Commands With Oracle Cloud Infrastructure”.
A cloud virtual machine (cloud VM) is a type of VM that represents an instance on a cloud service. Cloud VMs are shown in the machine list in VirtualBox Manager, in the same way as local VMs are.
By using cloud VMs you can create, manage, and control your Oracle Cloud Infrastructure instances from VirtualBox Manager.
Note
Cloud VMs do not install, export, or import instances to the Oracle VM VirtualBox host. All operations are done remotely on the cloud service.
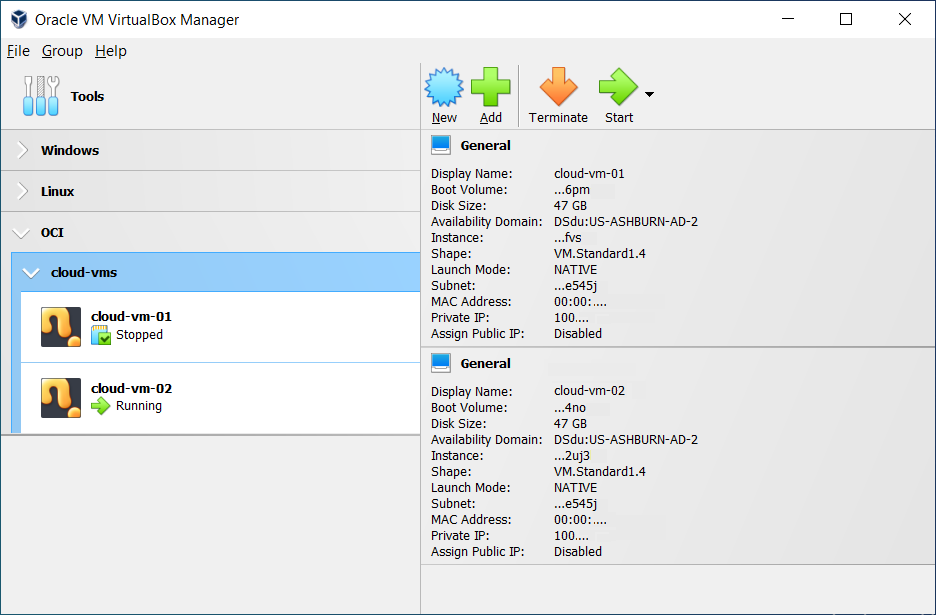
Cloud VMs can be used to do the following tasks in Oracle Cloud Infrastructure:
Create a new Oracle Cloud Infrastructure instance. See Section 1.16.7.2, “Creating a New Cloud VM”.
Use an existing Oracle Cloud Infrastructure instance. See Section 1.16.7.3, “Adding a Cloud VM”.
Configure an Oracle Cloud Infrastructure instance. You can change settings for the instance, such as display name and shape. See Section 1.16.7.4, “Changing Settings for a Cloud VM”.
Control an Oracle Cloud Infrastructure instance. Stop, start, and terminate the instance. See Section 1.16.7.5, “Controlling a Cloud VM”
Create a console connection to an Oracle Cloud Infrastructure instance. See Section 1.16.7.7, “Creating an Instance Console Connection for a Cloud VM”.
All cloud VMs are shown in the machine list in VirtualBox Manager, in a special VM group called OCI.
Cloud VMs are further grouped according to the cloud profile used to connect to them. The cloud profile identifies the user and compartment for the cloud VM and includes details of the key pair used to connect to cloud instances. See Section 1.16.4, “Creating a Cloud Profile”.

All cloud profiles registered with Oracle VM VirtualBox are listed automatically in the OCI group.
To enable or disable listing of cloud VMs in VirtualBox Manager for a specific cloud profile, do the following:
Display the Cloud Profile Manager and select or deselect the List VMs check box for each cloud profile.
When you create a new cloud VM, a new Oracle Cloud Infrastructure instance is created and associated with the cloud VM.
Perform the following steps to create a new cloud VM:
Click on a cloud profile in the OCI group.
The cloud VMs for the selected cloud profile are displayed.
Select Group, New Machine.
The Create Cloud Virtual Machine wizard is displayed.
On the initial page, configure the following settings for the new cloud VM:
Location: The cloud service provider that will host the new instance. Select Oracle Cloud Infrastructure.
Profile: The cloud profile used to connect to the new instance. Select from the available cloud profiles.
Source: The image that the new instance is based on. Choose from the available images and boot volumes.
Click Next to display the Cloud Virtual Machine Settings page.
You can use this page to change the default settings for the new Oracle Cloud Infrastructure instance, such as the display name, shape, and networking configuration.
To add an SSH key to the instance, click the SSH Authorised Keys field and paste the public key into the displayed dialog.
Click Finish to create a new Oracle Cloud Infrastructure instance using the selected image or boot volume. The new instance is started automatically.
The new cloud VM is shown in the OCI group in VirtualBox Manager.
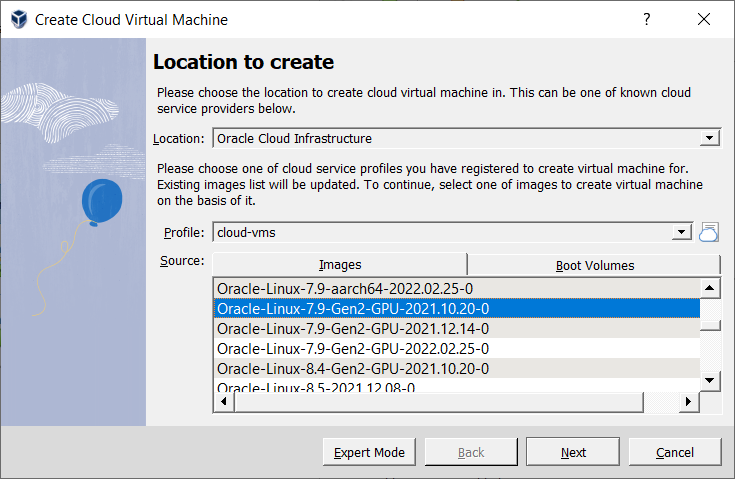
When you add a cloud VM, an existing Oracle Cloud Infrastructure instance is associated with the cloud VM. You can only add one cloud VM for each instance.
Perform the following steps to add a cloud VM:
Click on a cloud profile in the OCI group.
The cloud VMs for the selected cloud profile are displayed.
Select Group, Add Machine.
The Add Cloud Virtual Machine wizard is displayed.
Configure the following settings:
Source: The cloud service provider that hosts the instance used for the cloud VM. Select Oracle Cloud Infrastructure.
Profile: The cloud profile used to connect to the running instance. Select from the available cloud profiles.
Instances: The instance to use for the cloud VM. Choose from the available instances on your cloud service.
Click Finish to add a cloud VM based on the selected instance.
A cloud VM with the same name as the instance is added to the OCI group in VirtualBox Manager.
(Optional) To change the display name for the instance, click Settings and edit the Display Name field.
The cloud VM name in VirtualBox Manager is updated automatically.
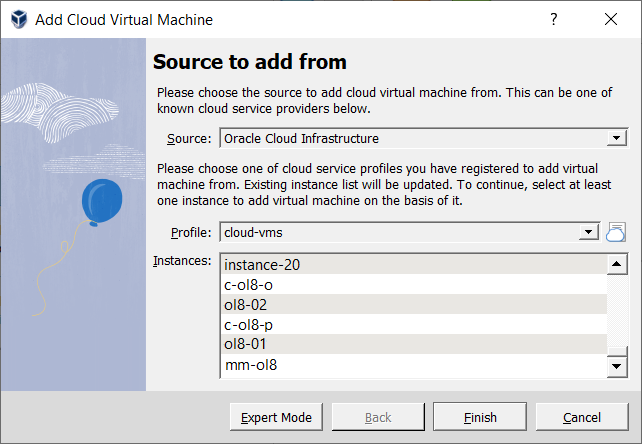
Select the cloud VM in VirtualBox Manager and click Settings.
For a new cloud VM, you can change many settings for the Oracle Cloud Infrastructure instance, such as the display name, shape, and disk size.
When you add a cloud VM based on an existing Oracle Cloud Infrastructure instance you can only change the display name.
You can use VirtualBox Manager to control a cloud VM as follows:
Start. Use the Start button in the VirtualBox Manager toolbar.
Stop. Right-click on the cloud VM name, to display the Close menu. Options to shut down and power off the cloud VM are available.
Terminate. Use the Terminate button in the VirtualBox Manager toolbar.
Caution
This action deletes the instance from Oracle Cloud Infrastructure.
When you control a cloud VM in VirtualBox Manager the machine list is updated automatically with the current instance state, such as Stopped or Running.
When you control an instance using the Oracle Cloud Infrastructure console, VirtualBox Manager updates the status for the corresponding cloud VM automatically.
You can use VirtualBox Manager to remove a cloud VM as follows:
Right-click on the cloud VM name and select Remove.
Click Remove Only to remove the cloud VM from the machine list in VirtualBox Manager.
Click Delete Everything to remove the cloud VM from VirtualBox Manager and also to delete the Oracle Cloud Infrastructure instance and any associated boot volumes.
To create a instance console connection, the cloud VM must be in Running state.
Right-click on the cloud VM name and select Console, Create Connection.
The Public Key dialog is displayed. Paste the public key used for the instance connection into the dialog and click OK.
By default, either the first entry in your SSH keys folder or the public key used for your previous instance console connection is used.
Click Connect to connect to the instance. An instance console is displayed automatically on the host.
(Optional) Click Show Log to display log messages for the instance console connection.
See the Oracle Cloud Infrastructure documentation for details about how you can use an instance console connection to troubleshoot instance problems.
Oracle VM VirtualBox supports the export of VMs to an Oracle Cloud Infrastructure service. The exported VM is stored on Oracle Cloud Infrastructure as a custom Linux image. You can configure whether a cloud instance is created and started after the export process has completed.
Note
Before you export a VM to Oracle Cloud Infrastructure, you must prepare the VM as described in Section 1.16.8.1, “Preparing a VM for Export to Oracle Cloud Infrastructure”.
Use the following steps to export a VM to Oracle Cloud Infrastructure:
Select File, Export Appliance to open the Export Virtual Appliance wizard.
Select a VM to export and click Next to display the Format Settings page.
From the Format drop-down list, select Oracle Cloud Infrastructure.
In the Profile drop-down list, select the cloud profile used for your Oracle Cloud Infrastructure account.
In the Machine Creation field, select an option to configure settings for the cloud instance created when you export to Oracle Cloud Infrastructure. The options enable you to do one of the following:
Configure settings for the cloud instance after you have finished exporting the VM.
Configure settings for the cloud instance before you start to export the VM.
Do not create a cloud instance when you export the VM.
Click Next to make an API request to the Oracle Cloud Infrastructure service and open the Appliance Settings page.
(Optional) Edit storage settings used for the exported virtual machine in Oracle Cloud Infrastructure. You can change the following settings:
The name of the bucket used to store the exported files.
Whether to store the custom image in Oracle Cloud Infrastructure.
The display name for the custom image in Oracle Cloud Infrastructure.
The launch mode for the custom image.
Paravirtualized mode gives improved performance and should be suitable for most Oracle VM VirtualBox VMs.
Emulated mode is suitable for legacy OS images.
Click Finish to continue.
(Optional) Depending on the selection in the Machine Creation field, the Appliance Settings page may be displayed before or after export. This screen enables you to configure settings for the cloud instance, such as Shape and Disk Size.
Click Finish. The VM is exported to Oracle Cloud Infrastructure.
Depending on the Machine Creation setting, a cloud instance may be started after upload to Oracle Cloud Infrastructure is completed.
Monitor the export process by using the Oracle Cloud Infrastructure Console.
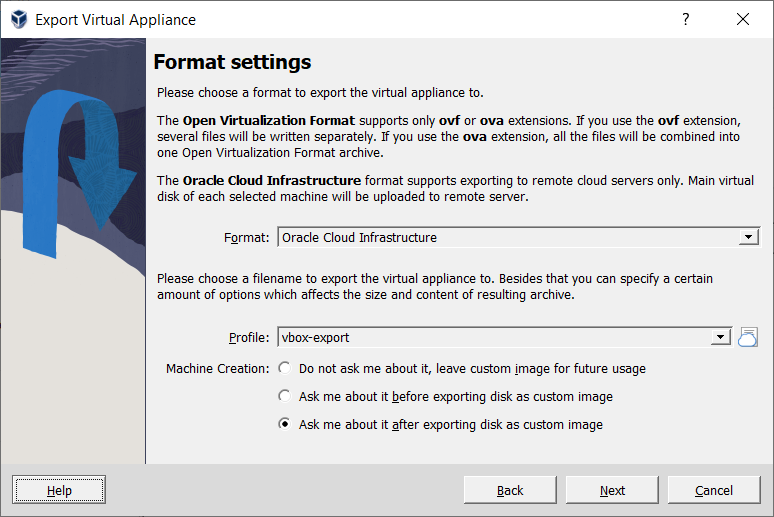
You can also use the VBoxManage export command to export a VM to Oracle Cloud Infrastructure. See Section 8.17.2.2, “Export a Virtual Machine to Oracle Cloud Infrastructure”.
Oracle Cloud Infrastructure provides the option to import a custom Linux image. Before an Oracle VM VirtualBox image can be exported to Oracle Cloud Infrastructure, the custom image needs to be prepared to ensure that instances launched from the custom image can boot correctly and that network connections will work. This section provides advice on how to prepare a Linux image for export from Oracle VM VirtualBox.
The following list shows some tasks to consider when preparing an Oracle Linux VM for export:
Use DHCP for network addresses. Configure the VM to use a DHCP server to allocate network addresses, rather than using a static IP address. The Oracle Cloud Infrastructure instance will then be allocated an IP address automatically.
Do not specify a MAC address. The network interface configuration for the VM must not specify the MAC address.
Remove the HWADDR setting from the
/etc/sysconfig/ifcfg-network script.devicenameDisable persistent network device naming rules. This means that the Oracle Cloud Infrastructure instance will use the same network device names as the VM.
Change the GRUB kernel parameters.
Add
net.ifnames=0andbiosdevname=0as kernel parameter values to theGRUB_CMDLINE_LINUXvariable.Update the GRUB configuration.
# grub2-mkconfig -o /boot/grub2/grub.cfg
Disable any
udevrules for network device naming.For example, if an automated
udevrule exists fornet-persistence:# cd /etc/udev/rules.d # rm -f 70-persistent-net.rules # ln -s /dev/null /etc/udev/rules.d/70-persistent-net.rules
Enable the serial console. This enables you to troubleshoot the instance when it is running on Oracle Cloud Infrastructure.
Edit the
/etc/default/grubfile, as follows:Remove the
resumesetting from the kernel parameters. This setting slows down boot time significantly.Replace
GRUB_TERMINAL="gfxterm"withGRUB_TERMINAL="console serial". This configures use of the serial console instead of a graphical terminal.Add
GRUB_SERIAL_COMMAND="serial --unit=0
                      --speed=115200"
. This configures the serial connection.Add
console=tty0
                      console=ttyS0,115200
to theGRUB_CMDLINE_LINUXvariable. This adds the serial console to the Linux kernel boot parameters.
Regenerate the GRUB configuration.
# grub2-mkconfig -o /boot/grub2/grub.cfg
To verify the changes, reboot the machine and run the dmesg command to look for the updated kernel parameters.
# dmesg |grep console=ttyS0
Enable paravirtualized device support. You do this by adding the
virtiodrivers to theinitrdfor the VM.This procedure works only on machines with a Linux kernel of version 3.4 or later. Check that the VM is running a supported kernel:
# uname -a
Use the
dracuttool to rebuildinitrd. Add theqemumodule, as follows:# dracut –-logfile /var/log/Dracut.log --force --add qemu
Verify that the
virtiodrivers are now present ininitrd.# lsinitrd |grep virtio
For more information about importing a custom Linux image into Oracle Cloud Infrastructure, see also:
https://docs.cloud.oracle.com/iaas/Content/Compute/Tasks/importingcustomimagelinux.htm
Perform the following steps to import a cloud instance from Oracle Cloud Infrastructure into Oracle VM VirtualBox:
Select File, Import Appliance to open the Import Virtual Appliance wizard.
In the Source drop-down list, select Oracle Cloud Infrastructure.
In the Profile drop-down list, select the cloud profile for your Oracle Cloud Infrastructure account.
Choose the required cloud instance from the list in the Machines field.
Click Next to make an API request to the Oracle Cloud Infrastructure service and display the Appliance Settings page.
(Optional) Edit settings for the new local virtual machine.
For example, you can edit the VM name and description.
Click Finish to import the instance from Oracle Cloud Infrastructure.
Monitor the import process by using the Oracle Cloud Infrastructure Console.
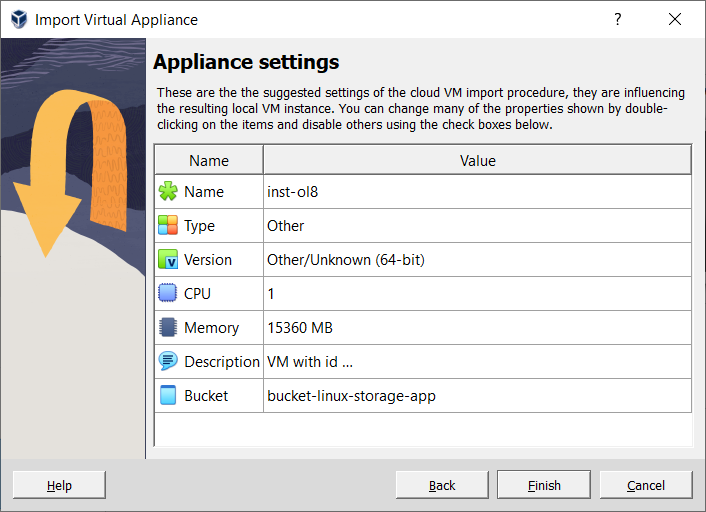
You can also use the VBoxManage import command to import an instance from Oracle Cloud Infrastructure. See Section 8.16.2.3, “Cloud Import Options”.
The following describes the sequence of events when you import an instance from Oracle Cloud Infrastructure.
A custom image is created from the boot volume of the instance.
The custom image is exported to an Oracle Cloud Infrastructure object and is stored using Object Storage in the bucket specified by the user.
The Oracle Cloud Infrastructure object is downloaded to the local host. The object is a TAR archive which contains a boot volume of the instance in QCOW2 format and a JSON file containing metadata related to the instance.
The boot volume of the instance is extracted from the archive and a new VMDK image is created by converting the boot volume into the VMDK format. The VMDK image is registered with Oracle VM VirtualBox.
A new VM is created using the VMDK image for the cloud instance.
By default, the new VM is not started after import from Oracle Cloud Infrastructure.
The downloaded TAR archive is deleted after a successful import.
A cloud network is a type of network that can be used for connections from a local VM to a remote Oracle Cloud Infrastructure cloud instance.
To create and use a cloud network, do the following:
Set up a virtual cloud network on Oracle Cloud Infrastructure.
The following steps create and configure a virtual cloud network (VCN) on Oracle Cloud Infrastructure. The VCN is used to tunnel network traffic across the cloud.
Ensure that you have a cloud profile for connecting to Oracle Cloud Infrastructure. See Section 1.16.4, “Creating a Cloud Profile”.
Run the following VBoxManage cloud command:
VBoxManage cloud --provider="OCI" --profile="vbox-oci" network setup
where
vbox-ociis the name of your cloud profile.Other options are available for the VBoxManage cloud network setup command, to enable you to configure details for the VCN. For example, you can configure the operating system used for the cloud gateway instance and the IP address range used by the tunneling network. See Section 8.14, “VBoxManage cloud”.
For best results, use an Oracle Linux 7 instance for the cloud gateway. This is the default option.
Register the new cloud network with Oracle VM VirtualBox.
Use the Cloud Networks tab in the Network Manager tool. See Section 6.11.3, “Cloud Networks Tab”.
Add cloud network adaptors to the local VMs that will use the cloud network. See Section 6.10, “Cloud Networks”.
This section includes some examples of how VBoxManage commands can be used to integrate with Oracle Cloud Infrastructure and perform common cloud operations.
Creating a Cloud Profile
To create a cloud profile called vbox-oci:
VBoxManage cloudprofile --provider "OCI" --profile="vbox-oci" add \
--clouduser="ocid1.user.oc1..."  --keyfile="/home/username/.oci/oci_api_key.pem" \
--tenancy="ocid1.tenancy.oc1..."  --compartment="ocid1.compartment.oc1..."  --region="us-ashburn-1"
The new cloud profile is added to the
oci_config file in your Oracle VM VirtualBox
global configuration directory. For example, this is
$HOME/.VirtualBox/oci_config on a Windows
host.
Listing Cloud Instances
To list the instances in your Oracle Cloud Infrastructure compartment:
VBoxManage cloud --provider="OCI" --profile="vbox-oci" list instances
Exporting an Oracle VM VirtualBox VM to the Cloud
To export a VM called myVM and create a cloud
instance called myVM_Cloud:
VBoxManage export myVM --output OCI:// --cloud 0 --vmname myVM_Cloud \
--cloudprofile "vbox-oci" --cloudbucket myBucket \
--cloudshape VM.Standard2.1 --clouddomain US-ASHBURN-AD-1 --clouddisksize 50  \
--cloudocivcn ocid1.vcn.oc1... --cloudocisubnet ocid1.subnet.oc1... \
--cloudkeepobject true --cloudlaunchinstance true --cloudpublicip true
Importing a Cloud Instance Into Oracle VM VirtualBox
To import a cloud instance and create an Oracle VM VirtualBox VM
called oci_Import:
VBoxManage import OCI:// --cloud --vmname oci_Import --memory 4000
--cpus 3 --ostype FreeBSD_64 --cloudprofile "vbox-oci"
--cloudinstanceid ocid1.instance.oc1... --cloudbucket myBucket
Creating a New Cloud Instance From a Custom Image
To create a new cloud instance from a custom image on Oracle Cloud Infrastructure:
VBoxManage cloud --provider="OCI" --profile="vbox-oci" instance create \
--domain-name="oraclecloud.com" --image-id="ocid1.image.oc1..." --display-name="myInstance" \
--shape="VM.Standard2.1" --subnet="ocid1.subnet.oc1..."
Terminating a Cloud Instance
To terminate an instance in your compartment on Oracle Cloud Infrastructure:
VBoxManage cloud --provider="OCI" --profile="vbox-oci" instance terminate \
--id="ocid1.instance.oc1..."
For more details about the available commands for cloud operations, see Section 8.14, “VBoxManage cloud”.
The Preferences window offers a selection of settings, which apply to all virtual machines of the current user.
To display the Preferences window, do either of the following:
Select File, Preferences.
Click Preferences on the Welcome screen in VirtualBox Manager.
The following settings are available:
General. Enables you to specify the default folder or directory for VM files, and the VRDP Authentication Library.
Input. Enables you to specify keyboard shortcuts, such as the Host key. This is the key that toggles whether the cursor is in the focus of the VM or the Host OS windows, see Section 1.9.2, “Capturing and Releasing Keyboard and Mouse”. The Host key is also used to trigger certain VM actions, see Section 1.9.3, “Typing Special Characters”.
Update. Enables you to specify various settings for Automatic Updates.
Language. Enables you to specify the language used for menus, labels, and text in VirtualBox Manager.
Display. Enables you to specify the screen resolution, and its width and height. A default scale factor can be specified for all guest screens.
Proxy. Enables you to configure an HTTP Proxy Server.
Interface. Enables you to select a color theme for the VirtualBox Manager user interface.
Note
This setting is only available on Windows host platforms.
As briefly mentioned in Section 1.3, “Features Overview”, Oracle VM VirtualBox has a very flexible internal design that enables you to use multiple interfaces to control the same virtual machines. For example, you can start a virtual machine with the VirtualBox Manager window and then stop it from the command line. With Oracle VM VirtualBox's support for the Remote Desktop Protocol (RDP), you can even run virtual machines remotely on a headless server and have all the graphical output redirected over the network.
The following front-ends are shipped in the standard Oracle VM VirtualBox package:
VirtualBox. This is the VirtualBox Manager, a graphical user interface that uses the Qt toolkit. This interface is described throughout this manual. While this is the simplest and easiest front-end to use, some of the more advanced Oracle VM VirtualBox features are not included.
VBoxManage. A command-line interface for automated and detailed control of every aspect of Oracle VM VirtualBox. See Chapter 8, VBoxManage.
VBoxHeadless. A front-end that produces no visible output on the host at all, but can act as a RDP server if the VirtualBox Remote Desktop Extension (VRDE) is installed and enabled for the VM. As opposed to the other graphical interfaces, the headless front-end requires no graphics support. This is useful, for example, if you want to host your virtual machines on a headless Linux server that has no X Window system installed. See Section 7.1.2, “VBoxHeadless, the Remote Desktop Server”.
If the above front-ends still do not satisfy your particular needs, it is possible to create yet another front-end to the complex virtualization engine that is the core of Oracle VM VirtualBox, as the Oracle VM VirtualBox core neatly exposes all of its features in a clean API. See Chapter 11, Oracle VM VirtualBox Programming Interfaces.
Oracle VM VirtualBox provides a soft keyboard that enables you to input keyboard characters on the guest. A soft keyboard is an on-screen keyboard that can be used as an alternative to a physical keyboard. See Section 1.19.1, “Using the Soft Keyboard” for details of how to use the soft keyboard.
Caution
For best results, ensure that the keyboard layout configured on the guest OS matches the keyboard layout used by the soft keyboard. Oracle VM VirtualBox does not do this automatically.
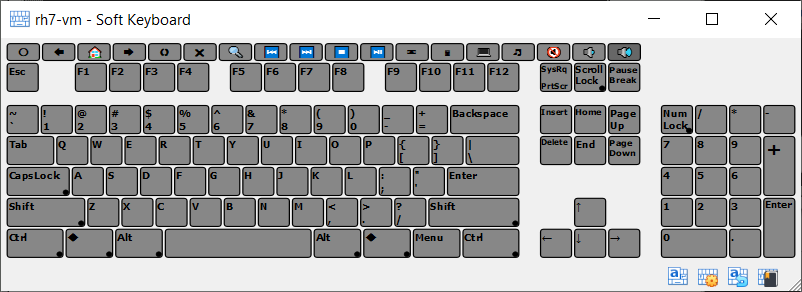
The soft keyboard can be used in the following scenarios:
When the physical keyboard on the host is not the same as the keyboard layout configured on the guest. For example, if the guest is configured to use an international keyboard, but the host keyboard is US English.
To send special key combinations to the guest. Note that some common key combinations are also available in the Input, Keyboard menu of the guest VM window. See Section 1.9.3, “Typing Special Characters”.
For guests in kiosk mode, where a physical keyboard is not present.
When using nested virtualization, the soft keyboard provides a method of sending key presses to a guest.
By default, the soft keyboard includes some common international keyboard layouts. You can copy and modify these to meet your own requirements. See Section 1.19.2, “Creating a Custom Keyboard Layout”.
Display the soft keyboard.
In the guest VM window, select Input, Keyboard, Soft Keyboard.
Select the required keyboard layout.
The name of the current keyboard layout is displayed in the toolbar of the soft keyboard window. This is the previous keyboard layout that was used.
Click the Layout List icon in the toolbar of the soft keyboard window. The Layout List window is displayed.
Select the required keyboard layout from the entries in the Layout List window.
The keyboard display graphic is updated to show the available input keys.
Use the soft keyboard to enter keyboard characters on the guest.
Modifier keys such as Shift, Ctrl, and Alt are available on the soft keyboard. Click once to select the modifier key, click twice to lock the modifier key.
The Reset the Keyboard and Release All Keys icon can be used to release all pressed modifier keys, both on the host and the guest.
To change the look of the soft keyboard, click the Settings icon in the toolbar. You can change colors used in the keyboard graphic, and can hide or show sections of the keyboard, such as the NumPad or multimedia keys.
You can use one of the supplied default keyboard layouts as the starting point to create a custom keyboard layout.
Note
To permananently save a custom keyboard layout, you must save it to a file. Otherwise, any changes you make are discarded when you close down the Soft Keyboard window.
Custom keyboard layouts that you save are stored as an XML
file on the host, in the keyboardLayouts
folder in the global configuration data directory. For
example, in
$HOME/.config/VirtualBox/keyboardLayouts
on a Linux host.
Display the Layout List.
Click the Layout List icon in the toolbar of the soft keyboard window.
Make a copy of an existing keyboard layout.
Highlight the required layout and click the Copy the Selected Layout icon.
A new layout entry with a name suffix of
-Copyis created.Edit the new keyboard layout.
Highlight the new layout in the Layout List and click the Edit the Selected Layout icon.
Enter a new name for the layout.
Edit keys in the new layout. Click on the key that you want to edit and enter new key captions in the Captions fields.
The keyboard graphic is updated with the new captions.
(Optional) Save the layout to a file. This means that your custom keyboard layout will be available for future use.
Highlight the new layout in the Layout List and click the Save the Selected Layout into File icon.
Any custom layouts that you create can later be removed from the Layout List, by highlighting and clicking the Delete the Selected Layout icon.
VirtualBox Manager includes the following tools for viewing runtime information and changing the configuration of virtual machines.
VM Activity Overview. Displays an overview of performance metrics for all running VMs.
Session Information Dialog. Displays configuration and runtime information for the selected guest system.
The VM Activity Overview tool displays several performance metrics for all running virtual machines and for the host system. This provides an overview of system resources used by individual virtual machines and the host system.
To display the VM Activity Overview tool, do the following:
Go to the global Tools menu and click Activities. The VM Activity Overview window is shown.

To show metrics for all virtual machines, including those that are not running, right-click on the list of virtual machines and select List All Virtual Machines.
To configure the set of metrics to be shown, click Columns in the toolbar. You can then sort the list of virtual machines by a particular metric.
To see more performance information for a virtual machine, select the VM name and click VM Activity in the toolbar. The VM Activity tab of the Session Information dialog is shown, see Section 1.20.2, “Session Information Dialog”.
The Session Information dialog includes multiple tabs which show important configuration and runtime information for the guest system. The tabs of the dialog are as follows:
Configuration Details. Displays the system configuration of the virtual machine in a tabular format. The displayed information includes details such as storage configuration and audio settings.
Runtime Information. Displays runtime information for the guest session in a tabular format similar to the Configuration Details tab.
VM Activity. Includes several time series charts which monitor guest resource usage including CPU, RAM, Disk I/O, and Network. Note that the RAM chart requires the Guest Additions to be running on the guest system. The VM Activity tab can also be accessed directly from the VM Activity Overview tool. See Section 1.20.1, “VM Activity Overview”.
Guest Control. Details of processes used by the Guest Control File Manager. See Section 4.8, “Guest Control File Manager”.
To display the Session Information dialog, select Machine, Session Information in the guest VM.

Every time you start up a VM, Oracle VM VirtualBox creates a log file that records system configuration and events. The Log Viewer is a VirtualBox Manager tool that enables you to view and analyze system logs.
To display the Log Viewer, do either of the following:
Click the VM name in the machine list and select Logs from the machine tools menu.
In the guest VM, select Machine, Show Log.
Log messages for the VM are displayed in tabs in the Log Viewer window. See Section 12.1.2, “Collecting Debugging Information” for details of the various log files generated by Oracle VM VirtualBox.
If you select multiple VMs in the machine list, logs are listed for each VM.
The toolbar of the Log Viewer includes the following options:
Save: Exports the contents of the selected log file to a text file. Specify the destination filename and location in the displayed dialog.
Find: Searches for a text string in the log file.
Filter: Uses filter terms to display specific types of log messages. Common log message terms used by Oracle VM VirtualBox, such as Audio and NAT, are included by default. Select one or more terms from the drop-down list. To add your own filter term, enter the text string in the text box field.
Bookmark: Saves the location of a log message, enabling you to find it quickly. To create a bookmark, either click on the line number, or select some text and then click Bookmark.
Options: Configures the text display used in the log message window.
Refresh: Refreshes the log file you are currently viewing. Only log messages in the current tab are updated.
Reload: Refreshes all log files. Log messages in every tab are updated.
Settings: Displays the Settings window for the VM, enabling you to make configuration changes.
Discard: For a running VM, discards the saved state for the VM and closes it down.
Show/Start: For a running VM, Show displays the VM window. For a stopped VM, Start displays options for powering up the VM.
Table of Contents
As installation of Oracle VM VirtualBox varies depending on your host operating system, the following sections provide installation instructions for Windows, macOS, Linux, and Oracle Solaris.
For the various versions of Windows that are supported as host operating systems, please refer to Section 1.4, “Supported Host Operating Systems”.
In addition, Windows Installer must be present on your system. This should be the case for all supported Windows platforms.
The installation directory on Windows hosts must meet certain security requirements, in order to be accepted by the Windows installer.
This also applies for upgrades of Oracle VM VirtualBox.
For example, when installing Oracle VM VirtualBox into a custom location at X:\Data\MyPrograms\Oracle VM VirtualBox, all parent directories of this path (namely X:\Data and X:\Data\MyPrograms) have to meet the following Discretionary Access Control List (DACL):
          Users               S-1-5-32-545:(OI)(CI)(RX)
          Users               S-1-5-32-545:(DE,WD,AD,WEA,WA)
          Authenticated Users S-1-5-11:(OI)(CI)(RX)
          Authenticated Users S-1-5-11:(DE,WD,AD,WEA,WA)
Directory inheritance must also be disabled for all parent directories.
You can use the icacls Windows command line tool to meet the security requirements. For example:
          icacls <Directory> /reset /t /c
          icacls <Directory> /inheritance:d /t /c
          icacls <Directory> /grant *S-1-5-32-545:(OI)(CI)(RX)
          icacls <Directory> /deny  *S-1-5-32-545:(DE,WD,AD,WEA,WA)
          icacls <Directory> /grant *S-1-5-11:(OI)(CI)(RX)
          icacls <Directory> /deny  *S-1-5-11:(DE,WD,AD,WEA,WA)
Note that these commands must be repeated for all parent directories (X:\Data and X:\Data\MyPrograms in this example).
The Oracle VM VirtualBox installation can be started in either of the following ways:
By double-clicking on the executable file.
By entering the following command:
VirtualBox-<version>-<revision>-Win.exe -extract
This will extract the installer into a temporary directory, along with the .MSI file. Run the following command to perform the installation:
msiexec /i VirtualBox-<version>-<revision>-Win.msi
Using either way displays the installation Welcome dialog and enables you to choose where to install Oracle VM VirtualBox, and which components to install. In addition to the Oracle VM VirtualBox application, the following components are available:
USB support. This package contains special drivers for your Windows host that Oracle VM VirtualBox requires to fully support USB devices inside your virtual machines.
Networking. This package contains extra networking drivers for your Windows host that Oracle VM VirtualBox needs to support Bridged Networking. This enables your VM's virtual network cards to be accessed from other machines on your physical network.
Python support. This package contains Python scripting support for the Oracle VM VirtualBox API, see Chapter 11, Oracle VM VirtualBox Programming Interfaces. For this to work, an already working Windows Python installation on the system is required.
See, for example: http://www.python.org/download/windows/.
Note
Python version at least 2.6 is required. Python 3 is also supported.
Depending on your Windows configuration, you may see warnings about unsigned drivers, or similar. Click Continue for these warnings, as otherwise Oracle VM VirtualBox might not function correctly after installation.
The installer will create an Oracle VM VirtualBox group in the Windows Start menu, which enables you to launch the application and access its documentation.
With standard settings, Oracle VM VirtualBox will be installed for all users on the local system. If this is not wanted, you must invoke the installer by first extracting as follows:
VirtualBox.exe -extract
Then, run either of the following commands on the extracted .MSI file. This will install Oracle VM VirtualBox only for the current user.
VirtualBox.exe -msiparams ALLUSERS=2
msiexec /i VirtualBox-<version>-Win.msi ALLUSERS=2
If you do not want to install all features of Oracle VM VirtualBox,
you can set the optional ADDLOCAL parameter
to explicitly name the features to be installed. The following
features are available:
- VBoxApplication
Main binaries of Oracle VM VirtualBox.
Note
This feature must not be absent, since it contains the minimum set of files to have working Oracle VM VirtualBox installation.
- VBoxUSB
USB support.
- VBoxNetwork
All networking support. This includes the VBoxNetworkFlt and VBoxNetworkAdp features.
- VBoxNetworkFlt
Bridged networking support.
- VBoxNetworkAdp
Host-only networking support
- VBoxPython
Python support
For example, to only install USB support along with the main binaries, run either of the following commands:
VirtualBox.exe -msiparams ADDLOCAL=VBoxApplication,VBoxUSB
msiexec /i VirtualBox-<version>-Win.msi ADDLOCAL=VBoxApplication,VBoxUSB
The user is able to choose between NDIS5 and NDIS6 host network
filter drivers during the installation. This is done using a
command line parameter, NETWORKTYPE. The
NDIS6 driver is the default for most supported Windows hosts.
For some legacy Windows versions, the installer will
automatically select the NDIS5 driver and this cannot be
changed.
You can force an install of the legacy NDIS5 host network filter
driver by specifying NETWORKTYPE=NDIS5. For
example, to install the NDIS5 driver on Windows 7 use either of
the following commands:
VirtualBox.exe -msiparams NETWORKTYPE=NDIS5
msiexec /i VirtualBox-<version>-Win;.msi NETWORKTYPE=NDIS5
As Oracle VM VirtualBox uses the standard Microsoft Windows installer, Oracle VM VirtualBox can be safely uninstalled at any time. Click the program entry in the Add/Remove Programs list in the Windows Control Panel.
Unattended installations can be performed using the standard MSI support.
Public properties can be specified with the MSI API, to control additional behavior and features of the Windows host installer. Use either of the following commands:
VirtualBox.exe -msiparams NAME=VALUE [...]
msiexec /i VirtualBox-<version>-Win.msi NAME=VALUE [...]
The following public properties are available.
VBOX_INSTALLDESKTOPSHORTCUT
Specifies whether or not an Oracle VM VirtualBox icon on the desktop should be created.
Set to
1to enable,0to disable. Default is 1.VBOX_INSTALLQUICKLAUNCHSHORTCUT
Specifies whether or not an Oracle VM VirtualBox icon in the Quick Launch Bar should be created.
Set to
1to enable,0to disable. Default is 1.VBOX_REGISTERFILEEXTENSIONS
Specifies whether or not the file extensions .vbox, .vbox-extpack, .ovf, .ova, .vdi, .vmdk, .vhd and .vdd should be associated with Oracle VM VirtualBox. Files of these types then will be opened with Oracle VM VirtualBox.
Set to
1to enable,0to disable. Default is 1.VBOX_START
Specifies whether to start Oracle VM VirtualBox right after successful installation.
Set to
1to enable,0to disable. Default is 1.
For macOS hosts, Oracle VM VirtualBox ships in a
dmg disk image file. Perform the following
steps to install on a macOS host:
Double-click on the
dmgfile, to mount the contents.A window opens, prompting you to double-click on the
VirtualBox.pkginstaller file displayed in that window.This starts the installer, which enables you to select where to install Oracle VM VirtualBox.
An Oracle VM VirtualBox icon is added to the
Applicationsfolder in the Finder.
To uninstall Oracle VM VirtualBox, open the disk image
dmg file and double-click on the uninstall
icon shown.
To perform a non-interactive installation of Oracle VM VirtualBox you can use the command line version of the installer application.
Mount the dmg disk image file, as described
in the installation procedure, or use the following command
line:
hdiutil attach /path/to/VirtualBox-xyz.dmg
Open a terminal session and run the following command:
sudo installer -pkg /Volumes/VirtualBox/VirtualBox.pkg -target /Volumes/Macintosh\ HD
For the various versions of Linux that are supported as host operating systems, see Section 1.4, “Supported Host Operating Systems”.
You may need to install the following packages on your Linux system before starting the installation. Some systems will do this for you automatically when you install Oracle VM VirtualBox.
Qt 5.3.2 or later. Qt 5.6.2 or later is recommended.
SDL 1.2.7 or later. This graphics library is typically called
libsdlor similar.
Note
These packages are only required if you want to run the Oracle VM VirtualBox graphical user interfaces. In particular, VirtualBox, the graphical VirtualBox Manager, requires both Qt and SDL. If you only want to run VBoxHeadless, neither Qt nor SDL are required.
In order to run other operating systems in virtual machines alongside your main operating system, Oracle VM VirtualBox needs to integrate very tightly with your system. To do this it installs a driver module called vboxdrv into the system kernel. The kernel is the part of the operating system which controls your processor and physical hardware. Without this kernel module, you can still use VirtualBox Manager to configure virtual machines, but they will not start.
Network drivers called vboxnetflt and vboxnetadp are also installed. They enable virtual machines to make more use of your computer's network capabilities and are needed for any virtual machine networking beyond the basic NAT mode.
Since distributing driver modules separately from the kernel is not something which Linux supports well, the Oracle VM VirtualBox install process creates the modules on the system where they will be used. This means that you may need to install some software packages from the distribution which are needed for the build process. Required packages may include the following:
GNU compiler (GCC)
GNU Make (make)
Kernel header files
Also ensure that all system updates have been installed and that your system is running the most up-to-date kernel for the distribution.
Note
The running kernel and the kernel header files must be updated to matching versions.
The following list includes some details of the required files for some common distributions. Start by finding the version name of your kernel, using the command uname -r in a terminal. The list assumes that you have not changed too much from the original installation, in particular that you have not installed a different kernel type.
With Debian and Ubuntu-based distributions, you must install the correct version of the
linux-headers, usually whichever oflinux-headers-generic,linux-headers-amd64,linux-headers-i686orlinux-headers-i686-paebest matches the kernel version name. Also, thelinux-kbuildpackage if it exists. Basic Ubuntu releases should have the correct packages installed by default.On Fedora, Red Hat, Oracle Linux and many other RPM-based systems, the kernel version sometimes has a code of letters or a word close to the end of the version name. For example "uek" for the Oracle Unbreakable Enterprise Kernel or "default" or "desktop" for the standard kernels. In this case, the package name is
kernel-uek-develor equivalent. If there is no such code, it is usuallykernel-devel.On some SUSE and openSUSE Linux versions, you may need to install the
kernel-sourceandkernel-symspackages.
If you suspect that something has gone wrong with module installation, check that your system is set up as described above and try running the following command, as root:
rcvboxdrv setup
If you are running on a system using UEFI (Unified Extensible Firmware Interface) Secure Boot, you may need to sign the following kernel modules before you can load them:
vboxdrv
vboxnetadp
vboxnetflt
vboxpci
See your system documentation for details of the kernel module signing process.
Oracle VM VirtualBox is available in a number of package formats native to various common Linux distributions. See Section 1.4, “Supported Host Operating Systems”. In addition, there is an alternative generic installer (.run) which you can use on supported Linux distributions.
Download the appropriate package for your distribution. The following example assumes that you are installing to a 64-bit Ubuntu Xenial system. Use dpkg to install the Debian package,as follows:
sudo dpkg -i virtualbox-version-number_Ubuntu_xenial_amd64.deb
The installer will also try to build kernel modules suitable
for the current running kernel. If the build process is not
successful you will be shown a warning and the package will be
left unconfigured. Look at
/var/log/vbox-install.log to find out why
the compilation failed. You may have to install the
appropriate Linux kernel headers, see
Section 2.3.2, “The Oracle VM VirtualBox Kernel Modules”. After correcting any
problems, run the following command:
sudo rcvboxdrv setup
This will start a second attempt to build the module.
If a suitable kernel module was found in the package or the module was successfully built, the installation script will attempt to load that module. If this fails, please see Section 12.7.1, “Linux Kernel Module Refuses to Load” for further information.
Once Oracle VM VirtualBox has been successfully installed and configured, you can start it by clicking VirtualBox in your Start menu or from the command line. See Section 2.3.5, “Starting Oracle VM VirtualBox on Linux”.
The alternative generic installer performs the following steps:
Unpacks the application files to the target directory
/opt/VirtualBox/, which cannot be changed.Builds and installs the Oracle VM VirtualBox kernel modules: vboxdrv, vboxnetflt, and vboxnetadp.
Creates
/sbin/rcvboxdrv, an init script to start the Oracle VM VirtualBox kernel module.Creates a new system group called
vboxusers.Creates symbolic links in
/usr/binto a shell script/opt/VirtualBox/VBoxwhich does some sanity checks and dispatches to the actual executables: VirtualBox, VBoxVRDP, VBoxHeadless and VBoxManage.Creates
/etc/udev/rules.d/60-vboxdrv.rules, a description file for udev, if that is present, which makes the USB devices accessible to all users in thevboxusersgroup.Writes the installation directory to
/etc/vbox/vbox.cfg.
The installer must be executed as root with either
install or uninstall as
the first parameter. For example:
sudo ./VirtualBox.run install
Or if you do not have the sudo command available, run the following as root instead:
./VirtualBox.run install
Add every user who needs to access USB devices from a
VirtualBox guests to the group vboxusers.
Either use the OS user management tools or run the following
command as root:
sudo usermod -a -G vboxusers username
Note
The usermod command of some older Linux
distributions does not support the -a
option, which adds the user to the given group without
affecting membership of other groups. In this case, find out
the current group memberships with the
groups command and add all these groups
in a comma-separated list to the command line after the
-G option. For example: usermod -G
group1,group2,vboxusers
username.
If you cannot use the shell script installer described in Section 2.3.3.2, “Using the Alternative Generic Installer (VirtualBox.run)”, you can perform a manual installation. Run the installer as follows:
./VirtualBox.run --keep --noexec
This will unpack all the files needed for installation in the
directory install under the current
directory. The Oracle VM VirtualBox application files are contained
in VirtualBox.tar.bz2 which you can
unpack to any directory on your system. For example:
sudo mkdir /opt/VirtualBox
sudo tar jxf ./install/VirtualBox.tar.bz2 -C /opt/VirtualBox
To run the same example as root, use the following commands:
mkdir /opt/VirtualBox
tar jxf ./install/VirtualBox.tar.bz2 -C /opt/VirtualBox
The sources for Oracle VM VirtualBox's kernel module are provided in
the src directory. To build the module,
change to the directory and use the following command:
make
If everything builds correctly, run the following command to install the module to the appropriate module directory:
sudo make install
In case you do not have sudo, switch the user account to root and run the following command:
make install
The Oracle VM VirtualBox kernel module needs a device node to
operate. The above make command will tell
you how to create the device node, depending on your Linux
system. The procedure is slightly different for a classical
Linux setup with a /dev directory, a
system with the now deprecated devfs and a
modern Linux system with udev.
On certain Linux distributions, you might experience difficulties building the module. You will have to analyze the error messages from the build system to diagnose the cause of the problems. In general, make sure that the correct Linux kernel sources are used for the build process.
Note that the /dev/vboxdrv kernel module
device node must be owned by root:root and must be
read/writable only for the user.
Next, you install the system initialization script for the kernel module and activate the initialization script using the right method for your distribution, as follows:
cp /opt/VirtualBox/vboxdrv.sh /sbin/rcvboxdrv
This example assumes you installed Oracle VM VirtualBox to the
/opt/VirtualBox directory.
Create a configuration file for Oracle VM VirtualBox, as follows:
mkdir /etc/vbox
echo INSTALL_DIR=/opt/VirtualBox > /etc/vbox/vbox.cfg
Create the following symbolic links:
ln -sf /opt/VirtualBox/VBox.sh /usr/bin/VirtualBox
ln -sf /opt/VirtualBox/VBox.sh /usr/bin/VBoxManage
ln -sf /opt/VirtualBox/VBox.sh /usr/bin/VBoxHeadless
Before updating or uninstalling Oracle VM VirtualBox, you must terminate any virtual machines which are currently running and exit the Oracle VM VirtualBox or VBoxSVC applications. To update Oracle VM VirtualBox, simply run the installer of the updated version. To uninstall Oracle VM VirtualBox, run the installer as follows:
sudo ./VirtualBox.run uninstall
As root, you can use the following command:
./VirtualBox.run uninstall
You can uninstall the .run package as follows:
/opt/VirtualBox/uninstall.sh
To manually uninstall Oracle VM VirtualBox, perform the manual installation steps in reverse order.
The Debian packages will request some user feedback when
installed for the first time. The debconf system is used to
perform this task. To prevent any user interaction during
installation, default values can be defined. A file
vboxconf can contain the following debconf
settings:
virtualbox virtualbox/module-compilation-allowed boolean true
virtualbox virtualbox/delete-old-modules boolean true
The first line enables compilation of the vboxdrv kernel module if no module was found for the current kernel. The second line enables the package to delete any old vboxdrv kernel modules compiled by previous installations.
These default settings can be applied prior to the installation of the Oracle VM VirtualBox Debian package, as follows:
debconf-set-selections vboxconf
In addition there are some common configuration options that can be set prior to the installation. See Section 2.3.3.7, “Automatic Installation Options”.
The RPM format does not provide a configuration system comparable to the debconf system. See Section 2.3.3.7, “Automatic Installation Options” for how to set some common installation options provided by Oracle VM VirtualBox.
To configure the installation process for .deb and .rpm
packages, you can create a response file named
/etc/default/virtualbox. The automatic
generation of the udev rule can be prevented with the
following setting:
INSTALL_NO_UDEV=1
The creation of the group vboxusers can be prevented as follows:
INSTALL_NO_GROUP=1
If the following line is specified, the package installer will not try to build the vboxdrv kernel module if no module fitting the current kernel was found.
INSTALL_NO_VBOXDRV=1
The Linux installers create the system user group
vboxusers during installation. Any system
user who is going to use USB devices from Oracle VM VirtualBox guests
must be a member of that group. A user can be made a member of
the group vboxusers either by using the
desktop user and group tools, or with the following command:
sudo usermod -a -G vboxusers username
The easiest way to start an Oracle VM VirtualBox program is by running the program of your choice (VirtualBox, VBoxManage, or VBoxHeadless) from a terminal. These are symbolic links to VBox.sh that start the required program for you.
The following detailed instructions should only be of interest
if you wish to execute Oracle VM VirtualBox without installing it
first. You should start by compiling the
vboxdrv kernel module and inserting it into
the Linux kernel. Oracle VM VirtualBox consists of a service daemon,
VBoxSVC, and several application programs.
The daemon is automatically started if necessary. All
Oracle VM VirtualBox applications will communicate with the daemon
through UNIX local domain sockets. There can be multiple daemon
instances under different user accounts and applications can
only communicate with the daemon running under the user account
as the application. The local domain socket resides in a
subdirectory of your system's directory for temporary files
called .vbox-<username>-ipc. In case
of communication problems or server startup problems, you may
try to remove this directory.
All Oracle VM VirtualBox applications (VirtualBox, VBoxManage, and VBoxHeadless) require the Oracle VM VirtualBox directory to be in the library path, as follows:
LD_LIBRARY_PATH=. ./VBoxManage showvminfo "Windows XP"
For the specific versions of Oracle Solaris that are supported as host operating systems, see Section 1.4, “Supported Host Operating Systems”.
If you have a previously installed instance of Oracle VM VirtualBox on your Oracle Solaris host, please uninstall it first before installing a new instance. See Section 2.4.4, “Uninstallation” for uninstall instructions.
Oracle VM VirtualBox is available as a standard Oracle Solaris package. Download the Oracle VM VirtualBox SunOS package, which includes the 64-bit version of Oracle VM VirtualBox. The installation must be performed as root and from the global zone. This is because the Oracle VM VirtualBox installer loads kernel drivers, which cannot be done from non-global zones. To verify which zone you are currently in, execute the zonename command.
To start installation, run the following commands:
gunzip -cd VirtualBox-version-number-SunOS.tar.gz | tar xvf -The Oracle VM VirtualBox kernel package is integrated into the main package. Install the Oracle VM VirtualBox package as follows:
pkgadd -d VirtualBox-version-number-SunOS.pkgThe installer will then prompt you to enter the package you wish to install. Choose 1 or all and proceed. Next the installer will ask you if you want to allow the postinstall script to be executed. Choose y and proceed, as it is essential to execute this script which installs the Oracle VM VirtualBox kernel module. Following this confirmation the installer will install Oracle VM VirtualBox and execute the postinstall setup script.
Once the postinstall script has been executed your installation
is now complete. You may now safely delete the uncompressed
package and autoresponse files from your
system. Oracle VM VirtualBox is installed in
/opt/VirtualBox.
Note
If you need to use Oracle VM VirtualBox from non-global zones, see Section 2.4.6, “Configuring a Non-Global Zone for Running Oracle VM VirtualBox”.
The installer creates the system user group
vboxuser during installation for Oracle
Solaris hosts that support the USB features required by
Oracle VM VirtualBox. Any system user who is going to use USB devices
from Oracle VM VirtualBox guests must be a member of this group. A
user can be made a member of this group either by using the
desktop user and group tools or by running the following command
as root:
usermod -G vboxuser username
Note that adding an active user to the
vboxuser group will require the user to log
out and then log in again. This should be done manually after
successful installation of the package.
The easiest way to start an Oracle VM VirtualBox program is by running the program of your choice (VirtualBox, VBoxManage, or VBoxHeadless) from a terminal. These are symbolic links to VBox.sh that start the required program for you.
Alternatively, you can directly invoke the required programs
from /opt/VirtualBox. Using the links
provided is easier as you do not have to enter the full path.
You can configure some elements of the VirtualBox Qt GUI, such as fonts and colours, by running VBoxQtconfig from the terminal.
Uninstallation of Oracle VM VirtualBox on Oracle Solaris requires root permissions. To perform the uninstallation, start a root terminal session and run the following command:
pkgrm SUNWvbox
After confirmation, this will remove Oracle VM VirtualBox from your system.
To perform a non-interactive installation of Oracle VM VirtualBox
there is a response file named
autoresponse. The installer uses this for
responses to inputs, rather than prompting the user.
Extract the tar.gz package as described in Section 2.4.1, “Performing the Installation”. Then open a root terminal session and run the following command:
pkgadd -d VirtualBox-version-number-SunOS-x86 -n -a autoresponse SUNWvboxTo perform a non-interactive uninstallation, open a root terminal session and run the following command:
pkgrm -n -a /opt/VirtualBox/autoresponse SUNWvbox
After installing Oracle VM VirtualBox in the global zone (see Section 2.4, “Installing on Oracle Solaris Hosts” for the installation instructions) the first step required to run Oracle VM VirtualBox in a non-global zone is to modify the zone's configuration to be able to access the Oracle VM VirtualBox device nodes located in the global zone. This is done by performing the following steps as a zone administrator in the global zone.
global$ zonecfg -z vboxzone
Replace vboxzone with the name of the
non-global zone where you plan to run Oracle VM VirtualBox.
Use zonecfg(8) to add the
device resource and the match
property for each Oracle VM VirtualBox device node in the global zone to
the non-global zone as follows:
zonecfg:vboxzone> add device
zonecfg:vboxzone:device> set match=/dev/vboxdrv
zonecfg:vboxzone:device> end
zonecfg:vboxzone> add device
zonecfg:vboxzone:device> set match=/dev/vboxdrvu
zonecfg:vboxzone:device> end
zonecfg:vboxzone> exit
On Oracle Solaris 11 if you plan to use VMs configured to use a USB device, e.g. a USB
pointing device or a USB pass-through device, you should also pass through the
/dev/vboxusbmon device using the steps above.
Oracle Solaris 11 doesn't support sparse root zones so you will need to
loopback mount /opt/VirtualBox from the
global zone into the non-global zone at the same path. This is
done using zonecfg(8) to set the dir
attribute and the special attribute for this directory.
For example:
zonecfg:vboxzone> add fs
zonecfg:vboxzone:fs> set dir=/opt/VirtualBox
zonecfg:vboxzone:fs> set special=/opt/VirtualBox
zonecfg:vboxzone:fs> set type=lofs
zonecfg:vboxzone:fs> add options [readonly]
zonecfg:vboxzone:fs> end
zonecfg:vboxzone>exit
After making the above changes using zonecfg(8), reboot the zone using zoneadm(8) as follows:
global$ zoneadm -z vboxzone rebootfor the changes to take effect. You will then be able to run Oracle VM VirtualBox from /opt/VirtualBox within the configured non-global zone.
Extension packs provide extra functionality to the Oracle VM VirtualBox base package, such as extended USB device support and cloud integration features. See Section 1.5, “Installing Oracle VM VirtualBox and Extension Packs”.
To install an Oracle VM VirtualBox extension pack, do the following:
Double-click on the extension package file name.
Oracle VM VirtualBox extension packs have a
.vbox-extpackfile name extension.Follow the on-screen instructions to install the extension pack.
You can also use the Extension Pack Manager tool to install an extension pack. See Section 2.5.1, “The Extension Pack Manager”.
Extension packs can be installed and managed using the Extension Pack Manager tool in VirtualBox Manager.
The Extension Pack Manager lists the extension packs that are currently installed on the host, and enables you to install and uninstall extension packs.
To display the Extension Pack Manager, go to the global Tools menu and click Extensions. The Extension Pack Manager is shown.
To install an extension pack using the Extension Pack Manager, click Install and select an extension package file. The extension pack is installed on the host and listed in Extension Pack Manager.
To uninstall an extension pack with the Extension Pack Manager, do the following:
Select the extension pack in the Extension Pack Manager window and click Uninstall.
Click Remove in the prompt dialog.
The extension pack is uninstalled from the host and removed from the Extension Pack Manager.
Alternatively, you can use the VBoxManage command line to install and manage Oracle VM VirtualBox extension packs. See Section 8.52, “VBoxManage extpack”.
Table of Contents
- 3.1. Supported Guest Operating Systems
- 3.2. Unattended Guest Installation
- 3.3. Emulated Hardware
- 3.4. General Settings
- 3.5. System Settings
- 3.6. Display Settings
- 3.7. Storage Settings
- 3.8. Audio Settings
- 3.9. Network Settings
- 3.10. Serial Ports
- 3.11. USB Support
- 3.12. Shared Folders
- 3.13. User Interface
- 3.14. Alternative Firmware (EFI)
This chapter provides detailed steps for configuring an Oracle VM VirtualBox virtual machine (VM). For an introduction to Oracle VM VirtualBox and steps to get your first virtual machine running, see Chapter 1, First Steps.
You have considerable latitude when deciding what virtual hardware to provide to the guest. Use virtual hardware to communicate with the host system or with other guests. For example, you can use virtual hardware in the following ways:
Have Oracle VM VirtualBox present an ISO CD-ROM image to a guest system as if it were a physical CD-ROM.
Provide a guest system access to the physical network through its virtual network card.
Provide the host system, other guests, and computers on the Internet access to the guest system.
Because Oracle VM VirtualBox is designed to provide a generic virtualization environment for x86 systems, it can run guest operating systems (OSes) of any kind.
The following guest OS platforms are supported:
Platforms With Full Support. These guest OS platforms qualify for Oracle Premier Support. See Table 3.1, “Guest Operating Systems With Full Support”.
Platforms With Limited Support. These legacy guest OS platforms can be used with Oracle VM VirtualBox, but only qualify for best effort support. Therefore, resolution of customer issues is not guaranteed. See Table 3.2, “Legacy Guest Operating Systems With Limited Support”.
Table 3.1. Guest Operating Systems With Full Support
Operating System | Comments |
|---|---|
Windows 11 (64-bit) | Insider preview builds are not supported |
Windows 10 (32-bit and 64-bit) | Insider preview builds are not supported |
Windows 8 and 8.1 (32-bit and 64-bit) | |
Windows Server 2019 (64-bit) | |
Windows Server 2016 (64-bit) | |
Windows Server 2012 and 2012 R2 (64-bit) | |
Solaris 11 (32-bit and 64-bit) | |
Solaris 10 8/11 Update 10 and later (32-bit and 64-bit) | |
Oracle Linux 8 (64-bit) | Includes Red Hat Enterprise Linux 8, CentOS 8 |
Oracle Linux 7 (64-bit) | Includes Red Hat Enterprise Linux 7, CentOS 7 |
Oracle Linux 6 (32-bit and 64-bit) | Includes Red Hat Enterprise Linux 6, CentOS 6 |
Ubuntu 16.04 LTS (Xenial Xerus) (32-bit and 64-bit) | |
Ubuntu 18.04 LTS (Bionic Beaver) (64-bit) | |
Ubuntu 20.04 LTS (Focal Fossa) (64-bit) | |
SUSE Linux Enterprise Server 15 (64-bit) | |
SUSE Linux Enterprise Server 12 (64-bit) |
Table 3.2. Legacy Guest Operating Systems With Limited Support
Operating System | Comments |
|---|---|
Windows 7 (32-bit and 64-bit) | |
Windows Vista SP2 and later (32-bit and 64-bit) | |
Windows XP (32-bit) | |
Windows Vista (32-bit) | |
Windows Server 2008 and 2008 R2 (32-bit and 64-bit) | |
Windows Server 2003 (32-bit and 64-bit) | |
Oracle Linux 5 (32-bit and 64-bit) | Includes Red Hat Enterprise Linux 5, CentOS 5 |
Ubuntu 14.04.5 LTS (Trusty Tahr) (32-bit and 64-bit) | |
OS/2 Warp 4.5 |
Oracle VM VirtualBox enables you to install and execute unmodified versions of Mac OS X guests on supported host hardware. Note that this feature is experimental and thus unsupported.
Oracle VM VirtualBox is the first product to provide the modern PC architecture expected by OS X without requiring any of the modifications used by competing virtualization solutions. For example, some competing solutions perform modifications to the Mac OS X install DVDs, such as a different boot loader and replaced files.
Be aware of the following important issues before you attempt to install a Mac OS X guest:
Mac OS X is commercial, licensed software and contains both license and technical restrictions that limit its use to certain hardware and usage scenarios. You must understand and comply with these restrictions.
In particular, Apple prohibits the installation of most versions of Mac OS X on non-Apple hardware.
These license restrictions are also enforced on a technical level. Mac OS X verifies that it is running on Apple hardware. Most DVDs that accompany Apple hardware check for the exact model. These restrictions are not circumvented by Oracle VM VirtualBox and continue to apply.
Only CPUs that are known and tested by Apple are supported. As a result, if your Intel CPU is newer than the Mac OS X build, or if you have a non-Intel CPU, you will likely encounter a panic during bootup with an "Unsupported CPU" exception.
Ensure that you use the Mac OS X DVD that comes with your Apple hardware.
The Mac OS X installer expects the hard disk to be partitioned. So, the installer will not offer a partition selection to you. Before you can install the software successfully, start the Disk Utility from the Tools menu and partition the hard disk. Close the Disk Utility and proceed with the installation.
In addition, Mac OS X support in Oracle VM VirtualBox is an experimental feature. See Chapter 14, Known Limitations.
Warning
Be sure to enable I/O APIC for virtual machines that you intend to use in 64-bit mode. This is especially true for 64-bit Windows VMs. See Section 3.5.1, “Motherboard Tab”. For 64-bit Windows guests, ensure that the VM uses the Intel networking device because there is no 64-bit driver support for the AMD PCNet card. See Section 6.1, “Virtual Networking Hardware”.
If you use the Create VM wizard of VirtualBox Manager, Oracle VM VirtualBox automatically uses the correct settings for each selected 64-bit OS type. See Section 1.8, “Creating Your First Virtual Machine”.
Oracle VM VirtualBox can install a guest OS automatically. You only need to provide the installation medium and a few other parameters, such as the name of the default user.
You can perform an unattended guest installation in the following ways:
Use the Create Virtual Machine wizard. An optional step in the wizard enables you to configure unattended installation. You can specify the default user credentials for the guest OS and also whether to install the Guest Additions automatically. See Section 1.8, “Creating Your First Virtual Machine”.
During this step, Oracle VM VirtualBox scans the installation medium and changes certain parameters to ensure a seamless installation as a guest running on Oracle VM VirtualBox.
Use the VBoxManage commands. Section 3.2.1, “Using VBoxManage Commands for Unattended Guest Installation” describes how to perform an unattended guest installation for an Oracle Linux guest.
When you first start a VM that has been configured for unattended installation, the guest OS installation is performed automatically.
The installation operation changes the boot device order to boot the virtual hard disk first and then the virtual DVD drive. If the virtual hard disk is empty prior to the automatic installation, the VM boots from the virtual DVD drive and begins the installation.
If the virtual hard disk contains a bootable OS, the installation operation exits. In this case, change the boot device order manually by pressing F12 during the BIOS splash screen.
The following example shows how to perform an unattended guest installation for an Oracle Linux VM. The example uses various VBoxManage commands to prepare the guest VM. The VBoxManage unattended install command is then used to install and configure the guest OS.
Create the virtual machine.
# VM="ol7-autoinstall"
# VBoxManage list ostypes
# VBoxManage createvm --name $VM --ostype "Oracle_64" --register
Note the following:
The $VM variable represents the name of the VM.
The VBoxManage list ostypes command lists the guest OSes supported by Oracle VM VirtualBox, including the name used for each OS in the VBoxManage commands.
A 64-bit Oracle Linux 7 VM is created and registered with Oracle VM VirtualBox.
The VM has a unique UUID.
An XML settings file is generated.
Create a virtual hard disk and storage devices for the VM.
# VBoxManage createhd --filename /VirtualBox/$VM/$VM.vdi --size 32768
# VBoxManage storagectl $VM --name "SATA Controller" --add sata --controller IntelAHCI
# VBoxManage storageattach $VM --storagectl "SATA Controller" --port 0 --device 0 \
--type hdd --medium /VirtualBox/$VM/$VM.vdi
# VBoxManage storagectl $VM --name "IDE Controller" --add ide
# VBoxManage storageattach $VM --storagectl "IDE Controller" --port 0 --device 0 \
--type dvddrive --medium /u01/Software/OL/OracleLinux-R7-U6-Server-x86_64-dvd.iso
The previous commands do the following:
Create a 32768 MB virtual hard disk.
Create a SATA storage controller and attach the virtual hard disk.
Create an IDE storage controller for a virtual DVD drive and attach an Oracle Linux installation ISO.
(Optional) Configure some settings for the VM.
# VBoxManage modifyvm $VM --ioapic on
# VBoxManage modifyvm $VM --boot1 dvd --boot2 disk --boot3 none --boot4 none
# VBoxManage modifyvm $VM --memory 8192 --vram 128
The previous commands do the following:
Enable I/O APIC for the motherboard of the VM.
Configure the boot device order for the VM.
Allocate 8192 MB of RAM and 128 MB of video RAM to the VM.
Perform an unattended install of the OS.
# VBoxManage unattended install $VM \ --iso=/u01/Software/OL/OracleLinux-R7-U6-Server-x86_64-dvd.iso \ --user=
login--full-user-name=name--passwordpassword\ --install-additions --time-zone=CETThe previous command does the following:
Specifies an Oracle Linux ISO as the installation ISO.
Specifies a login name, full name, and login password for a default user on the guest OS.
Note that the specified password is also used for the root user account on the guest.
Installs the Guest Additions on the VM.
Sets the time zone for the guest OS to Central European Time (CET).
Start the virtual machine.
This step completes the unattended installation process.
# VBoxManage startvm $VM --type headless
The VM starts in headless mode, which means that the VirtualBox Manager window does not open.
(Optional) Update the guest OS to use the latest Oracle Linux packages.
On the guest VM, run the following command:
# yum update
Oracle VM VirtualBox virtualizes nearly all hardware of the host. Depending on a VM's configuration, the guest will see the following virtual hardware:
Input devices. Oracle VM VirtualBox can emulate a standard PS/2 keyboard and mouse. These devices are supported by most guest OSes.
In addition, Oracle VM VirtualBox can provide virtual USB input devices to avoid having to capture mouse and keyboard, as described in Section 1.9.2, “Capturing and Releasing Keyboard and Mouse”.
Graphics. The default Oracle VM VirtualBox graphics device for Windows guests is an SVGA device. For Linux guests, the default graphics device emulates a VMware SVGA graphics device. See Section 3.6.1, “Screen Tab”.
For legacy guest OSes, a VGA-compatible graphics device is available.
Storage. Oracle VM VirtualBox emulates the most common types of hard disk controllers. See Section 5.1, “Hard Disk Controllers”. Whereas supporting only one of these controllers would be enough for Oracle VM VirtualBox by itself, this multitude of storage adapters is required for compatibility with other hypervisors. Windows is very selective about its boot devices, and migrating VMs between hypervisors is very difficult or impossible if the storage controllers are different.
Networking. See Section 6.1, “Virtual Networking Hardware”.
USB. Oracle VM VirtualBox emulates these types of USB host controllers: xHCI, EHCI, and OHCI. While xHCI handles all USB transfer speeds, some legacy guest OSes may not support xHCI. Note that for some legacy Windows guests, third party drivers must be installed for xHCI support.
Legacy guest OSes typically support OHCI and EHCI. These two controllers are needed because OHCI only handles USB low-speed and full-speed devices (both USB 1.x and 2.0), while EHCI only handles high-speed devices (USB 2.0 only).
The emulated USB controllers do not communicate directly with devices on the host. Instead they communicate with a virtual USB layer which abstracts the USB protocol and enables the use of remote USB devices.
Audio. See Section 3.8, “Audio Settings”.
In the Settings window, under General, you can configure the most fundamental aspects of the virtual machine such as memory and essential hardware. The following tabs are available.
In the Basic tab of the General settings category, you can find these settings:
Name: The name of the the VM, as shown in the list of VMs in the main VirtualBox Manager window. Using this name, Oracle VM VirtualBox also saves the VM's configuration files. If you change the name, Oracle VM VirtualBox renames these files as well. As a result, you can only use characters which are allowed for file names on your host OS.
Note that internally, Oracle VM VirtualBox uses unique identifiers (UUIDs) to identify virtual machines. You can display these using the VBoxManage commands.
Type: The type of the guest OS for the VM. This is the same setting that is specified in the New Virtual Machine wizard. See Section 1.8, “Creating Your First Virtual Machine”.
Whereas the default settings of a newly created VM depend on the selected OS type, changing the type later has no effect on VM settings. This value is purely informational and decorative.
Version: The version of the guest OS for the VM. This is the same setting that is specified in the New Virtual Machine wizard. See Section 1.8, “Creating Your First Virtual Machine”.
The following settings are available in the Advanced tab:
Snapshot Folder: By default, Oracle VM VirtualBox saves snapshot data together with your other Oracle VM VirtualBox configuration data. See Section 10.1, “Where Oracle VM VirtualBox Stores its Files”. With this setting, you can specify any other folder for each VM.
Shared Clipboard: You can select here whether the clipboard of the guest OS should be shared with that of your host. If you select Bidirectional, then Oracle VM VirtualBox will always make sure that both clipboards contain the same data. If you select Host to Guest or Guest to Host, then Oracle VM VirtualBox will only ever copy clipboard data in one direction.
Clipboard sharing requires that the Oracle VM VirtualBox Guest Additions be installed. In such a case, this setting has no effect. See Chapter 4, Guest Additions.
For security reasons, the shared clipboard is disabled by default. This setting can be changed at any time using the Shared Clipboard menu item in the Devices menu of the virtual machine.
Drag and Drop: This setting enables support for drag and drop. Select an object, such as a file, from the host or guest and directly copy or open it on the guest or host. Multiple drag and drop modes for a VM enable restricting of access in either direction.
For drag and drop to work the Guest Additions need to be installed on the guest.
Note
Drag and drop is disabled by default. This setting can be changed at any time using the Drag and Drop menu item in the Devices menu of the virtual machine.
On the Description tab you can enter a description for your virtual machine. This has no effect on the functionality of the machine, but you may find this space useful to note down things such as the configuration of a virtual machine and the software that has been installed into it.
To insert a line break into the Description text field, press Shift+Enter.
The Disk Encryption tab enables you to encrypt disks that are attached to the virtual machine.
To enable disk encryption, select the Enable Disk Encryption check box.
Settings are available to configure the cipher used for encryption and the encryption password.
Note
All files related to the virtual machine except disk images are stored unencrypted. To encrypt these files, use the VBoxManage encryptvm command as described in Section 9.22, “Encryption of VMs”.
The System category groups various settings that are related to the basic hardware that is presented to the virtual machine.
Note
As the activation mechanism of Microsoft Windows is sensitive to hardware changes, if you are changing hardware settings for a Windows guest, some of these changes may trigger a request for another activation with Microsoft.
The following tabs are available.
On the Motherboard tab, you can configure virtual hardware that would normally be on the motherboard of a real computer.
Base Memory: Sets the amount of RAM that is allocated and given to the VM when it is running. The specified amount of memory will be requested from the host OS, so it must be available or made available as free memory on the host when attempting to start the VM and will not be available to the host while the VM is running. This is the same setting that was specified in the New Virtual Machine wizard, as described in Section 1.8, “Creating Your First Virtual Machine”.
Generally, it is possible to change the memory size after installing the guest OS. But you must not reduce the memory to an amount where the OS would no longer boot.
Boot Order: Determines the order in which the guest OS will attempt to boot from the various virtual boot devices. Analogous to a real PC's BIOS setting, Oracle VM VirtualBox can tell a guest OS to start from the virtual floppy, the virtual CD/DVD drive, the virtual hard drive (each of these as defined by the other VM settings), the network, or none of these.
If you select Network, the VM will attempt to boot from a network using the PXE mechanism. This needs to be configured in detail on the command line. See Section 8.10, “VBoxManage modifyvm”.
Chipset: You can select which chipset will be presented to the virtual machine. PIIX3 is the default chipset for most guests. For some guest OSes such as Mac OS X, the PIIX3 chipset is not well supported. As a result, Oracle VM VirtualBox supports an emulation of the ICH9 chipset, which supports PCI express, three PCI buses, PCI-to-PCI bridges and Message Signaled Interrupts (MSI). This enables modern OSes to address more PCI devices and no longer requires IRQ sharing. Using the ICH9 chipset it is also possible to configure up to 36 network cards, compared to a maximum of eight network adapters with PIIX3. Note that ICH9 support is experimental and not recommended for guest OSes which do not require it.
TPM: Enables support for a Trusted Platform Module (TPM) security processor. Choose from the supported TPM versions.
Pointing Device: The default virtual pointing device for some guest OSes is the traditional PS/2 mouse. If set to USB Tablet, Oracle VM VirtualBox reports to the virtual machine that a USB tablet device is present and communicates mouse events to the virtual machine through this device. Another setting is USB Multi-Touch Tablet, which is suitable for guests running Windows 8 or later.
Using the virtual USB tablet has the advantage that movements are reported in absolute coordinates, instead of as relative position changes. This enables Oracle VM VirtualBox to translate mouse events over the VM window into tablet events without having to "capture" the mouse in the guest as described in Section 1.9.2, “Capturing and Releasing Keyboard and Mouse”. This makes using the VM less tedious even if Guest Additions are not installed.
Enable I/O APIC: Advanced Programmable Interrupt Controllers (APICs) are an x86 hardware feature that have replaced Programmable Interrupt Controllers (PICs). With an I/O APIC, OSes can use more than 16 interrupt requests (IRQs) and therefore avoid IRQ sharing for improved reliability.
Note
Enabling the I/O APIC is required, especially for 64-bit Windows guest OSes. It is also required if you want to use more than one virtual CPU in a virtual machine.
However, software support for I/O APICs has been unreliable with some OSes other than Windows. Also, the use of an I/O APIC slightly increases the overhead of virtualization and therefore slows down the guest OS a little.
Warning
All Windows OSes install different kernels, depending on whether an I/O APIC is available. As with ACPI, the I/O APIC therefore must not be turned off after installation of a Windows guest OS. Turning it on after installation will have no effect however.
Hardware Clock in UTC Time: If selected, Oracle VM VirtualBox will report the system time in UTC format to the guest instead of the local (host) time. This affects how the virtual real-time clock (RTC) operates and may be useful for UNIX-like guest OSes, which typically expect the hardware clock to be set to UTC.
Enable EFI: Enables Extensible Firmware Interface (EFI), which replaces the legacy BIOS and may be useful for certain advanced use cases. See Section 3.14, “Alternative Firmware (EFI)”.
Enable Secure Boot: Enables Secure Boot, to provide a secure environment for starting the guest OS.
In addition, you can turn off the Advanced Configuration and Power Interface (ACPI) which Oracle VM VirtualBox presents to the guest OS by default.
ACPI is the current industry standard to allow OSes to recognize hardware, configure motherboards and other devices and manage power. As most computers contain this feature and Windows and Linux support ACPI, it is also enabled by default in Oracle VM VirtualBox. ACPI can only be turned off using the command line. See Section 8.10, “VBoxManage modifyvm”.
Warning
All Windows OSes install different kernels, depending on whether ACPI is available. This means that ACPI must not be turned off after installation of a Windows guest OS. However, turning it on after installation will have no effect.
On the Processor tab, you can configure settings for the CPU used by the virtual machine.
Processor(s): Sets the number of virtual CPU cores the guest OSes can see. Oracle VM VirtualBox supports symmetrical multiprocessing (SMP) and can present up to 32 virtual CPU cores to each virtual machine.
You should not configure virtual machines to use more CPU cores than are available physically. This includes real cores, with no hyperthreads.
Execution Cap: Configures the CPU execution cap. This limits the amount of time a host CPU spends to emulate a virtual CPU. The default setting is 100%, meaning that there is no limitation. A setting of 50% implies a single virtual CPU can use up to 50% of a single host CPU. Note that limiting the execution time of the virtual CPUs may cause guest timing problems.
A warning is displayed at the bottom of the Processor tab if an Execution Cap setting is made that may affect system performance.
Enable PAE/NX: Determines whether the PAE and NX capabilities of the host CPU will be exposed to the virtual machine.
PAE stands for Physical Address Extension. Normally, if enabled and supported by the OS, then even a 32-bit x86 CPU can access more than 4 GB of RAM. This is made possible by adding another 4 bits to memory addresses, so that with 36 bits, up to 64 GB can be addressed. Some OSes, such as Ubuntu Server, require PAE support from the CPU and cannot be run in a virtual machine without it.
Enable Nested VT-x/AMD-V: Enables nested virtualization, with passthrough of hardware virtualization functions to the guest VM.
With virtual machines running modern server OSes, Oracle VM VirtualBox also supports CPU hot-plugging. For details, see Section 9.4, “CPU Hot-Plugging”.
On this tab, you can configure Oracle VM VirtualBox to use hardware virtualization extensions that your host CPU supports.
Paravirtualization Interface: Oracle VM VirtualBox provides paravirtualization interfaces to improve time-keeping accuracy and performance of guest OSes. The options available are documented under the
--paravirt-provideroption in Section 8.10, “VBoxManage modifyvm”. For further details on the paravirtualization providers, see Section 10.5, “Paravirtualization Providers”.Hardware Virtualization: You can configure hardware virtualization features for each virtual machine.
Enable Nested Paging: If the host CPU supports the nested paging (AMD-V) or EPT (Intel VT-x) features, then you can expect a significant performance increase by enabling nested paging in addition to hardware virtualization. For technical details, see Section 10.6, “Nested Paging and VPIDs”. For Intel EPT security recommendations, see Section 13.4.1, “CVE-2018-3646”.
Advanced users may be interested in technical details about hardware virtualization. See Section 10.3, “Hardware Virtualization”.
In most cases, the default settings on the Acceleration tab will work well. Oracle VM VirtualBox selects sensible defaults, depending on the OS that you selected when you created the virtual machine. In certain situations, however, you may want to change the preconfigured defaults.
The following tabs are available for configuring the display for a virtual machine.
Video Memory: Sets the size of the memory provided by the virtual graphics card available to the guest, in MB. As with the main memory, the specified amount will be allocated from the host's resident memory. Based on the amount of video memory, higher resolutions and color depths may be available.
VirtualBox Manager will show a warning if the amount of video memory is too small to be able to switch the VM into full screen mode. The minimum value depends on the number of virtual monitors, the screen resolution and the color depth of the host display as well as on the use of 3D acceleration and 2D video acceleration. A rough estimate is (color depth / 8) x vertical pixels x horizontal pixels x number of screens = number of bytes. Extra memory may be required if display acceleration is used.
Monitor Count: With this setting, Oracle VM VirtualBox can provide more than one virtual monitor to a virtual machine. If a guest OS supports multiple attached monitors, Oracle VM VirtualBox can pretend that multiple virtual monitors are present. Up to eight such virtual monitors are supported.
The output of the multiple monitors are displayed on the host in multiple VM windows which are running side by side. However, in full screen and seamless mode, they use the available physical monitors attached to the host. As a result, for full screen and seamless modes to work with multiple monitors, you will need at least as many physical monitors as you have virtual monitors configured, or Oracle VM VirtualBox will report an error.
You can configure the relationship between guest and host monitors using the View menu by pressing Host key + Home when you are in full screen or seamless mode.
See also Chapter 14, Known Limitations.
Scale Factor: Enables scaling of the display size. For multiple monitor displays, you can set the scale factor for individual monitors, or globally for all of the monitors. Use the slider to select a scaling factor up to 200%.
You can set a default scale factor for all VMs. Use the Display tab in the Preferences window.
Graphics Controller: Specifies the graphics adapter type used by the guest VM. Note that you must install the Guest Additions on the guest VM to specify the VBoxSVGA or VMSVGA graphics controller. The following options are available:
VBoxSVGA: The default graphics controller for new VMs that use Windows 7 or later.
This graphics controller improves performance and 3D support when compared to the legacy VBoxVGA option.
VBoxVGA: Use this graphics controller for legacy guest OSes. This is the default graphics controller for Windows versions before Windows 7 and for Oracle Solaris.
3D acceleration is not supported for this graphics controller.
VMSVGA: Use this graphics controller to emulate a VMware SVGA graphics device. This is the default graphics controller for Linux guests.
None: Does not emulate a graphics adapter type.
Enable 3D Acceleration: If a virtual machine has Guest Additions installed, you can select here whether the guest should support accelerated 3D graphics. See Section 4.5.1, “Hardware 3D Acceleration (OpenGL and Direct3D 8/9)”.
On the Remote Display tab, if the VirtualBox Remote Display Extension (VRDE) is installed, you can enable the VRDP server that is built into Oracle VM VirtualBox. This enables you to connect to the console of the virtual machine remotely with any standard RDP viewer, such as mstsc.exe that comes with Microsoft Windows. On Linux and Oracle Solaris systems you can use the standard open source rdesktop program. These features are described in Section 7.1, “Remote Display (VRDP Support)”.
Enable Server: Select this check box and configure settings for the remote display connection.
On the Recording tab you can enable video and audio recording for a virtual machine and change related settings. Note that these features can be enabled and disabled while a VM is running.
Enable Recording: Select this check box and select a Recording Mode option.
Recording Mode: You can choose to record video, audio, or both video and audio.
Some settings on the Recording tab may be grayed out, depending on the Recording Mode setting.
File Path: The file where the recording is saved.
Frame Size: The video resolution of the recorded video, in pixels. The drop-down list enables you to select from common frame sizes.
Frame Rate: Use the slider to set the maximum number of video frames per second (FPS) to record. Frames that have a higher frequency are skipped. Increasing this value reduces the number of skipped frames and increases the file size.
Video Quality: Use the slider to set the the bit rate of the video in kilobits per second. Increasing this value improves the appearance of the video at the cost of an increased file size.
Audio Quality: Use the slider to set the quality of the audio recording. Increasing this value improves the audio quality at the cost of an increased file size.
Screens: For a multiple monitor display, you can select which screens to record video from.
As you adjust the video and audio recording settings, the approximate output file size for a five minute video is shown.
The Storage category in the VM settings enables you to connect virtual hard disk, CD/DVD, and floppy images and drives to your virtual machine.
In a real computer, so-called storage controllers connect physical disk drives to the rest of the computer. Similarly, Oracle VM VirtualBox presents virtual storage controllers to a virtual machine. Under each controller, the virtual devices, such as hard disks, CD/DVD or floppy drives, attached to the controller are shown.
Note
This section gives a quick introduction to the Oracle VM VirtualBox storage settings. See Chapter 5, Virtual Storage for a full description of the available storage settings in Oracle VM VirtualBox.
If you have used the Create Virtual Machine wizard to create a machine, you will normally see something like the following:
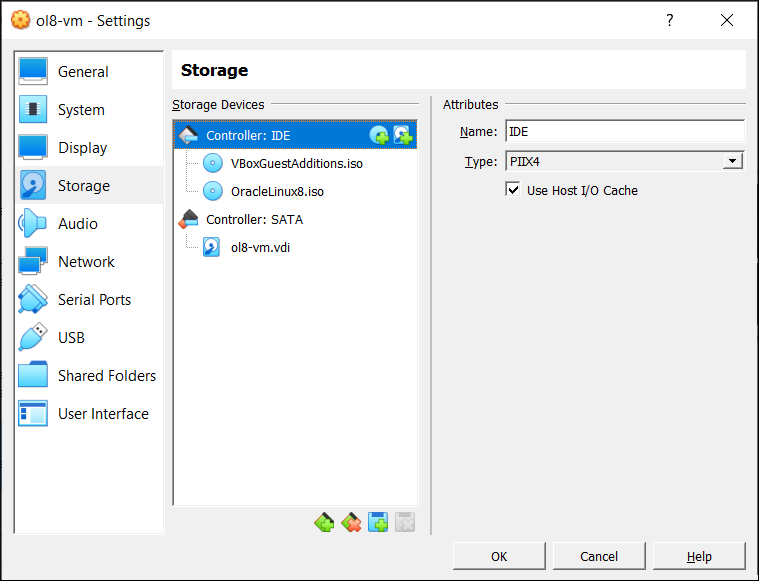
Depending on the guest OS type that you selected when you created the VM, a new VM includes the following storage devices:
IDE controller. A virtual CD/DVD drive is attached to device 0 on the secondary channel of the IDE controller.
SATA controller. This is a modern type of storage controller for higher hard disk data throughput, to which the virtual hard disks are attached. Initially you will normally have one such virtual disk, but as shown in the previous screenshot, you can have more than one. Each is represented by a disk image file, such as a VDI file in this example.
If you created your VM with an older version of Oracle VM VirtualBox, the default storage layout may differ. You might then only have an IDE controller to which both the CD/DVD drive and the hard disks have been attached. This might also apply if you selected an older OS type when you created the VM. Since older OSes do not support SATA without additional drivers, Oracle VM VirtualBox will make sure that no such devices are present initially. See Section 5.1, “Hard Disk Controllers”.
Oracle VM VirtualBox also provides a floppy controller. You cannot add devices other than floppy drives to this controller. Virtual floppy drives, like virtual CD/DVD drives, can be connected to either a host floppy drive, if you have one, or a disk image, which in this case must be in RAW format.
You can modify these media attachments freely. For example, if you wish to copy some files from another virtual disk that you created, you can connect that disk as a second hard disk, as in the above screenshot. You could also add a second virtual CD/DVD drive, or change where these items are attached. The following options are available:
To add another virtual hard disk, or a CD/DVD or floppy drive, select the storage controller to which it should be added (such as IDE, SATA, SCSI, SAS, floppy controller) and then click the Add Disk button below the tree. You can then either select Optical Drive or Hard Disk. If you clicked on a floppy controller, you can add a floppy drive instead. Alternatively, right-click on the storage controller and select a menu item there.
A dialog is displayed, enabling you to select an existing disk image file or to create a new disk image file. Depending on the type of disk image, the dialog is called Hard Disk Selector, Optical Disk Selector, or Floppy Disk Selector.
See Section 5.2, “Disk Image Files (VDI, VMDK, VHD, HDD)” for information on the image file types that are supported by Oracle VM VirtualBox.
For virtual CD/DVD drives, the image files will typically be in the standard ISO format instead. Most commonly, you will select this option when installing an OS from an ISO file that you have obtained from the Internet. For example, most Linux distributions are available in this way.
Depending on the type of disk image, you can set the following Attributes for the disk image in the right part of the Storage settings page:
The device slot of the controller that the virtual disk is connected to. IDE controllers have four slots: primary device 0, primary device 1, secondary device 0, and secondary device 1. By contrast, SATA and SCSI controllers offer you up to 30 slots for attaching virtual devices.
Solid-state Drive presents a virtual disk to the guest as a solid-state device.
Hot-pluggable presents a virtual disk to the guest as a hot-pluggable device.
For virtual CD/DVD drives, you can select Live CD/DVD. This means that the virtual optical disk is not removed from when the guest system ejects it.
To remove an attachment, either select it and click on the Remove icon at the bottom, or right-click on it and select the menu item.
Removable media, such as CD/DVDs and floppies, can be changed while the guest is running. Since the Settings window is not available at that time, you can also access these settings from the Devices menu of your virtual machine window.
The Audio section in a virtual machine's Settings window determines whether the VM will detect a connected sound card, and if the audio output should be played on the host system.
To enable audio for a guest, select the Enable Audio check box. The following settings are available:
Host Audio Driver: The audio driver that Oracle VM VirtualBox uses on the host.
The Default option is enabled by default for all new VMs. This option selects the best audio driver for the host platform automatically. This enables you to move VMs between different platforms without having to change the audio driver.
On a Linux host, depending on your host configuration, you can select between the OSS, ALSA, or the PulseAudio subsystem. On newer Linux distributions, the PulseAudio subsystem is preferred.
Only OSS is supported on Oracle Solaris hosts. The Oracle Solaris Audio audio backend is no longer supported on Oracle Solaris hosts.
Audio Controller: You can choose between the emulation of an Intel AC'97 controller, an Intel HD Audio controller, or a SoundBlaster 16 card.
Enable Audio Output: Enables audio output only for the VM.
Enable Audio Input: Enables audio input only for the VM.
The Network section in a virtual machine's Settings window enables you to configure how Oracle VM VirtualBox presents virtual network cards to your VM, and how they operate.
When you first create a virtual machine, Oracle VM VirtualBox by default enables one virtual network card and selects the Network Address Translation (NAT) mode for it. This way the guest can connect to the outside world using the host's networking and the outside world can connect to services on the guest which you choose to make visible outside of the virtual machine.
This default setup is good for the majority of Oracle VM VirtualBox users. However, Oracle VM VirtualBox is extremely flexible in how it can virtualize networking. It supports many virtual network cards per virtual machine. The first four virtual network cards can be configured in detail in VirtualBox Manager. Additional network cards can be configured using the VBoxManage command.
Many networking options are available. See Chapter 6, Virtual Networking for more information.
Oracle VM VirtualBox supports the use of virtual serial ports in a virtual machine.
Ever since the original IBM PC, personal computers have been equipped with one or two serial ports, also called COM ports by DOS and Windows. Serial ports were commonly used with modems, and some computer mice used to be connected to serial ports before USB became commonplace.
While serial ports are no longer as common as they used to be, there are still some important uses left for them. For example, serial ports can be used to set up a primitive network over a null-modem cable, in case Ethernet is not available. Also, serial ports are indispensable for system programmers needing to do kernel debugging, since kernel debugging software usually interacts with developers over a serial port. With virtual serial ports, system programmers can do kernel debugging on a virtual machine instead of needing a real computer to connect to.
If a virtual serial port is enabled, the guest OS sees a standard 16550A compatible UART device. Other UART types can be configured using the VBoxManage modifyvm command. Both receiving and transmitting data is supported. How this virtual serial port is then connected to the host is configurable, and the details depend on your host OS.
You can use either the Settings tabs or the
VBoxManage command to set up virtual serial
ports. For the latter, see Section 8.10, “VBoxManage modifyvm”
for information on the --uart,
--uart-mode and --uart-type
options.
You can configure up to four virtual serial ports per virtual machine. For each device, you must set the following:
Port Number: This determines the serial port that the virtual machine should see. For best results, use the traditional values as follows:
COM1: I/O base 0x3F8, IRQ 4
COM2: I/O base 0x2F8, IRQ 3
COM3: I/O base 0x3E8, IRQ 4
COM4: I/O base 0x2E8, IRQ 3
You can also configure a user-defined serial port. Enter an I/O base address and interrupt (IRQ).
Port Mode: What the virtual port is connected to. For each virtual serial port, you have the following options:
Disconnected: The guest will see the device, but it will behave as if no cable had been connected to it.
Host Device: Connects the virtual serial port to a physical serial port on your host. On a Windows host, this will be a name like
COM1. On Linux or Oracle Solaris hosts, it will be a device node like/dev/ttyS0. Oracle VM VirtualBox will then simply redirect all data received from and sent to the virtual serial port to the physical device.Host Pipe: Configure Oracle VM VirtualBox to connect the virtual serial port to a software pipe on the host. This depends on your host OS, as follows:
On a Windows host, data will be sent and received through a named pipe. The pipe name must be in the format
\\.\pipe\wherenamenameshould identify the virtual machine but may be freely chosen.On a Mac OS, Linux, or Oracle Solaris host, a local domain socket is used instead. The socket filename must be chosen such that the user running Oracle VM VirtualBox has sufficient privileges to create and write to it. The
/tmpdirectory is often a good candidate.On Linux there are various tools which can connect to a local domain socket or create one in server mode. The most flexible tool is socat and is available as part of many distributions.
In this case, you can configure whether Oracle VM VirtualBox should create the named pipe, or the local domain socket non-Windows hosts, itself or whether Oracle VM VirtualBox should assume that the pipe or socket exists already. With the VBoxManage command-line options, this is referred to as server mode or client mode, respectively.
For a direct connection between two virtual machines, corresponding to a null-modem cable, simply configure one VM to create a pipe or socket and another to attach to it.
Raw File: Send the virtual serial port output to a file. This option is very useful for capturing diagnostic output from a guest. Any file may be used for this purpose, as long as the user running Oracle VM VirtualBox has sufficient privileges to create and write to the file.
TCP: Useful for forwarding serial traffic over TCP/IP, acting as a server, or it can act as a TCP client connecting to other servers. This option enables a remote machine to directly connect to the guest's serial port using TCP.
TCP Server: Deselect the Connect to Existing Pipe/Socket check box and specify the port number in the Path/Address field. This is typically 23 or 2023. Note that on UNIX-like systems you will have to use a port a number greater than 1024 for regular users.
The client can use software such as PuTTY or the telnet command line tool to access the TCP Server.
TCP Client: To create a virtual null-modem cable over the Internet or LAN, the other side can connect using TCP by specifying
hostname:port
Up to four serial ports can be configured per virtual machine, but you can pick any port numbers out of the above. However, serial ports cannot reliably share interrupts. If both ports are to be used at the same time, they must use different interrupt levels, for example COM1 and COM2, but not COM1 and COM3.
The USB section in a virtual machine's Settings window enables you to configure Oracle VM VirtualBox's sophisticated USB support.
Oracle VM VirtualBox can enable virtual machines to access the USB devices on your host directly. To achieve this, Oracle VM VirtualBox presents the guest OS with a virtual USB controller. As soon as the guest system starts using a USB device, it will appear as unavailable on the host.
Note
Be careful with USB devices that are currently in use on the host. For example, if you allow your guest to connect to your USB hard disk that is currently mounted on the host, when the guest is activated, it will be disconnected from the host without a proper shutdown. This may cause data loss.
Oracle Solaris hosts have a few known limitations regarding USB support. See Chapter 14, Known Limitations.
In addition to allowing a guest access to your local USB devices, Oracle VM VirtualBox even enables your guests to connect to remote USB devices by use of the VirtualBox Remote Desktop Extension (VRDE). See Section 7.1.4, “Remote USB”.
To enable USB for a VM, select the Enable USB Controller check box. The following settings are available:
USB Controller: Selects a controller with the specified level of USB support, as follows:
OHCI for USB 1.1
EHCI for USB 2.0. This also enables OHCI.
xHCI for USB 3.0. This supports all USB speeds.
USB Device Filters: When USB support is enabled for a VM, you can determine in detail which devices will be automatically attached to the guest. For this, you can create filters by specifying certain properties of the USB device. USB devices with a matching filter will be automatically passed to the guest once they are attached to the host. USB devices without a matching filter can be passed manually to the guest, for example by using the Devices, USB menu.
Clicking on the + button to the right of the USB Device Filters window creates a new filter. You can give the filter a name, for later reference, and specify the filter criteria. The more criteria you specify, the more precisely devices will be selected. For instance, if you specify only a vendor ID of 046d, all devices produced by Logitech will be available to the guest. If you fill in all fields, on the other hand, the filter will only apply to a particular device model from a particular vendor, and not even to other devices of the same type with a different revision and serial number.
In detail, the following criteria are available:
Vendor and Product ID. With USB, each vendor of USB products carries an identification number that is unique world-wide, called the vendor ID. Similarly, each line of products is assigned a product ID number. Both numbers are commonly written in hexadecimal, and a colon separates the vendor from the product ID. For example,
046d:c016stands for Logitech as a vendor, and the M-UV69a Optical Wheel Mouse product.Alternatively, you can also specify Manufacturer and Product by name.
To list all the USB devices that are connected to your host machine with their respective vendor IDs and product IDs, use the following command:
VBoxManage list usbhost
On Windows, you can also see all USB devices that are attached to your system in the Device Manager. On Linux, you can use the lsusb command.
Serial Number. While vendor ID and product ID are quite specific to identify USB devices, if you have two identical devices of the same brand and product line, you will also need their serial numbers to filter them out correctly.
Remote. This setting specifies whether the device will be local only, remote only, such as over VRDP, or either.
On a Windows host, you will need to unplug and reconnect a USB device to use it after creating a filter for it.
As an example, you could create a new USB filter and specify a vendor ID of 046d for Logitech, Inc, a manufacturer index of 1, and "not remote". Then any USB devices on the host system produced by Logitech, Inc with a manufacturer index of 1 will be visible to the guest system.
Several filters can select a single device. For example, a filter which selects all Logitech devices, and one which selects a particular webcam.
You can deactivate filters without deleting them by deselecting the check box next to the filter name.
On Windows hosts, a kernel mode device driver provides USB proxy support. It implements both a USB monitor, which enables Oracle VM VirtualBox to capture devices when they are plugged in, and a USB device driver to claim USB devices for a particular virtual machine. System reboots are not necessary after installing the driver. Also, you do not need to replug devices for Oracle VM VirtualBox to claim them.
On supported Linux hosts, Oracle VM VirtualBox accesses USB devices
through special files in the file system. When Oracle VM VirtualBox is
installed, these are made available to all users in the
vboxusers system group. In order to be able
to access USB from guest systems, make sure that you are a
member of this group.
Shared folders enable you to easily exchange data between a virtual machine and your host. This feature requires that the Oracle VM VirtualBox Guest Additions be installed in a virtual machine and is described in detail in Section 4.3, “Shared Folders”.
The User Interface section enables you to change certain aspects of the user interface of the selected VM.
Menu Bar: This widget enables you to disable a complete menu, by clicking on the menu name to deselect it. Menu entries can be disabled, by deselecting the check box next to the entry. On Windows and Linux hosts, the complete menu bar can be disabled by deselecting the check box on the right.
Mini ToolBar: In full screen or seamless mode, Oracle VM VirtualBox can display a small toolbar that contains some of the items that are normally available from the virtual machine's menu bar. This toolbar reduces itself to a small gray line unless you move the mouse over it. With the toolbar, you can return from full screen or seamless mode, control machine execution, or enable certain devices. If you do not want to see the toolbar, disable the Show in Full Screen/Seamless setting.
The Show at Top of Screen setting enables you to show the toolbar at the top of the screen, instead of showing it at the bottom.
The Mini Toolbar is not available on macOS hosts.
Status Bar: This widget enables you to disable and reorder icons on the status bar. Deselect the check box of an icon to disable it, or rearrange icons by dragging and dropping the icon. To disable the complete status bar deselect the check box on the left.
Oracle VM VirtualBox includes experimental support for the Extensible Firmware Interface (EFI), which is an industry standard intended to replace the legacy BIOS as the primary interface for bootstrapping computers and certain system services later.
By default, Oracle VM VirtualBox uses the BIOS firmware for virtual machines. To use EFI for a given virtual machine, you can enable EFI in the machine's Settings window. See Section 3.5.1, “Motherboard Tab”. Alternatively, use the VBoxManage command line interface as follows:
VBoxManage modifyvm "VM name" --firmware efi
To switch back to using the BIOS:
VBoxManage modifyvm "VM name" --firmware bios
One notable user of EFI is Apple Mac OS X. More recent Linux versions and Windows releases, starting with Vista, also offer special versions that can be booted using EFI.
Another possible use of EFI in Oracle VM VirtualBox is development and testing of EFI applications, without booting any OS.
Note that the Oracle VM VirtualBox EFI support is experimental and will be enhanced as EFI matures and becomes more widespread. Mac OS X, Linux, and newer Windows guests are known to work fine. Windows 7 guests are unable to boot with the Oracle VM VirtualBox EFI implementation.
EFI provides two distinct video interfaces: GOP (Graphics Output Protocol) and UGA (Universal Graphics Adapter). Modern OSes, such as Mac OS X, generally use GOP, while some older ones still use UGA. Oracle VM VirtualBox provides a configuration option to control the graphics resolution for both interfaces, making the difference mostly irrelevant for users.
The default resolution is 1024x768. To select a graphics resolution for EFI, use the following VBoxManage command:
VBoxManage setextradata "VM name" VBoxInternal2/EfiGraphicsResolution HxV
Determine the horizontal resolution H and the vertical resolution V from the following list of default resolutions:
- VGA
640x480, 32bpp, 4:3
- SVGA
800x600, 32bpp, 4:3
- XGA
1024x768, 32bpp, 4:3
- XGA+
1152x864, 32bpp, 4:3
- HD
1280x720, 32bpp, 16:9
- WXGA
1280x800, 32bpp, 16:10
- SXGA
1280x1024, 32bpp, 5:4
- SXGA+
1400x1050, 32bpp, 4:3
- WXGA+
1440x900, 32bpp, 16:10
- HD+
1600x900, 32bpp, 16:9
- UXGA
1600x1200, 32bpp, 4:3
- WSXGA+
1680x1050, 32bpp, 16:10
- Full HD
1920x1080, 32bpp, 16:9
- WUXGA
1920x1200, 32bpp, 16:10
- DCI 2K
2048x1080, 32bpp, 19:10
- Full HD+
2160x1440, 32bpp, 3:2
- Unnamed
2304x1440, 32bpp, 16:10
- QHD
2560x1440, 32bpp, 16:9
- WQXGA
2560x1600, 32bpp, 16:10
- QWXGA+
2880x1800, 32bpp, 16:10
- QHD+
3200x1800, 32bpp, 16:9
- WQSXGA
3200x2048, 32bpp, 16:10
- 4K UHD
3840x2160, 32bpp, 16:9
- WQUXGA
3840x2400, 32bpp, 16:10
- DCI 4K
4096x2160, 32bpp, 19:10
- HXGA
4096x3072, 32bpp, 4:3
- UHD+
5120x2880, 32bpp, 16:9
- WHXGA
5120x3200, 32bpp, 16:10
- WHSXGA
6400x4096, 32bpp, 16:10
- HUXGA
6400x4800, 32bpp, 4:3
- 8K UHD2
7680x4320, 32bpp, 16:9
If this list of default resolution does not cover your needs, see Section 9.6.1, “Custom VESA Resolutions”. Note that the color depth value specified in a custom video mode must be specified. Color depths of 8, 16, 24, and 32 are accepted. EFI assumes a color depth of 32 by default.
The EFI default video resolution settings can only be changed when the VM is powered off.
It is currently not possible to manipulate EFI variables from
within a running guest. For example, setting the
boot-args variable by running the
nvram tool in a Mac OS X guest will not work.
As an alternative method,
VBoxInternal2/EfiBootArgs extradata can be
passed to a VM in order to set the boot-args
variable. To change the boot-args EFI
variable, use the following command:
VBoxManage setextradata "VM name" VBoxInternal2/EfiBootArgs <value>
Table of Contents
- 4.1. Introduction to Guest Additions
- 4.2. Installing and Maintaining Guest Additions
- 4.3. Shared Folders
- 4.4. Drag and Drop
- 4.5. Hardware-Accelerated Graphics
- 4.6. Seamless Windows
- 4.7. Guest Properties
- 4.8. Guest Control File Manager
- 4.9. Guest Control of Applications
- 4.10. Memory Overcommitment
- 4.11. Controlling Virtual Monitor Topology
The previous chapter covered getting started with Oracle VM VirtualBox and installing operating systems in a virtual machine. For any serious and interactive use, the Oracle VM VirtualBox Guest Additions will make your life much easier by providing closer integration between host and guest and improving the interactive performance of guest systems. This chapter describes the Guest Additions in detail.
As mentioned in Section 1.2, “Some Terminology”, the Guest Additions are designed to be installed inside a virtual machine after the guest operating system has been installed. They consist of device drivers and system applications that optimize the guest operating system for better performance and usability. See Section 3.1, “Supported Guest Operating Systems” for details on what guest operating systems are fully supported with Guest Additions by Oracle VM VirtualBox.
The Oracle VM VirtualBox Guest Additions for all supported guest
operating systems are provided as a single CD-ROM image file which
is called VBoxGuestAdditions.iso. This image
file is located in the installation directory of Oracle VM VirtualBox.
To install the Guest Additions for a particular VM, you mount this
ISO file in your VM as a virtual CD-ROM and install from there.
The Guest Additions offer the following features:
Mouse pointer integration. To overcome the limitations for mouse support described in Section 1.9.2, “Capturing and Releasing Keyboard and Mouse”, this feature provides you with seamless mouse support. You will only have one mouse pointer and pressing the Host key is no longer required to free the mouse from being captured by the guest OS. To make this work, a special mouse driver is installed in the guest that communicates with the physical mouse driver on your host and moves the guest mouse pointer accordingly.
Shared folders. These provide an easy way to exchange files between the host and the guest. Much like ordinary Windows network shares, you can tell Oracle VM VirtualBox to treat a certain host directory as a shared folder, and Oracle VM VirtualBox will make it available to the guest operating system as a network share, irrespective of whether the guest actually has a network. See Section 4.3, “Shared Folders”.
Better video support. While the virtual graphics card which Oracle VM VirtualBox emulates for any guest operating system provides all the basic features, the custom video drivers that are installed with the Guest Additions provide you with extra high and non-standard video modes, as well as accelerated video performance.
In addition, with Windows, Linux, and Oracle Solaris guests, you can resize the virtual machine's window if the Guest Additions are installed. The video resolution in the guest will be automatically adjusted, as if you had manually entered an arbitrary resolution in the guest's Display settings. See Section 1.9.5, “Resizing the Machine's Window”.
If the Guest Additions are installed, 3D graphics and 2D video for guest applications can be accelerated. See Section 4.5, “Hardware-Accelerated Graphics”.
Seamless windows. With this feature, the individual windows that are displayed on the desktop of the virtual machine can be mapped on the host's desktop, as if the underlying application was actually running on the host. See Section 4.6, “Seamless Windows”.
Generic host/guest communication channels. The Guest Additions enable you to control and monitor guest execution. The guest properties provide a generic string-based mechanism to exchange data bits between a guest and a host, some of which have special meanings for controlling and monitoring the guest. See Section 4.7, “Guest Properties”.
Additionally, applications can be started in a guest from the host. See Section 4.9, “Guest Control of Applications”.
Time synchronization. With the Guest Additions installed, Oracle VM VirtualBox can ensure that the guest's system time is better synchronized with that of the host.
For various reasons, the time in the guest might run at a slightly different rate than the time on the host. The host could be receiving updates through NTP and its own time might not run linearly. A VM could also be paused, which stops the flow of time in the guest for a shorter or longer period of time. When the wall clock time between the guest and host only differs slightly, the time synchronization service attempts to gradually and smoothly adjust the guest time in small increments to either catch up or lose time. When the difference is too great, for example if a VM paused for hours or restored from saved state, the guest time is changed immediately, without a gradual adjustment.
The Guest Additions will resynchronize the time regularly. See Section 9.11.3, “Tuning the Guest Additions Time Synchronization Parameters” for how to configure the parameters of the time synchronization mechanism.
Shared clipboard. With the Guest Additions installed, the clipboard of the guest operating system can optionally be shared with your host operating system. See Section 3.4, “General Settings”.
Automated logins. Also called credentials passing. See Section 9.1, “Automated Guest Logins”.
Each version of Oracle VM VirtualBox, even minor releases, ship with their own version of the Guest Additions. While the interfaces through which the Oracle VM VirtualBox core communicates with the Guest Additions are kept stable so that Guest Additions already installed in a VM should continue to work when Oracle VM VirtualBox is upgraded on the host, for best results, it is recommended to keep the Guest Additions at the same version.
The Windows and Linux Guest Additions therefore check automatically whether they have to be updated. If the host is running a newer Oracle VM VirtualBox version than the Guest Additions, a notification with further instructions is displayed in the guest.
To disable this update check for the Guest Additions of a given
virtual machine, set the value of its
/VirtualBox/GuestAdd/CheckHostVersion guest
property to 0. See
Section 4.7, “Guest Properties”.
Guest Additions are available for virtual machines running Windows, Linux, Oracle Solaris, or OS/2. The following sections describe the specifics of each variant in detail.
The Oracle VM VirtualBox Windows Guest Additions are designed to be installed in a virtual machine running a Windows operating system. The following versions of Windows guests are supported:
Microsoft Windows NT 4.0 (any service pack)
Microsoft Windows 2000 (any service pack)
Microsoft Windows XP (any service pack)
Microsoft Windows Server 2003 (any service pack)
Microsoft Windows Server 2008
Microsoft Windows Vista (all editions)
Microsoft Windows 7 (all editions)
Microsoft Windows 8 (all editions)
Microsoft Windows 10 RTM build 10240
Microsoft Windows Server 2012
In the Devices menu in the virtual machine's menu bar, Oracle VM VirtualBox has a menu item Insert Guest Additions CD Image, which mounts the Guest Additions ISO file inside your virtual machine. A Windows guest should then automatically start the Guest Additions installer, which installs the Guest Additions on your Windows guest.
For other guest operating systems, or if automatic start of software on a CD is disabled, you need to do a manual start of the installer.
Note
For the basic Direct3D acceleration to work in a Windows guest, you have to install the WDDM video driver available for Windows Vista or later.
For Windows 8 and later, only the WDDM Direct3D video driver is available. For basic Direct3D acceleration to work in Windows XP guests, you have to install the Guest Additions in Safe Mode. See Chapter 14, Known Limitations for details.
If you prefer to mount the Guest Additions manually, you can perform the following steps:
Start the virtual machine in which you have installed Windows.
Select Optical Drives from the Devices menu in the virtual machine's menu bar and then Choose/Create a Disk Image. This displays the Virtual Media Manager, described in Section 5.3, “The Virtual Media Manager”.
In the Virtual Media Manager, click Add and browse your host file system for the
VBoxGuestAdditions.isofile.On a Windows host, this file is in the Oracle VM VirtualBox installation directory, usually in
C:\Program files\Oracle\VirtualBox.On macOS hosts, this file is in the application bundle of Oracle VM VirtualBox. Right-click on the Oracle VM VirtualBox icon in Finder and choose Show Package Contents. The file is located in the
Contents/MacOSfolder.On a Linux host, this file is in the
additionsfolder where you installed Oracle VM VirtualBox, usually/opt/VirtualBox/.On Oracle Solaris hosts, this file is in the
additionsfolder where you installed Oracle VM VirtualBox, usually/opt/VirtualBox.
In the Virtual Media Manager, select the ISO file and click the Add button. This mounts the ISO file and presents it to your Windows guest as a CD-ROM.
Unless you have the Autostart feature disabled in your Windows
guest, Windows will now autostart the Oracle VM VirtualBox Guest
Additions installation program from the Additions ISO. If the
Autostart feature has been turned off, choose
VBoxWindowsAdditions.exe from the CD/DVD
drive inside the guest to start the installer.
The installer will add several device drivers to the Windows driver database and then invoke the hardware detection wizard.
Depending on your configuration, it might display warnings that the drivers are not digitally signed. You must confirm these in order to continue the installation and properly install the Additions.
After installation, reboot your guest operating system to activate the Additions.
Windows Guest Additions can be updated by running the installation program again. This replaces the previous Additions drivers with updated versions.
Alternatively, you can also open the Windows Device Manager and select Update Driver... for the following devices:
Oracle VM VirtualBox Graphics Adapter
Oracle VM VirtualBox System Device
For each, choose the option to provide your own driver, click Have Disk and navigate to the CD-ROM drive with the Guest Additions.
You can configure unattended installation of the Oracle VM VirtualBox Guest Additions when you create a new VM using the Create Virtual Machine wizard. Select the Guest Additions check box on the Unattended Guest OS Install page of the wizard.
Guest Additions are installed automatically, following completion of the guest OS installation.
To avoid popups when performing an unattended installation of the Oracle VM VirtualBox Guest Additions, the code signing certificates used to sign the drivers needs to be installed in the correct certificate stores on the guest operating system. Failure to do this will cause a typical Windows installation to display multiple dialogs asking whether you want to install a particular driver.
Note
On some legacy Windows versions, such as Windows 2000 and Windows XP, the user intervention popups mentioned above are always displayed, even after importing the Oracle certificates.
Installing the code signing certificates on a Windows guest
can be done automatically. Use the
VBoxCertUtil.exe utility from the
cert folder on the Guest Additions
installation CD.
Use the following steps:
Log in as Administrator on the guest.
Mount the Oracle VM VirtualBox Guest Additions .ISO.
Open a command line window on the guest and change to the
certfolder on the Oracle VM VirtualBox Guest Additions CD.Run the following command:
VBoxCertUtil.exe add-trusted-publisher vbox*.cer --root vbox*.cer
This command installs the certificates to the certificate store. When installing the same certificate more than once, an appropriate error will be displayed.
To allow for completely unattended guest installations, you can specify a command line parameter to the install launcher:
VBoxWindowsAdditions.exe /S
This automatically installs the right files and drivers for the corresponding platform, either 32-bit or 64-bit.
Note
By default on an unattended installation on a Vista or
Windows 7 guest, there will be the XPDM graphics driver
installed. This graphics driver does not support Windows
Aero / Direct3D on the guest. Instead, the WDDM graphics
driver needs to be installed. To select this driver by
default, add the command line parameter
/with_wddm when invoking the Windows
Guest Additions installer. This is only required for Vista
and Windows 7.
Note
For Windows Aero to run correctly on a guest, the guest's VRAM size needs to be configured to at least 128 MB.
For more options regarding unattended guest installations, consult the command line help by using the command:
VBoxWindowsAdditions.exe /?
If you would like to install the files and drivers manually, you can extract the files from the Windows Guest Additions setup as follows:
VBoxWindowsAdditions.exe /extract
To explicitly extract the Windows Guest Additions for another
platform than the current running one, such as 64-bit files on
a 32-bit system, you must use the appropriate platform
installer. Use
VBoxWindowsAdditions-x86.exe or
VBoxWindowsAdditions-amd64.exe with the
/extract parameter.
Like the Windows Guest Additions, the Oracle VM VirtualBox Guest Additions for Linux are a set of device drivers and system applications which may be installed in the guest operating system.
The following Linux distributions are officially supported:
Oracle Linux as of version 5, including UEK kernels
Fedora as of Fedora Core 4
Red Hat Enterprise Linux as of version 3
SUSE and openSUSE Linux as of version 9
Ubuntu as of version 5.10
Many other distributions are known to work with the Guest Additions.
The version of the Linux kernel supplied by default in SUSE and openSUSE 10.2, Ubuntu 6.10 (all versions) and Ubuntu 6.06 (server edition) contains a bug which can cause it to crash during startup when it is run in a virtual machine. The Guest Additions work in those distributions.
Note that some Linux distributions already come with all or part of the Oracle VM VirtualBox Guest Additions. You may choose to keep the distribution's version of the Guest Additions but these are often not up to date and limited in functionality, so we recommend replacing them with the Guest Additions that come with Oracle VM VirtualBox. The Oracle VM VirtualBox Linux Guest Additions installer tries to detect an existing installation and replace them but depending on how the distribution integrates the Guest Additions, this may require some manual interaction. It is highly recommended to take a snapshot of the virtual machine before replacing preinstalled Guest Additions.
The Oracle VM VirtualBox Guest Additions for Linux are provided on the same virtual CD-ROM file as the Guest Additions for Windows. See Section 4.2.1.1, “Installing the Windows Guest Additions”. They also come with an installation program that guides you through the setup process. However, due to the significant differences between Linux distributions, installation may be slightly more complex when compared to Windows.
Installation generally involves the following steps:
Before installing the Guest Additions, you prepare your guest system for building external kernel modules. This works as described in Section 2.3.2, “The Oracle VM VirtualBox Kernel Modules”, except that this step must be performed in your Linux guest instead of on a Linux host system.
If you suspect that something has gone wrong, check that your guest is set up correctly and run the following command as root:
rcvboxadd setup
Insert the
VBoxGuestAdditions.isoCD file into your Linux guest's virtual CD-ROM drive, as described for a Windows guest in Section 4.2.1.1, “Installing the Windows Guest Additions”.Change to the directory where your CD-ROM drive is mounted and run the following command as root:
sh ./VBoxLinuxAdditions.run
You can configure unattended installation of the Oracle VM VirtualBox Guest Additions when you create a new VM using the Create Virtual Machine wizard. Select the Guest Additions check box on the Unattended Guest OS Install page of the wizard.
Guest Additions are installed automatically, following completion of the guest OS installation.
In Linux and Oracle Solaris guests, Oracle VM VirtualBox graphics and mouse integration goes through the X Window System. Oracle VM VirtualBox can use the X.Org variant of the system, or XFree86 version 4.3 which is identical to the first X.Org release. During the installation process, the X.Org display server will be set up to use the graphics and mouse drivers which come with the Guest Additions.
After installing the Guest Additions into a fresh installation of a supported Linux distribution or Oracle Solaris system, many unsupported systems will work correctly too, the guest's graphics mode will change to fit the size of the Oracle VM VirtualBox window on the host when it is resized. You can also ask the guest system to switch to a particular resolution by sending a video mode hint using the VBoxManage tool.
Multiple guest monitors are supported in guests using the X.Org server version 1.3, which is part of release 7.3 of the X Window System version 11, or a later version. The layout of the guest screens can be adjusted as needed using the tools which come with the guest operating system.
If you want to understand more about the details of how the X.Org drivers are set up, in particular if you wish to use them in a setting which our installer does not handle correctly, see Section 9.3.2, “Guest Graphics and Mouse Driver Setup in Depth”.
Starting from Oracle VM VirtualBox 7, Linux guest screen resize functionality for guests running VMSVGA graphics configuration has been changed. Since then, this functionality consists of a standalone daemon called VBoxDRMClient and its Desktop Environment helper counterpart.
VBoxDRMClient runs as a root process and is a bridge between the host and the guest's vmwgfx driver. This means that VBoxDRMClient listens to screen resize hints from the host and forwards them to the vmwgfx driver. This enables guest screen resize functionality to be available before the user has performed a graphical login.
In order to perform Desktop Environment specific actions, such as setting the primary screen in a multimonitor setup, a Desktop Environment helper is used. Once the user has performed a graphical login operation, the helper daemon starts with user session scope and attempts to connect to VBoxDRMClient using an IPC connection. When VBoxDRMClient has received a corresponding command from the host, it is forwarded to the helper daemon over IPC and the action is then performed.
By default, VBoxDRMClient allows any process to connect to its IPC socket. This can be restricted by using the following steps:
The Guest Additions Linux installer creates a
vboxdrmipcuser group. A corresponding user needs to be added to this group.You must set the
DRMIpcRestrictedguest property, as follows:VBoxManage guestproperty set "VM name" /VirtualBox/GuestAdd/DRMIpcRestricted 1 \ --flags RDONLYGUEST
It is important to set only the RDONLYGUEST flag for the property, so that it cannot be changed from inside the guest.
Note
Both steps are required. If one of them is missing, all processes will have access to the IPC socket.
Restricted mode can be disabled by unsetting the guest property, as follows:
VBoxManage guestproperty unset "VM name" /VirtualBox/GuestAdd/DRMIpcRestricted
The Guest Additions can simply be updated by going through the installation procedure again with an updated CD-ROM image. This will replace the drivers with updated versions. You should reboot after updating the Guest Additions.
If you have a version of the Guest Additions installed on your
virtual machine and wish to remove it without installing new
ones, you can do so by inserting the Guest Additions CD image
into the virtual CD-ROM drive as described above. Then run the
installer for the current Guest Additions with the
uninstall parameter from the path that the
CD image is mounted on in the guest, as follows:
sh ./VBoxLinuxAdditions.run uninstall
While this will normally work without issues, you may need to do some manual cleanup of the guest in some cases, especially of the XFree86Config or xorg.conf file. In particular, if the Additions version installed or the guest operating system were very old, or if you made your own changes to the Guest Additions setup after you installed them.
You can uninstall the Additions as follows:
/opt/VBoxGuestAdditions-version/uninstall.sh
Replace
/opt/VBoxGuestAdditions-
with the correct Guest Additions installation directory.
version
Like the Windows Guest Additions, the Oracle VM VirtualBox Guest Additions for Oracle Solaris take the form of a set of device drivers and system applications which may be installed in the guest operating system.
The following Oracle Solaris distributions are officially supported:
Oracle Solaris 11, including Oracle Solaris 11 Express
Oracle Solaris 10 4/08 and later
Other distributions may work if they are based on comparable software releases.
The Oracle VM VirtualBox Guest Additions for Oracle Solaris are provided on the same ISO CD-ROM as the Additions for Windows and Linux. They come with an installation program that guides you through the setup process.
Installation involves the following steps:
Mount the
VBoxGuestAdditions.isofile as your Oracle Solaris guest's virtual CD-ROM drive, exactly the same way as described for a Windows guest in Section 4.2.1.1, “Installing the Windows Guest Additions”.If the CD-ROM drive on the guest does not get mounted, as seen with some versions of Oracle Solaris 10, run the following command as root:
svcadm restart volfs
Change to the directory where your CD-ROM drive is mounted and run the following command as root:
pkgadd -G -d ./VBoxSolarisAdditions.pkg
Choose 1 and confirm installation of the Guest Additions package. After the installation is complete, log out and log in to X server on your guest, to activate the X11 Guest Additions.
You can configure unattended installation of the Oracle VM VirtualBox Guest Additions when you create a new VM using the Create Virtual Machine wizard. Select the Guest Additions check box on the Unattended Guest OS Install page of the wizard.
Guest Additions are installed automatically, following completion of the guest OS installation.
The Oracle Solaris Guest Additions can be safely removed by removing the package from the guest. Open a root terminal session and run the following command:
pkgrm SUNWvboxguest
Oracle VM VirtualBox also ships with a set of drivers that improve running OS/2 in a virtual machine. Due to restrictions of OS/2 itself, this variant of the Guest Additions has a limited feature set. See Chapter 14, Known Limitations for details.
The OS/2 Guest Additions are provided on the same ISO CD-ROM as
those for the other platforms. Mount the ISO in OS/2 as
described previously. The OS/2 Guest Additions are located in
the directory \OS2.
We do not provide an automatic installer at this time. See the
readme.txt file in the CD-ROM directory,
which describes how to install the OS/2 Guest Additions
manually.
With the shared folders feature of Oracle VM VirtualBox, you can access files of your host system from within the guest system. This is similar to how you would use network shares in Windows networks, except that shared folders do not require networking, only the Guest Additions. Shared folders are supported with Windows 2000 or later, Linux, and Oracle Solaris guests. Oracle VM VirtualBox includes experimental support for Mac OS X and OS/2 guests.
Shared folders physically reside on the host and are then shared with the guest, which uses a special file system driver in the Guest Additions to talk to the host. For Windows guests, shared folders are implemented as a pseudo-network redirector. For Linux and Oracle Solaris guests, the Guest Additions provide a virtual file system.
To share a host folder with a virtual machine in Oracle VM VirtualBox, you must specify the path of the folder and choose a share name that the guest can use to access the shared folder. This happens on the host. In the guest you can then use the share name to connect to it and access files.
There are several ways in which shared folders can be set up for a virtual machine:
In the window of a running VM, you select Shared Folders from the Devices menu, or click on the folder icon on the status bar in the bottom right corner.
If a VM is not currently running, you can configure shared folders in the virtual machine's Settings window.
From the command line, you can create shared folders using VBoxManage, as follows:
VBoxManage sharedfolder add "VM name" --name "sharename" --hostpath "C:\test"
There are two types of shares:
Permanent shares, that are saved with the VM settings.
Transient shares, that are added at runtime and disappear when the VM is powered off. These can be created using a check box in VirtualBox Manager, or by using the
--transientoption of the VBoxManage sharedfolder add command.
Shared folders can either be read-write or read-only. This means
that the guest is either allowed to both read and write, or just
read files on the host. By default, shared folders are read-write.
Read-only folders can be created using a check box in the
VirtualBox Manager, or with the --readonly option of the
VBoxManage sharedfolder add command.
Oracle VM VirtualBox shared folders also support symbolic links, also called symlinks, under the following conditions:
The host operating system must support symlinks. For example, a macOS, Linux, or Oracle Solaris host is required.
The guest VM must have a version of the Guest Additions installed which supports symlinks. Currently only the Linux and Oracle Solaris Guest Additions support symlinks.
For security reasons the guest OS is not allowed to create symlinks by default. If you trust the guest OS to not abuse the functionality, you can enable the creation of symlinks for a shared folder as follows:
VBoxManage setextradata
VM-nameVBoxInternal2/SharedFoldersEnableSymlinksCreate/sharename1
If a symbolic link is created inside a shared folder on the host and the installed Guest Additions don't support symbolic links then the guest will see the target of the symlink as a file inside the shared folder. For example, if a symlink is created to a file on a Linux host:
$ cd /SharedFolder && ln -s filename symlink-to-filename
And then the shared folder is viewed on a Windows guest there will be two identical files listed, filename and symlink-to-filename.
You can mount the shared folder from inside a VM, in the same way as you would mount an ordinary network share:
In a Windows guest, shared folders are browseable and therefore visible in Windows Explorer. To attach the host's shared folder to your Windows guest, open Windows Explorer and look for the folder in My Networking Places, Entire Network, Oracle VM VirtualBox Shared Folders. By right-clicking on a shared folder and selecting Map Network Drive from the menu that pops up, you can assign a drive letter to that shared folder.
Alternatively, on the Windows command line, use the following command:
net use x: \\vboxsvr\sharename
While
vboxsvris a fixed name, note thatvboxsrvwould also work, replacex:with the drive letter that you want to use for the share, andsharenamewith the share name specified with VBoxManage.In a Linux guest, use the following command:
mount -t vboxsf [-o OPTIONS] sharename mountpoint
To mount a shared folder during boot, add the following entry to
/etc/fstab:sharename mountpoint vboxsf defaults 0 0
In a Oracle Solaris guest, use the following command:
mount -F vboxfs [-o OPTIONS] sharename mountpoint
Replace
sharename, use a lowercase string, with the share name specified with VBoxManage or VirtualBox Manager. Replacemountpointwith the path where you want the share to be mounted on the guest, such as/mnt/share. The usual mount rules apply. For example, create this directory first if it does not exist yet.Here is an example of mounting the shared folder for the user jack on Oracle Solaris:
$ id
uid=5000(jack) gid=1(other)
$ mkdir /export/home/jack/mount
$ pfexec mount -F vboxfs -o uid=5000,gid=1 jackshare /export/home/jack/mount
$ cd ~/mount
$ ls
sharedfile1.mp3 sharedfile2.txt
$
Beyond the standard options supplied by the mount command, the following are available:
iocharset CHARSET
This option sets the character set used for I/O operations. Note that on Linux guests, if the
iocharsetoption is not specified, then the Guest Additions driver will attempt to use the character set specified by the CONFIG_NLS_DEFAULT kernel option. If this option is not set either, then UTF-8 is used.convertcp CHARSET
This option specifies the character set used for the shared folder name. This is UTF-8 by default.
The generic mount options, documented in the mount manual page, apply also. Especially useful are the options
uid,gidandmode, as they can allow access by normal users in read/write mode, depending on the settings, even if root has mounted the filesystem.In an OS/2 guest, use the VBoxControl command to manage shared folders. For example:
VBoxControl sharedfolder use D: MyShareName
VBoxControl sharedfolder unuse D:
VBoxControl sharedfolder list
As with Windows guests, shared folders can also be accessed via UNC using
\\VBoxSF\,\\VBoxSvr\or\\VBoxSrv\as the server name and the shared folder name assharename.
Oracle VM VirtualBox provides the option to mount shared folders automatically. When automatic mounting is enabled for a shared folder, the Guest Additions service will mount it for you automatically. For Windows or OS/2, a preferred drive letter can also be specified. For Linux or Oracle Solaris, a mount point directory can also be specified.
If a drive letter or mount point is not specified, or is in use already, an alternative location is found by the Guest Additions service. The service searches for an alternative location depending on the guest OS, as follows:
Windows and OS/2 guests. Search for a free drive letter, starting at
Z:. If all drive letters are assigned, the folder is not mounted.Linux and Oracle Solaris guests. Folders are mounted under the
/mediadirectory. The folder name is normalized (no spaces, slashes or colons) and is prefixed withsf_.For example, if you have a shared folder called
myfiles, it will appear as/media/sf_myfilesin the guest.The guest properties
/VirtualBox/GuestAdd/SharedFolders/MountDirand the more generic/VirtualBox/GuestAdd/SharedFolders/MountPrefixcan be used to override the automatic mount directory and prefix. See Section 4.7, “Guest Properties”.
Access to an automatically mounted shared folder is granted to
everyone in a Windows guest, including the guest user. For Linux
and Oracle Solaris guests, access is restricted to members of
the group vboxsf and the
root user.
Oracle VM VirtualBox enables you to drag and drop content from the host to the guest, and vice versa. For this to work the latest version of the Guest Additions must be installed on the guest.
Drag and drop transparently allows copying or opening files, directories, and even certain clipboard formats from one end to the other. For example, from the host to the guest or from the guest to the host. You then can perform drag and drop operations between the host and a VM, as it would be a native drag and drop operation on the host OS.
At the moment drag and drop is implemented for Windows-based and X-Windows-based systems, both on the host and guest side. As X-Windows supports many different drag and drop protocols only the most common one, XDND, is supported for now. Applications using other protocols, such as Motif or OffiX, will not be recognized by Oracle VM VirtualBox.
In the context of using drag and drop, the origin of the data is called the source. That is, where the actual data comes from and is specified. The destination specifies where the data from the source should go to. Transferring data from the source to the destination can be done in various ways, such as copying, moving, or linking.
Note
At the moment only copying of data is supported. Moving or linking is not yet implemented.
When transferring data from the host to the guest OS, the host in this case is the source, whereas the guest OS is the destination. However, when transferring data from the guest OS to the host, the guest OS this time became the source and the host is the destination.
For security reasons drag and drop can be configured at runtime on a per-VM basis either using the Drag and Drop menu item in the Devices menu of the virtual machine, as shown below, or the VBoxManage command.
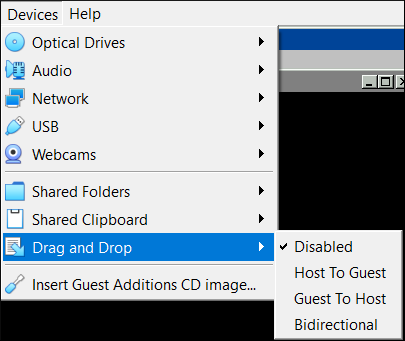
The following drag and drop modes are available:
Disabled. Disables the drag and drop feature entirely. This is the default when creating a new VM.
Host To Guest. Enables drag and drop operations from the host to the guest only.
Guest To Host. Enables drag and drop operations from the guest to the host only.
Bidirectional. Enables drag and drop operations in both directions: from the host to the guest, and from the guest to the host.
Note
Drag and drop support depends on the frontend being used. At the moment, only the VirtualBox Manager frontend provides this functionality.
To use the VBoxManage command to control the current drag and drop mode, see Chapter 8, VBoxManage. The modifyvm and controlvm commands enable setting of a VM's current drag and drop mode from the command line.
As Oracle VM VirtualBox can run on a variety of host operating systems and also supports a wide range of guests, certain data formats must be translated after transfer. This is so that the destination operating system, which receives the data, is able to handle them in an appropriate manner.
Note
When dragging files no data conversion is done in any way. For example, when transferring a file from a Linux guest to a Windows host the Linux-specific line endings are not converted to Windows line endings.
The following formats are handled by the Oracle VM VirtualBox drag and drop service:
Plain text: From applications such as text editors, internet browsers and terminal windows.
Files: From file managers such as Windows Explorer, Nautilus, and Finder.
Directories: For directories, the same formats apply as for files.
The following limitations are known for drag and drop:
On Windows hosts, dragging and dropping content between UAC-elevated (User Account Control) programs and non-UAC-elevated programs is not allowed. If you start Oracle VM VirtualBox with Administrator privileges then drag and drop will not work with Windows Explorer, which runs with regular user privileges by default.
On Linux hosts and guests, programs can query for drag and drop data while the drag operation is still in progress. For example, on LXDE using the PCManFM file manager. This currently is not supported. As a workaround, a different file manager, such as Nautilus, can be used instead.
The Oracle VM VirtualBox Guest Additions contain experimental hardware 3D support for Windows, Linux, and Oracle Solaris guests.
With this feature, if an application inside your virtual machine uses 3D features through the OpenGL or Direct3D 8/9 programming interfaces, instead of emulating them in software, which would be slow, Oracle VM VirtualBox will attempt to use your host's 3D hardware. This works for all supported host platforms, provided that your host operating system can make use of your accelerated 3D hardware in the first place.
The 3D acceleration feature currently has the following preconditions:
It is only available for certain Windows, Linux, and Oracle Solaris guests. In particular:
3D acceleration with Windows guests requires Windows 2000 or later. Apart from on Windows 2000 guests, both OpenGL and Direct3D 8/9 are supported on an experimental basis.
OpenGL on Linux requires kernel 2.6.27 or later, as well as X.org server version 1.5 or later. Ubuntu 10.10 and Fedora 14 have been tested and confirmed as working.
OpenGL on Oracle Solaris guests requires X.org server version 1.5 or later.
The Guest Additions must be installed.
Note
For the basic Direct3D acceleration to work in a Windows Guest, Oracle VM VirtualBox needs to replace Windows system files in the virtual machine. As a result, the Guest Additions installation program offers Direct3D acceleration as an option that must be explicitly enabled. Also, you must install the Guest Additions in Safe Mode. This does not apply to the WDDM Direct3D video driver available for Windows Vista and later. See Chapter 14, Known Limitations for details.
Because 3D support is still experimental at this time, it is disabled by default and must be manually enabled in the VM settings. See Section 3.6, “Display Settings”.
Note
Untrusted guest systems should not be allowed to use the 3D acceleration features of Oracle VM VirtualBox, just as untrusted host software should not be allowed to use 3D acceleration. Drivers for 3D hardware are generally too complex to be made properly secure and any software which is allowed to access them may be able to compromise the operating system running them. In addition, enabling 3D acceleration gives the guest direct access to a large body of additional program code in the Oracle VM VirtualBox host process which it might conceivably be able to use to crash the virtual machine.
To enable Aero theme support, the Oracle VM VirtualBox WDDM video driver must be installed, which is available with the Guest Additions installation. The WDDM driver is not installed by default for Vista and Windows 7 guests and must be manually selected in the Guest Additions installer by clicking No in the Would You Like to Install Basic Direct3D Support dialog displayed when the Direct3D feature is selected.
The Aero theme is not enabled by default on Windows. See your Windows platform documentation for details of how to enable the Aero theme.
Technically, Oracle VM VirtualBox implements 3D acceleration by installing an additional hardware 3D driver inside the guest when the Guest Additions are installed. This driver acts as a hardware 3D driver and reports to the guest operating system that the virtual hardware is capable of 3D hardware acceleration. When an application in the guest then requests hardware acceleration through the OpenGL or Direct3D programming interfaces, these are sent to the host through a special communication tunnel implemented by Oracle VM VirtualBox. The host then performs the requested 3D operation using the host's programming interfaces.
The Oracle VM VirtualBox Guest Additions contain experimental hardware 2D video acceleration support for Windows guests.
With this feature, if an application such as a video player inside your Windows VM uses 2D video overlays to play a movie clip, then Oracle VM VirtualBox will attempt to use your host's video acceleration hardware instead of performing overlay stretching and color conversion in software, which would be slow. This currently works for Windows, Linux and macOS host platforms, provided that your host operating system can make use of 2D video acceleration in the first place.
Hardware 2D video acceleration currently has the following preconditions:
Only available for Windows guests, running Windows XP or later.
Guest Additions must be installed.
Because 2D support is still experimental at this time, it is disabled by default and must be manually enabled in the VM settings. See Section 3.6, “Display Settings”.
Technically, Oracle VM VirtualBox implements this by exposing video overlay DirectDraw capabilities in the Guest Additions video driver. The driver sends all overlay commands to the host through a special communication tunnel implemented by Oracle VM VirtualBox. On the host side, OpenGL is then used to implement color space transformation and scaling.
With the seamless windows feature of Oracle VM VirtualBox, you can have the windows that are displayed within a virtual machine appear side by side next to the windows of your host. This feature is supported for the following guest operating systems, provided that the Guest Additions are installed:
Windows guests.
Supported Linux or Oracle Solaris guests running the X Window System.
After seamless windows are enabled, Oracle VM VirtualBox suppresses the display of the desktop background of your guest, allowing you to run the windows of your guest operating system seamlessly next to the windows of your host.
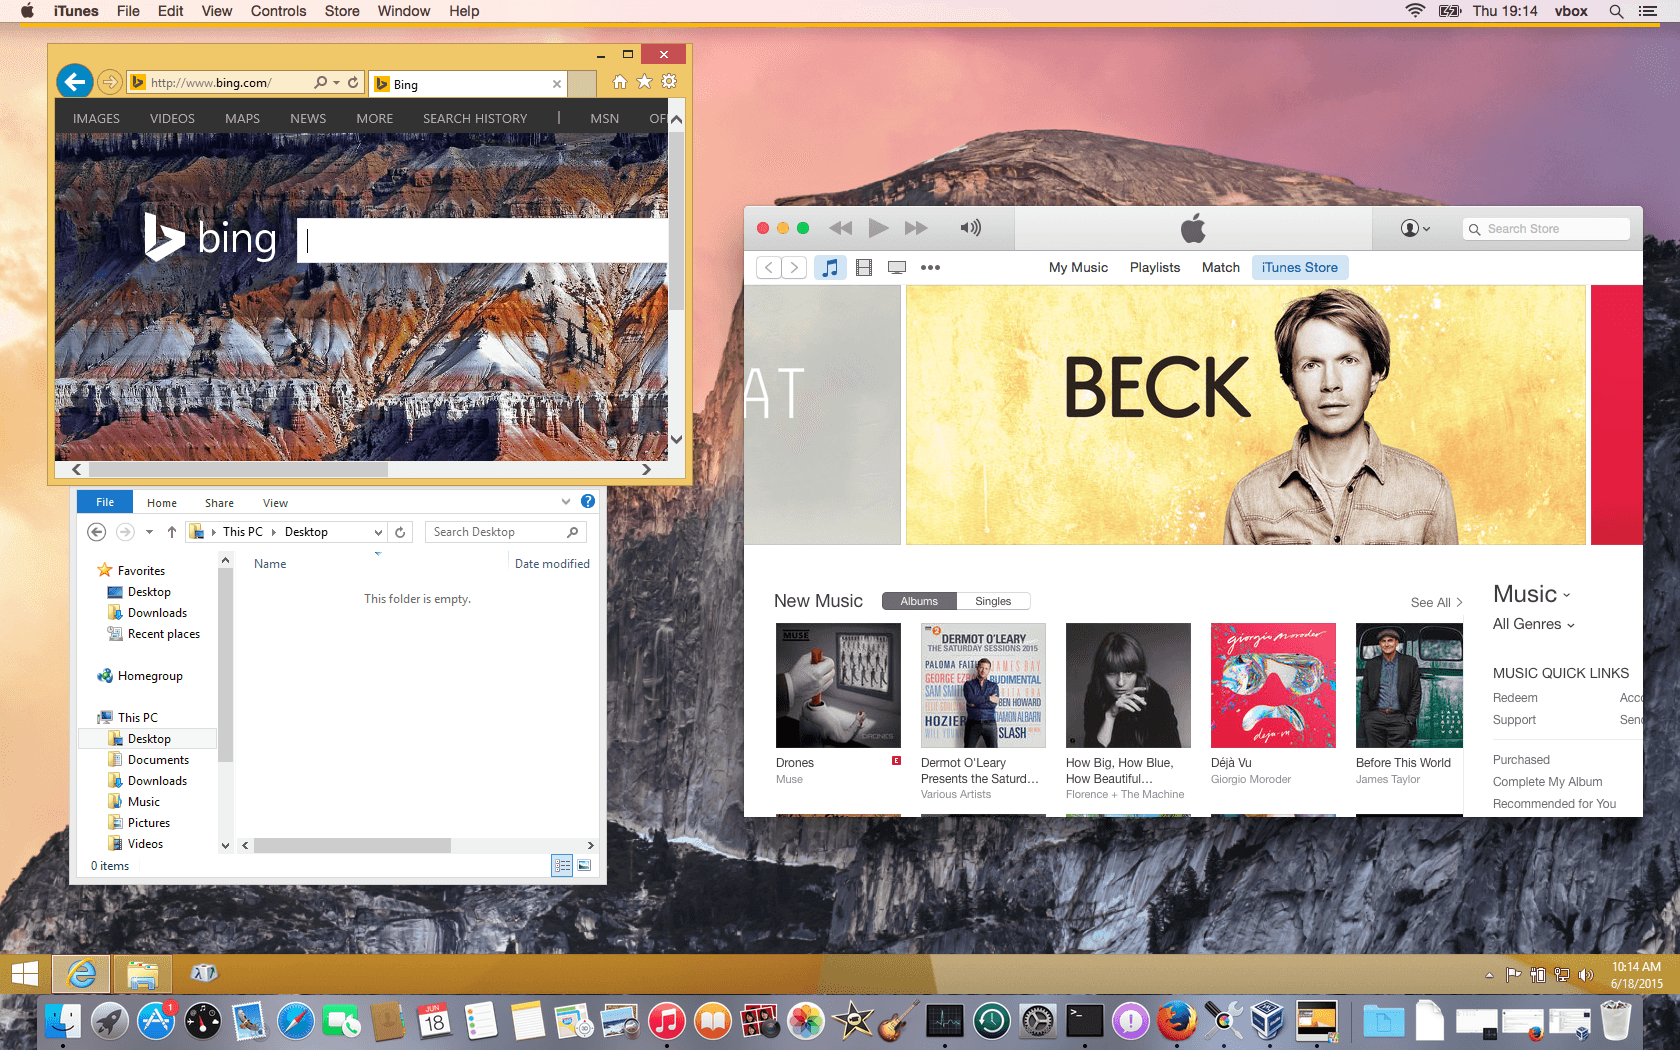
To enable seamless mode, after starting the virtual machine, press the Host key + L. The Host key is normally the right control key. This will enlarge the size of the VM's display to the size of your host screen and mask out the guest operating system's background. To disable seamless windows and go back to the normal VM display, press the Host key + L again.
Oracle VM VirtualBox enables requests of some properties from a running guest, provided that the Oracle VM VirtualBox Guest Additions are installed and the VM is running. This provides the following advantages:
A number of predefined VM characteristics are automatically maintained by Oracle VM VirtualBox and can be retrieved on the host. For example, to monitor VM performance and statistics.
Arbitrary string data can be exchanged between guest and host. This works in both directions.
To accomplish this, Oracle VM VirtualBox establishes a private communication channel between the Oracle VM VirtualBox Guest Additions and the host, and software on both sides can use this channel to exchange string data for arbitrary purposes. Guest properties are simply string keys to which a value is attached. They can be set, or written to, by either the host and the guest. They can also be read from both sides.
In addition to establishing the general mechanism of reading and
writing values, a set of predefined guest properties is
automatically maintained by the Oracle VM VirtualBox Guest Additions to
allow for retrieving interesting guest data such as the guest's
exact operating system and service pack level, the installed
version of the Guest Additions, users that are currently logged
into the guest OS, network statistics and more. These predefined
properties are all prefixed with /VirtualBox/
and organized into a hierarchical tree of keys.
Some of this runtime information is shown when you select Session Information Dialog from a virtual machine's Machine menu.
A more flexible way to use this channel is with the VBoxManage guestproperty command. See Section 8.43, “VBoxManage guestproperty”. For example, to have all the available guest properties for a given running VM listed with their respective values, use this command:
$ VBoxManage guestproperty enumerate "Windows Vista III" VirtualBox Command Line Management Interface Versionversion-numberCopyright (C) 2005-2023 Oracle and/or its affiliates Name: /VirtualBox/GuestInfo/OS/Product, value: Windows Vista Business Edition, timestamp: 1229098278843087000, flags: Name: /VirtualBox/GuestInfo/OS/Release, value: 6.0.6001, timestamp: 1229098278950553000, flags: Name: /VirtualBox/GuestInfo/OS/ServicePack, value: 1, timestamp: 1229098279122627000, flags: Name: /VirtualBox/GuestAdd/InstallDir, value: C:/Program Files/Oracle/VirtualBox Guest Additions, timestamp: 1229098279269739000, flags: Name: /VirtualBox/GuestAdd/Revision, value: 40720, timestamp: 1229098279345664000, flags: Name: /VirtualBox/GuestAdd/Version, value:version-number, timestamp: 1229098279479515000, flags: Name: /VirtualBox/GuestAdd/Components/VBoxControl.exe, value:version-numberr40720, timestamp: 1229098279651731000, flags: Name: /VirtualBox/GuestAdd/Components/VBoxHook.dll, value:version-numberr40720, timestamp: 1229098279804835000, flags: Name: /VirtualBox/GuestAdd/Components/VBoxDisp.dll, value:version-numberr40720, timestamp: 1229098279880611000, flags: Name: /VirtualBox/GuestAdd/Components/VBoxMRXNP.dll, value:version-numberr40720, timestamp: 1229098279882618000, flags: Name: /VirtualBox/GuestAdd/Components/VBoxService.exe, value:version-numberr40720, timestamp: 1229098279883195000, flags: Name: /VirtualBox/GuestAdd/Components/VBoxTray.exe, value:version-numberr40720, timestamp: 1229098279885027000, flags: Name: /VirtualBox/GuestAdd/Components/VBoxGuest.sys, value:version-numberr40720, timestamp: 1229098279886838000, flags: Name: /VirtualBox/GuestAdd/Components/VBoxMouse.sys, value:version-numberr40720, timestamp: 1229098279890600000, flags: Name: /VirtualBox/GuestAdd/Components/VBoxSF.sys, value:version-numberr40720, timestamp: 1229098279893056000, flags: Name: /VirtualBox/GuestAdd/Components/VBoxVideo.sys, value:version-numberr40720, timestamp: 1229098279895767000, flags: Name: /VirtualBox/GuestInfo/OS/LoggedInUsers, value: 1, timestamp: 1229099826317660000, flags: Name: /VirtualBox/GuestInfo/OS/NoLoggedInUsers, value: false, timestamp: 1229098455580553000, flags: Name: /VirtualBox/GuestInfo/Net/Count, value: 1, timestamp: 1229099826299785000, flags: Name: /VirtualBox/HostInfo/GUI/LanguageID, value: C, timestamp: 1229098151272771000, flags: Name: /VirtualBox/GuestInfo/Net/0/V4/IP, value: 192.168.2.102, timestamp: 1229099826300088000, flags: Name: /VirtualBox/GuestInfo/Net/0/V4/Broadcast, value: 255.255.255.255, timestamp: 1229099826300220000, flags: Name: /VirtualBox/GuestInfo/Net/0/V4/Netmask, value: 255.255.255.0, timestamp: 1229099826300350000, flags: Name: /VirtualBox/GuestInfo/Net/0/Status, value: Up, timestamp: 1229099826300524000, flags: Name: /VirtualBox/GuestInfo/OS/LoggedInUsersList, value: username, timestamp: 1229099826317386000, flags:
To query the value of a single property, use the get subcommand as follows:
$ VBoxManage guestproperty get "Windows Vista III" "/VirtualBox/GuestInfo/OS/Product"
VirtualBox Command Line Management Interface Version version-number
Copyright (C) 2005-2023 Oracle and/or its affiliates

Value: Windows Vista Business Edition
To add or change guest properties from the guest, use the tool VBoxControl. This tool is included in the Guest Additions. When started from a Linux guest, this tool requires root privileges for security reasons.
$ sudo VBoxControl guestproperty enumerate
VirtualBox Guest Additions Command Line Management Interface Version version-number
Copyright (C) 2005-2023 Oracle and/or its affiliates

Name: /VirtualBox/GuestInfo/OS/Release, value: 2.6.28-18-generic,
    timestamp: 1265813265835667000, flags: <NULL>
Name: /VirtualBox/GuestInfo/OS/Version, value: #59-Ubuntu SMP Thu Jan 28 01:23:03 UTC 2010,
    timestamp: 1265813265836305000, flags: <NULL>
      ...
For more complex needs, you can use the Oracle VM VirtualBox programming interfaces. See Chapter 11, Oracle VM VirtualBox Programming Interfaces.
The properties /VirtualBox/HostInfo/VBoxVer,
/VirtualBox/HostInfo/VBoxVerExt or
/VirtualBox/HostInfo/VBoxRev can be waited on
to detect that the VM state was restored from saved state or
snapshot:
$ VBoxControl guestproperty wait /VirtualBox/HostInfo/VBoxVer
Similarly the
/VirtualBox/HostInfo/ResumeCounter can be
used to detect that a VM was resumed from the paused state or
saved state.
The Guest Control File Manager is a feature of the Guest Additions that enables easy copying and moving of files between a guest and the host system. Other file management operations provide support to create new folders and to rename or delete files.
This feature is useful when the VM window of a guest is not visible. For example, when the guest is running in headless mode.
Note
To use the Guest Control File Manager, the guest must be running. For powered-off guests, it is disabled automatically.
The Guest Control File Manager works by mounting the host file system. Guest users must authenticate and create a guest session before they can transfer files.
The following steps describe how to use the Guest Control File Manager.
Open the Guest Control File Manager. Do either of the following:
In the guest VM, select Machine, File Manager.
In VirtualBox Manager, click on the machine name. Click File Manager in the machine tools menu for the VM.
The left pane shows the files on the host system.
Create a guest session.
At the bottom of the Guest Control File Manager, enter authentication credentials for a user on the guest system.
Click Create Session.
The contents of the guest VM file system appears in the right pane of the Guest Control File Manager.
Transfer files between the guest and the host system by using the move and copy file transfer icons.
You can copy and move files from the guest to the host system or from the host system to the guest.
Close the Guest Control File Manager.
Click Close to end the guest session.
The Guest Additions enable starting of applications inside a guest VM from the host system. This feature can be used to automate deployment of software within the guest.
For this to work, the application needs to be installed on the guest. No additional software needs to be installed on the host. Additionally, text mode output to stdout and stderr can be shown on the host for further processing. There are options to specify user credentials and a timeout value, in milliseconds, to limit the time the application is able to run.
The Guest Additions for Windows allow for automatic updating. This applies for already installed Guest Additions versions. Also, copying files from host to the guest as well as remotely creating guest directories is available.
To use these features, use the Oracle VM VirtualBox command line. See Section 8.44, “VBoxManage guestcontrol”.
In server environments with many VMs, the Guest Additions can be used to share physical host memory between several VMs. This reduces the total amount of memory in use by the VMs. If memory usage is the limiting factor and CPU resources are still available, this can help with running more VMs on each host.
The Guest Additions can change the amount of host memory that a VM uses, while the machine is running. Because of how this is implemented, this feature is called memory ballooning.
Note
Oracle VM VirtualBox supports memory ballooning only on 64-bit hosts. It is not supported on macOS hosts.
Memory ballooning does not work well with large pages enabled. To turn off large pages support for a VM, run VBoxManage modifyvm
vmname--large-pages off
Normally, to change the amount of memory allocated to a virtual machine, you have to shut down the virtual machine entirely and modify its settings. With memory ballooning, memory that was allocated for a virtual machine can be given to another virtual machine without having to shut the machine down.
When memory ballooning is requested, the Oracle VM VirtualBox Guest Additions, which run inside the guest, allocate physical memory from the guest operating system on the kernel level and lock this memory down in the guest. This ensures that the guest will not use that memory any longer. No guest applications can allocate it, and the guest kernel will not use it either. Oracle VM VirtualBox can then reuse this memory and give it to another virtual machine.
The memory made available through the ballooning mechanism is only available for reuse by Oracle VM VirtualBox. It is not returned as free memory to the host. Requesting balloon memory from a running guest will therefore not increase the amount of free, unallocated memory on the host. Effectively, memory ballooning is therefore a memory overcommitment mechanism for multiple virtual machines while they are running. This can be useful to temporarily start another machine, or in more complicated environments, for sophisticated memory management of many virtual machines that may be running in parallel depending on how memory is used by the guests.
At this time, memory ballooning is only supported through VBoxManage. Use the following command to increase or decrease the size of the memory balloon within a running virtual machine that has Guest Additions installed:
VBoxManage controlvm "VM name" guestmemoryballoon n
where VM name is the name or UUID of
the virtual machine in question and n
is the amount of memory to allocate from the guest in megabytes.
See Section 8.20, “VBoxManage controlvm”.
You can also set a default balloon that will automatically be requested from the VM every time after it has started up with the following command:
VBoxManage modifyvm "VM name" --guest-memory-balloon n
By default, no balloon memory is allocated. This is a VM setting, like other modifyvm settings, and therefore can only be set while the machine is shut down. See Section 8.10, “VBoxManage modifyvm”.
Whereas memory ballooning simply reduces the amount of RAM that is available to a VM, Page Fusion works differently. It avoids memory duplication between several similar running VMs.
In a server environment running several similar VMs on the same host, lots of memory pages are identical. For example, if the VMs are using identical operating systems. Oracle VM VirtualBox's Page Fusion technology can efficiently identify these identical memory pages and share them between multiple VMs.
Note
Oracle VM VirtualBox supports Page Fusion only on 64-bit hosts, and it is not supported on macOS hosts. Page Fusion currently works only with Windows 2000 and later guests.
The more similar the VMs on a given host are, the more efficiently Page Fusion can reduce the amount of host memory that is in use. It therefore works best if all VMs on a host run identical operating systems. Instead of having a complete copy of each operating system in each VM, Page Fusion identifies the identical memory pages in use by these operating systems and eliminates the duplicates, sharing host memory between several machines. This is called deduplication. If a VM tries to modify a page that has been shared with other VMs, a new page is allocated again for that VM with a copy of the shared page. This is called copy on write. All this is fully transparent to the virtual machine.
You may be familiar with this kind of memory overcommitment from other hypervisor products, which call this feature page sharing or same page merging. However, Page Fusion differs significantly from those other solutions, whose approaches have several drawbacks:
Traditional hypervisors scan all guest memory and compute checksums, also called hashes, for every single memory page. Then, they look for pages with identical hashes and compare the entire content of those pages. If two pages produce the same hash, it is very likely that the pages are identical in content. This process can take rather long, especially if the system is not idling. As a result, the additional memory only becomes available after a significant amount of time, such as hours or sometimes days. Even worse, this kind of page sharing algorithm generally consumes significant CPU resources and increases the virtualization overhead by 10 to 20%.
Page Fusion in Oracle VM VirtualBox uses logic in the Oracle VM VirtualBox Guest Additions to quickly identify memory cells that are most likely identical across VMs. It can therefore achieve most of the possible savings of page sharing almost immediately and with almost no overhead.
Page Fusion is also much less likely to be confused by identical memory that it will eliminate, just to learn seconds later that the memory will now change and having to perform a highly expensive and often service-disrupting reallocation.
At this time, Page Fusion can only be controlled with VBoxManage, and only while a VM is shut down. To enable Page Fusion for a VM, use the following command:
VBoxManage modifyvm "VM name" --page-fusion on
You can observe Page Fusion operation using some metrics.
RAM/VMM/Shared shows the total amount of
fused pages, whereas the per-VM metric
Guest/RAM/Usage/Shared will return the amount
of fused memory for a given VM. See
Section 8.46, “VBoxManage metrics” for information on how to
query metrics.
Note
Enabling Page Fusion might indirectly increase the chances for malicious guests to successfully attack other VMs running on the same host. See Section 13.3.4, “Potentially Insecure Operations”.
The Guest Additions provide services for controlling the guest
system's monitor topology. Monitor topology means the resolution
of each virtual monitor and its state (disabled/enabled). The
resolution of a virtual monitor can be modified from the host
side either by resizing the window that hosts the virtual
monitor, by using the View menu
or the VBoxManage controlvm
vmname setscreenlayout
command. On guest operating systems with X11/Wayland desktops
this is put into effect by either of the following two services:
        VBoxClient --vmsvga
        VBoxDRMClient
The following are some details about guest screen resolution control functionality:
On X11/Wayland desktops the resizing service is started during desktop session initialization, that is desktop login. On X11 desktops
VBoxClient --vmsvgahandles screen topology through the RandR extension. On Wayland clientsVBoxDRMClientis used. The decision is made automatically at each desktop session start.On 32-bit guest operating systems VBoxDRMClient is always used, in order to work around bugs.
Since the monitor topology control services are initialized during the desktop session start, it is impossible to control the monitor resolution of display managers such as GDM or LightDM. This default behavior can be changed by setting the guest property
/VirtualBox/GuestAdd/DRMResizeof the virtual machine to any value. See Section 4.7, “Guest Properties” for details of how to update guest properties. When this guest property is set then VBoxDRMClient is started during the guest OS boot and stays active all the time, for both the display manager login screen and the desktop session.
VBoxDRMClient is not able to handle
arbitrary guest monitor topologies. Specifically, disabling a
guest monitor that is not the last one invalidates the monitor
topology due to limitations in the
vmwgfx.ko Linux kernel module. For example,
when the guest is configured to have four monitors it is not
recommended to disable the second or third monitor.
Table of Contents
- 5.1. Hard Disk Controllers
- 5.2. Disk Image Files (VDI, VMDK, VHD, HDD)
- 5.3. The Virtual Media Manager
- 5.4. Special Image Write Modes
- 5.5. Differencing Images
- 5.6. Cloning Disk Images
- 5.7. Host Input/Output Caching
- 5.8. Limiting Bandwidth for Disk Images
- 5.9. CD/DVD Support
- 5.10. iSCSI Servers
- 5.11. vboximg-mount: A Utility for FUSE Mounting a Virtual Disk Image
As the virtual machine will most probably expect to see a hard disk built into its virtual computer, Oracle VM VirtualBox must be able to present real storage to the guest as a virtual hard disk. There are presently three methods by which to achieve this:
Oracle VM VirtualBox can use large image files on a real hard disk and present them to a guest as a virtual hard disk. This is the most common method, described in Section 5.2, “Disk Image Files (VDI, VMDK, VHD, HDD)”.
iSCSI storage servers can be attached to Oracle VM VirtualBox. This is described in Section 5.10, “iSCSI Servers”.
You can allow a virtual machine to access one of your host disks directly. This is an advanced feature, described in Section 9.7.1, “Using a Raw Host Hard Disk From a Guest”.
Each such virtual storage device, such as an image file, iSCSI target, or physical hard disk, needs to be connected to the virtual hard disk controller that Oracle VM VirtualBox presents to a virtual machine. This is explained in the next section.
In a computing device, hard disks and CD/DVD drives are connected to a device called a hard disk controller, which drives hard disk operation and data transfers. Oracle VM VirtualBox can emulate the most common types of hard disk controllers typically found in computing devices: IDE, SATA (AHCI), SCSI, SAS, USB-based, NVMe and virtio-scsi mass storage devices.
IDE (ATA) controllers are a backwards-compatible yet very advanced extension of the disk controller in the IBM PC/AT (1984). Initially, this interface worked only with hard disks, but was later extended to also support CD-ROM drives and other types of removable media. In physical PCs, this standard uses flat ribbon parallel cables with 40 or 80 wires. Each such cable can connect two devices, called device 0 and device 1, to a controller. Typical PCs had two connectors for such cables. As a result, support for up to four IDE devices was most common: primary device 0, primary device 1, secondary device 0, and secondary device 1.
In Oracle VM VirtualBox, each virtual machine may have one IDE controller enabled, which gives you up to four virtual storage devices that you can attach to the machine. By default, one of these virtual storage devices, device 0 on the secondary channel, is preconfigured to be the virtual machine's virtual CD/DVD drive. However, you can change the default setting.
Even if your guest OS has no support for SCSI or SATA devices, it should always be able to see an IDE controller.
You can also select which exact type of IDE controller hardware Oracle VM VirtualBox should present to the virtual machine: PIIX3, PIIX4, or ICH6. This makes no difference in terms of performance, but if you import a virtual machine from another virtualization product, the OS in that machine may expect a particular controller type and crash if it is not found.
After you have created a new virtual machine with the New Virtual Machine wizard in VirtualBox Manager, you will typically see one IDE controller in the machine's Storage settings. The virtual CD/DVD drive will be attached to one of the four ports of this controller.
Serial ATA (SATA) is a more recent standard than IDE. Compared to IDE, it supports both much higher speeds and more devices per controller. Also, with physical hardware, devices can be added and removed while the system is running. The standard interface for SATA controllers is called Advanced Host Controller Interface (AHCI).
Like a real SATA controller, Oracle VM VirtualBox's virtual SATA controller operates faster and also consumes fewer CPU resources than the virtual IDE controller. Also, this enables you to connect up to 30 virtual hard disks to one machine instead of just three, when compared to the Oracle VM VirtualBox IDE controller with a DVD drive attached.
For this reason, depending on the selected guest OS, Oracle VM VirtualBox uses SATA as the default for newly created virtual machines. One virtual SATA controller is created by default, and the default disk that is created with a new VM is attached to this controller.
Warning
The entire SATA controller and the virtual disks attached to it, including those in IDE compatibility mode, will not be seen by OSes that do not have device support for AHCI. In particular, there is no support for AHCI in Windows versions before Windows Vista. Legacy Windows versions such as Windows XP, even with SP3 installed, will not see such disks unless you install additional drivers. It is possible to switch from IDE to SATA after installation by installing the SATA drivers and changing the controller type in the VM Settings window.
Oracle VM VirtualBox recommends the Intel Matrix Storage drivers, which can be downloaded from http://downloadcenter.intel.com/Product_Filter.aspx?ProductID=2101.
To add a SATA controller to a machine for which it has not been enabled by default, either because it was created by an earlier version of Oracle VM VirtualBox, or because SATA is not supported by default by the selected guest OS, do the following. Go to the Storage page of the machine's Settings window, click Add Controller under the Storage Tree box and then select Add SATA Controller. The new controller appears as a separate PCI device in the virtual machine, and you can add virtual disks to it.
To change the IDE compatibility mode settings for the SATA controller, see Section 8.27, “VBoxManage storagectl”.
SCSI is another established industry standard, standing for Small Computer System Interface. SCSI is as a generic interface for data transfer between all kinds of devices, including storage devices. SCSI is still used for connecting some hard disks and tape devices, but it has mostly been displaced in commodity hardware. It is still in common use in high-performance workstations and servers.
Primarily for compatibility with other virtualization software, Oracle VM VirtualBox optionally supports LSI Logic and BusLogic SCSI controllers, to each of which up to fifteen virtual hard disks can be attached.
To enable a SCSI controller, on the Storage page of a virtual machine's Settings window, click Add Controller under the Storage Tree box and then select Add SCSI Controller. The new controller appears as a separate PCI device in the virtual machine.
Warning
As with the other controller types, a SCSI controller will only be seen by OSes with device support for it. Windows 2003 and later ships with drivers for the LSI Logic controller, while Windows NT 4.0 and Windows 2000 ships with drivers for the BusLogic controller. Windows XP ships with drivers for neither.
Serial Attached SCSI (SAS) is another bus standard which uses the SCSI command set. As opposed to SCSI physical devices, serial cables are used instead of parallel cables. This simplifies physical device connections. In some ways, therefore, SAS is to SCSI what SATA is to IDE: it enables more reliable and faster connections.
To support high-end guests which require SAS controllers, Oracle VM VirtualBox emulates a LSI Logic SAS controller, which can be enabled much the same way as a SCSI controller. At this time, up to 255 devices can be connected to the SAS controller.
Warning
As with SATA, the SAS controller will only be seen by OSes with device support for it. In particular, there is no support for SAS in Windows before Windows Vista. So Windows XP, even SP3, will not see such disks unless you install additional drivers.
The USB mass storage device class is a standard to connect external storage devices like hard disks or flash drives to a host through USB. All major OSes support these devices and ship generic drivers making third-party drivers superfluous. In particular, legacy OSes without support for SATA controllers may benefit from USB mass storage devices.
The virtual USB storage controller offered by Oracle VM VirtualBox works differently to the other storage controller types. While most storage controllers appear as a single PCI device to the guest with multiple disks attached to it, the USB-based storage controller does not appear as virtual storage controller. Each disk attached to the controller appears as a dedicated USB device to the guest.
Warning
Booting from drives attached using USB is only supported when EFI is used as the BIOS lacks USB support.
Non volatile memory express (NVMe) is a standard for connecting non volatile memory (NVM) directly over PCI Express to lift the bandwidth limitation of the previously used SATA protocol for solid-state devices. Unlike other standards the command set is very simple in order to achieve maximum throughput and is not compatible with ATA or SCSI. OSes need to support NVMe devices to make use of them. For example, Windows 8.1 added native NVMe support. For Windows 7, native support was added with an update.
The NVMe controller is part of the extension pack.
Warning
Booting from drives attached using NVMe is only supported when EFI is used as the BIOS lacks the appropriate driver.
Virtual I/O Device SCSI is a standard to connect virtual storage devices like hard disks or optical drives to a VM. Recent Linux and Windows versions support these devices, but Windows needs additional drivers. Currently virtio-scsi controller support is experimental.
Warning
The virtio-scsi controller will only be seen by OSes with device support for it. In particular, there is no built-in support in Windows. So Windows will not see such disks unless you install additional drivers.
In summary, Oracle VM VirtualBox gives you the following categories of virtual storage slots:
Four slots attached to the traditional IDE controller, which are always present. One of these is typically a virtual CD/DVD drive.
30 slots attached to the SATA controller, if enabled and supported by the guest OS.
15 slots attached to the SCSI controller, if enabled and supported by the guest OS.
Up to 255 slots attached to the SAS controller, if enabled and supported by the guest OS.
Eight slots attached to the virtual USB controller, if enabled and supported by the guest OS.
Up to 255 slots attached to the NVMe controller, if enabled and supported by the guest OS.
Up to 256 slots attached to the virtio-scsi controller, if enabled and supported by the guest OS.
Given this large choice of storage controllers, you may not know which one to choose. In general, you should avoid IDE unless it is the only controller supported by your guest. Whether you use SATA, SCSI, or SAS does not make any real difference. The variety of controllers is only supplied by Oracle VM VirtualBox for compatibility with existing hardware and other hypervisors.
Disk image files reside on the host system and are seen by the guest systems as hard disks of a certain geometry. When a guest OS reads from or writes to a hard disk, Oracle VM VirtualBox redirects the request to the image file.
Like a physical disk, a virtual disk has a size, or capacity, which must be specified when the image file is created. As opposed to a physical disk however, Oracle VM VirtualBox enables you to expand an image file after creation, even if it has data already. See Section 8.31, “VBoxManage modifymedium”.
Oracle VM VirtualBox supports the following types of disk image files:
VDI. Normally, Oracle VM VirtualBox uses its own container format for guest hard disks. This is called a Virtual Disk Image (VDI) file. This format is used when you create a new virtual machine with a new disk.
VMDK. Oracle VM VirtualBox also fully supports the popular and open VMDK container format that is used by many other virtualization products, such as VMware.
VHD. Oracle VM VirtualBox also fully supports the VHD format used by Microsoft.
HDD. Image files of Parallels version 2 (HDD format) are also supported.
Due to lack of documentation of the format, newer versions such as 3 and 4 are not supported. You can however convert such image files to version 2 format using tools provided by Parallels.
Irrespective of the disk capacity and format, as mentioned in Section 1.8, “Creating Your First Virtual Machine”, there are two options for creating a disk image: fixed-size or dynamically allocated.
Fixed-size. If you create a fixed-size image, an image file will be created on your host system which has roughly the same size as the virtual disk's capacity. So, for a 10 GB disk, you will have a 10 GB file. Note that the creation of a fixed-size image can take a long time depending on the size of the image and the write performance of your hard disk.
Dynamically allocated. For more flexible storage management, use a dynamically allocated image. This will initially be very small and not occupy any space for unused virtual disk sectors, but will grow every time a disk sector is written to for the first time, until the drive reaches the maximum capacity chosen when the drive was created. While this format takes less space initially, the fact that Oracle VM VirtualBox needs to expand the image file consumes additional computing resources, so until the disk file size has stabilized, write operations may be slower than with fixed size disks. However, after a time the rate of growth will slow and the average penalty for write operations will be negligible.
Oracle VM VirtualBox keeps track of all the hard disk, CD/DVD-ROM, and floppy disk images which are in use by virtual machines. These are often referred to as known media and come from two sources:
All media currently attached to virtual machines.
Registered media, for compatibility with legacy Oracle VM VirtualBox versions.
The known media can be viewed and changed using the Virtual Media Manager tool, which you access by clicking Media on the global Tools menu in VirtualBox Manager.
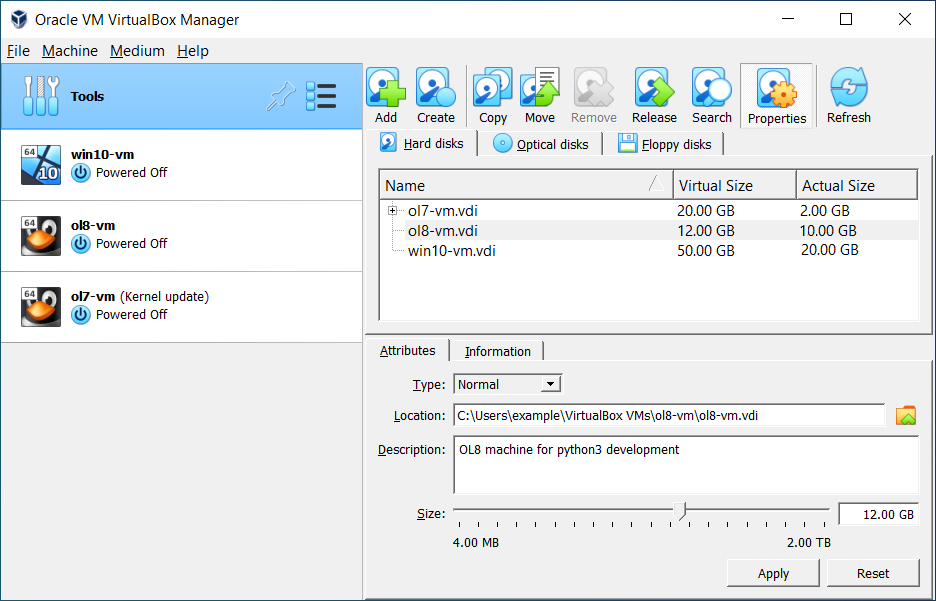
The known media are conveniently grouped in separate tabs for the supported formats. These formats are:
Hard disk images, either in Oracle VM VirtualBox's own Virtual Disk Image (VDI) format, or in the third-party formats listed in Section 5.2, “Disk Image Files (VDI, VMDK, VHD, HDD)”.
CD/DVD images in standard ISO format.
Floppy images in standard RAW format.
For each image, the Virtual Media Manager shows you the full path of the image file and other information, such as the virtual machine the image is currently attached to.
The Virtual Media Manager enables you to do the following:
Add an image to the known media.
Create a new disk image.
For hard disks, the Create Virtual Hard Disk wizard is shown. See Section 5.3.1, “Creating a Virtual Hard Disk Image”.
For optical disks, the VISO Creator tool is shown. See Section 5.3.2, “Creating a Virtual Optical Disk Image”.
For floppy disks, the Floppy Disk Creator tool is shown. See Section 5.3.3, “Creating a Virtual Floppy Disk Image”.
Copy an image to create another one.
For virtual hard disks, you can specify one of the following target types: VDI, VHD, or VMDK.
Move an image to another location.
A file dialog prompts you for the new image file location.
When you use the Virtual Media Manager to move a disk image, Oracle VM VirtualBox updates all related configuration files automatically.
Note
Always use the Virtual Media Manager or the VBoxManage modifymedium command to move a disk image.
If you use a file management feature of the host OS to move a disk image to a new location, run the VBoxManage modifymedium
--setlocationcommand to configure the new path of the disk image on the host file system. This command updates the Oracle VM VirtualBox configuration automatically.Remove an image from the known media. You can optionally delete the image file when removing the image.
Release an image to detach it from a VM. This action only applies if the image is currently attached to a VM as a virtual hard disk.
Clear all inaccessible disk images from the list. The disk images are released from the VMs they are attached to and removed from the known media.
Note
This option is for optical disks and floppy disks only.
Search for an image by name or UUID.
View and edit the Properties of a disk image.
Available properties include the following:
Type: Specifies the snapshot behavior of the disk. See Section 5.4, “Special Image Write Modes”.
Location: Specifies the location of the disk image file on the host system. You can use a file dialog to browse for the disk image location.
Description: Specifies a short description of the disk image.
Size: Specifies the size of the disk image. You can use the slider to increase or decrease the disk image size.
Information: Specifies detailed information about the disk image.
Refresh the property values of the selected disk image.
To perform these actions, highlight the medium in the Virtual Media Manager and then do one of the following:
Click an icon in the Virtual Media Manager toolbar.
Right-click the medium and select an option.
Use the Storage page in a VM's Settings window to create a new disk image. By default, disk images are stored in the VM's folder.
You can copy hard disk image files to other host systems and then import them in to VMs from the host system. However, some Windows guest OSes may require that you configure the new VM in a similar way to the old one.
Note
Do not simply make copies of virtual disk images. If you import such a second copy into a VM, Oracle VM VirtualBox issues an error because Oracle VM VirtualBox assigns a universally unique identifier (UUID) to each disk image to ensure that it is only used one time. See Section 5.6, “Cloning Disk Images”. Also, if you want to copy a VM to another system, use the Oracle VM VirtualBox import and export features. See Section 1.15, “Importing and Exporting Virtual Machines”.
Use the Create Virtual Hard Disk wizard to create a hard disk image.
Display the Hard Disks tab in Virtual Media Manager and click Create.
The Create Virtual Hard Disk wizard is shown.
On the Virtual Hard Disk File Type page, select a file type for the new virtual hard disk image.
Click Next.
On the Storage on Physical Hard Disk page, select whether the size of the virtual hard disk file is dynamically allocated or is of fixed size.
Click Next.
On the File Location and Size page, configure the location of the virtual hard disk file and use the slider to set the size limit for the virtual hard disk.
Click Finish to create the virtual hard disk file.
The virtual hard disk image is created in the specified location and added to the Hard Disks tab in Virtual Media Manager.
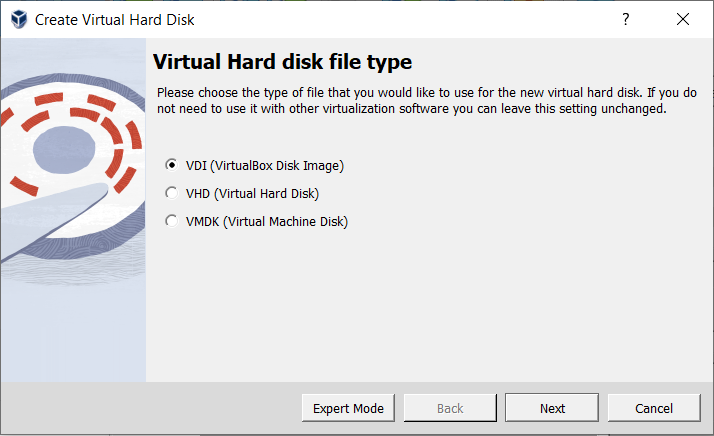
Use the VISO Creator tool to create a virtual optical disk image. This enables you to create a virtual ISO from selected files on the host.
Display the Optical Disks tab in Virtual Media Manager and click Create.
The VISO Creator tool is shown.
Create the virtual ISO file.
Configure the name of the ISO file.
Click Configuration and enter a name in the Viso Name field.
Add files to your virtual ISO.
In the Host File System pane, select files to copy from the host system to the virtual ISO.
Click Add Items To VISO. The files are displayed in the VISO Content pane.
The following file operations are also available:
To create folders on the virtual ISO, click Create New Directory.
To remove files from the virtual ISO, select files in the VISO Content pane and click Remove Items From VISO.
To remove all files from the virtual ISO, click Reset the VISO Content.
Create the virtual ISO image.
Click Create.
A virtual ISO file with the specified name and content is created.
Use the Floppy Disk Creator tool to create a floppy disk image.
Display the Floppy Disks tab in Virtual Media Manager and click Create.
The Floppy Disk Creator tool is shown.
Configure the following settings:
File Path: The name and location of the floppy disk image.
Size: Select from the list of supported floppy disk sizes.
Format Disk as FAT 12: This is the default format used for most floppy disks. For an unformatted disk, do not select this option.
Create the floppy disk image file.
Click Create.
The floppy disk image is created in the specified location and added to the Floppy Disks tab in Virtual Media Manager.
For each virtual disk image supported by Oracle VM VirtualBox, you can determine separately how it should be affected by write operations from a virtual machine and snapshot operations. This applies to all of the aforementioned image formats (VDI, VMDK, VHD, or HDD) and irrespective of whether an image is fixed-size or dynamically allocated.
By default, images are in normal mode. To
mark an existing image with one of the non-standard modes listed
below, use VBoxManage modifymedium. See
Section 8.31, “VBoxManage modifymedium”. Alternatively, use
VBoxManage storageattach to attach the image to
a VM and specify the --mtype argument. See
Section 8.26, “VBoxManage storageattach”.
The available virtual disk image modes are as follows:
Normal images have no restrictions on how guests can read from and write to the disk. This is the default image mode.
When you take a snapshot of your virtual machine as described in Section 1.11, “Snapshots”, the state of a normal hard disk is recorded together with the snapshot, and when reverting to the snapshot, its state will be fully reset.
The image file itself is not reset. Instead, when a snapshot is taken, Oracle VM VirtualBox freezes the image file and no longer writes to it. For the write operations from the VM, a second, differencing image file is created which receives only the changes to the original image. See Section 5.5, “Differencing Images”.
While you can attach the same normal image to more than one virtual machine, only one of these virtual machines attached to the same image file can be executed simultaneously, as otherwise there would be conflicts if several machines write to the same image file.
Write-through hard disks are completely unaffected by snapshots. Their state is not saved when a snapshot is taken, and not restored when a snapshot is restored.
Shareable hard disks are a variant of write-through hard disks. In principle they behave exactly the same. Their state is not saved when a snapshot is taken, and not restored when a snapshot is restored. The difference only shows if you attach such disks to several VMs. Shareable disks may be attached to several VMs which may run concurrently. This makes them suitable for use by cluster filesystems between VMs and similar applications which are explicitly prepared to access a disk concurrently. Only fixed size images can be used in this way, and dynamically allocated images are rejected.
Warning
This is an expert feature, and misuse can lead to data loss, as regular filesystems are not prepared to handle simultaneous changes by several parties.
Immutable images only remember write accesses temporarily while the virtual machine is running. All changes are lost when the virtual machine is powered on the next time. As a result, as opposed to Normal images, the same immutable image can be used with several virtual machines without restrictions.
Creating an immutable image makes little sense since it would be initially empty and lose its contents with every machine restart. You would have a disk that is always unformatted when the machine starts up. Instead, you can first create a normal image and then later mark it as immutable when you decide that the contents are useful.
If you take a snapshot of a machine with immutable images, then on every machine power-up, those images are reset to the state of the last (current) snapshot, instead of the state of the original immutable image.
Note
As a special exception, immutable images are not reset if they are attached to a machine in a saved state or whose last snapshot was taken while the machine was running. This is called an online snapshot. As a result, if the machine's current snapshot is an online snapshot, its immutable images behave exactly like the a normal image. To reenable the automatic resetting of such images, delete the current snapshot of the machine.
Oracle VM VirtualBox never writes to an immutable image directly at all. All write operations from the machine are directed to a differencing image. The next time the VM is powered on, the differencing image is reset so that every time the VM starts, its immutable images have exactly the same content.
The differencing image is only reset when the machine is powered on from within Oracle VM VirtualBox, not when you reboot by requesting a reboot from within the machine. This is also why immutable images behave as described above when snapshots are also present, which use differencing images as well.
If the automatic discarding of the differencing image on VM startup does not fit your needs, you can turn it off using the
autoresetparameter of VBoxManage modifymedium. See Section 8.31, “VBoxManage modifymedium”.Multiattach mode images can be attached to more than one virtual machine at the same time, even if these machines are running simultaneously. For each virtual machine to which such an image is attached, a differencing image is created. As a result, data that is written to such a virtual disk by one machine is not seen by the other machines to which the image is attached. Each machine creates its own write history of the multiattach image.
Technically, a multiattach image behaves identically to an immutable image except the differencing image is not reset every time the machine starts.
This mode is useful for sharing files which are almost never written, for instance picture galleries, where every guest changes only a small amount of data and the majority of the disk content remains unchanged. The modified blocks are stored in differencing images which remain relatively small and the shared content is stored only once at the host.
Read-only images are used automatically for CD/DVD images, since CDs/DVDs can never be written to.
The following scenario illustrates the differences between the various image modes, with respect to snapshots.
Assume you have installed your guest OS in your VM, and you have taken a snapshot. Later, your VM is infected with a virus and you would like to go back to the snapshot. With a normal hard disk image, you simply restore the snapshot, and the earlier state of your hard disk image will be restored as well and your virus infection will be undone. With an immutable hard disk, all it takes is to shut down and power on your VM, and the virus infection will be discarded. With a write-through image however, you cannot easily undo the virus infection by means of virtualization, but will have to disinfect your virtual machine like a real computer.
You might find write-through images useful if you want to preserve critical data irrespective of snapshots. As you can attach more than one image to a VM, you may want to have one immutable image for the OS and one write-through image for your data files.
The previous section mentioned differencing images and how they are used with snapshots, immutable images, and multiple disk attachments. This section describes in more detail how differencing images work.
A differencing image is a special disk image that only holds the differences to another image. A differencing image by itself is useless, it must always refer to another image. The differencing image is then typically referred to as a child, which holds the differences to its parent.
When a differencing image is active, it receives all write operations from the virtual machine instead of its parent. The differencing image only contains the sectors of the virtual hard disk that have changed since the differencing image was created. When the machine reads a sector from such a virtual hard disk, it looks into the differencing image first. If the sector is present, it is returned from there. If not, Oracle VM VirtualBox looks into the parent. In other words, the parent becomes read-only. It is never written to again, but it is read from if a sector has not changed.
Differencing images can be chained. If another differencing image is created for a virtual disk that already has a differencing image, then it becomes a grandchild of the original parent. The first differencing image then becomes read-only as well, and write operations only go to the second-level differencing image. When reading from the virtual disk, Oracle VM VirtualBox needs to look into the second differencing image first, then into the first if the sector was not found, and then into the original image.
There can be an unlimited number of differencing images, and each image can have more than one child. As a result, the differencing images can form a complex tree with parents, siblings, and children, depending on how complex your machine configuration is. Write operations always go to the one active differencing image that is attached to the machine, and for read operations, Oracle VM VirtualBox may need to look up all the parents in the chain until the sector in question is found. You can view such a tree in the Virtual Media Manager.
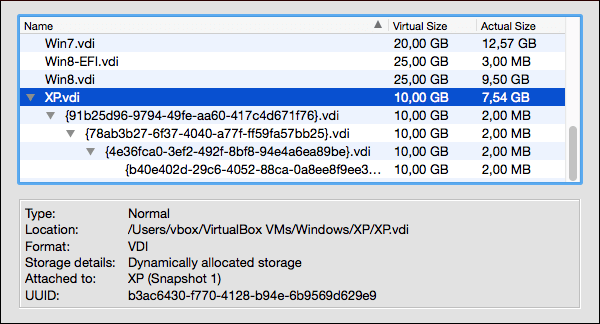
In all of these situations, from the point of view of the virtual machine, the virtual hard disk behaves like any other disk. While the virtual machine is running, there is a slight run-time I/O overhead because Oracle VM VirtualBox might need to look up sectors several times. This is not noticeable however since the tables with sector information are always kept in memory and can be looked up quickly.
Differencing images are used in the following situations:
Snapshots. When you create a snapshot, as explained in the previous section, Oracle VM VirtualBox freezes the images attached to the virtual machine and creates differencing images for each image that is not in write-through mode. From the point of view of the virtual machine, the virtual disks continue to operate before, but all write operations go into the differencing images. Each time you create another snapshot, for each hard disk attachment, another differencing image is created and attached, forming a chain or tree.
In the above screenshot, you see that the original disk image is now attached to a snapshot, representing the state of the disk when the snapshot was taken.
If you restore a snapshot, and want to go back to the exact machine state that was stored in the snapshot, the following happens:
Oracle VM VirtualBox copies the virtual machine settings that were copied into the snapshot back to the virtual machine. As a result, if you have made changes to the machine configuration since taking the snapshot, they are undone.
If the snapshot was taken while the machine was running, it contains a saved machine state, and that state is restored as well. After restoring the snapshot, the machine will then be in Saved state and resume execution from there when it is next started. Otherwise the machine will be in Powered Off state and do a full boot.
For each disk image attached to the machine, the differencing image holding all the write operations since the current snapshot was taken is thrown away, and the original parent image is made active again. If you restored the root snapshot, then this will be the root disk image for each attachment. Otherwise, some other differencing image descended from it. This effectively restores the old machine state.
If you later delete a snapshot in order to free disk space, for each disk attachment, one of the differencing images becomes obsolete. In this case, the differencing image of the disk attachment cannot simply be deleted. Instead, Oracle VM VirtualBox needs to look at each sector of the differencing image and needs to copy it back into its parent. This is called "merging" images and can be a potentially lengthy process, depending on how large the differencing image is. It can also temporarily need a considerable amount of extra disk space, before the differencing image obsoleted by the merge operation is deleted.
Immutable images. When an image is switched to immutable mode, a differencing image is created as well. As with snapshots, the parent image then becomes read-only, and the differencing image receives all the write operations. Every time the virtual machine is started, all the immutable images which are attached to it have their respective differencing image thrown away, effectively resetting the virtual machine's virtual disk with every restart.
You can duplicate hard disk image files on the same host to quickly produce a second virtual machine with the same OS setup. However, you should only make copies of virtual disk images using the utility supplied with Oracle VM VirtualBox. See Section 8.32, “VBoxManage clonemedium”. This is because Oracle VM VirtualBox assigns a UUID to each disk image, which is also stored inside the image, and Oracle VM VirtualBox will refuse to work with two images that use the same number. If you do accidentally try to reimport a disk image which you copied normally, you can make a second copy using the VBoxManage clonevm command and import that instead.
Note that Linux distributions identify the boot hard disk from the
ID of the drive. The ID Oracle VM VirtualBox reports for a drive is
determined from the UUID of the virtual disk image. So if you
clone a disk image and try to boot the copied image the guest
might not be able to determine its own boot disk as the UUID
changed. In this case you have to adapt the disk ID in your boot
loader script, for example
/boot/grub/menu.lst. The disk ID looks like
the following:
scsi-SATA_VBOX_HARDDISK_VB5cfdb1e2-c251e503
The ID for the copied image can be determined as follows:
hdparm -i /dev/sda
Oracle VM VirtualBox can optionally disable the I/O caching that the host OS would otherwise perform on disk image files.
Traditionally, Oracle VM VirtualBox has opened disk image files as normal files, which results in them being cached by the host OS like any other file. The main advantage of this is speed: when the guest OS writes to disk and the host OS cache uses delayed writing, the write operation can be reported as completed to the guest OS quickly while the host OS can perform the operation asynchronously. Also, when you start a VM a second time and have enough memory available for the OS to use for caching, large parts of the virtual disk may be in system memory, and the VM can access the data much faster.
Note that this applies only to image files. Buffering does not occur for virtual disks residing on remote iSCSI storage, which is the more common scenario in enterprise-class setups. See Section 5.10, “iSCSI Servers”.
While buffering is a useful default setting for virtualizing a few machines on a desktop computer, there are some disadvantages to this approach:
Delayed writing through the host OS cache is less secure. When the guest OS writes data, it considers the data written even though it has not yet arrived on a physical disk. If for some reason the write does not happen, such as power failure or host crash, the likelihood of data loss increases.
Disk image files tend to be very large. Caching them can therefore quickly use up the entire host OS cache. Depending on the efficiency of the host OS caching, this may slow down the host immensely, especially if several VMs run at the same time. For example, on Linux hosts, host caching may result in Linux delaying all writes until the host cache is nearly full and then writing out all these changes at once, possibly stalling VM execution for minutes. This can result in I/O errors in the guest as I/O requests time out there.
Physical memory is often wasted as guest OSes typically have their own I/O caches, which may result in the data being cached twice, in both the guest and the host caches, for little effect.
If you decide to disable host I/O caching for the above reasons, Oracle VM VirtualBox uses its own small cache to buffer writes, but no read caching since this is typically already performed by the guest OS. In addition, Oracle VM VirtualBox fully supports asynchronous I/O for its virtual SATA, SCSI, and SAS controllers through multiple I/O threads.
Since asynchronous I/O is not supported by IDE controllers, for performance reasons, you may want to leave host caching enabled for your VM's virtual IDE controllers.
For this reason, Oracle VM VirtualBox enables you to configure whether the host I/O cache is used for each I/O controller separately. Either select the Use Host I/O Cache check box in the Storage settings for a given virtual storage controller, or use the following VBoxManage command to disable the host I/O cache for a virtual storage controller:
VBoxManage storagectl "VM name" --name <controllername> --hostiocache off
See Section 8.27, “VBoxManage storagectl”.
For the above reasons, Oracle VM VirtualBox uses SATA controllers by default for new virtual machines.
Oracle VM VirtualBox supports limiting of the maximum bandwidth used for asynchronous I/O. Additionally it supports sharing limits through bandwidth groups for several images. It is possible to have more than one such limit.
Limits are configured using VBoxManage. The example below creates a bandwidth group named Limit, sets the limit to 20 MB per second, and assigns the group to the attached disks of the VM:
VBoxManage bandwidthctl "VM name" add Limit --type disk --limit 20M
VBoxManage storageattach "VM name" --storagectl "SATA" --port 0 --device 0 --type hdd
                                   --medium disk1.vdi --bandwidthgroup Limit
VBoxManage storageattach "VM name" --storagectl "SATA" --port 1 --device 0 --type hdd
                                   --medium disk2.vdi --bandwidthgroup Limit
All disks in a group share the bandwidth limit, meaning that in the example above the bandwidth of both images combined can never exceed 20 MBps. However, if one disk does not require bandwidth the other can use the remaining bandwidth of its group.
The limits for each group can be changed while the VM is running, with changes being picked up immediately. The example below changes the limit for the group created in the example above to 10 MBps:
VBoxManage bandwidthctl "VM name" set Limit --limit 10M
Virtual CD/DVD drives by default support only reading. The medium configuration is changeable at runtime. You can select between the following options to provide the medium data:
Host Drive defines that the guest can read from the medium in the host drive.
Image file gives the guest read-only access to the data in the image. This is typically an ISO file.
Empty means a drive without an inserted medium.
Changing between the above, or changing a medium in the host drive that is accessed by a machine, or changing an image file will signal a medium change to the guest OS. The guest OS can then react to the change, for example by starting an installation program.
Medium changes can be prevented by the guest, and Oracle VM VirtualBox reflects that by locking the host drive if appropriate. You can force a medium removal in such situations by using the VirtualBox Manager or the VBoxManage command line tool. Effectively this is the equivalent of the emergency eject which many CD/DVD drives provide, with all associated side effects. The guest OS can issue error messages, just like on real hardware, and guest applications may misbehave. Use this with caution.
Note
The identification string of the drive provided to the guest, displayed by configuration tools such as the Windows Device Manager, is always VBOX CD-ROM, irrespective of the current configuration of the virtual drive. This is to prevent hardware detection from being triggered in the guest OS every time the configuration is changed.
The standard CD/DVD emulation enables reading of standard data CD and DVD formats only. As an experimental feature, for additional capabilities, it is possible to give the guest direct access to the CD/DVD host drive by enabling passthrough mode. Depending on the host hardware, this may potentially enable the following things to work:
CD/DVD writing from within the guest, if the host DVD drive is a CD/DVD writer
Playing audio CDs
Playing encrypted DVDs
To enable host drive passthrough you can use the
--passthrough option of the VBoxManage
storageattach command. See
Section 8.26, “VBoxManage storageattach”.
Even if passthrough is enabled, unsafe commands, such as updating the drive firmware, will be blocked. Video CD formats are never supported, not even in passthrough mode, and cannot be played from a virtual machine.
On Oracle Solaris hosts, passthrough requires running Oracle VM VirtualBox with real root permissions due to security measures enforced by the host.
iSCSI stands for Internet SCSI and is a standard that supports use of the SCSI protocol over Internet (TCP/IP) connections. Especially with the advent of Gigabit Ethernet, it has become affordable to attach iSCSI storage servers simply as remote hard disks to a computer network. In iSCSI terminology, the server providing storage resources is called an iSCSI target, while the client connecting to the server and accessing its resources is called an iSCSI initiator.
Oracle VM VirtualBox can transparently present iSCSI remote storage to a virtual machine as a virtual hard disk. The guest OS will not see any difference between a virtual disk image (VDI file) and an iSCSI target. To achieve this, Oracle VM VirtualBox has an integrated iSCSI initiator.
Oracle VM VirtualBox's iSCSI support has been developed according to the iSCSI standard and should work with all standard-conforming iSCSI targets. To use an iSCSI target with Oracle VM VirtualBox, you must use the command line. See Section 8.26, “VBoxManage storageattach”.
vboximg-mount is a command line utility for Mac OS and Linux hosts that provides raw access to an Oracle VM VirtualBox virtual disk image on the host system. Use this utility to mount, view, and optionally modify the disk image contents.
The utility is based on Filesystem in Userspace (FUSE) technology and uses the VirtualBox runtime engine. Ensure that Oracle VM VirtualBox is running on the host system.
Note
When using vboximg-mount, ensure that the following conditions apply:
The disk image is not being used by any other systems, such as by guest VMs.
No VMs are running on the host system.
Raw access using FUSE is preferred over direct loopback mounting of virtual disk images, because it is snapshot aware. It can selectively merge disk differencing images in an exposed virtual hard disk, providing historical or up-to-date representations of the virtual disk contents.
vboximg-mount enables you to view information about registered VMs, their attached disk media, and any snapshots. Also, you can view partition information for a disk image.
The vboximg-mount command includes experimental read-only access to file systems inside a VM disk image. This feature enables you to extract some files from the disk image without starting the VM and without requiring third-party file system drivers on the host system. FAT, NTFS, ext2, ext3, and ext4 file systems are supported.
Use the --help option to view information about
the vboximg-mount command usage. The complete
command reference is described in
Section 8.55, “vboximg-mount”.
When vboximg-mount mounts an Oracle VM VirtualBox disk image, it creates a one level deep file system at a mount point that you specify. The file system includes a device node that represents the synthesized disk image as a readable or readable-writeable bytestream. This bytestream can be mounted either by using the host OS or by using other FUSE-based file systems.
The following examples show how to use the vboximg-mount command to view information about virtual disk images.
The following command outputs detailed information about all registered VMs and associated snapshots:
$ vboximg-mount --list --verbose

    ------------------------------------------------------
    VM Name:   "macOS High Sierra 10.13"
    UUID:      3887d96d-831c-4187-a55a-567c504ff0e1
    Location:  /Volumes/work/vm_guests/macOS High Sierra 10.13/macOS High Sierra 10.13.vbox
       -----------------------
       HDD base:   "macOS High Sierra 10.13.vdi"
       UUID:       f9ea7173-6869-4aa9-b487-68023a655980
       Location:   /Volumes/work/vm_guests/macOS High Sierra 10.13/macOS High Sierra 10.13.vdi

         Diff 1:
              UUID:       98c2bac9-cf37-443d-a935-4e879b70166d
              Location:   /Volumes/work/vm_guests/macOS High Sierra 10.13/
              Snapshots/{98c2bac9-cf37-443d-a935-4e879b70166d}.vdi
         Diff 2:
              UUID:       f401f381-7377-40b3-948e-3c61241b1a42
              Location:   /Volumes/work/vm_guests/macOS High Sierra 10.13/
              Snapshots/{f401f381-7377-40b3-948e-3c61241b1a42}.vdi
       -----------------------
       HDD base:   "simple_fixed_disk.vdi"
       UUID:       ffba4d7e-1277-489d-8173-22ca7660773d
       Location:   /Volumes/work/vm_guests/macOS High Sierra 10.13/simple_fixed_disk.vdi

         Diff 1:
              UUID:       aecab681-0d2d-468b-8682-93f79dc97a48
              Location:   /Volumes/work/vm_guests/macOS High Sierra 10.13/
              Snapshots/{aecab681-0d2d-468b-8682-93f79dc97a48}.vdi
         Diff 2:
              UUID:       70d6b34d-8422-47fa-8521-3b6929a1971c
              Location:   /Volumes/work/vm_guests/macOS High Sierra 10.13/
              Snapshots/{70d6b34d-8422-47fa-8521-3b6929a1971c}.vdi
      ------------------------------------------------------
      VM Name:   "debian"
      UUID:      5365ab5f-470d-44c0-9863-dad532ee5905
      Location:  /Volumes/work/vm_guests/debian/debian.vbox
         -----------------------
         HDD base:   "debian.vdi"
         UUID:       96d2e92e-0d4e-46ab-a0f1-008fdbf997e7
         Location:   /Volumes/work/vm_guests/debian/ol7.vdi

            Diff 1:
                UUID:       f9cc866a-9166-42e9-a503-bbfe9b7312e8
                Location:   /Volumes/work/vm_guests/debian/Snapshots/
                {f9cc866a-9166-42e9-a503-bbfe9b7312e8}.vdi
The following command outputs partition information about the specified disk image:
$ vboximg-mount --image=f9ea7173-6869-4aa9-b487-68023a655980 --list

    Virtual disk image:

       Path: /Volumes/work/vm_guests/macOS High Sierra 10.13/macOS High Sierra 10.13.vdi
       UUID: f9ea7173-6869-4aa9-b487-68023a655980

      #     Start  Sectors     Size       Offset  Type
      1        40  409599    199.9M        20480  EFI System
      2    409640  67453071   32.1G    209735680  Hierarchical File System Plus (HFS+)
3 67862712 1269535 107.8M 34745708544 Apple Boot (Recovery HD)The following steps show how to use the vboximg-mount command to mount a partition of a virtual disk image on the host OS.
Create a mount point on the host OS. For example:
$ mkdir macos_sysdisk
Show partition information about the virtual disk image.
$ vboximg-mount --image=
uuid--listwhere
uuidis the UUID of the disk image.Use vboximg-mount to perform a FUSE mount of a partition on the virtual disk image. For example:
$ vboximg-mount --image=
uuid-p 2 macos_sysdiskwhere
uuidis the UUID for the disk image.In this example, partition 2 is mounted on the
macos_sysdiskmount point. The mount includes all snapshots for the disk image.Use the host OS to mount the
vhdddevice node. The FUSE-mounted device node represents the virtual disk image.$ ls macos_sysdisk macOS High Sierra 10.13.vdi vhdd $ sudo mount macos_sysdisk/vhdd /mnt
Table of Contents
- 6.1. Virtual Networking Hardware
- 6.2. Introduction to Networking Modes
- 6.3. Network Address Translation (NAT)
- 6.4. Network Address Translation Service
- 6.5. Bridged Networking
- 6.6. Internal Networking
- 6.7. Host-Only Networking
- 6.8. UDP Tunnel Networking
- 6.9. VDE Networking
- 6.10. Cloud Networks
- 6.11. Network Manager
- 6.12. Limiting Bandwidth for Network Input/Output
- 6.13. Improving Network Performance
As mentioned in Section 3.9, “Network Settings”, Oracle VM VirtualBox provides up to eight virtual PCI Ethernet cards for each virtual machine. For each such card, you can individually select the following:
The hardware that will be virtualized.
The virtualization mode that the virtual card operates in, with respect to your physical networking hardware on the host.
Four of the network cards can be configured in the Network section of the Settings window in VirtualBox Manager. You can configure all eight network cards on the command line using VBoxManage modifyvm. See Section 8.10, “VBoxManage modifyvm”.
This chapter explains the various networking settings in more detail.
For each card, you can individually select what kind of hardware will be presented to the virtual machine. Oracle VM VirtualBox can virtualize the following types of networking hardware:
AMD PCNet PCI II (Am79C970A)
AMD PCNet FAST III (Am79C973), the default setting
Intel PRO/1000 MT Desktop (82540EM)
Intel PRO/1000 T Server (82543GC)
Intel PRO/1000 MT Server (82545EM)
Paravirtualized network adapter (virtio-net)
The PCNet FAST III is the default because it is supported by nearly all operating systems, as well as by the GNU GRUB boot manager. As an exception, the Intel PRO/1000 family adapters are chosen for some guest operating system types that no longer ship with drivers for the PCNet card, such as Windows Vista.
The Intel PRO/1000 MT Desktop type works with Windows Vista and later versions. The T Server variant of the Intel PRO/1000 card is recognized by Windows XP guests without additional driver installation. The MT Server variant facilitates OVF imports from other platforms.
The Paravirtualized network adapter (virtio-net) is special. If you select this adapter, then Oracle VM VirtualBox does not virtualize common networking hardware that is supported by common guest operating systems. Instead, Oracle VM VirtualBox expects a special software interface for virtualized environments to be provided by the guest, thus avoiding the complexity of emulating networking hardware and improving network performance. Oracle VM VirtualBox provides support for the industry-standard virtio networking drivers, which are part of the open source KVM project.
The virtio networking drivers are available for the following guest operating systems:
Linux kernels version 2.6.25 or later can be configured to provide virtio support. Some distributions have also back-ported virtio to older kernels.
For Windows 2000, XP, and Vista, virtio drivers can be downloaded and installed from the KVM project web page:
Oracle VM VirtualBox also has limited support for jumbo frames. These are networking packets with more than 1500 bytes of data, provided that you use the Intel card virtualization and bridged networking. Jumbo frames are not supported with the AMD networking devices. In those cases, jumbo packets will silently be dropped for both the transmit and the receive direction. Guest operating systems trying to use this feature will observe this as a packet loss, which may lead to unexpected application behavior in the guest. This does not cause problems with guest operating systems in their default configuration, as jumbo frames need to be explicitly enabled.
Each of the networking adapters can be separately configured to operate in one of the following modes:
Not attached. In this mode, Oracle VM VirtualBox reports to the guest that a network card is present, but that there is no connection. This is as if no Ethernet cable was plugged into the card. Using this mode, it is possible to pull the virtual Ethernet cable and disrupt the connection, which can be useful to inform a guest operating system that no network connection is available and enforce a reconfiguration.
Network Address Translation (NAT). If all you want is to browse the Web, download files, and view email inside the guest, then this default mode should be sufficient for you, and you can skip the rest of this section. Please note that there are certain limitations when using Windows file sharing. See Section 6.3.3, “NAT Limitations”.
NAT Network. A NAT network is a type of internal network that allows outbound connections. See Section 6.4, “Network Address Translation Service”.
Bridged networking. This is for more advanced networking needs, such as network simulations and running servers in a guest. When enabled, Oracle VM VirtualBox connects to one of your installed network cards and exchanges network packets directly, circumventing your host operating system's network stack.
Internal networking. This can be used to create a different kind of software-based network which is visible to selected virtual machines, but not to applications running on the host or to the outside world.
Host-only networking. This can be used to create a network containing the host and a set of virtual machines, without the need for the host's physical network interface. Instead, a virtual network interface, similar to a loopback interface, is created on the host, providing connectivity among virtual machines and the host.
Cloud networking. This can be used to connect a local VM to a subnet on a remote cloud service.
Generic networking. Rarely used modes which share the same generic network interface, by allowing the user to select a driver which can be included with Oracle VM VirtualBox or be distributed in an extension pack.
The following sub-modes are available:
UDP Tunnel: Used to interconnect virtual machines running on different hosts directly, easily, and transparently, over an existing network infrastructure.
VDE (Virtual Distributed Ethernet) networking: Used to connect to a Virtual Distributed Ethernet switch on a Linux or a FreeBSD host. At the moment this option requires compilation of Oracle VM VirtualBox from sources, as the Oracle packages do not include it.
The following table provides an overview of the most important networking modes.
Table 6.1. Overview of Networking Modes
| Mode | VM→Host | VM←Host | VM1↔VM2 | VM→Net/LAN | VM←Net/LAN |
|---|---|---|---|---|---|
Host-only | + | + | + | – | – |
Internal | – | – | + | – | – |
Bridged | + | + | + | + | + |
NAT | + | – | + | ||
NATservice | + | + | + |
The following sections describe the available network modes in more detail.
Network Address Translation (NAT) is the simplest way of accessing an external network from a virtual machine. Usually, it does not require any configuration on the host network and guest system. For this reason, it is the default networking mode in Oracle VM VirtualBox.
A virtual machine with NAT enabled acts much like a real computer that connects to the Internet through a router. The router, in this case, is the Oracle VM VirtualBox networking engine, which maps traffic from and to the virtual machine transparently. In Oracle VM VirtualBox this router is placed between each virtual machine and the host. This separation maximizes security since by default virtual machines cannot talk to each other.
The disadvantage of NAT mode is that, much like a private network behind a router, the virtual machine is invisible and unreachable from the outside internet. You cannot run a server this way unless you set up port forwarding. See Section 6.3.1, “Configuring Port Forwarding with NAT”.
The network frames sent out by the guest operating system are received by Oracle VM VirtualBox's NAT engine, which extracts the TCP/IP data and resends it using the host operating system. To an application on the host, or to another computer on the same network as the host, it looks like the data was sent by the Oracle VM VirtualBox application on the host, using an IP address belonging to the host. Oracle VM VirtualBox listens for replies to the packages sent, and repacks and resends them to the guest machine on its private network.
Note
Even though the NAT engine separates the VM from the host, the VM has access to the host's loopback interface and the network services running on it. The host's loopback interface is accessible as IP address 10.0.2.2. This access to the host's loopback interface can be extremely useful in some cases, for example when running a web application under development in the VM and the database server on the loopback interface on the host.
The virtual machine receives its network address and configuration on the private network from a DHCP server integrated into Oracle VM VirtualBox. The IP address thus assigned to the virtual machine is usually on a completely different network than the host. As more than one card of a virtual machine can be set up to use NAT, the first card is connected to the private network 10.0.2.0, the second card to the network 10.0.3.0 and so on. If you need to change the guest-assigned IP range, see Section 9.8, “Fine Tuning the Oracle VM VirtualBox NAT Engine”.
As the virtual machine is connected to a private network internal to Oracle VM VirtualBox and invisible to the host, network services on the guest are not accessible to the host machine or to other computers on the same network. However, like a physical router, Oracle VM VirtualBox can make selected services available to the world outside the guest through port forwarding. This means that Oracle VM VirtualBox listens to certain ports on the host and resends all packets which arrive there to the guest, on the same or a different port.
To an application on the host or other physical or virtual machines on the network, it looks as though the service being proxied is actually running on the host. This also means that you cannot run the same service on the same ports on the host. However, you still gain the advantages of running the service in a virtual machine. For example, services on the host machine or on other virtual machines cannot be compromised or crashed by a vulnerability or a bug in the service, and the service can run in a different operating system than the host system.
To configure port forwarding you can use the graphical Port Forwarding editor which can be found in the Network settings dialog for network adaptors configured to use NAT. Here, you can map host ports to guest ports to allow network traffic to be routed to a specific port in the guest.
Alternatively, the command line tool VBoxManage can be used. See Section 8.10, “VBoxManage modifyvm”.
You will need to know which ports on the guest the service uses and to decide which ports to use on the host. You may want to use the same ports on the guest and on the host. You can use any ports on the host which are not already in use by a service. For example, to set up incoming NAT connections to an ssh server in the guest, use the following command:
VBoxManage modifyvm "VM name" --nat-pf1 "guestssh,tcp,,2222,,22"
In the above example, all TCP traffic arriving on port 2222 on
any host interface will be forwarded to port 22 in the guest.
The protocol name tcp is a mandatory
attribute defining which protocol should be used for forwarding,
udp could also be used. The name
guestssh is purely descriptive and will be
auto-generated if omitted. The number after
--nat-pf denotes the network card, as with
other VBoxManage commands.
To remove this forwarding rule, use the following command:
VBoxManage modifyvm "VM name" --natpf1 delete "guestssh"
If for some reason the guest uses a static assigned IP address not leased from the built-in DHCP server, it is required to specify the guest IP when registering the forwarding rule, as follows:
VBoxManage modifyvm "VM name" --natpf1 "guestssh,tcp,,2222,10.0.2.19,22"
This example is identical to the previous one, except that the NAT engine is being told that the guest can be found at the 10.0.2.19 address.
To forward all incoming traffic from a specific host interface to the guest, specify the IP of that host interface as follows:
VBoxManage modifyvm "VM name" --natpf1 "guestssh,tcp,127.0.0.1,2222,,22"
This example forwards all TCP traffic arriving on the localhost interface at 127.0.0.1 through port 2222 to port 22 in the guest.
It is possible to configure incoming NAT connections while the VM is running, see Section 8.20, “VBoxManage controlvm”.
PXE booting is now supported in NAT mode. The NAT DHCP server
provides a boot file name of the form
vmname.pxeTFTP exists in the directory
where the user's VirtualBox.xml file is
kept. It is the responsibility of the user to provide
vmname.pxe
There are some limitations of NAT mode which users should be aware of, as follows:
ICMP protocol limitations. Some frequently used network debugging tools, such as ping or traceroute, rely on the ICMP protocol for sending and receiving messages. Oracle VM VirtualBox ICMP support has some limitations, meaning ping should work but some other tools may not work reliably.
Receiving of UDP broadcasts. The guest does not reliably receive UDP broadcasts. In order to save resources, it only listens for a certain amount of time after the guest has sent UDP data on a particular port. As a consequence, NetBios name resolution based on broadcasts does not always work, but WINS always works. As a workaround, you can use the numeric IP of the desired server in the
\\notation.server\shareSome protocols are not supported. Protocols other than TCP and UDP are not supported. GRE is not supported. This means some VPN products, such as PPTP from Microsoft, cannot be used. There are other VPN products which use only TCP and UDP.
Forwarding host ports below 1024. On UNIX-based hosts, such as Linux, Oracle Solaris, and macOS, it is not possible to bind to ports below 1024 from applications that are not run by
root. As a result, if you try to configure such a port forwarding, the VM will refuse to start.
These limitations normally do not affect standard network use. But the presence of NAT has also subtle effects that may interfere with protocols that are normally working. One example is NFS, where the server is often configured to refuse connections from non-privileged ports, which are those ports not below 1024.
The Network Address Translation (NAT) service works in a similar way to a home router, grouping the systems using it into a network and preventing systems outside of this network from directly accessing systems inside it, but letting systems inside communicate with each other and with systems outside using TCP and UDP over IPv4 and IPv6.
A NAT service is attached to an internal network. Virtual machines which are to make use of it should be attached to that internal network. The name of internal network is chosen when the NAT service is created and the internal network will be created if it does not already exist. The following is an example command to create a NAT network:
VBoxManage natnetwork add --netname natnet1 --network "192.168.15.0/24" --enable
Here, natnet1 is the name of the internal network to be used and 192.168.15.0/24 is the network address and mask of the NAT service interface. By default in this static configuration the gateway will be assigned the address 192.168.15.1, the address following the interface address, though this is subject to change. To attach a DHCP server to the internal network, modify the example command as follows:
VBoxManage natnetwork add --netname natnet1 --network "192.168.15.0/24" --enable --dhcp on
To add a DHCP server to an existing network, use the following command:
VBoxManage natnetwork modify --netname natnet1 --dhcp on
To disable the DHCP server, use the following command:
VBoxManage natnetwork modify --netname natnet1 --dhcp off
A DHCP server provides a list of registered nameservers, but does not map servers from the 127/8 network.
To start the NAT service, use the following command:
VBoxManage natnetwork start --netname natnet1
If the network has a DHCP server attached then it will start together with the NAT network service.
To stop the NAT network service, together with any DHCP server:
VBoxManage natnetwork stop --netname natnet1
To delete the NAT network service:
VBoxManage natnetwork remove --netname natnet1
This command does not remove the DHCP server if one is enabled on the internal network.
Port-forwarding is supported, using the
--port-forward-4 switch for IPv4 and
--port-forward-6 for IPv6. For example:
VBoxManage natnetwork modify \
  --netname natnet1 --port-forward-4 "ssh:tcp:[]:1022:[192.168.15.5]:22"
This adds a port-forwarding rule from the host's TCP 1022 port to the port 22 on the guest with IP address 192.168.15.5. Host port, guest port and guest IP are mandatory. To delete the rule, use the following command:
VBoxManage natnetwork modify --netname natnet1 --port-forward-4 delete ssh
It is possible to bind a NAT service to specified interface. For example:
VBoxManage setextradata global "NAT/win-nat-test-0/SourceIp4" 192.168.1.185
To see the list of registered NAT networks, use the following command:
VBoxManage list natnetworks
NAT networks can also be created, deleted, and configured using the Network Manager tool in VirtualBox Manager. Click File, Tools, Network Manager. See Section 6.11, “Network Manager”.
Note
Even though the NAT service separates the VM from the host, the VM has access to the host's loopback interface and the network services running on it. The host's loopback interface is accessible as IP address 10.0.2.2 (assuming the default configuration, in other configurations it's the respective address in the configured IPv4 or IPv6 network range). This access to the host's loopback interface can be extremely useful in some cases, for example when running a web application under development in the VM and the database server on the loopback interface on the host.
With bridged networking, Oracle VM VirtualBox uses a device driver on your host system that filters data from your physical network adapter. This driver is therefore called a net filter driver. This enables Oracle VM VirtualBox to intercept data from the physical network and inject data into it, effectively creating a new network interface in software. When a guest is using such a new software interface, it looks to the host system as though the guest were physically connected to the interface using a network cable. The host can send data to the guest through that interface and receive data from it. This means that you can set up routing or bridging between the guest and the rest of your network.
Note
Even though TAP interfaces are no longer necessary on Linux for bridged networking, you can still use TAP interfaces for certain advanced setups, since you can connect a VM to any host interface.
To enable bridged networking, open the Settings dialog of a virtual machine, go to the Network page and select Bridged Network in the drop-down list for the Attached To field. Select a host interface from the list at the bottom of the page, which contains the physical network interfaces of your systems. On a typical MacBook, for example, this will allow you to select between en1: AirPort, which is the wireless interface, and en0: Ethernet, which represents the interface with a network cable.
Note
Bridging to a wireless interface is done differently from bridging to a wired interface, because most wireless adapters do not support promiscuous mode. All traffic has to use the MAC address of the host's wireless adapter, and therefore Oracle VM VirtualBox needs to replace the source MAC address in the Ethernet header of an outgoing packet to make sure the reply will be sent to the host interface. When Oracle VM VirtualBox sees an incoming packet with a destination IP address that belongs to one of the virtual machine adapters it replaces the destination MAC address in the Ethernet header with the VM adapter's MAC address and passes it on. Oracle VM VirtualBox examines ARP and DHCP packets in order to learn the IP addresses of virtual machines.
Depending on your host operating system, the following limitations apply:
macOS hosts. Functionality is limited when using AirPort, the Mac's wireless networking system, for bridged networking. Currently, Oracle VM VirtualBox supports only IPv4 and IPv6 over AirPort. For other protocols, such as IPX, you must choose a wired interface.
Linux hosts. Functionality is limited when using wireless interfaces for bridged networking. Currently, Oracle VM VirtualBox supports only IPv4 and IPv6 over wireless. For other protocols, such as IPX, you must choose a wired interface.
Also, setting the MTU to less than 1500 bytes on wired interfaces provided by the sky2 driver on the Marvell Yukon II EC Ultra Ethernet NIC is known to cause packet losses under certain conditions.
Some adapters strip VLAN tags in hardware. This does not allow you to use VLAN trunking between VM and the external network with pre-2.6.27 Linux kernels, or with host operating systems other than Linux.
Oracle Solaris hosts. There is no support for using wireless interfaces. Filtering guest traffic using IPFilter is also not completely supported due to technical restrictions of the Oracle Solaris networking subsystem. These issues may be addressed in later releases of Oracle Solaris 11.
On Oracle Solaris 11 hosts build 159 and above, it is possible to use Oracle Solaris Crossbow Virtual Network Interfaces (VNICs) directly with Oracle VM VirtualBox without any additional configuration other than each VNIC must be exclusive for every guest network interface.
When using VLAN interfaces with Oracle VM VirtualBox, they must be named according to the PPA-hack naming scheme, such as e1000g513001. Otherwise, the guest may receive packets in an unexpected format.
Internal Networking is similar to bridged networking in that the VM can directly communicate with the outside world. However, the outside world is limited to other VMs on the same host which connect to the same internal network.
Even though technically, everything that can be done using internal networking can also be done using bridged networking, there are security advantages with internal networking. In bridged networking mode, all traffic goes through a physical interface of the host system. It is therefore possible to attach a packet sniffer such as Wireshark to the host interface and log all traffic that goes over it. If, for any reason, you prefer two or more VMs on the same machine to communicate privately, hiding their data from both the host system and the user, bridged networking therefore is not an option.
Internal networks are created automatically as needed. There is no central configuration. Every internal network is identified simply by its name. Once there is more than one active virtual network card with the same internal network ID, the Oracle VM VirtualBox support driver will automatically wire the cards and act as a network switch. The Oracle VM VirtualBox support driver implements a complete Ethernet switch and supports both broadcast/multicast frames and promiscuous mode.
In order to attach a VM's network card to an internal network, set its networking mode to Internal Networking. There are two ways to accomplish this:
Use the VM's Settings window in VirtualBox Manager. In the Network category of the Settings window, select Internal Network from the drop-down list of networking modes. Select the name of an existing internal network from the drop-down list below, or enter a new name into the Name field.
Use the command line, for example:
VBoxManage modifyvm "VM name" --nic<x> intnet
Optionally, you can specify a network name with the command:
VBoxManage modifyvm "VM name" --intnet<x> "network name"
If you do not specify a network name, the network card will be attached to the network
intnetby default.
Unless you configure the virtual network cards in the guest operating systems that are participating in the internal network to use static IP addresses, you may want to use the DHCP server that is built into Oracle VM VirtualBox to manage IP addresses for the internal network. See Section 8.50, “VBoxManage dhcpserver”.
As a security measure, by default, the Linux implementation of internal networking only allows VMs running under the same user ID to establish an internal network. However, it is possible to create a shared internal networking interface, accessible by users with different user IDs.
Host-only networking can be thought of as a hybrid between the bridged and internal networking modes. As with bridged networking, the virtual machines can talk to each other and the host as if they were connected through a physical Ethernet switch. As with internal networking, a physical networking interface need not be present, and the virtual machines cannot talk to the world outside the host since they are not connected to a physical networking interface.
When host-only networking is used, Oracle VM VirtualBox creates a new software interface on the host which then appears next to your existing network interfaces. In other words, whereas with bridged networking an existing physical interface is used to attach virtual machines to, with host-only networking a new loopback interface is created on the host. And whereas with internal networking, the traffic between the virtual machines cannot be seen, the traffic on the loopback interface on the host can be intercepted.
Note
Hosts running recent macOS versions do not support host-only adapters. These adapters are replaced by host-only networks, which define a network mask and an IP address range, where the host network interface receives the lowest address in the range.
The host network interface gets added and removed dynamically by the operating system, whenever a host-only network is used by virtual machines.
On macOS hosts, choose the Host-Only Network option when configuring a network adapter. The Host-Only Adapter option is provided for legacy support.
Host-only networking is particularly useful for preconfigured virtual appliances, where multiple virtual machines are shipped together and designed to cooperate. For example, one virtual machine may contain a web server and a second one a database, and since they are intended to talk to each other, the appliance can instruct Oracle VM VirtualBox to set up a host-only network for the two. A second, bridged, network would then connect the web server to the outside world to serve data to, but the outside world cannot connect to the database.
To enable a host-only network interface for a virtual machine, do either of the following:
Go to the Network page in the virtual machine's Settings dialog and select an Adapter tab. Ensure that the Enable Network Adapter check box is selected and choose Host-Only Adapter for the Attached To field.
On the command line, use VBoxManage modifyvm
vmname--nicxhostonly. See Section 8.10, “VBoxManage modifyvm”.
For host-only networking, as with internal networking, you may find the DHCP server useful that is built into Oracle VM VirtualBox. This is enabled by default and manages the IP addresses in the host-only network. Without the DHCP server you would need to configure all IP addresses statically.
In VirtualBox Manager you can configure the DHCP server by choosing File, Tools, Network Manager. The Network Manager window lists all host-only networks which are presently in use. Select the network name and then use the DHCP Server tab to configure DHCP server settings. See Section 6.11, “Network Manager”.
Alternatively, you can use the VBoxManage dhcpserver command. See Section 8.50, “VBoxManage dhcpserver”.
Note
On Linux and macOS hosts the number of host-only interfaces is limited to 128. There is no such limit for Oracle Solaris and Windows hosts.
On Linux, macOS and Solaris Oracle VM VirtualBox will only allow IP
addresses in 192.168.56.0/21 range to be assigned to host-only
adapters. For IPv6 only link-local addresses are allowed. If other
ranges are desired, they can be enabled by creating
/etc/vbox/networks.conf and specifying
allowed ranges there. For example, to allow 10.0.0.0/8 and
192.168.0.0/16 IPv4 ranges as well as 2001::/64 range put the
following lines into /etc/vbox/networks.conf:
      * 10.0.0.0/8 192.168.0.0/16
      * 2001::/64
Lines starting with the hash # are ignored. The following example allows any addresses, effectively disabling range control:
* 0.0.0.0/0 ::/0
If the file exists, but no ranges are specified in it, no addresses will be assigned to host-only adapters. The following example effectively disables all ranges:
# No addresses are allowed for host-only adapters
This networking mode enables you to interconnect virtual machines running on different hosts.
Technically this is done by encapsulating Ethernet frames sent or received by the guest network card into UDP/IP datagrams, and sending them over any network available to the host.
UDP Tunnel mode has the following parameters:
Source UDP port: The port on which the host listens. Datagrams arriving on this port from any source address will be forwarded to the receiving part of the guest network card.
Destination address: IP address of the target host of the transmitted data.
Destination UDP port: Port number to which the transmitted data is sent.
When interconnecting two virtual machines on two different hosts, their IP addresses must be swapped. On a single host, source and destination UDP ports must be swapped.
In the following example, host 1 uses the IP address 10.0.0.1 and host 2 uses IP address 10.0.0.2. To configure using the command-line:
        VBoxManage modifyvm "VM 01 on host 1" --nic<x> generic
        VBoxManage modifyvm "VM 01 on host 1" --nic-generic-drv<x> UDPTunnel
        VBoxManage modifyvm "VM 01 on host 1" --nic-property<x> dest=10.0.0.2
        VBoxManage modifyvm "VM 01 on host 1" --nic-property<x> sport=10001
        VBoxManage modifyvm "VM 01 on host 1" --nic-property<x> dport=10002
VBoxManage modifyvm "VM 02 on host 2" --nic<y> generic
VBoxManage modifyvm "VM 02 on host 2" --nic-generic-drv<y> UDPTunnel
VBoxManage modifyvm "VM 02 on host 2" --nic-property<y> dest=10.0.0.1
VBoxManage modifyvm "VM 02 on host 2" --nic-property<y> sport=10002
VBoxManage modifyvm "VM 02 on host 2" --nic-property<y> dport=10001Of course, you can always interconnect two virtual machines on the same host, by setting the destination address parameter to 127.0.0.1 on both. It will act similarly to an internal network in this case. However, the host can see the network traffic which it could not in the normal internal network case.
Note
On UNIX-based hosts, such as Linux, Oracle Solaris, and Mac OS
X, it is not possible to bind to ports below 1024 from
applications that are not run by root. As a
result, if you try to configure such a source UDP port, the VM
will refuse to start.
Virtual Distributed Ethernet (VDE) is a flexible, virtual network infrastructure system, spanning across multiple hosts in a secure way. It enables L2/L3 switching, including spanning-tree protocol, VLANs, and WAN emulation. It is an optional part of Oracle VM VirtualBox which is only included in the source code.
VDE is a project developed by Renzo Davoli, Associate Professor at the University of Bologna, Italy.
The basic building blocks of the infrastructure are VDE switches, VDE plugs, and VDE wires which interconnect the switches.
The Oracle VM VirtualBox VDE driver has a single parameter: VDE network. This is the name of the VDE network switch socket to which the VM will be connected.
The following basic example shows how to connect a virtual machine to a VDE switch.
Create a VDE switch:
vde_switch -s /tmp/switch1
Configure VMs using the command-line:
VBoxManage modifyvm "VM name" --nic<x> generic
VBoxManage modifyvm "VM name" --nic-generic-drv<x> VDE
To connect to an automatically allocated switch port:
VBoxManage modifyvm "VM name" --nic-property<x> network=/tmp/switch1
To connect to a specific switch port
n:VBoxManage modifyvm "VM name" --nic-property<x> network=/tmp/switch1[<n>]
This command can be useful for VLANs.
(Optional) Map between a VDE switch port and a VLAN.
Using the switch command line:
vde$ vlan/create <VLAN>
vde$ port/setvlan <port> <VLAN>
VDE is available on Linux and FreeBSD hosts only. It is only available if the VDE software and the VDE plugin library from the VirtualSquare project are installed on the host system.
Note
For Linux hosts, the shared library libvdeplug.so must be available in the search path for shared libraries.
For more information on setting up VDE networks, please see the documentation accompanying the software. See also http://wiki.virtualsquare.org.
Cloud networks can be used for connections from a local VM to a subnet on a remote Oracle Cloud Infrastructure instance. See Section 6.11.3, “Cloud Networks Tab” for details of how to create and configure a cloud network using the Network Manager tool in VirtualBox Manager.
To enable a cloud network interface for a virtual machine, do either of the following:
Go to the Network page in the virtual machine's Settings dialog and select an Adapter tab. Ensure that the Enable Network Adapter check box is selected and choose Cloud Network for the Attached To field.
On the command line, use VBoxManage modifyvm
vmname--nicxcloud. See Section 8.10, “VBoxManage modifyvm”.
The Network Manager tool in VirtualBox Manager enables you to create, delete, and configure the following types of networks used by Oracle VM VirtualBox:
Host-only networks. See Section 6.11.1, “Host-Only Networks Tab”.
NAT networks. See Section 6.11.2, “NAT Networks Tab”.
Cloud networks. See Section 6.11.3, “Cloud Networks Tab”.
To display the Network Manager, go to the global Tools menu and click Network.
The Host-Only Networks tab in Network Manager lists all host-only networks that are currently in use.
Click Create to add a new host-only network to the list.
Click Remove to remove a host-only network from the list.
Click Properties to show or hide settings for the selected host-only network.
To configure a host-only network, select the network name in the Name field and do the following:
Use the Adapter tab to configure the network adapter for the host-only network.
Use the DHCP Server tab to configure settings for the DHCP server used by the host-only network. The DHCP server is built into Oracle VM VirtualBox and manages IP addresses for the network automatically.
The NAT Networks tab in Network Manager lists all NAT networks that are currently in use.
Click Create to add a new NAT network to the list.
Click Remove to remove a NAT network from the list.
Click Properties to show or hide settings for the selected NAT network.
To configure a NAT network, select the network name in the Name field and do the following:
Use the General Options tab to configure the network settings used by the NAT network. For example, the network address and mask of the NAT service interface.
Use the Port Forwarding tab to configure port forwarding rules used by the NAT network.
The Cloud Networks tab in Network Manager lists all cloud networks that are currently in use.
Click Create to add a new cloud network to the list.
Click Remove to remove a cloud network from the list.
Click Properties to show or hide settings for the selected cloud network.
To configure a cloud network, select the network name in the Name field and specify the following:
Name: The name used for the cloud network.
Provider: The cloud service provider, such as Oracle Cloud Infrastructure.
Profile: The cloud profile used to connect to the cloud network.
ID: The OCID for the cloud tunneling network. Click the Network icon to view the subnets on Oracle Cloud Infrastructure that are available for tunneling traffic.
See Section 1.16.10, “Using a Cloud Network” for details of how you can use the VBoxManage cloud command to create and configure a virtual cloud network (VCN) on Oracle Cloud Infrastructure.
Oracle VM VirtualBox supports limiting of the maximum bandwidth used for network transmission. Several network adapters of one VM may share limits through bandwidth groups. It is possible to have more than one such limit.
Note
Oracle VM VirtualBox shapes VM traffic only in the transmit direction, delaying the packets being sent by virtual machines. It does not limit the traffic being received by virtual machines.
Limits are configured through VBoxManage. The following example creates a bandwidth group named Limit, sets the limit to 20 Mbps and assigns the group to the first and second adapters of the VM:
VBoxManage bandwidthctl "VM name" add Limit --type network --limit 20m
VBoxManage modifyvm "VM name" --nicbandwidthgroup1 Limit
VBoxManage modifyvm "VM name" --nicbandwidthgroup2 Limit
All adapters in a group share the bandwidth limit, meaning that in the example above the bandwidth of both adapters combined can never exceed 20 Mbps. However, if one adapter does not require bandwidth the other can use the remaining bandwidth of its group.
The limits for each group can be changed while the VM is running, with changes being picked up immediately. The following example changes the limit for the group created in the previous example to 100 Kbps:
VBoxManage bandwidthctl "VM name" set Limit --limit 100k
To completely disable shaping for the first adapter of VM use the following command:
VBoxManage modifyvm "VM name" --nicbandwidthgroup1 none
It is also possible to disable shaping for all adapters assigned to a bandwidth group while VM is running, by specifying the zero limit for the group. For example, for the bandwidth group named Limit:
VBoxManage bandwidthctl "VM name" set Limit --limit 0
Oracle VM VirtualBox provides a variety of virtual network adapters that can be attached to the host's network in a number of ways. Depending on which types of adapters and attachments are used the network performance will be different. Performance-wise the virtio network adapter is preferable over Intel PRO/1000 emulated adapters, which are preferred over the PCNet family of adapters. Both virtio and Intel PRO/1000 adapters enjoy the benefit of segmentation and checksum offloading. Segmentation offloading is essential for high performance as it allows for less context switches, dramatically increasing the sizes of packets that cross the VM/host boundary.
Note
Neither virtio nor Intel PRO/1000 drivers for Windows XP support segmentation offloading. Therefore Windows XP guests never reach the same transmission rates as other guest types. Refer to MS Knowledge base article 842264 for additional information.
Three attachment types: Internal, Bridged, and Host-Only, have nearly identical performance. The Internal type is a little bit faster and uses less CPU cycles as the packets never reach the host's network stack. The NAT attachment type is the slowest and most secure of all attachment types, as it provides network address translation. The generic driver attachment is special and cannot be considered as an alternative to other attachment types.
The number of CPUs assigned to VM does not improve network performance and in some cases may hurt it due to increased concurrency in the guest.
Here is a short summary of things to check in order to improve network performance:
Whenever possible use the virtio network adapter. Otherwise, use one of the Intel PRO/1000 adapters.
Use a Bridged attachment instead of NAT.
Make sure segmentation offloading is enabled in the guest OS. Usually it will be enabled by default. You can check and modify offloading settings using the ethtool command on Linux guests.
Perform a full detailed analysis of network traffic on the VM's network adaptor using a third party tool such as Wireshark. To do this, a promiscuous mode policy needs to be used on the VM's network adaptor. Use of this mode is only possible on the following network types: NAT Network, Bridged Adapter, Internal Network, and Host-Only Adapter.
To setup a promiscuous mode policy, either select from the drop down list located in the Network Settings dialog for the network adaptor or use the command line tool VBoxManage. See Section 8.10, “VBoxManage modifyvm”.
Promiscuous mode policies are as follows:
deny, which hides any traffic not intended for the VM's network adaptor. This is the default setting.allow-vms, which hides all host traffic from the VM's network adaptor, but allows it to see traffic from and to other VMs.allow-all, which removes all restrictions. The VM's network adaptor sees all traffic.
Table of Contents
- 7.1. Remote Display (VRDP Support)
- 7.1.1. Common Third-Party RDP Viewers
- 7.1.2. VBoxHeadless, the Remote Desktop Server
- 7.1.3. Step by Step: Creating a Virtual Machine on a Headless Server
- 7.1.4. Remote USB
- 7.1.5. RDP Authentication
- 7.1.6. RDP Encryption
- 7.1.7. Multiple Connections to the VRDP Server
- 7.1.8. Multiple Remote Monitors
- 7.1.9. VRDP Video Redirection
- 7.1.10. VRDP Customization
- 7.2. Teleporting
- 7.3. VBoxHeadless
Oracle VM VirtualBox can display virtual machines remotely, meaning that a virtual machine can execute on one computer even though the machine will be displayed on a second computer, and the machine will be controlled from there as well, as if the virtual machine was running on that second computer.
For maximum flexibility, Oracle VM VirtualBox implements remote machine display through a generic extension interface called the VirtualBox Remote Desktop Extension (VRDE). The base open source Oracle VM VirtualBox package only provides this interface, while implementations can be supplied by third parties with Oracle VM VirtualBox extension packages, which must be installed separately from the base package. See Section 1.5, “Installing Oracle VM VirtualBox and Extension Packs”.
Oracle provides support for the VirtualBox Remote Display Protocol (VRDP) in such an Oracle VM VirtualBox extension package.
VRDP is a backwards-compatible extension to Microsoft's Remote Desktop Protocol (RDP). As a result, you can use any standard RDP client to control the remote VM.
Even when the extension is installed, the VRDP server is disabled by default. It can easily be enabled on a per-VM basis either from VirtualBox Manager in the Display settings, see Section 3.6, “Display Settings”, or with the VBoxManage command, as follows:
$ VBoxManage modifyvm VM-name --vrde on
By default, the VRDP server uses TCP port 3389.
You will need to change the default port if you run more than one
VRDP server, since the port can only be used by one server at a
time. You might also need to change it on Windows hosts since the
default port might already be used by the RDP server that is built
into Windows itself. Ports 5000 through 5050 are typically not
used and might be a good choice.
The port can be changed either in the
Display settings of the graphical
user interface or with the --vrde-port option of
the VBoxManage modifyvm command. You can
specify a comma-separated list of ports or ranges of ports. Use a
dash between two port numbers to specify a range. The VRDP server
will bind to one of the available ports from
the specified list. For example, VBoxManage modifyvm
VM-name --vrde-port
5000,5010-5012 configures the server to bind to one of
the ports 5000, 5010, 5011, or 5012. See
Section 8.10, “VBoxManage modifyvm”.
The actual port used by a running VM can be either queried with the VBoxManage showvminfo command or seen in VirtualBox Manager on the Runtime tab of the Session Information dialog, which is accessible from the Machine menu of the VM window.
Oracle VM VirtualBox supports IPv6. If the host OS supports IPv6 the VRDP server will automatically listen for IPv6 connections in addition to IPv4.
Since VRDP is backwards-compatible to RDP, you can use any standard RDP viewer to connect to such a remote virtual machine. For this to work, you must specify the IP address of your host system, not of the virtual machine, as the server address to connect to. You must also specify the port number that the VRDP server is using.
The following examples are for the most common RDP viewers:
On Windows, you can use the Microsoft Terminal Services Connector, mstsc.exe, that is included with Windows. Press the Windows key + R, to display the Run dialog. Enter mstsc to start the program. You can also find the program in Start, All Programs, Accessories, Remote Desktop Connection. If you use the Run dialog, you can enter options directly. For example:
mstsc 1.2.3.4:3389
Replace
1.2.3.4with the host IP address, and3389with a different port, if necessary.Note
IPv6 addresses must be enclosed in square brackets to specify a port. For example:
mstsc
                  [fe80::1:2:3:4]:3389
When connecting to localhost in order to test the connection, the addresses
localhostand127.0.0.1might not work using mstsc.exe. Instead, the address127.0.0.2[:3389]has to be used.
On other systems, you can use the standard open source rdesktop program. This ships with most Linux distributions.
With rdesktop, use a command line such as the following:
$ rdesktop -a 16 -N 1.2.3.4:3389
Replace
1.2.3.4with the host IP address, and3389with a different port, if necessary. The-a 16option requests a color depth of 16 bits per pixel, which we recommend. For best performance, after installation of the guest operating system, you should set its display color depth to the same value. The-Noption enables use of the NumPad keys.You can use the Remmina remote desktop client with VRDP. This application is included with some Linux distributions, such as Debian and Ubuntu.
If you run the KDE desktop, you can use krdc, the KDE RDP viewer. A typical command line is as follows:
$ krdc rdp://1.2.3.4:3389
Replace
1.2.3.4with the host IP address, and3389with a different port, if necessary. Therdp://prefix is required with krdc to switch it into RDP mode.With Sun Ray thin clients you can use uttsc, which is part of the Sun Ray Windows Connector package. See the Sun Ray documentation for details.
While any VM started from VirtualBox Manager is capable of running virtual machines remotely, it is not convenient to have to run the full GUI if you never want to have VMs displayed locally in the first place. In particular, if you are running server hardware whose only purpose is to host VMs, and all your VMs are supposed to run remotely over VRDP, then it is pointless to have a graphical user interface on the server at all. This is especially true for Linux or Oracle Solaris hosts, as the VirtualBox Manager comes with dependencies on the Qt and SDL libraries. This is inconvenient if you would rather not have the X Window system on your server at all.
Oracle VM VirtualBox therefore comes with a front-end called VBoxHeadless, which produces no visible output on the host at all, but still can optionally deliver VRDP data. This front-end has no dependencies on the X Window system on Linux and Oracle Solaris hosts.
Note
In legacy releases of Oracle VM VirtualBox, the headless server was called VBoxVRDP. For backwards compatibility, the Oracle VM VirtualBox installation still includes an executable with that name.
To start a virtual machine with VBoxHeadless, you have the following options:
Use the VBoxManage command, as follows:
$ VBoxManage startvm
VM-name--type headlessThe
--typeoption causes Oracle VM VirtualBox to use VBoxHeadless as the front-end to the internal virtualization engine, instead of the Qt front-end.Use the VBoxHeadless command, as follows:
VBoxHeadless --startvm
uuid|vmnameThis way of starting the VM helps troubleshooting problems reported by VBoxManage startvm, because you can sometimes see more detailed error messages, especially for early failures before the VM execution is started. In normal situations VBoxManage startvm is preferred, since it runs the VM directly as a background process which has to be done explicitly when directly starting with VBoxHeadless. The full documentation of the command is in Section 7.3, “VBoxHeadless”.
Start VBoxHeadless from VirtualBox Manager, by pressing the Shift key when starting a virtual machine or by selecting Headless Start from the Machine menu.
When you use the VBoxHeadless command to
start a VM, the VRDP server will be enabled according to the VM
configuration. You can override the VM's setting using
--vrde command line parameter. To enable the
VRDP server, start the VM as follows:
VBoxHeadless --startvmuuid|vmname--vrde on
To disable the VRDP server:
VBoxHeadless --startvmuuid|vmname--vrde off
To have the VRDP server enabled depending on the VM configuration, as for other front-ends:
VBoxHeadless --startvmuuid|vmname--vrde config
This command is the same as the following:
VBoxHeadless --startvmuuid|vmname
If you start the VM with VBoxManage startvm then the configuration settings of the VM are always used.
The following instructions describe how to create a virtual machine on a headless server over a network connection. This example creates a virtual machine, establishes an RDP connection and installs a guest operating system. All of these tasks are done without having to touch the headless server. You need the following prerequisites:
Oracle VM VirtualBox on a server machine with a supported host operating system. The Oracle VM VirtualBox Extension Pack for the VRDP server must be installed, see Section 7.1, “Remote Display (VRDP Support)”. The procedures assume a Linux server is used.
An ISO file accessible from the server, containing the installation data for the guest operating system to install. Windows XP is used in the example.
A terminal connection to that host through which you can access a command line, such as ssh.
An RDP viewer on the remote client. See Section 7.1.1, “Common Third-Party RDP Viewers” for examples.
Note that on the server machine, since we will only use the headless server, Qt and the X Window system are not required.
On the headless server, create a new virtual machine. For example:
VBoxManage createvm --name "Windows XP" --ostype WindowsXP --register
If you do not specify
--register, you will have to manually use the registervm command later.You do not need to specify
--ostype, but doing so selects some sensible default values for certain VM parameters. For example, the RAM size and the type of the virtual network device. To get a complete list of supported operating systems you can use the following command:VBoxManage list ostypes
Make sure the settings for the VM are appropriate for the guest operating system that we will install. For example:
VBoxManage modifyvm "Windows XP" --memory 256 --acpi on --boot1 dvd --nic1 nat
Create a virtual hard disk for the VM. For example, to create a 10 GB virtual hard disk:
VBoxManage createhd --filename "WinXP.vdi" --size 10000
Add an IDE Controller to the new VM. For example:
VBoxManage storagectl "Windows XP" --name "IDE Controller"
  --add ide --controller PIIX4
Set the VDI file you created as the first virtual hard disk of the new VM. For example:
VBoxManage storageattach "Windows XP" --storagectl "IDE Controller"
 --port 0 --device 0 --type hdd --medium "WinXP.vdi"
Attach the ISO file that contains the operating system installation that you want to install later to the virtual machine. This is done so that the VM can boot from it.
VBoxManage storageattach "Windows XP" --storagectl "IDE Controller"
 --port 0 --device 1 --type dvddrive --medium /full/path/to/iso.iso
Enable the VirtualBox Remote Desktop Extension, the VRDP server, as follows:
VBoxManage modifyvm "Windows XP" --vrde on
Start the virtual machine using the VBoxHeadless command:
VBoxHeadless --startvm "Windows XP"
If the configuration steps worked, you should see a copyright notice. If you are returned to the command line, then something did not work correctly.
On the client machine, start the RDP viewer and connect to the server. See Section 7.1.1, “Common Third-Party RDP Viewers” for details of how to use various common RDP viewers.
The installation routine of your guest operating system should be displayed in the RDP viewer.
As a special feature additional to the VRDP support, Oracle VM VirtualBox also supports remote USB devices over the wire. That is, an Oracle VM VirtualBox guest that runs on one computer can access the USB devices of the remote computer on which the VRDP data is being displayed the same way as USB devices that are connected to the actual host. This enables running of virtual machines on an Oracle VM VirtualBox host that acts as a server, where a client can connect from elsewhere that needs only a network adapter and a display capable of running an RDP viewer. When USB devices are plugged into the client, the remote Oracle VM VirtualBox server can access them.
For these remote USB devices, the same filter rules apply as for other USB devices. See Section 3.11.1, “USB Settings”. All you have to do is specify Remote, or Any, when setting up these rules.
Accessing remote USB devices is only possible if the RDP client supports this extension. Some versions of uttsc, a client tailored for the use with Sun Ray thin clients, support accessing remote USB devices. RDP clients for other platforms will be provided in future Oracle VM VirtualBox versions.
For each virtual machine that is remotely accessible using RDP,
you can individually determine if and how client connections are
authenticated. For this, use the VBoxManage
modifyvm command with the
--vrde-auth-type option. See
Section 8.10, “VBoxManage modifyvm”. The following methods of
authentication are available:
The null method means that there is no authentication at all. Any client can connect to the VRDP server and thus the virtual machine. This is very insecure and only to be recommended for private networks.
The external method provides external authentication through a special authentication library. Oracle VM VirtualBox ships with two special authentication libraries:
The default authentication library, VBoxAuth, authenticates against user credentials of the hosts. Depending on the host platform, this means the following:
On Linux hosts, VBoxAuth.so authenticates users against the host's PAM system.
On Windows hosts, VBoxAuth.dll authenticates users against the host's WinLogon system.
On macOS hosts, VBoxAuth.dylib authenticates users against the host's directory service.
In other words, the external method by default performs authentication with the user accounts that exist on the host system. Any user with valid authentication credentials is accepted. For example, the username does not have to correspond to the user running the VM.
An additional library called VBoxAuthSimple performs authentication against credentials configured in the
extradatasection of a virtual machine's XML settings file. This is probably the simplest way to get authentication that does not depend on a running and supported guest. The following steps are required:Enable VBoxAuthSimple with the following command:
VBoxManage setproperty vrdeauthlibrary "VBoxAuthSimple"
To enable the library for a particular VM, you must switch authentication to external, as follows:
VBoxManage modifyvm
VM-name--vrde-auth-type externalReplace
VM-namewith the VM name or UUID.You then need to configure users and passwords by writing items into the machine's extradata. Since the XML machine settings file, into whose
extradatasection the password needs to be written, is a plain text file, Oracle VM VirtualBox uses hashes to encrypt passwords. The following command must be used:VBoxManage setextradata
VM-name"VBoxAuthSimple/users/user"hashReplace
VM-namewith the VM name or UUID,userwith the user name who should be allowed to log in andhashwith the encrypted password. The following command example obtains the hash value for the passwordsecret:$ VBoxManage internalcommands passwordhash "secret" 2bb80d537b1da3e38bd30361aa855686bde0eacd7162fef6a25fe97bf527a25b
You then use VBoxManage setextradata to store this value in the machine's
extradatasection.As a combined example, to set the password for the user
johnand the machineMy VMtosecret, use this command:VBoxManage setextradata "My VM" "VBoxAuthSimple/users/john" 2bb80d537b1da3e38bd30361aa855686bde0eacd7162fef6a25fe97bf527a25b
The guest authentication method performs authentication with a special component that comes with the Guest Additions. As a result, authentication is not performed on the host, but with the guest user accounts.
This method is currently still in testing and not yet supported.
In addition to the methods described above, you can replace the default external authentication module with any other module. For this, Oracle VM VirtualBox provides a well-defined interface that enables you to write your own authentication module. This is described in detail in the Oracle VM VirtualBox Software Development Kit (SDK) reference. See Chapter 11, Oracle VM VirtualBox Programming Interfaces.
RDP features data stream encryption, which is based on the RC4 symmetric cipher, with keys up to 128-bit. The RC4 keys are replaced at regular intervals, every 4096 packets.
RDP provides the following different authentication methods:
RDP 4 authentication was used historically. With RDP 4, the RDP client does not perform any checks in order to verify the identity of the server it connects to. Since user credentials can be obtained using a man in the middle (MITM) attack, RDP4 authentication is insecure and should generally not be used.
RDP 5.1 authentication employs a server certificate for which the client possesses the public key. This way it is guaranteed that the server possess the corresponding private key. However, as this hard-coded private key became public some years ago, RDP 5.1 authentication is also insecure.
RDP 5.2 or later authentication uses Enhanced RDP Security, which means that an external security protocol is used to secure the connection. RDP 4 and RDP 5.1 use Standard RDP Security. The VRDP server supports Enhanced RDP Security with TLS protocol and, as a part of the TLS handshake, sends the server certificate to the client.
The
Security/MethodVRDE property sets the desired security method, which is used for a connection. Valid values are as follows:Negotiate. Both Enhanced (TLS) and Standard RDP Security connections are allowed. The security method is negotiated with the client. This is the default setting.
RDP. Only Standard RDP Security is accepted.
TLS. Only Enhanced RDP Security is accepted. The client must support TLS.
The version of OpenSSL used by Oracle VM VirtualBox supports TLS versions 1.0, 1.1, 1.2, and 1.3.
For example, the following command enables a client to use either Standard or Enhanced RDP Security connection:
vboxmanage modifyvm
VM-name--vrde-property "Security/Method=negotiate"If the
Security/Methodproperty is set to either Negotiate or TLS, the TLS protocol will be automatically used by the server, if the client supports TLS. However, in order to use TLS the server must possess the Server Certificate, the Server Private Key and the Certificate Authority (CA) Certificate. The following example shows how to generate a server certificate.Create a CA self signed certificate.
openssl req -new -x509 -days 365 -extensions v3_ca \
  -keyout ca_key_private.pem -out ca_cert.pem
Generate a server private key and a request for signing.
openssl genrsa -out server_key_private.pem
openssl req -new -key server_key_private.pem -out server_req.pem
Generate the server certificate.
openssl x509 -req -days 365 -in server_req.pem \
  -CA ca_cert.pem -CAkey ca_key_private.pem -set_serial 01 -out server_cert.pem
The server must be configured to access the required files. For example:
vboxmanage modifyvm
VM-name\ --vrde-property "Security/CACertificate=path/ca_cert.pem"vboxmanage modifyvm
VM-name\ --vrde-property "Security/ServerCertificate=path/server_cert.pem"vboxmanage modifyvm
VM-name\ --vrde-property "Security/ServerPrivateKey=path/server_key_private.pem"
As the client that connects to the server determines what type
of encryption will be used, with rdesktop,
the Linux RDP viewer, use the -4 or
-5 options.
The VRDP server of Oracle VM VirtualBox supports multiple simultaneous connections to the same running VM from different clients. All connected clients see the same screen output and share a mouse pointer and keyboard focus. This is similar to several people using the same computer at the same time, taking turns at the keyboard.
The following command enables multiple connection mode:
VBoxManage modifyvm VM-name --vrde-multi-con onTo access two or more remote VM displays you have to enable the VRDP multiconnection mode. See Section 7.1.7, “Multiple Connections to the VRDP Server”.
The RDP client can select the virtual monitor number to connect
to using the domain login parameter
(-d). If the parameter ends with
@ followed by a number, Oracle VM VirtualBox
interprets this number as the screen index. The primary guest
screen is selected with @1, the first
secondary screen is @2, and so on.
The Microsoft RDP 6 client does not let you specify a separate
domain name. Instead, enter
domain\username@2\.
namename must be supplied, and must be
the name used to log in if the VRDP server is set up to require
credentials. If it is not, you may use any text as the username.
The VRDP server can redirect video streams from the guest to the RDP client. Video frames are compressed using the JPEG algorithm allowing a higher compression ratio than standard RDP bitmap compression methods. It is possible to increase the compression ratio by lowering the video quality.
The VRDP server automatically detects video streams in a guest as frequently updated rectangular areas. As a result, this method works with any guest operating system without having to install additional software in the guest. In particular, the Guest Additions are not required.
On the client side, however, currently only the Windows 7 Remote Desktop Connection client supports this feature. If a client does not support video redirection, the VRDP server falls back to regular bitmap updates.
The following command enables video redirection:
VBoxManage modifyvm VM-name --vrde-video-channel onThe quality of the video is defined as a value from 10 to 100 percent, representing a JPEG compression level, where lower numbers mean lower quality but higher compression. The quality can be changed using the following command:
VBoxManage modifyvm VM-name --vrde-video-channel-quality 75You can disable display output, mouse and keyboard input, audio, remote USB, or clipboard individually in the VRDP server.
The following commands change the corresponding server settings:
$ VBoxManage modifyvmVM-name--vrde-property Client/DisableDisplay=1 $ VBoxManage modifyvmVM-name--vrde-property Client/DisableInput=1 $ VBoxManage modifyvmVM-name--vrde-property Client/DisableUSB=1 $ VBoxManage modifyvmVM-name--vrde-property Client/DisableAudio=1 $ VBoxManage modifyvmVM-name--vrde-property Client/DisableClipboard=1 $ VBoxManage modifyvmVM-name--vrde-property Client/DisableUpstreamAudio=1
To reenable a feature, use a similar command without the trailing 1. For example:
$ VBoxManage modifyvm VM-name --vrde-property Client/DisableDisplay=Oracle VM VirtualBox supports teleporting. Teleporting is moving a virtual machine over a network from one Oracle VM VirtualBox host to another, while the virtual machine is running. This works regardless of the host operating system that is running on the hosts. You can teleport virtual machines between Oracle Solaris and macOS hosts, for example.
Teleporting requires that a machine be currently running on one host, which is called the source. The host to which the virtual machine will be teleported is called the target. The machine on the target is then configured to wait for the source to contact the target. The machine's running state will then be transferred from the source to the target with minimal downtime.
Teleporting happens over any TCP/IP network. The source and the target only need to agree on a TCP/IP port which is specified in the teleporting settings.
At this time, there are a few prerequisites for this to work, as follows:
On the target host, you must configure a virtual machine in Oracle VM VirtualBox with exactly the same hardware settings as the machine on the source that you want to teleport. This does not apply to settings which are merely descriptive, such as the VM name, but obviously for teleporting to work, the target machine must have the same amount of memory and other hardware settings. Otherwise teleporting will fail with an error message.
The two virtual machines on the source and the target must share the same storage, hard disks as well as floppy disks and CD/DVD images. This means that they either use the same iSCSI targets or that the storage resides somewhere on the network and both hosts have access to it using NFS or SMB/CIFS.
This also means that neither the source nor the target machine can have any snapshots.
To configure teleporting, perform the following steps:
On the target host, configure the virtual machine to wait for a teleport request to arrive when it is started, instead of actually attempting to start the machine. This is done with the following VBoxManage command:
VBoxManage modifyvm
targetvmname--teleporter on --teleporter-portporttargetvmnameis the name of the virtual machine on the target host andportis a TCP/IP port number to be used on both the source and the target hosts. For example, use 6000. See Section 8.10, “VBoxManage modifyvm”.Start the VM on the target host. Instead of running, the VM shows a progress dialog, indicating that it is waiting for a teleport request to arrive.
Start the VM on the source host as usual. When it is running and you want it to be teleported, issue the following command on the source host:
VBoxManage controlvm
sourcevmnameteleport --hosttargethost--portportwhere
sourcevmnameis the name of the virtual machine on the source host, which is the machine that is currently running.targethostis the host or IP name of the target host on which the machine is waiting for the teleport request, andportmust be the same number as specified in the command on the target host. See Section 8.20, “VBoxManage controlvm”.
For testing, you can also teleport machines on the same host. In that case, use localhost as the hostname on both the source and the target host.
Note
In rare cases, if the CPUs of the source and the target are very different, teleporting can fail with an error message, or the target may hang. This may happen especially if the VM is running application software that is highly optimized to run on a particular CPU without correctly checking that certain CPU features are actually present. Oracle VM VirtualBox filters what CPU capabilities are presented to the guest operating system. Advanced users can attempt to restrict these virtual CPU capabilities with the VBoxManage modifyvm --cpuid-portability-level command. See Section 8.10, “VBoxManage modifyvm”.
Oracle VM VirtualBox remote desktop server.
The VBoxHeadless command is an alternate front end that enables you to remotely manage virtual machines (VMs). The front end is a CLI rather than the VirtualBox Manager graphical user interface (GUI).
For information about using this command, see Section 7.1.2, “VBoxHeadless, the Remote Desktop Server”.
-
--startvm=uuid|vmname Specifies the Universally Unique Identifier (UUID) or name of the VM to start.
Use the VBoxManage list vms command to obtain VM information.
The short versions of this option are
-sand-startvm.-
--vrde=on | off | config Specifies how to use the VRDP server. The default value is
config. Valid values are as follows:onenables the VRDP server.VBoxHeadless --startvm=
vmname--vrde=onoffdisables the VRDP server.VBoxHeadless --startvm=
vmname--vrde=offconfigenables the VRDP server depending on the VM configuration.VBoxHeadless --startvm=
vmname--vrde=config
The short version of this option is
-v.-
--vrdeproperty=prop-name=prop-value Specifies a value for one of the following properties:
The
TCP/Portsproperty value is a comma-separated list of ports to which the VRDE server can bind. Use a hyphen (-) between two port numbers to specify a range of ports.The
TCP/Addressproperty value is the interface IP address to which to bind the VRDE server.
-
--settingspw=[password] Specifies a settings password to access encrypted settings. If you do not specify the password on the command line, VBoxHeadless prompts you for the password.
-
--settingspwfile=password-file Specifies the file that contains the settings password.
-
--start-paused=vmname Starts the specified VM in the paused state.
-
--capture Records the VM screen output to a file. In addition to this option, you must use the
--filenameoption to specify the name of the file.-
--width=width Specifies the frame width of the recording in pixels. This option is associated with the
--captureoption.-
--height=height Specifies the frame height of the recording in pixels. This option is associated with the
--captureoption.-
--bitrate=bit-rate Specifies the bit rate of the recording in kilobits per second. This option is associated with the
--captureoption.-
--filename=filename Specifies the name of the file in which to store the recording. The codec used is based on the file extension that you choose. You must specify this option if you use the
--captureoption.
The following command starts the ol7u4 VM:
$ VBoxHeadless --startvm "ol7u4"
The following command starts the ol7u6 VM in
the Paused state.
$ VBoxHeadless --startvm "ol7u6" --start-paused
The following command starts the ol7u6 VM and
records the session. The recording is saved to the
ol7u6-recording WebM file.
$ VBoxHeadless --startvm "ol7u6" --capture --filename ol7u6-recording.webm
Table of Contents
- 8.1. Introduction
- 8.2. Commands Overview
- 8.3. General Options
- 8.4. VBoxManage
- 8.5. VBoxManage list
- 8.6. VBoxManage showvminfo
- 8.7. VBoxManage registervm
- 8.8. VBoxManage unregistervm
- 8.9. VBoxManage createvm
- 8.10. VBoxManage modifyvm
- 8.11. VBoxManage clonevm
- 8.12. VBoxManage movevm
- 8.13. VBoxManage encryptvm
- 8.14. VBoxManage cloud
- 8.15. VBoxManage cloudprofile
- 8.16. VBoxManage import
- 8.17. VBoxManage export
- 8.18. VBoxManage signova
- 8.19. VBoxManage startvm
- 8.20. VBoxManage controlvm
- 8.21. VBoxManage unattended
- 8.22. VBoxManage discardstate
- 8.23. VBoxManage adoptstate
- 8.24. VBoxManage snapshot
- 8.25. VBoxManage closemedium
- 8.26. VBoxManage storageattach
- 8.27. VBoxManage storagectl
- 8.28. VBoxManage bandwidthctl
- 8.29. VBoxManage showmediuminfo
- 8.30. VBoxManage createmedium
- 8.31. VBoxManage modifymedium
- 8.32. VBoxManage clonemedium
- 8.33. VBoxManage mediumproperty
- 8.34. VBoxManage encryptmedium
- 8.35. VBoxManage checkmediumpwd
- 8.36. VBoxManage convertfromraw
- 8.37. VBoxManage mediumio
- 8.38. VBoxManage setextradata
- 8.39. VBoxManage getextradata
- 8.40. VBoxManage setproperty
- 8.41. VBoxManage usbfilter
- 8.42. VBoxManage sharedfolder
- 8.43. VBoxManage guestproperty
- 8.44. VBoxManage guestcontrol
- 8.45. VBoxManage debugvm
- 8.46. VBoxManage metrics
- 8.47. VBoxManage natnetwork
- 8.48. VBoxManage hostonlyif
- 8.49. VBoxManage hostonlynet
- 8.50. VBoxManage dhcpserver
- 8.51. VBoxManage usbdevsource
- 8.52. VBoxManage extpack
- 8.53. VBoxManage updatecheck
- 8.54. VBoxManage modifynvram
- 8.55. vboximg-mount
As briefly mentioned in Section 1.18, “Alternative Front-Ends”, VBoxManage is the command-line interface to Oracle VM VirtualBox. With it, you can completely control Oracle VM VirtualBox from the command line of your host operating system. VBoxManage supports all the features that the graphical user interface gives you access to, but it supports a lot more than that. It exposes all the features of the virtualization engine, even those that cannot be accessed from the GUI.
You will need to use the command line if you want to do the following:
Use a different user interface than the main GUI such as the VBoxHeadless server.
Control some of the more advanced and experimental configuration settings for a VM.
There are two main things to keep in mind when using VBoxManage. First, VBoxManage must always be used with a specific subcommand, such as list or createvm or startvm. All the subcommands that VBoxManage supports are described in detail in Chapter 8, VBoxManage.
Second, most of these subcommands require that you specify a particular virtual machine after the subcommand. There are two ways you can do this:
You can specify the VM name, as it is shown in the Oracle VM VirtualBox GUI. Note that if that name contains spaces, then you must enclose the entire name in double quotes. This is always required with command line arguments that contain spaces. For example:
VBoxManage startvm "Windows XP"
You can specify the UUID, which is the internal unique identifier that Oracle VM VirtualBox uses to refer to the virtual machine. Assuming that the VM called "Windows XP" has the UUID shown below, the following command has the same effect as the previous example:
VBoxManage startvm 670e746d-abea-4ba6-ad02-2a3b043810a5
You can enter VBoxManage list vms to have all currently registered VMs listed with all their settings, including their respective names and UUIDs.
Some typical examples of how to control Oracle VM VirtualBox from the command line are listed below:
To create a new virtual machine from the command line and immediately register it with Oracle VM VirtualBox, use VBoxManage createvm with the
--registeroption, as follows:$ VBoxManage createvm --name "SUSE 10.2" --register VirtualBox Command Line Management Interface Version
version-numberCopyright (C) 2005-2023 Oracle and/or its affiliates Virtual machine 'SUSE 10.2' is created. UUID: c89fc351-8ec6-4f02-a048-57f4d25288e5 Settings file: '/home/username/.config/VirtualBox/Machines/SUSE 10.2/SUSE 10.2.xml'As can be seen from the above output, a new virtual machine has been created with a new UUID and a new XML settings file.
For more details, see Section 8.9, “VBoxManage createvm”.
To show the configuration of a particular VM, use VBoxManage showvminfo. See Section 8.6, “VBoxManage showvminfo” for details and an example.
To change settings while a VM is powered off, use VBoxManage modifyvm. For example:
VBoxManage modifyvm "Windows XP" --memory 512
See also Section 8.10, “VBoxManage modifyvm”.
To change the storage configuration, such as to add a storage controller and then a virtual disk, use VBoxManage storagectl and VBoxManage storageattach. See Section 8.27, “VBoxManage storagectl” and Section 8.26, “VBoxManage storageattach”.
To control VM operation, use one of the following:
To start a VM that is currently powered off, use VBoxManage startvm. See Section 8.19, “VBoxManage startvm”.
To pause or save a VM that is currently running or change some of its settings, use VBoxManage controlvm. See Section 8.20, “VBoxManage controlvm”.
When running VBoxManage without parameters or when supplying an invalid command line, the following command syntax list is shown. Note that the output will be slightly different depending on the host platform. If in doubt, check the output of VBoxManage for the commands available on your particular host.
VBoxManage [ -V | --version ] [--dump-build-type] [ -q | --nologo ] [--settingspw=password] [--settingspwfile=pw-file] [@response-file] [[help]subcommand]
VBoxManage list [--long] [--sorted] [ bridgedifs | cloudnets | cloudprofiles | cloudproviders | cpu-profiles | dhcpservers | dvds | extpacks | floppies | groups | hddbackends | hdds | hostcpuids | hostdrives | hostdvds | hostfloppies | hostinfo | hostonlyifs | hostonlynets | intnets | natnets | ostypes | runningvms | screenshotformats | systemproperties | usbfilters | usbhost | vms | webcams ]
VBoxManage showvminfo < uuid | vmname > [--details] [--machinereadable] [--password-id] [--password]
VBoxManage showvminfo < uuid | vmname > <--log=index> [--password-id id] [--password file|-]
VBoxManage createvm <--name=name> [--basefolder=basefolder] [--default] [--groups=group-ID,...] [--ostype=ostype] [--register] [--uuid=uuid] [--cipher cipher] [--password-id password-id] [--password file]
VBoxManage modifyvm < uuid | vmname > [--name=name] [--groups= group [,group...] ] [--description=description] [--os-type=OS-type] [--icon-file=filename] [--memory=size-in-MB] [--page-fusion= on | off ] [--vram=size-in-MB] [--acpi= on | off ] [--ioapic= on | off ] [--hardware-uuid=UUID] [--cpus=CPU-count] [--cpu-hotplug= on | off ] [--plug-cpu=CPU-ID] [--unplug-cpu=CPU-ID] [--cpu-execution-cap=number] [--pae= on | off ] [--long-mode= on | off ] [--ibpb-on-vm-exit= on | off ] [--ibpb-on-vm-entry= on | off ] [--spec-ctrl= on | off ] [--l1d-flush-on-sched= on | off ] [--l1d-flush-on-vm-entry= on | off ] [--mds-clear-on-sched= on | off ] [--mds-clear-on-vm-entry= on | off ] [--cpu-profile= host | Intel 8086 | Intel 80286 | Intel 80386 ] [--hpet= on | off ] [--hwvirtex= on | off ] [--triple-fault-reset= on | off ] [--apic= on | off ] [--x2apic= on | off ] [--paravirt-provider= none | default | legacy | minimal | hyperv | kvm ] [--paravirt-debug= key=value [,key=value...] ] [--nested-paging= on | off ] [--large-pages= on | off ] [--vtx-vpid= on | off ] [--vtx-ux= on | off ] [--nested-hw-virt= on | off ] [--virt-vmsave-vmload= on | off ] [--accelerate-3d= on | off ] [--accelerate-2d-video= on | off ] [--chipset= ich9 | piix3 ] [--iommu= none | automatic | amd | intel ] [--tpm-type= none | 1.2 | 2.0 | host | swtpm ] [--tpm-location= location ] [--bios-logo-fade-in= on | off ] [--bios-logo-fade-out= on | off ] [--bios-logo-display-time=msec] [--bios-logo-image-path=pathname] [--bios-boot-menu= disabled | menuonly | messageandmenu ] [--bios-apic= disabled | apic | x2apic ] [--bios-system-time-offset=msec] [--bios-pxe-debug= on | off ] [--system-uuid-le= on | off ] [--bootX= none | floppy | dvd | disk | net ] [--rtc-use-utc= on | off ] [--graphicscontroller= none | vboxvga | vmsvga | vboxsvga ] [--snapshot-folder= default | pathname ] [--firmware= bios | efi | efi32 | efi64 ] [--guest-memory-balloon=size-in-MB] [--default-frontend= default | name ] [--vm-process-priority= default | flat | low | normal | high ]
VBoxManage modifyvm < uuid | vmname > [--nicN= none | null | nat | bridged | intnet | hostonly | hostonlynet | generic | natnetwork | cloud ] [--nic-typeN= Am79C970A | Am79C973 | 82540EM | 82543GC | 82545EM | virtio ] [--cable-connectedN= on | off ] [--nic-traceN= on | off ] [--nic-trace-fileN=filename] [--nic-propertyN=name= [value]] [--nic-speedN=kbps] [--nic-boot-prioN=priority] [--nic-promiscN= deny | allow-vms | allow-all ] [--nic-bandwidth-groupN= none | name ] [--bridge-adapterN= none | device-name ] [--cloud-networkN=network-name] [--host-only-adapterN= none | device-name ] [--host-only-netN=network-name] [--intnetN=network-name] [--nat-networkN=network-name] [--nic-generic-drvN=driver-name] [--mac-addressN= auto | MAC-address ]
VBoxManage modifyvm < uuid | vmname > [--nat-netN= network | default ] [--nat-pfN= [rule-name],tcp | udp,[host-IP],hostport,[guest-IP],guestport ] [--nat-pfN=delete=rule-name] [--nat-tftp-prefixN=prefix] [--nat-tftp-fileN=filename] [--nat-tftp-serverN=IP-address] [--nat-bind-ipN=IP-address] [--nat-dns-pass-domainN= on | off ] [--nat-dns-proxyN= on | off ] [--nat-dns-host-resolverN= on | off ] [--nat-localhostreachableN= on | off ] [--nat-settingsN=[mtu],[socksnd],[sockrcv],[tcpsnd],[tcprcv]] [--nat-alias-modeN= default | [log],[proxyonly],[sameports] ]
VBoxManage modifyvm < uuid | vmname > [--mouse= ps2 | usb | usbtablet | usbmultitouch | usbmtscreenpluspad ] [--keyboard= ps2 | usb ] [--uartN= off | IO-baseIRQ ] [--uart-modeN= disconnected | server pipe | client pipe | tcpserver port | tcpclient hostname:port | file filename | device-name ] [--uart-typeN= 16450 | 16550A | 16750 ] [--lpt-modeN=device-name] [--lptN= off | IO-baseIRQ ] [--audio-controller= ac97 | hda | sb16 ] [--audio-codec= stac9700 | ad1980 | stac9221 | sb16 ] [--audio-driver= none | default | null | dsound | was | oss | alsa | pulse | coreaudio ] [--audio-enabled= on | off ] [--audio-in= on | off ] [--audio-out= on | off ] [--clipboard-mode= disabled | hosttoguest | guesttohost | bidirectional ] [--drag-and-drop= disabled | hosttoguest | guesttohost | bidirectional ] [--monitor-count=number] [--usb-ehci= on | off ] [--usb-ohci= on | off ] [--usb-xhci= on | off ] [--usb-rename=old-namenew-name]
VBoxManage modifyvm < uuid | vmname > [--recording= on | off ] [--recording-screens= all | none | screen-ID[,screen-ID...] ] [--recording-file=filename] [--recording-max-size=MB] [--recording-max-time=msec] [--recording-opts= key=value[,key=value...] ] [--recording-video-fps=fps] [--recording-video-rate=rate] [--recording-video-res=widthheight]
VBoxManage modifyvm < uuid | vmname > [--vrde= on | off ] [--vrde-property=property-name= [property-value]] [--vrde-extpack= default | name ] [--vrde-port=port] [--vrde-address=hostip] [--vrde-auth-type= null | external | guest ] [--vrde-auth-library= default | name ] [--vrde-multi-con= on | off ] [--vrde-reuse-con= on | off ] [--vrde-video-channel= on | off ] [--vrde-video-channel-quality=percent]
VBoxManage modifyvm < uuid | vmname > [--teleporter= on | off ] [--teleporter-port=port] [--teleporter-address= address | empty ] [--teleporter-password=password] [--teleporter-password-file= filename | stdin ] [--cpuid-portability-level=level] [--cpuid-set=leaf [:subleaf]eax ebx ecx edx] [--cpuid-remove=leaf [:subleaf]] [--cpuid-remove-all]
VBoxManage modifyvm < uuid | vmname > [--tracing-enabled= on | off ] [--tracing-config=string] [--tracing-allow-vm-access= on | off ]
VBoxManage modifyvm < uuid | vmname > [--usb-card-reader= on | off ]
VBoxManage modifyvm < uuid | vmname > [--autostart-enabled= on | off ] [--autostart-delay=seconds]
VBoxManage modifyvm < uuid | vmname > [--guest-debug-provider= none | native | gdb | kd ] [--guest-debug-io-provider= none | tcp | udp | ipc ] [--guest-debug-address= IP-Address | path ] [--guest-debug-port=port]
VBoxManage modifyvm < uuid | vmname > [--pci-attach=host-PCI-address [@guest-PCI-bus-address]] [--pci-detach=host-PCI-address]
VBoxManage modifyvm < uuid | vmname > [--testing-enabled= on | off ] [--testing-mmio= on | off ] [--testing-cfg-dwordidx=value]
VBoxManage clonevm <vmname|uuid> [--basefolder=basefolder] [--groups=group,...] [ --mode=machine | --mode=machinechildren | --mode=all ] [--name=name] [--options=option,...] [--register] [--snapshot=snapshot-name] [--uuid=uuid]
VBoxManage encryptvm < uuid | vmname > setencryption --old-password file --cipher cipher-identifier --new-password file --new-password-id password-identifier --force
VBoxManage encryptvm < uuid | vmname > checkpassword <file>
VBoxManage encryptvm < uuid | vmname > addpassword --password file --password-id password-identifier
VBoxManage encryptvm < uuid | vmname > removepassword <password-identifier>
VBoxManage cloud <--provider=name> <--profile=name>
list instances [--state=string] [--compartment-id=string]
VBoxManage cloud <--provider=name> <--profile=name>
list images <--compartment-id=string> [--state=string]
VBoxManage cloud <--provider=name> <--profile=name>
list vnicattachments <--compartment-id=string> [--filter=string]
VBoxManage cloud <--provider=name> <--profile=name>
instance create <--domain-name=name> <<--image-id=id> | <--boot-volume-id=id>> <--display-name=name> <--shape=type> <--subnet=id> [--boot-disk-size=size in GB] [--publicip=true/false] [--privateip=IP address] [--public-ssh-key=key string...] [--launch-mode=NATIVE/EMULATED/PARAVIRTUALIZED] [--cloud-init-script-path=path to a script]
VBoxManage cloud <--provider=name> <--profile=name>
instance info <--id=unique id>
VBoxManage cloud <--provider=name> <--profile=name>
instance terminate <--id=unique id>
VBoxManage cloud <--provider=name> <--profile=name>
instance start <--id=unique id>
VBoxManage cloud <--provider=name> <--profile=name>
instance pause <--id=unique id>
VBoxManage cloud <--provider=name> <--profile=name>
instance reset <--id=unique id>
VBoxManage cloud <--provider=name> <--profile=name>
image create <--display-name=name> [--bucket-name=name] [--object-name=name] [--instance-id=unique id]
VBoxManage cloud <--provider=name> <--profile=name>
image info <--id=unique id>
VBoxManage cloud <--provider=name> <--profile=name>
image delete <--id=unique id>
VBoxManage cloud <--provider=name> <--profile=name>
image import <--id=unique id> [--bucket-name=name] [--object-name=name]
VBoxManage cloud <--provider=name> <--profile=name>
image export <--id=unique id> <--display-name=name> [--bucket-name=name] [--object-name=name]
VBoxManage cloud <--provider=name> <--profile=name>
network setup [--gateway-os-name=string] [--gateway-os-version=string] [--gateway-shape=string] [--tunnel-network-name=string] [--tunnel-network-range=string] [--proxy=string] [--compartment-id=string]
VBoxManage cloud <--provider=name> <--profile=name>
network create <--name=string> <--network-id=string> [ --enable | --disable ]
VBoxManage cloud network update <--name=string> [--network-id=string] [ --enable | --disable ]
VBoxManage cloud network delete <--name=string>
VBoxManage cloud network info <--name=string>
VBoxManage cloudprofile <--provider=name> <--profile=name> add [--clouduser=unique id] [--fingerprint=MD5 string] [--keyfile=path] [--passphrase=string] [--tenancy=unique id] [--compartment=unique id] [--region=string]
VBoxManage cloudprofile <--provider=name> <--profile=name> update [--clouduser=unique id] [--fingerprint=MD5 string] [--keyfile=path] [--passphrase=string] [--tenancy=unique id] [--compartment=unique id] [--region=string]
VBoxManage cloudprofile <--provider=name> <--profile=name> delete
VBoxManage cloudprofile <--provider=name> <--profile=name> show
VBoxManage import < ovfname | ovaname > [--dry-run] [--options= keepallmacs | keepnatmacs | importtovdi ] [--vsys=n] [--ostype=ostype] [--vmname=name] [--settingsfile=file] [--basefolder=folder] [--group=group] [--memory=MB] [--cpus=n] [--description=text] [--eula= show | accept ] [--unit=n] [--ignore] [--scsitype= BusLogic | LsiLogic ] [--disk=path] [--controller=index] [--port=n]
VBoxManage import OCI:// --cloud [--ostype=ostype] [--vmname=name] [--basefolder=folder] [--memory=MB] [--cpus=n] [--description=text] <--cloudprofile=profile> <--cloudinstanceid=id> [--cloudbucket=bucket]
VBoxManage export <machines> <--output=name> [ --legacy09 | --ovf09 | --ovf10 | --ovf20 ] [--manifest] [--options= manifest | iso | nomacs | nomacsbutnat ... ] [--vsys=virtual-system-number] [--description=description-info] [--eula=license-text] [--eulafile=filename] [--product=product-name] [--producturl=product-URL] [--vendor=vendor-name] [--vendorurl=vendor-URL] [--version=version-info] [--vmname=vmname]
VBoxManage export <machine> <--output=cloud-service-provider> [--opc10] [--vmname=vmname] [--cloud=virtual-system-number] [--cloudprofile=cloud-profile-name] [--cloudshape=cloud-shape-name] [--clouddomain=cloud-domain] [--clouddisksize=disk-size-in-GB] [--cloudbucket=bucket-name] [--cloudocivcn=OCI-VCN-ID] [--cloudocisubnet=OCI-subnet-ID] [--cloudkeepobject= true | false ] [--cloudlaunchinstance= true | false ] [--cloudlaunchmode= EMULATED | PARAVIRTUALIZED ] [--cloudpublicip= true | false ]
VBoxManage signova <ova> <--certificate=file> <--private-key=file> [ --private-key-password-file=password-file | --private-key-password=password ] [--digest-type=type] [ --pkcs7 | --no-pkcs7 ] [--intermediate-cert=file] [--force] [--verbose] [--quiet] [--dry-run]
VBoxManage startvm < uuid | vmname ...> [--putenv=name[=value]] [--type= [ gui | headless | sdl | separate ]] --password file --password-id password identifier
VBoxManage controlvm < uuid | vmname > pause
VBoxManage controlvm < uuid | vmname > resume
VBoxManage controlvm < uuid | vmname > reset
VBoxManage controlvm < uuid | vmname > poweroff
VBoxManage controlvm < uuid | vmname > savestate
VBoxManage controlvm < uuid | vmname > acpipowerbutton
VBoxManage controlvm < uuid | vmname > acpisleepbutton
VBoxManage controlvm < uuid | vmname > reboot
VBoxManage controlvm < uuid | vmname > shutdown [--force]
VBoxManage controlvm < uuid | vmname > keyboardputscancode <hex> [hex...]
VBoxManage controlvm < uuid | vmname > keyboardputstring <string> [string...]
VBoxManage controlvm < uuid | vmname > keyboardputfile <filename>
VBoxManage controlvm < uuid | vmname > setlinkstateN < on | off >
VBoxManage controlvm < uuid | vmname > nicN < null | nat | bridged | intnet | hostonly | generic | natnetwork > [device-name]
VBoxManage controlvm < uuid | vmname > nictraceN < on | off >
VBoxManage controlvm < uuid | vmname > nictracefileN <filename>
VBoxManage controlvm < uuid | vmname > nicpropertyN <prop-name=prop-value>
VBoxManage controlvm < uuid | vmname > nicpromiscN < deny | allow-vms | allow-all >
VBoxManage controlvm < uuid | vmname > natpfN < [rulename] ,tcp | udp, [host-IP], hostport, [guest-IP], guestport >
VBoxManage controlvm < uuid | vmname > natpfN delete <rulename>
VBoxManage controlvm < uuid | vmname > guestmemoryballoon <balloon-size>
VBoxManage controlvm < uuid | vmname > usbattach < uuid | address > [--capturefile=filename]
VBoxManage controlvm < uuid | vmname > usbdetach < uuid | address >
VBoxManage controlvm < uuid | vmname > audioin < on | off >
VBoxManage controlvm < uuid | vmname > audioout < on | off >
VBoxManage controlvm < uuid | vmname > clipboard mode < disabled | hosttoguest | guesttohost | bidirectional >
VBoxManage controlvm < uuid | vmname > clipboard filetransfers < on | off >
VBoxManage controlvm < uuid | vmname > draganddrop < disabled | hosttoguest | guesttohost | bidirectional >
VBoxManage controlvm < uuid | vmname > vrde < on | off >
VBoxManage controlvm < uuid | vmname > vrdeport <port>
VBoxManage controlvm < uuid | vmname > vrdeproperty <prop-name=prop-value>
VBoxManage controlvm < uuid | vmname > vrdevideochannelquality <percentage>
VBoxManage controlvm < uuid | vmname > setvideomodehint <xres> <yres> <bpp> [[display] [ enabled:yes | no | [x-origin y-origin]]]
VBoxManage controlvm < uuid | vmname > setscreenlayout <display> < on | primary x-origin y-origin x-resolution y-resolution bpp | off >
VBoxManage controlvm < uuid | vmname > screenshotpng <filename> [display]
VBoxManage controlvm < uuid | vmname > recording < on | off >
VBoxManage controlvm < uuid | vmname > recording screens < all | none | screen-ID[,screen-ID...] >
VBoxManage controlvm < uuid | vmname > recording filename <filename>
VBoxManage controlvm < uuid | vmname > recording videores <widthxheight>
VBoxManage controlvm < uuid | vmname > recording videorate <rate>
VBoxManage controlvm < uuid | vmname > recording videofps <fps>
VBoxManage controlvm < uuid | vmname > recording maxtime <sec>
VBoxManage controlvm < uuid | vmname > recording maxfilesize <MB>
VBoxManage controlvm < uuid | vmname > setcredentials <username> --passwordfile= < filename | password > <domain-name> --allowlocallogon= < yes | no >
VBoxManage controlvm < uuid | vmname > teleport <--host=host-name> <--port=port-name> [--maxdowntime=msec] [ --passwordfile=filename | --password=password ]
VBoxManage controlvm < uuid | vmname > plugcpu <ID>
VBoxManage controlvm < uuid | vmname > unplugcpu <ID>
VBoxManage controlvm < uuid | vmname > cpuexecutioncap <num>
VBoxManage controlvm < uuid | vmname > vm-process-priority < default | flat | low | normal | high >
VBoxManage controlvm < uuid | vmname > webcam attach [pathname [settings]]
VBoxManage controlvm < uuid | vmname > webcam detach [pathname]
VBoxManage controlvm < uuid | vmname > webcam list
VBoxManage controlvm < uuid | vmname > addencpassword <ID> < password-file | - > [--removeonsuspend= yes | no ]
VBoxManage controlvm < uuid | vmname > removeencpassword <ID>
VBoxManage controlvm < uuid | vmname > removeallencpasswords
VBoxManage controlvm < uuid | vmname > changeuartmodeN disconnected | server pipe-name | client pipe-name | tcpserver port | tcpclient hostname:port | file filename | device-name
VBoxManage controlvm < uuid | vmname > autostart-enabledN on | off
VBoxManage controlvm < uuid | vmname > autostart-delayseconds
VBoxManage unattended detect <--iso=install-iso> [--machine-readable]
VBoxManage unattended install <uuid|vmname> <--iso=install-iso> [--user=login] [--password=password] [--password-file=file] [--full-user-name=name] [--key=product-key] [--install-additions] [--no-install-additions] [--additions-iso=add-iso] [--install-txs] [--no-install-txs] [--validation-kit-iso=testing-iso] [--locale=ll_CC] [--country=CC] [--time-zone=tz] [--hostname=fqdn] [--package-selection-adjustment=keyword] [--dry-run] [--auxiliary-base-path=path] [--image-index=number] [--script-template=file] [--post-install-template=file] [--post-install-command=command] [--extra-install-kernel-parameters=params] [--language=lang] [--start-vm=session-type]
VBoxManage snapshot <uuid|vmname>
VBoxManage snapshot <uuid|vmname> take <snapshot-name> [--description=description] [--live] [--uniquename Number,Timestamp,Space,Force]
VBoxManage snapshot <uuid|vmname> delete <snapshot-name>
VBoxManage snapshot <uuid|vmname> restore <snapshot-name>
VBoxManage snapshot <uuid|vmname> restorecurrent
VBoxManage snapshot <uuid|vmname> edit < snapshot-name | --current > [--description=description] [--name=new-name]
VBoxManage snapshot <uuid|vmname> list [[--details] | [--machinereadable]]
VBoxManage snapshot <uuid|vmname> showvminfo <snapshot-name>
VBoxManage storageattach < uuid | vmname > <--storagectl=name> [--bandwidthgroup= name | none ] [--comment=text] [--device=number] [--discard= on | off ] [--encodedlun=lun] [--forceunmount] [--hotpluggable= on | off ] [--initiator=initiator] [--intnet] [--lun=lun] [--medium= none | emptydrive | additions | uuid | filename | host:drive | iscsi ] [--mtype= normal | writethrough | immutable | shareable | readonly | multiattach ] [--nonrotational= on | off ] [--passthrough= on | off ] [--passwordfile=file] [--password=password] [--port=number] [--server= name | ip ] [--setparentuuid=uuid] [--setuuid=uuid] [--target=target] [--tempeject= on | off ] [--tport=port] [--type= dvddrive | fdd | hdd ] [--username=username]
VBoxManage storagectl < uuid | vmname > <--name=controller-name> [--add= floppy | ide | pcie | sas | sata | scsi | usb ] [--controller= BusLogic | I82078 | ICH6 | IntelAhci | LSILogic | LSILogicSAS | NVMe | PIIX3 | PIIX4 | USB | VirtIO ] [--bootable= on | off ] [--hostiocache= on | off ] [--portcount=count] [--remove] [--rename=new-controller-name]
VBoxManage bandwidthctl < uuid | vmname > add <bandwidth-group-name> <--limit=bandwidth-limit[k|m|g|K|M|G]> <--type=disk|network>
VBoxManage bandwidthctl < uuid | vmname > list [--machinereadable]
VBoxManage bandwidthctl < uuid | vmname > remove <bandwidth-group-name>
VBoxManage bandwidthctl < uuid | vmname > set <bandwidth-group-name> <--limit=bandwidth-limit[k|m|g|K|M|G]>
VBoxManage createmedium [ disk | dvd | floppy ] <--filename=filename> [ --size=megabytes | --sizebyte=bytes ] [--diffparent= UUID | filename ] [--format= VDI | VMDK | VHD ] [--variant Standard,Fixed,Split2G,Stream,ESX,Formatted,RawDisk] --property
name=value... --property-file
name=/path/to/file/with/value...
VBoxManage modifymedium [ disk | dvd | floppy ] < uuid | filename > [--autoreset=on | off] [--compact] [--description=description] [--move=pathname] [--property=name=[value]] [--resize=megabytes | --resizebyte=bytes] [--setlocation=pathname] [--type=normal | writethrough | immutable | shareable | readonly | multiattach]
VBoxManage clonemedium < uuid | source-medium > < uuid | target-medium > [ disk | dvd | floppy ] [--existing] [--format= VDI | VMDK | VHD | RAW | other ] [--variant=Standard,Fixed,Split2G,Stream,ESX]
VBoxManage mediumproperty [ disk | dvd | floppy ] set < uuid | filename > <property-name> <property-value>
VBoxManage mediumproperty [ disk | dvd | floppy ] get < uuid | filename > <property-name>
VBoxManage mediumproperty [ disk | dvd | floppy ] delete < uuid | filename > <property-name>
VBoxManage encryptmedium < uuid | filename > [--cipher=cipher-ID] [--newpassword=password] [--newpasswordid=password-ID] [--oldpassword=password]
VBoxManage convertfromraw <inputfile> <outputfile> [--format= VDI | VMDK | VHD ] [--uuid=uuid] [--variant=Standard,Fixed,Split2G,Stream,ESX]
VBoxManage convertfromraw stdin <outputfile> <bytes> [--format= VDI | VMDK | VHD ] [--uuid=uuid] [--variant=Standard,Fixed,Split2G,Stream,ESX]
VBoxManage mediumio < --disk=uuid|filename | --dvd=uuid|filename | --floppy=uuid|filename > [--password-file=-|filename] formatfat [--quick]
VBoxManage mediumio < --disk=uuid|filename | --dvd=uuid|filename | --floppy=uuid|filename > [--password-file=-|filename] cat [--hex] [--offset=byte-offset] [--size=bytes] [--output=-|filename]
VBoxManage mediumio < --disk=uuid|filename | --dvd=uuid|filename | --floppy=uuid|filename > [--password-file=-|filename] stream [--format=image-format] [--variant=image-variant] [--output=-|filename]
VBoxManage usbfilter add <index,0-N> <--target= < uuid | vmname | global >> <--name=string> <--action=ignore | hold> [--active=yes | no] [--vendorid=XXXX] [--productid=XXXX] [--revision=IIFF] [--manufacturer=string] [--product=string] [--port=hex] [--remote=yes | no] [--serialnumber=string] [--maskedinterfaces=XXXXXXXX]
VBoxManage usbfilter modify <index,0-N> <--target= < uuid | vmname | global >> [--name=string] [--action=ignore | hold] [--active=yes | no] [--vendorid=XXXX | ""] [--productid=XXXX | ""] [--revision=IIFF | ""] [--manufacturer=string | ""] [--product=string | ""] [--port=hex] [--remote=yes | no] [--serialnumber=string | ""] [--maskedinterfaces=XXXXXXXX]
VBoxManage usbfilter remove <index,0-N> <--target= < uuid | vmname | global >>
VBoxManage sharedfolder add < uuid | vmname > <--name=name> <--hostpath=hostpath> [--readonly] [--transient] [--automount] [--auto-mount-point=path]
VBoxManage sharedfolder remove < uuid | vmname > <--name=name> [--transient]
VBoxManage guestproperty get < uuid | vmname > <property-name> [--verbose]
VBoxManage guestproperty enumerate < uuid | vmname > [--no-timestamp] [--no-flags] [--relative] [--old-format] [patterns...]
VBoxManage guestproperty set < uuid | vmname > <property-name> [property-value [--flags=flags]]
VBoxManage guestproperty unset < uuid | vmname > <property-name>
VBoxManage guestproperty wait < uuid | vmname > <patterns> [--timeout=msec] [--fail-on-timeout]
VBoxManage guestcontrol < uuid | vmname > run [--arg0=argument 0] [--domain=domainname] [--dos2unix] [--exe=filename] [--ignore-orphaned-processes] [ --no-wait-stderr | --wait-stderr ] [ --no-wait-stdout | --wait-stdout ] [ --passwordfile=password-file | --password=password ] [--profile] [--putenv=var-name=[value]] [--quiet] [--timeout=msec] [--unix2dos] [--unquoted-args] [--username=username] [--verbose] <-- [argument...]>
VBoxManage guestcontrol < uuid | vmname > start [--arg0=argument 0] [--domain=domainname] [--exe=filename] [--ignore-orphaned-processes] [ --passwordfile=password-file | --password=password ] [--profile] [--putenv=var-name=[value]] [--quiet] [--timeout=msec] [--unquoted-args] [--username=username] [--verbose] <-- [argument...]>
VBoxManage guestcontrol < uuid | vmname > copyfrom [--dereference] [--domain=domainname] [ --passwordfile=password-file | --password=password ] [--quiet] [--no-replace] [--recursive] [--target-directory=host-destination-dir] [--update] [--username=username] [--verbose] <guest-source0> guest-source1 [...] <host-destination>
VBoxManage guestcontrol < uuid | vmname > copyto [--dereference] [--domain=domainname] [ --passwordfile=password-file | --password=password ] [--quiet] [--no-replace] [--recursive] [--target-directory=guest-destination-dir] [--update] [--username=username] [--verbose] <host-source0> host-source1 [...]
VBoxManage guestcontrol < uuid | vmname > mkdir [--domain=domainname] [--mode=mode] [--parents] [ --passwordfile=password-file | --password=password ] [--quiet] [--username=username] [--verbose] <guest-directory...>
VBoxManage guestcontrol < uuid | vmname > rmdir [--domain=domainname] [ --passwordfile=password-file | --password=password ] [--quiet] [--recursive] [--username=username] [--verbose] <guest-directory...>
VBoxManage guestcontrol < uuid | vmname > rm [--domain=domainname] [--force] [ --passwordfile=password-file | --password=password ] [--quiet] [--username=username] [--verbose] <guest-directory...>
VBoxManage guestcontrol < uuid | vmname > mv [--domain=domainname] [ --passwordfile=password-file | --password=password ] [--quiet] [--username=username] [--verbose] <source...> <destination-directory>
VBoxManage guestcontrol < uuid | vmname > mktemp [--directory] [--domain=domainname] [--mode=mode] [ --passwordfile=password-file | --password=password ] [--quiet] [--secure] [--tmpdir=directory-name] [--username=username] [--verbose] <template-name>
VBoxManage guestcontrol < uuid | vmname > stat [--domain=domainname] [ --passwordfile=password-file | --password=password ] [--quiet] [--username=username] [--verbose] <filename>
VBoxManage guestcontrol < uuid | vmname > list < all | files | processes | sessions > [--quiet] [--verbose]
VBoxManage guestcontrol < uuid | vmname > closeprocess [ --session-id=ID | --session-name=name-or-pattern ] [--quiet] [--verbose] <PID...>
VBoxManage guestcontrol < uuid | vmname > closesession [ --all | --session-id=ID | --session-name=name-or-pattern ] [--quiet] [--verbose]
VBoxManage guestcontrol < uuid | vmname > updatega [--quiet] [--verbose] [--source=guest-additions.ISO] [--wait-start] [-- [argument...]]
VBoxManage guestcontrol < uuid | vmname > watch [--quiet] [--verbose]
VBoxManage debugvm <uuid|vmname> dumpvmcore [--filename=name]
VBoxManage debugvm <uuid|vmname> info <item> [args...]
VBoxManage debugvm <uuid|vmname> injectnmi
VBoxManage debugvm <uuid|vmname> log [[--release] | [--debug]] [group-settings...]
VBoxManage debugvm <uuid|vmname> logdest [[--release] | [--debug]] [destinations...]
VBoxManage debugvm <uuid|vmname> logflags [[--release] | [--debug]] [flags...]
VBoxManage debugvm <uuid|vmname> osdetect
VBoxManage debugvm <uuid|vmname> osinfo
VBoxManage debugvm <uuid|vmname> osdmesg [--lines=lines]
VBoxManage debugvm <uuid|vmname> getregisters [--cpu=id] [reg-set.reg-name...]
VBoxManage debugvm <uuid|vmname> setregisters [--cpu=id] [reg-set.reg-name=value...]
VBoxManage debugvm <uuid|vmname> show [[--human-readable] | [--sh-export] | [--sh-eval] | [--cmd-set]] [settings-item...]
VBoxManage debugvm <uuid|vmname> stack [--cpu=id]
VBoxManage debugvm <uuid|vmname> statistics [--reset] [--descriptions] [--pattern=pattern]
VBoxManage debugvm <uuid|vmname> guestsample [--filename=filename] [--sample-interval-us=interval] [--sample-time-us=time]
VBoxManage metrics collect [--detach] [--list] [--period=seconds] [--samples=count] [ * | host | vmname [metric-list] ]
VBoxManage metrics disable [--list] [ * | host | vmname [metric-list] ]
VBoxManage metrics enable [--list] [ * | host | vmname [metric-list] ]
VBoxManage metrics list [ * | host | vmname [metric-list] ]
VBoxManage metrics query [ * | host | vmname [metric-list] ]
VBoxManage metrics setup [--list] [--period seconds] [--samples count] [ * | host | vmname [metric-list] ]
VBoxManage natnetwork add [ --disable | --enable ] <--netname=name> <--network=network> [--dhcp=on|off] [--ipv6=on|off] [--loopback-4=rule] [--loopback-6=rule] [--port-forward-4=rule] [--port-forward-6=rule]
VBoxManage natnetwork list [filter-pattern]
VBoxManage natnetwork modify [--dhcp=on|off] [ --disable | --enable ] <--netname=name> <--network=network> [--ipv6=on|off] [--loopback-4=rule] [--loopback-6=rule] [--port-forward-4=rule] [--port-forward-6=rule]
VBoxManage natnetwork remove <--netname=name>
VBoxManage natnetwork start <--netname=name>
VBoxManage natnetwork stop <--netname=name>
VBoxManage hostonlyif ipconfig <ifname> [ --dhcp | --ip=IPv4-address [--netmask=IPv4-netmask] | --ipv6=IPv6-address [--netmasklengthv6=length] ]
VBoxManage hostonlyif create
VBoxManage hostonlyif remove <ifname>
VBoxManage hostonlynet add <--name=netname> [--id=netid] <--netmask=mask> <--lower-ip=address> <--upper-ip=address> [ --enable | --disable ]
VBoxManage hostonlynet modify < --name=netname | --id=netid > [--lower-ip=address] [--upper-ip=address] [--netmask=mask] [ --enable | --disable ]
VBoxManage hostonlynet remove < --name=netname | --id=netid >
VBoxManage dhcpserver add < --network=netname | --interface=ifname > <--server-ip=address> <--netmask=mask> <--lower-ip=address> <--upper-ip=address> < --enable | --disable >
[[--global] | [--set-opt=dhcp-opt-no value...] | [--set-opt-hex=dhcp-opt-no hexstring...] | [--force-opt=dhcp-opt-no...] | [--supress-opt=dhcp-opt-no...] | [--min-lease-time=seconds] | [--default-lease-time=seconds] | [--max-lease-time=seconds]...]
[<--group=name> | [--set-opt=dhcp-opt-no value...] | [--set-opt-hex=dhcp-opt-no hexstring...] | [--force-opt=dhcp-opt-no...] | [--supress-opt=dhcp-opt-no...] | [--incl-mac=address...] | [--excl-mac=address...] | [--incl-mac-wild=pattern...] | [--excl-mac-wild=pattern...] | [--incl-vendor=string...] | [--excl-vendor=string...] | [--incl-vendor-wild=pattern...] | [--excl-vendor-wild=pattern...] | [--incl-user=string...] | [--excl-user=string...] | [--incl-user-wild=pattern...] | [--excl-user-wild=pattern...] | [--min-lease-time=seconds] | [--default-lease-time=seconds] | [--max-lease-time=seconds]...]
[<--vm=name|uuid> | [--nic=1-N] | [--set-opt=dhcp-opt-no value...] | [--set-opt-hex=dhcp-opt-no hexstring...] | [--force-opt=dhcp-opt-no...] | [--supress-opt=dhcp-opt-no...] | [--min-lease-time=seconds] | [--default-lease-time=seconds] | [--max-lease-time=seconds] | [--fixed-address=address]...]
[<--mac-address=address> | [--set-opt=dhcp-opt-no value...] | [--set-opt-hex=dhcp-opt-no hexstring...] | [--force-opt=dhcp-opt-no...] | [--supress-opt=dhcp-opt-no...] | [--min-lease-time=seconds] | [--default-lease-time=seconds] | [--max-lease-time=seconds] | [--fixed-address=address]...]
VBoxManage dhcpserver modify < --network=netname | --interface=ifname > [--server-ip=address] [--lower-ip=address] [--upper-ip=address] [--netmask=mask] [ --enable | --disable ]
[[--global] | [--del-opt=dhcp-opt-no...] | [--set-opt=dhcp-opt-no value...] | [--set-opt-hex=dhcp-opt-no hexstring...] | [--force-opt=dhcp-opt-no...] | [--unforce-opt=dhcp-opt-no...] | [--supress-opt=dhcp-opt-no...] | [--unsupress-opt=dhcp-opt-no...] | [--min-lease-time=seconds] | [--default-lease-time=seconds] | [--max-lease-time=seconds] | [--remove-config]...]
[<--group=name> | [--set-opt=dhcp-opt-no value...] | [--set-opt-hex=dhcp-opt-no hexstring...] | [--force-opt=dhcp-opt-no...] | [--unforce-opt=dhcp-opt-no...] | [--supress-opt=dhcp-opt-no...] | [--unsupress-opt=dhcp-opt-no...] | [--del-mac=address...] | [--incl-mac=address...] | [--excl-mac=address...] | [--del-mac-wild=pattern...] | [--incl-mac-wild=pattern...] | [--excl-mac-wild=pattern...] | [--del-vendor=string...] | [--incl-vendor=string...] | [--excl-vendor=string...] | [--del-vendor-wild=pattern...] | [--incl-vendor-wild=pattern...] | [--excl-vendor-wild=pattern...] | [--del-user=string...] | [--incl-user=string...] | [--excl-user=string...] | [--del-user-wild=pattern...] | [--incl-user-wild=pattern...] | [--excl-user-wild=pattern...] | [--zap-conditions] | [--min-lease-time=seconds] | [--default-lease-time=seconds] | [--max-lease-time=seconds] | [--remove-config]...]
[<--vm=name|uuid> | [--nic=1-N] | [--del-opt=dhcp-opt-no...] | [--set-opt=dhcp-opt-no value...] | [--set-opt-hex=dhcp-opt-no hexstring...] | [--force-opt=dhcp-opt-no...] | [--unforce-opt=dhcp-opt-no...] | [--supress-opt=dhcp-opt-no...] | [--unsupress-opt=dhcp-opt-no...] | [--min-lease-time=seconds] | [--default-lease-time=seconds] | [--max-lease-time=seconds] | [--fixed-address=address] | [--remove-config]...]
[<--mac-address=address> | [--del-opt=dhcp-opt-no...] | [--set-opt=dhcp-opt-no value...] | [--set-opt-hex=dhcp-opt-no hexstring...] | [--force-opt=dhcp-opt-no...] | [--unforce-opt=dhcp-opt-no...] | [--supress-opt=dhcp-opt-no...] | [--unsupress-opt=dhcp-opt-no...] | [--min-lease-time=seconds] | [--default-lease-time=seconds] | [--max-lease-time=seconds] | [--fixed-address=address] | [--remove-config]...]
VBoxManage dhcpserver remove < --network=netname | --interface=ifname >
VBoxManage dhcpserver start < --network=netname | --interface=ifname >
VBoxManage dhcpserver restart < --network=netname | --interface=ifname >
VBoxManage dhcpserver stop < --network=netname | --interface=ifname >
VBoxManage dhcpserver findlease < --network=netname | --interface=ifname > <--mac-address=mac>
VBoxManage usbdevsource add <source-name> <--backend=backend> <--address=address>
VBoxManage usbdevsource remove <source-name>
VBoxManage extpack install [--replace] [--accept-license=sha256] <tarball>
VBoxManage extpack uninstall [--force] <name>
VBoxManage extpack cleanup
VBoxManage updatecheck perform [--machine-readable]
VBoxManage updatecheck list [--machine-readable]
VBoxManage updatecheck modify [ --disable | --enable ] [--channel=stable | withbetas | all] [--frequency=days]
VBoxManage modifynvram <uuid|vmname> inituefivarstore
VBoxManage modifynvram <uuid|vmname> enrollmssignatures
VBoxManage modifynvram <uuid|vmname> enrollorclpk
VBoxManage modifynvram <uuid|vmname> enrollpk [--platform-key=filename] [--owner-uuid=uuid]
VBoxManage modifynvram <uuid|vmname> enrollmok [--mok=filename] [--owner-uuid=uuid]
VBoxManage modifynvram <uuid|vmname> listvars
VBoxManage modifynvram <uuid|vmname> queryvar [--name=name] [--filename=filename]
VBoxManage modifynvram <uuid|vmname> deletevar [--name=name] [--owner-uuid=uuid]
VBoxManage modifynvram <uuid|vmname> changevar [--name=name] [--filename=filename]
Each time VBoxManage is invoked, only one command can be executed. However, a command might support several subcommands which then can be invoked in one single call. The following sections provide detailed reference information on the different commands.
-v|--version: Show the version of this tool and exit.--nologo: Suppress the output of the logo information. This option is useful for scripts.--settingspw: Specifiy a settings password.--settingspwfile: Specify a file containing the settings password.
The settings password is used for certain settings which need to
be stored in encrypted form for security reasons. At the moment,
the only encrypted setting is the iSCSI initiator secret, see
Section 8.26, “VBoxManage storageattach”. As long as no
settings password is specified, this information is stored in
plain text. After using the
--settingspw|--settingspwfile option once, it
must be always used. Otherwise, the encrypted setting cannot be
unencrypted.
Oracle VM VirtualBox command-line interface.
The VBoxManage command is the command-line interface (CLI) for the Oracle VM VirtualBox software. The CLI supports all the features that are available with the Oracle VM VirtualBox graphical user interface (GUI). In addition, you can use the VBoxManage command to manage the features of the virtualization engine that cannot be managed by the GUI.
Each time you invoke the VBoxManage command, only one command is executed. Note that some VBoxManage subcommands invoke several subcommands.
Run the VBoxManage command from the command line of the host operating system (OS) to control Oracle VM VirtualBox software.
The VBoxManage command is stored in the following locations on the host system:
Linux:
/usr/bin/VBoxManageMac OS X:
/Applications/VirtualBox.app/Contents/MacOS/VBoxManageOracle Solaris:
/opt/VirtualBox/bin/VBoxManageWindows:
C:\Program
          Files\Oracle\VirtualBox\VBoxManage.exe
In addition to managing virtual machines (VMs) with this CLI or the GUI, you can use the VBoxHeadless CLI to manage VMs remotely.
The VBoxManage command performs particular tasks by using subcommands, such as list, createvm, and startvm. See the associated information for each VBoxManage subcommand.
If required, specify the VM by its name or by its Universally Unique Identifier (UUID).
Use the VBoxManage list vms command to obtain information about all currently registered VMs, including the VM names and associated UUIDs.
Note that you must enclose the entire VM name in double quotes if it contains spaces.
-
--nologo Suppresses the output of the logo information, which is useful for scripts.
The short version of this option is
-q.-
--settingspw=[password] Specifies the settings password. You can optionally specify the password as an argument to this option. If you do not specify the password in this way, the VBoxManage command prompts you for the password.
The settings password is a security feature that encrypts stored settings, which are stored as plain text by default.
You cannot unencrypt encrypted settings. So, if the settings are encrypted, you must continue to specify the
--settingspwor--settingspwfileoption.Only the iSCSI secret is encrypted at this time.
-
--settingspwfile=pw-filename Specifies the file that contains the settings password.
-
--version Shows version information about the VBoxManage command.
The short version of this option is
-V.- @
response-file Loads arguments from the specified Bourne shell response file.
-
subcommand Specifies one of the VBoxManage subcommands, such as controlvm, createvm, list, modifyvm, showvminfo, startvm, storageattach, and storagectl.
Each subcommand is described in its own command topic, some of which are shown in See Also sections.
The following command creates a virtual machine called
Win8 and registers it with Oracle VM VirtualBox by
using the --register option.
$ VBoxManage createvm --name "Win8" --register Virtual machine 'Win8' is created. UUID:UUID-stringSettings file: '/home/username/VirtualBox VMs/Win8/Win8.vbox'
The command output shows that the Win8 VM is
assigned a UUID and an XML machine settings file.
You can use the VBoxManage showvminfo command to view the configuration information of a VM.
The following example uses the VBoxManage
modifyvm command to change the amount of memory for the
Windows XP VM to be 1024 megabytes:
$ VBoxManage modifyvm "Windows XP" --memory 1024
Note that you can use the VBoxManage modifyvm command even when the VM is powered off.
You can use the VBoxManage storagectl command
or the VBoxManage storageattach command to
modify the storage configuration for a VM. For example, to create
a SATA storage controller called sata01 and add
it to the ol7 VM:
$ VBoxManage storagectl ol7 --name "sata01" --add sata
Use the VBoxManage startvm command to start a
VM that is currently powered off. For example, to start the
win7 VM:
$ VBoxManage startvm win7
Use the VBoxManage controlvm command to pause
or save a VM that is currently running. You can also use this
command to modify settings for the VM. For example, to enable
audio input for the ol6u9 VM.
$ VBoxManage controlvm ol6u9 audioin on
View system information and VM configuration details.
VBoxManage list [--long] [--sorted] [ bridgedifs | cloudnets | cloudprofiles | cloudproviders | cpu-profiles | dhcpservers | dvds | extpacks | floppies | groups | hddbackends | hdds | hostcpuids | hostdrives | hostdvds | hostfloppies | hostinfo | hostonlyifs | hostonlynets | intnets | natnets | ostypes | runningvms | screenshotformats | systemproperties | usbfilters | usbhost | vms | webcams ]
The VBoxManage list subcommands enable you to obtain information about the Oracle VM VirtualBox software, the VMs and associated services that you create.
The VBoxManage list bridgedifs command lists the bridged network interfaces that are currently available on the host system. The output shows detailed configuration information about each interface. See Chapter 6, Virtual Networking.
The VBoxManage list dhcpservers command lists the DHCP servers that are currently available on the host system. The output shows detailed configuration information about each DHCP server. See Chapter 6, Virtual Networking.
The VBoxManage list dvds command shows information about the DVD virtual disk images that are currently in use by the Oracle VM VirtualBox software. For each image, the output shows all the settings, the UUIDs associated with the image by Oracle VM VirtualBox, and all files associated with the image.
This command performs the same function as the Virtual Media Manager. See Section 5.3, “The Virtual Media Manager”.
The VBoxManage list extpacks command shows all Oracle VM VirtualBox extension packs that are currently installed. See Section 1.5, “Installing Oracle VM VirtualBox and Extension Packs” and Section 8.52, “VBoxManage extpack”.
The VBoxManage list floppies command shows information about the floppy disk images that are currently in use by the Oracle VM VirtualBox software. For each image, the output shows all the settings, the UUIDs associated with the image by Oracle VM VirtualBox, and all files associated with the image.
This command performs the same function as the Virtual Media Manager. See Section 5.3, “The Virtual Media Manager”.
The VBoxManage list groups command shows all VM groups. See Section 1.10, “Using VM Groups”.
The VBoxManage list hdds command shows information about the hard disk virtual disk images that are currently in use by the Oracle VM VirtualBox software. For each image, the output shows all the settings, the UUIDs associated with the image by Oracle VM VirtualBox, and all files associated with the image.
This command performs the same function as the Virtual Media Manager. See Section 5.3, “The Virtual Media Manager”.
The VBoxManage list hostonlyifs command lists the host-only network interfaces that are currently available on the host system. The output shows detailed configuration information about each interface. See Chapter 6, Virtual Networking.
The VBoxManage list hostonlynets command lists the host-only networks that have been configured. A host-only network provides connectivity between the host and local VMs. See Chapter 6, Virtual Networking.
The VBoxManage list intnets command shows information about the internal networks. See Chapter 6, Virtual Networking.
The VBoxManage list natnets command lists the NAT network interfaces that are currently available on the host system. See Chapter 6, Virtual Networking.
The VBoxManage list ostypes command lists all guest operating systems (OSes) that are known to Oracle VM VirtualBox. Each OS entry includes an identifier, a description, a family identifier, a family description, and whether the OS has 64-bit support.
You can use these identifiers with the VBoxManage modifyvm command.
The VBoxManage list systemproperties command shows a large collection of global Oracle VM VirtualBox settings and limits, such as minimum and maximum guest RAM, virtual hard disk size, folder settings, and the current authentication library in use.
The VBoxManage list usbhost command shows information about the USB devices that are attached to the host system. The output includes information that you can use to construct USB filters and indicates whether the device is currently in use by the host system.
The VBoxManage list webcams command shows the list of webcams that are attached to the running VM.
The output is a list of absolute paths or aliases that are used to attach the webcams to the VM by using the VBoxManage webcam attach command.
Show configuration information or log file contents for a virtual machine.
The VBoxManage showvminfo command outputs configuration information or log file contents for a specified virtual machine (VM).
VBoxManage showvminfo < uuid | vmname > [--details] [--machinereadable] [--password-id] [--password]
The VBoxManage showvminfo command outputs information about the specified VM in a detailed format or in a machine-readable format.
The VBoxManage showvminfo command shows the same information for the specified VM in the same format as the VBoxManage list vms --long command.
-
--details Includes detailed information about the VM.
-
--machinereadable Specifies that the VM information be in a machine-readable format.
-
--password-idid Specifies password id of the VM if it is encrypted.
-
--passwordfile|- Specifies password of the VM if it is encrypted. Either specify the absolute pathname of a password file on the host operating system, or
-to prompt you for the password.
VBoxManage showvminfo < uuid | vmname > <--log=index> [--password-id id] [--password file|-]
The VBoxManage showvminfo --log command outputs the contents of one of the specified VM's log files.
-
--log=index Specifies a numerical index that identifies the log file.
The index value starts at
0, which indicates theVBox.logfile. An index value of1indicates theVBoxHardening.logfile. Index values starting at2indicate other log files, such as theVBox.log.1file.-
--password-idid Specifies password id of the VM if it is encrypted.
-
--passwordfile|- Specifies password of the VM if it is encrypted. Either specify the absolute pathname of a password file on the host operating system, or
-to prompt you for the password.
The following example shows typical output for this command:
$ VBoxManage showvminfo "Windows 10"
VirtualBox Command Line Management Interface Version version-number
Copyright (C) 2005-2023 Oracle and/or its affiliates

Name:            Windows 10
Groups:          /
Guest OS:        Windows 10 (64-bit)
UUID:            1bf3464d-57c6-4d49-92a9-a5cc3816b7e7
Config file:     /home/username/VirtualBox VMs/Windows 10/Windows 10.vbox
Snapshot folder: /home/username/VirtualBox VMs/Windows 10/Snapshots
Log folder:      /home/username/VirtualBox VMs/Windows 10/Logs
Hardware UUID:   1bf3464d-57c6-4d49-92a9-a5cc3816b7e7
Memory size:     2048MB
Page Fusion:     off
VRAM size:       12MB
CPU exec cap:    100%
...
The following example shows the information output in a
machine-readable format, which shows the entries as a
property=value
string:
$ VBoxManage showvminfo "Windows 10" --machinereadable
...
groups="/"
ostype="Windows 10 (64-bit)"
UUID="1bf3464d-57c6-4d49-92a9-a5cc3816b7e7"
...
The following example shows the contents of the
VBox.log log file:
$ VBoxManage showvminfo "Windows 10" --log 0
00:00:02.895106 VirtualBox VM 6.0.0_RC1 r127378 linux.amd64 (Dec 10 2018 17:16:06) release log
00:00:02.895109 Log opened 2018-12-14T14:31:44.088259000Z
00:00:02.895111 Build Type: release
00:00:02.895115 OS Product: Linux
00:00:02.895117 OS Release: 4.1.12-61.1.22.el7uek.x86_64
00:00:02.895119 OS Version: #2 SMP Fri Dec 2 09:28:44 PST 2016
...
Register a virtual machine.
The VBoxManage registervm command enables you to create a virtual machine (VM) by importing an XML machine configuration file into Oracle VM VirtualBox. The VM cannot have the same UUID as a VM that is already registered in Oracle VM VirtualBox. Ensure that the XML machine configuration file is in the machines folder prior to registration.
Note
When you use the VBoxManage createvm command
to create a VM, you can specify the --register
option to register the VM.
-
filename Specifies the XML machine configuration file. This file has the
.vboxfile extension.-
--password Use the
--passwordto supply the encryption password of the VM. Either specify the absolute pathname of a password file on the host operating system, or-to prompt you for the password on the command line.
Unregister a virtual machine.
The VBoxManage unregistervm command unregisters a virtual machine (VM).
uuid|vmnameSpecifies the name or Universally Unique Identifier (UUID) of the VM.
-
--delete Deletes the following files related to the VM automatically:
All hard disk image files, including differencing files.
All saved state files that the machine created, including one for each snapshot.
XML VM machine definition file and its backups.
VM log files.
The empty directory associated with the unregistered VM.
-
--delete-all Deletes the files described in the
--deleteoption, as well as all DVDs and Floppy disks located in the VM folder and attached only to this VM.
Create a new virtual machine.
The VBoxManage createvm command creates a new XML virtual machine (VM) definition file.
You must specify the name of the VM by using --name
. This name is used by
default as the name of the settings file that has the
name.vbox extension and the machine folder, which
is a subfolder of the $HOME/VirtualBox VMs
directory.
The actual file name may not correspond directly to the VM name if it violates the host OS file name requirements (such as using the path separator or other reserved characters, they will be substituted with a placeholder). If you later rename the VM, the file and folder names will be updated to match the new name automatically.
In addition to specifying the name or UUID of the VM, which is required, you can specify any of the following options:
-
--basefolder=basefolder Specifies the name of the folder in which to save the machine configuration file for the new VM.
Note that the names of the file and the folder do not change if you rename the VM.
-
--default Applies a default hardware configuration for the specified guest OS. By default, the VM is created with minimal hardware.
-
--groups=group-ID[,...] Assigns the VM to the specified groups. If you specify more than one group, separate each group name with a comma.
Note that each group is identified by a group ID that starts with a slash character (
/) so that groups can be nested. By default, a VM is always assigned membership to the/group.-
--ostype=ostype Specifies the guest OS to run in the VM. Run the VBoxManage list ostypes command to see the available OS types.
-
--register Registers the VM with your Oracle VM VirtualBox installation. By default, the VBoxManage createvm command creates only the XML configuration for the VM but does not register the VM. If you do not register the VM at creation, you can run the VBoxManage registervm command after you create the VM.
-
--uuid=uuid Specifies the Universally Unique Identifier (UUID) of the VM. Ensure that this UUID is unique within the Oracle VM VirtualBox namespace of the host or of its VM group memberships if you decide to register the VM. By default, Oracle VM VirtualBox provides the UUID.
-
--ciphercipher Specifies the cipher to use for encryption. Valid values are
AES-128orAES-256.This option enables you to set up encryption on VM.
-
--password-idpassword-id Specifies a new password identifier that is used for correct identification when supplying multiple passwords for the VM.
This option enables you to set up encryption on VM.
-
--passwordfile Use the
--passwordto supply the encryption password of the VM. Either specify the absolute pathname of a password file on the host operating system, or-to prompt you for the password on the command line.This option enables you to set up encryption on VM.
Change settings for a virtual machine that is stopped.
VBoxManage modifyvm < uuid | vmname > [--name=name] [--groups= group [,group...] ] [--description=description] [--os-type=OS-type] [--icon-file=filename] [--memory=size-in-MB] [--page-fusion= on | off ] [--vram=size-in-MB] [--acpi= on | off ] [--ioapic= on | off ] [--hardware-uuid=UUID] [--cpus=CPU-count] [--cpu-hotplug= on | off ] [--plug-cpu=CPU-ID] [--unplug-cpu=CPU-ID] [--cpu-execution-cap=number] [--pae= on | off ] [--long-mode= on | off ] [--ibpb-on-vm-exit= on | off ] [--ibpb-on-vm-entry= on | off ] [--spec-ctrl= on | off ] [--l1d-flush-on-sched= on | off ] [--l1d-flush-on-vm-entry= on | off ] [--mds-clear-on-sched= on | off ] [--mds-clear-on-vm-entry= on | off ] [--cpu-profile= host | Intel 8086 | Intel 80286 | Intel 80386 ] [--hpet= on | off ] [--hwvirtex= on | off ] [--triple-fault-reset= on | off ] [--apic= on | off ] [--x2apic= on | off ] [--paravirt-provider= none | default | legacy | minimal | hyperv | kvm ] [--paravirt-debug= key=value [,key=value...] ] [--nested-paging= on | off ] [--large-pages= on | off ] [--vtx-vpid= on | off ] [--vtx-ux= on | off ] [--nested-hw-virt= on | off ] [--virt-vmsave-vmload= on | off ] [--accelerate-3d= on | off ] [--accelerate-2d-video= on | off ] [--chipset= ich9 | piix3 ] [--iommu= none | automatic | amd | intel ] [--tpm-type= none | 1.2 | 2.0 | host | swtpm ] [--tpm-location= location ] [--bios-logo-fade-in= on | off ] [--bios-logo-fade-out= on | off ] [--bios-logo-display-time=msec] [--bios-logo-image-path=pathname] [--bios-boot-menu= disabled | menuonly | messageandmenu ] [--bios-apic= disabled | apic | x2apic ] [--bios-system-time-offset=msec] [--bios-pxe-debug= on | off ] [--system-uuid-le= on | off ] [--bootX= none | floppy | dvd | disk | net ] [--rtc-use-utc= on | off ] [--graphicscontroller= none | vboxvga | vmsvga | vboxsvga ] [--snapshot-folder= default | pathname ] [--firmware= bios | efi | efi32 | efi64 ] [--guest-memory-balloon=size-in-MB] [--default-frontend= default | name ] [--vm-process-priority= default | flat | low | normal | high ]
VBoxManage modifyvm < uuid | vmname > [--nicN= none | null | nat | bridged | intnet | hostonly | hostonlynet | generic | natnetwork | cloud ] [--nic-typeN= Am79C970A | Am79C973 | 82540EM | 82543GC | 82545EM | virtio ] [--cable-connectedN= on | off ] [--nic-traceN= on | off ] [--nic-trace-fileN=filename] [--nic-propertyN=name= [value]] [--nic-speedN=kbps] [--nic-boot-prioN=priority] [--nic-promiscN= deny | allow-vms | allow-all ] [--nic-bandwidth-groupN= none | name ] [--bridge-adapterN= none | device-name ] [--cloud-networkN=network-name] [--host-only-adapterN= none | device-name ] [--host-only-netN=network-name] [--intnetN=network-name] [--nat-networkN=network-name] [--nic-generic-drvN=driver-name] [--mac-addressN= auto | MAC-address ]
VBoxManage modifyvm < uuid | vmname > [--nat-netN= network | default ] [--nat-pfN= [rule-name],tcp | udp,[host-IP],hostport,[guest-IP],guestport ] [--nat-pfN=delete=rule-name] [--nat-tftp-prefixN=prefix] [--nat-tftp-fileN=filename] [--nat-tftp-serverN=IP-address] [--nat-bind-ipN=IP-address] [--nat-dns-pass-domainN= on | off ] [--nat-dns-proxyN= on | off ] [--nat-dns-host-resolverN= on | off ] [--nat-localhostreachableN= on | off ] [--nat-settingsN=[mtu],[socksnd],[sockrcv],[tcpsnd],[tcprcv]] [--nat-alias-modeN= default | [log],[proxyonly],[sameports] ]
VBoxManage modifyvm < uuid | vmname > [--mouse= ps2 | usb | usbtablet | usbmultitouch | usbmtscreenpluspad ] [--keyboard= ps2 | usb ] [--uartN= off | IO-baseIRQ ] [--uart-modeN= disconnected | server pipe | client pipe | tcpserver port | tcpclient hostname:port | file filename | device-name ] [--uart-typeN= 16450 | 16550A | 16750 ] [--lpt-modeN=device-name] [--lptN= off | IO-baseIRQ ] [--audio-controller= ac97 | hda | sb16 ] [--audio-codec= stac9700 | ad1980 | stac9221 | sb16 ] [--audio-driver= none | default | null | dsound | was | oss | alsa | pulse | coreaudio ] [--audio-enabled= on | off ] [--audio-in= on | off ] [--audio-out= on | off ] [--clipboard-mode= disabled | hosttoguest | guesttohost | bidirectional ] [--drag-and-drop= disabled | hosttoguest | guesttohost | bidirectional ] [--monitor-count=number] [--usb-ehci= on | off ] [--usb-ohci= on | off ] [--usb-xhci= on | off ] [--usb-rename=old-namenew-name]
VBoxManage modifyvm < uuid | vmname > [--recording= on | off ] [--recording-screens= all | none | screen-ID[,screen-ID...] ] [--recording-file=filename] [--recording-max-size=MB] [--recording-max-time=msec] [--recording-opts= key=value[,key=value...] ] [--recording-video-fps=fps] [--recording-video-rate=rate] [--recording-video-res=widthheight]
VBoxManage modifyvm < uuid | vmname > [--vrde= on | off ] [--vrde-property=property-name= [property-value]] [--vrde-extpack= default | name ] [--vrde-port=port] [--vrde-address=hostip] [--vrde-auth-type= null | external | guest ] [--vrde-auth-library= default | name ] [--vrde-multi-con= on | off ] [--vrde-reuse-con= on | off ] [--vrde-video-channel= on | off ] [--vrde-video-channel-quality=percent]
VBoxManage modifyvm < uuid | vmname > [--teleporter= on | off ] [--teleporter-port=port] [--teleporter-address= address | empty ] [--teleporter-password=password] [--teleporter-password-file= filename | stdin ] [--cpuid-portability-level=level] [--cpuid-set=leaf [:subleaf]eax ebx ecx edx] [--cpuid-remove=leaf [:subleaf]] [--cpuid-remove-all]
VBoxManage modifyvm < uuid | vmname > [--tracing-enabled= on | off ] [--tracing-config=string] [--tracing-allow-vm-access= on | off ]
VBoxManage modifyvm < uuid | vmname > [--guest-debug-provider= none | native | gdb | kd ] [--guest-debug-io-provider= none | tcp | udp | ipc ] [--guest-debug-address= IP-Address | path ] [--guest-debug-port=port]
VBoxManage modifyvm < uuid | vmname > [--pci-attach=host-PCI-address [@guest-PCI-bus-address]] [--pci-detach=host-PCI-address]
The VBoxManage modifyvm command enables you to change the properties of a registered virtual machine (VM) that is not running.
Most of these properties correspond to the VM settings that are shown in each VM's Settings dialog in the VirtualBox Manager. See Chapter 3, Configuring Virtual Machines. However, some settings can only be viewed and managed with the VBoxManage command.
You can use the VBoxManage modifyvm command to change VM settings only when the VM is powered off. The VM cannot be running or in saved state when you use this command.
You can use the VBoxManage controlvm command to dynamically change some VM machine settings while the VM is running. See Section 8.20, “VBoxManage controlvm”.
VBoxManage modifyvm < uuid | vmname > [--name=name] [--groups= group [,group...] ] [--description=description] [--os-type=OS-type] [--icon-file=filename] [--memory=size-in-MB] [--page-fusion= on | off ] [--vram=size-in-MB] [--acpi= on | off ] [--ioapic= on | off ] [--hardware-uuid=UUID] [--cpus=CPU-count] [--cpu-hotplug= on | off ] [--plug-cpu=CPU-ID] [--unplug-cpu=CPU-ID] [--cpu-execution-cap=number] [--pae= on | off ] [--long-mode= on | off ] [--ibpb-on-vm-exit= on | off ] [--ibpb-on-vm-entry= on | off ] [--spec-ctrl= on | off ] [--l1d-flush-on-sched= on | off ] [--l1d-flush-on-vm-entry= on | off ] [--mds-clear-on-sched= on | off ] [--mds-clear-on-vm-entry= on | off ] [--cpu-profile= host | Intel 8086 | Intel 80286 | Intel 80386 ] [--hpet= on | off ] [--hwvirtex= on | off ] [--triple-fault-reset= on | off ] [--apic= on | off ] [--x2apic= on | off ] [--paravirt-provider= none | default | legacy | minimal | hyperv | kvm ] [--paravirt-debug= key=value [,key=value...] ] [--nested-paging= on | off ] [--large-pages= on | off ] [--vtx-vpid= on | off ] [--vtx-ux= on | off ] [--nested-hw-virt= on | off ] [--virt-vmsave-vmload= on | off ] [--accelerate-3d= on | off ] [--accelerate-2d-video= on | off ] [--chipset= ich9 | piix3 ] [--iommu= none | automatic | amd | intel ] [--tpm-type= none | 1.2 | 2.0 | host | swtpm ] [--tpm-location= location ] [--bios-logo-fade-in= on | off ] [--bios-logo-fade-out= on | off ] [--bios-logo-display-time=msec] [--bios-logo-image-path=pathname] [--bios-boot-menu= disabled | menuonly | messageandmenu ] [--bios-apic= disabled | apic | x2apic ] [--bios-system-time-offset=msec] [--bios-pxe-debug= on | off ] [--system-uuid-le= on | off ] [--bootX= none | floppy | dvd | disk | net ] [--rtc-use-utc= on | off ] [--graphicscontroller= none | vboxvga | vmsvga | vboxsvga ] [--snapshot-folder= default | pathname ] [--firmware= bios | efi | efi32 | efi64 ] [--guest-memory-balloon=size-in-MB] [--default-frontend= default | name ] [--vm-process-priority= default | flat | low | normal | high ]
The following options enable you to modify general information about your VM.
The VBoxManage modifyvm command supports the following options:
-
--name=vmname Changes the name of the VM and its related internal VM files. See Section 8.9, “VBoxManage createvm”.
-
--groups=group Changes the group membership of a VM. Group names always begin with a slash character (
/) and can be nested. By default, VMs are members of the/group. A VM can be member of multiple groups, but its primary group determines the directory structure where the internal VM files are placed by default.-
--description=desc Changes the optional VM description. Use a description to record details about the VM in a meaningful way. The GUI interprets HTML markup while the VBoxManage modifyvm command enables you include arbitrary strings that can contain multiple lines.
-
--os-type=OS-type Specifies the guest operating system (OS) information for the VM. Use the VBoxManage list ostypes command to view the OS type identifiers.
-
--icon-file=filename Specifies the path to the VM icon file in PNG format on the host system. The icon is shown in the VM manager UI and when running the VM with UI.
-
--memory=size Specifies the amount of host system RAM to allocate to the VM. The size is in MB. See Section 1.8, “Creating Your First Virtual Machine”.
-
--page-fusion=on | off Enables or disables the Page Fusion feature, which is disabled by default. Use the Page Fusion feature to minimize the memory duplication between VMs that have similar configurations and that run on the same host system. See Section 4.10.2, “Page Fusion”.
-
--vram=size Specifies the amount of RAM to allocate to the virtual graphics card. See Section 3.6, “Display Settings”.
-
--acpi=on | off Determines whether the VM has ACPI support. See Section 3.5.1, “Motherboard Tab”.
-
--ioapic=on | off Determines whether the VM has I/O APIC support. See Section 3.5.1, “Motherboard Tab”.
-
--hardware-uuid=uuid Specifies the Universally Unique Identifier (UUID) to present to the guest VM in memory tables (DMI/SMBIOS), hardware, and VM properties. By default this hardware UUID is the same as the VM UUID. Cloning a VM and the teleporting feature automatically preserve the hardware UUID value. Likewise for Virtual Appliance export and import, but only if both operations are done by Oracle VM VirtualBox.
-
--cpus=CPU-count Specifies the number of virtual CPUs to assign to the VM. See Section 3.5.2, “Processor Tab”.
If CPU hot-plugging is enabled, this option specifies the maximum number of virtual CPUs that can be plugged into the VMs.
-
--cpu-hotplug=on | off Enables or disables CPU hot-plugging. When enabled, you can dynamically add virtual CPUs to a VM or remove virtual CPUs from a VM. See Section 9.4, “CPU Hot-Plugging”.
-
--plug-cpu=CPU-ID Adds a virtual CPU to the VM.
CPU-IDis the index of the virtual CPU to add. A valid index value is a number from0to the maximum number of CPUs that you configured by using the--cpusoption.Only use this option if CPU hot-plugging is enabled.
-
--unplug-cpu=CPU-ID Removes a virtual CPU from the VM.
CPU-IDis the index of the virtual CPU to remove. A valid index value is a number from1to the maximum number of CPUs that you configured by using the--cpusoption.Only use this option if CPU hot-plugging is enabled.
Note that you cannot remove CPU 0.
-
--cpuexectioncap=percentage Specifies how much CPU time a virtual CPU can use. A valid value is from
1to100. A value of 50 indicates that a single virtual CPU can use up to 50% of a single host CPU.Use this feature with caution, it can have unexpected results including timekeeping problems and lower performance than specified. If you want to limit the resource usage of a VM it is more reliable to pick an appropriate number of VCPUs.
-
--pae=on | off Enables or disables physical address extension (PAE). See Section 3.5.2, “Processor Tab”.
-
--long-mode=on | off Enables or disables long mode. See Section 3.5.2, “Processor Tab”.
-
--ibpb-on-vm-exit=on | off Enables use of Indirect Branch Prediction Barrier (IBPB) on every VM exit.
-
--ibpb-on-vm-entry=on | off Enables use of Indirect Branch Prediction Barrier (IBPB) on every VM entry.
-
--spec-ctrl=on | off Enables or disables the exposure of speculation control interfaces to the guest VM. These interfaces must be available on the host system.
Depending on the host CPU and the workload, enabling speculation control might significantly reduce performance.
-
--l1d-flush-on-sched=on | off Enables or disables level 1 data cache flushing when a thread is scheduled to execute guest code. See Section 13.4.1, “CVE-2018-3646”.
-
--l1d-flush-on-vm-entry=on | off Enables or disables level 1 data cache flushing on every VM entry. See Section 13.4.1, “CVE-2018-3646”.
-
--mds-clear-on-sched=on | off Enables CPU buffer clearing when a thread is scheduled to execute guest code. See Section 13.4.2, “CVE-2018-12126, CVE-2018-12127, CVE-2018-12130, CVE-2019-11091”.
-
--mds-clear-on-vm-entry=on | off Enables CPU buffer clearing on every VM entry. See Section 13.4.2, “CVE-2018-12126, CVE-2018-12127, CVE-2018-12130, CVE-2019-11091”.
-
--cpu-profile=host | Intel 8086 | Intel 80286 | Intel 80386 Specifies the profile to use for guest CPU emulation. Specify a value that is based on the host system CPU (
host) or one of the following older Intel micro-architectures:8086,80286, or80386.-
--hpet=on | off Enables or disables a High Precision Event Timer (HPET) that can replace a legacy system timer. This feature is disabled by default. Note HPET is supported on Windows versions starting with Vista.
-
--hwvirtex=on | off Enables or disables the use of hardware virtualization extensions in the processor of the host system. Such extensions are Intel VT-x or AMD-V. See Section 10.3, “Hardware Virtualization”.
-
--triple-fault-reset=on | off Enables or disables the resetting of the guest VM instead of triggering a Guru Meditation. Some guest VMs raise a triple fault to reset the CPU, so sometimes resetting the guest VM is the best outcome. This option only applies to guests that do not use symmetric multiprocessing (SMP).
-
--apic=on | off Enables or disables APIC. With APIC, OSes can use more than 16 interrupt requests (IRQs) to avoid IRQ sharing and to improve reliability. APIC is enabled by default. See Section 3.5.1, “Motherboard Tab”.
-
--x2apic=on | off Enables or disables the CPU x2APIC feature. CPU x2APIC enables an OS to run more efficiently on high core count configurations and to optimize interrupt distribution in virtualized environments. This feature is enabled by default.
Disable this feature when the OS that runs on a host system or a guest VM is incompatible with CPU x2APIC.
-
--paravirt-provider=none | default | legacy | minimal | hyperv | kvm Specifies one of the following paravirtualization interfaces to provide to the guest OS:
nonedoes not expose any paravirtualization interface.defaultselects the appropriate interface based on the guest OS type when starting the VM. This is the default value used when creating new VMs.legacyselects a paravirtual interface for VMs that were created by older Oracle VM VirtualBox versions.minimalis required for Mac OS X guest VMs.kvmis recommended for Linux guest VMs. See Section 10.5, “Paravirtualization Providers”.hypervis recommended for Windows guest VMs. See Section 10.5, “Paravirtualization Providers”.
-
--paravirt-debug=property=value Specifies debugging properties that are specific to the paravirtualization provider configured for the specified VM. See Section 9.30, “Paravirtualized Debugging”.
-
--nested-paging=on | off Enables or disables the nested paging feature in the processor of the host system. This option is available only when hardware virtualization is enabled. See Section 10.3, “Hardware Virtualization” and Section 13.4.1, “CVE-2018-3646”.
-
--large-pages=on | off Enables or disables the hypervisor's use of large pages, which can improve performance by up to 5%. The use of large pages reduces TLB use and overhead. This option is available only when both hardware virtualization and nested paging are enabled.
-
--vtx-vpid=on | off Enables or disables the use of the tagged TLB (VPID) feature in the processor of your host system. See Section 10.3, “Hardware Virtualization”. This option is available only when hardware virtualization is enabled on Intel VT-x.
-
--vtx-ux=on | off Enables or disables the use of unrestricted guest mode for executing the guest VM. This option is available only when hardware virtualization is enabled on Intel VT-x.
-
--nested-hw-virt=on | off Enables or disables nested virtualization. Enabling makes hardware virtualization features available to the VM. See Section 9.34, “Nested Virtualization”.
-
--virt-vmsave-vmload=on | off If hardware virtualization is enabled and the host has an AMD CPU, this setting enables or disables the use of the virtualized vmsave/vmload host feature while executing the VM. It is enabled by default. It is recommended to leave it enabled as it has a drastic impact on performance while executing nested VMs when using the nested hardware virtualization feature. Section 9.34, “Nested Virtualization”.
-
--accelerate-3d=on | off Enables or disables hardware 3D acceleration for the graphics adapter variants which support it. This option has an effect only when the Guest Additions are installed. See Section 4.5.1, “Hardware 3D Acceleration (OpenGL and Direct3D 8/9)”.
-
--accelerate-2d-video=on | off Enables or disables 2D video acceleration for the graphics adapter variants which support it. This option has an effect only when the Guest Additions are installed. See Section 4.5.2, “Hardware 2D Video Acceleration for Windows Guests”.
-
--chipset=piix3 | ich9 Specify the Intel chipset for Oracle VM VirtualBox to emulate. The default value is the Intel PIIX3 chipset (
piix3).Change this value only if you need to relax some of the chipset constraints. See Section 3.5.1, “Motherboard Tab”.
-
--iommu=none | automatic | amd | intel Specifies the IOMMU type for Oracle VM VirtualBox to emulate. Both Intel and AMD IOMMU emulation currently require the use of the Intel ICH9 chipset (see
--chipsetoption).Valid values are as follows:
none– No IOMMU is present and is the default value.automatic– An IOMMU is present but its type is automatically chosen to match the host CPU vendor when the VM is powered on.amd– An AMD IOMMU is present.intel– An Intel IOMMU is present.
-
--tpm-type=none | 1.2 | 2.0 | host | swtpm Specifies the TPM type for Oracle VM VirtualBox to emulate.
Valid values are as follows:
none– No TPM is present and is the default value.1.2– A TPM conforming to the TCG specification version 1.2 is present.2.0– A TPM conforming to the TCG specification version 2.0 is present.host– The host TPM is passed through to the guest. May not be available on all supported host platforms.swtpm– The VM connects to an external TPM emulation compliant to swtpm. Requires to set the TPM location to connect to (see--tpm-locationoption).
-
--bios-logo-fade-in=on | off Specifies whether the BIOS logo fades in on VM startup. By default, an Oracle VM VirtualBox logo is shown.
-
--bios-logo-fade-out=on | off Specifies whether the BIOS logo fades out on VM startup.
-
--bios-logo-display-time=msec Specifies the amount of time in milliseconds that the BIOS logo is visible.
-
--bios-logo-image-path=pathname Replaces the existing BIOS logo with a different image. The replacement image must be an uncompressed 16, 256 or 16M color bitmap file (BMP) that does not contain color space information (Windows 3.0 format). Also ensure that the image is no larger than 640 X 480 pixels.
-
--bios-boot-menu=disabled | menuonly | messageandmenu Specifies whether the BIOS permits you to select a temporary boot device. Valid values are:
disabledoutputs the alternate boot device message and permits you to select a temporary boot device by pressing F12.menuonlysuppresses the alternate boot device message, but permits you to select a temporary boot device by pressing F12.messageandmenusuppresses the alternate boot device message and prevents you from selecting a temporary boot device by pressing F12.
-
--bios-apic=x2apic | apic | disabled Specifies the APIC level of the firmware. Valid values are:
x2apic,apic, anddisabled. When the value isdisabled, neither theapicnor thex2apicversion of the firmware is used.Note that if you specify the
x2apicvalue and x2APIC is unsupported by the virtual CPU, the APIC level downgrades toapic, if supported. Otherwise, the APIC level downgrades todisabled. Similarly, if you specify theapicvalue and APIC is unsupported by the virtual CPU, the APIC level downgrades todisabled.-
--bios-system-time-offset=msec Specifies the time offset in milliseconds of the guest VM relative to the time on the host system. If the offset value is positive, the guest VM time runs ahead of the time on the host system.
-
--bios-pxe-debug=on | off Enables or disables additional debugging output when using the Intel PXE boot ROM. The debug output is written to the release log file. See Section 12.1.2, “Collecting Debugging Information”.
-
--system-uuid-le=on | off Enables or disables representing the system UUID in little endian form. The default value is
onfor new VMs. For old VMs the setting isoffto keep the content of the DMI/SMBIOS table unchanged, which can be important for Windows license activation.-
--bootN=none | floppy | dvd | disk | net Enables you to specify the boot device order for the VM by assigning one of the device types to each of the four boot device slots that are represented by
Nin the option name.A value of 1 for
Nrepresents the first boot device slot, and so on.The device types are
floppyfor floppy disks,dvdfor DVDs or CDs,diskfor hard disks, andnetfor a network device. A value ofnoneindicates that no boot device is associated with the specified slot.-
--rtc-use-utc=on | off Specifies whether the real-time clock (RTC) uses coordinated universal time (UTC). See Section 3.5.1, “Motherboard Tab”.
-
--graphicscontroller=none | vboxvga | vmsvga | vboxsvga Specifies the graphics controller type to use. See Section 3.6.1, “Screen Tab”.
-
--snapshot-folder=default |pathname Specifies the name of the VM's snapshot storage folder. If you specify
default, the folder name isSnapshots/in the machine folder.-
--firmware=bios | efi | efi32 | efi64 Specifies the firmware used to boot the VM. Valid values are:
bios,efi,efi32, orefi64. Use EFI values with care.By default, BIOS firmware is used.
-
--guest-memory-balloon=size Specifies the size of the guest memory balloon. The guest memory balloon is the memory allocated by the Guest Additions from the guest OS and returned to the hypervisor for use by other VMs. Specify
sizein megabytes. The default value is0megabytes. See Section 4.10.1, “Memory Ballooning”.-
--default-frontend=default |name Specifies the default frontend to use when starting the specified VM. If you specify
default, the VM is shown in a window on the user's desktop. See Section 8.19, “VBoxManage startvm”.-
--vm-process-priority=default | flat | low | normal | high Specifies the priority scheme of the VM process to use when starting the specified VM and while the VM runs.
The following valid values are:
default– Default process priority determined by the OS.flat– Assumes a scheduling policy which puts the process at the default priority and with all threads at the same priority.low– Assumes a scheduling policy which puts the process mostly below the default priority of the host OS.normal– Assume a scheduling policy which shares the CPU resources fairly with other processes running with the default priority of the host OS.high– Assumes a scheduling policy which puts the task above the default priority of the host OS. This policy might easily cause other tasks in the system to starve.
VBoxManage modifyvm < uuid | vmname > [--nicN= none | null | nat | bridged | intnet | hostonly | hostonlynet | generic | natnetwork | cloud ] [--nic-typeN= Am79C970A | Am79C973 | 82540EM | 82543GC | 82545EM | virtio ] [--cable-connectedN= on | off ] [--nic-traceN= on | off ] [--nic-trace-fileN=filename] [--nic-propertyN=name= [value]] [--nic-speedN=kbps] [--nic-boot-prioN=priority] [--nic-promiscN= deny | allow-vms | allow-all ] [--nic-bandwidth-groupN= none | name ] [--bridge-adapterN= none | device-name ] [--cloud-networkN=network-name] [--host-only-adapterN= none | device-name ] [--host-only-netN=network-name] [--intnetN=network-name] [--nat-networkN=network-name] [--nic-generic-drvN=driver-name] [--mac-addressN= auto | MAC-address ]
The following options enable you to modify networking on your
VM. With all these options, N is an
integer greater than zero that represents the particular virtual
network adapter to configure.
-
--nicN=none | null | nat | natnetwork | bridged | intnet | hostonly | generic Configures the network type used by each virtual network card in the VM.
The following valid values correspond to the modes described in Section 6.2, “Introduction to Networking Modes”:
none– No networking presentnull– Not connected to the host systemnat– Use network address translation (NAT)natnetwork– Use a NAT networkbridged– Use bridged networkingintnet– Use internal networkinghostonly– Use host-only networkinggeneric– Access rarely used sub-modes
-
--nic-typeN=Am79C970A | Am79C973 | 82540EM | 82543GC | 82545EM | virtio Identifies the type of networking hardware that Oracle VM VirtualBox presents to the guest VM for the specified virtual network card. See Section 6.1, “Virtual Networking Hardware”.
Valid values are as follows:
Am79C970Arepresents the AMD PCNet PCI II.Am79C973represents the AMD PCNet FAST III, which is the default value.82540EMrepresents the Intel PRO/1000 MT Desktop.82543GCrepresents the Intel PRO/1000 T Server.82545EMrepresents the Intel PRO/1000 MT Server.virtiorepresents a paravirtualized network adapter.
-
--cable-connectedN=on | off Temporarily disconnects a virtual network interface, as if you pull a network cable from a physical network card. You might use this option to reset certain software components in the VM.
-
--nic-traceN=on | off Enables or disables network tracing for the specified virtual network card.
-
--nic-trace-fileN=filename Specifies the absolute path of the file in which to write trace log information. Use this option if network tracing is enabled.
-
--nic-propertyN=name=value Enables you to set property values and pass them to rarely used network backends. To use this option, you must also use the
--nic-generic-drvoption.These properties are specific to the backend engine and differ between the UDP Tunnel and the VDE backend drivers. For property examples, see Section 6.8, “UDP Tunnel Networking”.
-
--nic-speedN=kbps Specifies the throughput rate in kilobits per second for rarely used networking sub-modes such as VDE network and UDP Tunnel. Use this option only if you used the
--nicoption to enable generic networking for the specified virtual network card.-
--nic-boot-prioN=priority Assigns a priority to each NIC that determines the order in which that NIC is used to perform a PXE network boot. The priority value is an integer in the range from
0to4. Priority0, which is the default value, is the lowest priority. Priority1is the highest priority, and priorities3and4are lower.This option has an effect only when using the Intel PXE boot ROM.
-
--nic-promiscN=deny | allow-vms | allow-all Enables you to specify whether to deny or allow promiscuous mode for the specified VM virtual network card. This option is relevant only for bridged networking. Valid values are as follows:
denyhides any traffic that is not intended for the VM. This is the default value.allow-vmshides all host traffic from the VM, but allows the VM to see traffic to and from other VMs.allow-allallows the VM to see all traffic.
-
--nic-bandwidth-groupN=none |name Adds or removes a bandwidth group assignment to the specified virtual network interface. Valid values are as follows:
noneremoves any current bandwidth group assignment from the specified virtual network interface.nameadds a bandwidth group assignment to the specified virtual network interface.
See Section 6.12, “Limiting Bandwidth for Network Input/Output”.
-
--bridge-adapterN=none |device-name Specifies the host interface to use for the specified virtual network interface. See Section 6.5, “Bridged Networking”. Use this option only if you used the
--nicoption to enable bridged networking for the specified virtual network card.-
--host-only-adapterN=none |device-name Specifies which host-only networking interface to use for the specified virtual network interface. See Section 6.7, “Host-Only Networking”. Use this option only if you used the
--nicoption to enable host-only networking for the specified virtual network card.-
--intnetN=network-name Specifies the name of the internal network. See Section 6.6, “Internal Networking”. Use this option only if you used the
--nicoption to enable internal networking for the specified virtual network card.-
--nat-networkN=network-name Specifies the name of the NAT network to which this adapter is connected. Use this option only if the networking type is
natnetwork, notnat.-
--nic-generic-drvN=backend-driver Enables you to access rarely used networking sub-modes, such as VDE networks and UDP Tunnel. Use this option only if you used the
--nicoption to enable generic networking for a virtual network card.-
--mac-addressN=auto |MAC-address Specifies the MAC address of the specified network adapter on the VM. By default, Oracle VM VirtualBox assigns a random MAC address to each network adapter at VM creation.
VBoxManage modifyvm < uuid | vmname > [--nat-netN= network | default ] [--nat-pfN= [rule-name],tcp | udp,[host-IP],hostport,[guest-IP],guestport ] [--nat-pfN=delete=rule-name] [--nat-tftp-prefixN=prefix] [--nat-tftp-fileN=filename] [--nat-tftp-serverN=IP-address] [--nat-bind-ipN=IP-address] [--nat-dns-pass-domainN= on | off ] [--nat-dns-proxyN= on | off ] [--nat-dns-host-resolverN= on | off ] [--nat-localhostreachableN= on | off ] [--nat-settingsN=[mtu],[socksnd],[sockrcv],[tcpsnd],[tcprcv]] [--nat-alias-modeN= default | [log],[proxyonly],[sameports] ]
The following options use N to
specify the particular virtual network adapter to modify.
-
--nat-netN=default |network Specifies the IP address range to use for this network. See Section 9.8, “Fine Tuning the Oracle VM VirtualBox NAT Engine”. Use this option only if the networking type is
nat, notnatnetwork.-
--nat-pfN=[name],tcp | udp,[host-IP],hostport,[guest-IP],guestport Specifies the NAT port-forwarding rule to use. See Section 6.3.1, “Configuring Port Forwarding with NAT”.
-
--nat-pfN=deletename Specifies the NAT port-forwarding rule to delete. See Section 6.3.1, “Configuring Port Forwarding with NAT”.
-
--nat-tftp-prefixN=prefix Specifies a prefix to use for the built-in TFTP server. For example, you might use a prefix to indicate where the boot file is located. See Section 6.3.2, “PXE Booting with NAT” and Section 9.8.2, “Configuring the Boot Server (Next Server) of a NAT Network Interface”.
-
--nat-tftp-fileN=boot-file Specifies the name of the TFT boot file. See Section 9.8.2, “Configuring the Boot Server (Next Server) of a NAT Network Interface”.
-
--nat-tftp-serverN=tftp-server Specifies the address of the TFTP server from which to boot. See Section 9.8.2, “Configuring the Boot Server (Next Server) of a NAT Network Interface”.
-
--nat-bind-ipN=IP-address Specifies an alternate IP address to which the NAT engine binds. See Section 9.8.3, “Tuning TCP/IP Buffers for NAT”. By default, Oracle VM VirtualBox's NAT engine routes TCP/IP packets through the default interface assigned by the host's TCP/IP stack.
-
--nat-dns-pass-domainN=on | off Specifies whether the built-in DHCP server passes the domain name for network name resolution.
-
--nat-dns-proxyN=on | off Specifies whether the NAT engine is the proxy for all guest DNS requests to the host system's DNS servers. See Section 9.8.5, “Enabling DNS Proxy in NAT Mode”.
-
--nat-dns-host-resolverN=on | off Specifies whether the NAT engine uses the host system's resolver mechanisms to handle DNS requests. See Section 9.8.5, “Enabling DNS Proxy in NAT Mode”.
-
--nat-localhostreachableN=on | off Specifies whether the NAT engine allows traffic from the guest directed to 10.0.2.2 to pass to the host's loopback interface, i.e. localhost or 127.0.0.1.
-
--nat-settingsN=[mtu],[socksnd],[sockrcv],[tcpsnd],[tcprcv] Specifies values for tuning NAT performance. See Section 9.8.3, “Tuning TCP/IP Buffers for NAT”.
-
--nat-alias-modeN=default | [log],[proxyonly],[sameports] Specifies the behavior of the NAT engine core as follows:
logenables loggingproxyonlyswitches off aliasing mode and makes NAT transparentsameportsenforces that the NAT engine sends packets through the same port on which they originateddefaultdisables all aliasing modes
For more information, see Section 9.8.7, “Configuring Aliasing of the NAT Engine”.
VBoxManage modifyvm < uuid | vmname > [--mouse= ps2 | usb | usbtablet | usbmultitouch | usbmtscreenpluspad ] [--keyboard= ps2 | usb ] [--uartN= off | IO-baseIRQ ] [--uart-modeN= disconnected | server pipe | client pipe | tcpserver port | tcpclient hostname:port | file filename | device-name ] [--uart-typeN= 16450 | 16550A | 16750 ] [--lpt-modeN=device-name] [--lptN= off | IO-baseIRQ ] [--audio-controller= ac97 | hda | sb16 ] [--audio-codec= stac9700 | ad1980 | stac9221 | sb16 ] [--audio-driver= none | default | null | dsound | was | oss | alsa | pulse | coreaudio ] [--audio-enabled= on | off ] [--audio-in= on | off ] [--audio-out= on | off ] [--clipboard-mode= disabled | hosttoguest | guesttohost | bidirectional ] [--drag-and-drop= disabled | hosttoguest | guesttohost | bidirectional ] [--monitor-count=number] [--usb-ehci= on | off ] [--usb-ohci= on | off ] [--usb-xhci= on | off ] [--usb-rename=old-namenew-name]
The following options enable you to configure other hardware, such as the serial port, monitor, audio device, USB ports, and the clipboard, and drag-and-drop features.
-
--mouse=ps2 | usb | usbtablet | usbmultitouch | usbmtscreenpluspad Specifies the mode of the mouse to use in the VM. Valid values are:
ps2,usb,usbtablet,usbmultitouchandusbmtscreenpluspad.-
--keyboard=ps2 | usb Specifies the mode of the keyboard to use in the VM. Valid values are:
ps2andusb.-
--uartN=off |I/O-baseIRQ Configures virtual serial ports for the VM.
Nrepresents the serial port to modify. Valid values areoffto disable the port or an I/O base address and IRQ. For information about the traditional COM port I/O base address and IRQ values, see Section 3.10, “Serial Ports”.-
--uart-modeN=mode Specifies how Oracle VM VirtualBox connects the specified virtual serial port to the host system that runs the VM. See Section 3.10, “Serial Ports”.
Ensure that you first configure the virtual serial port by using the
--uartoption.NSpecify one of the following connection modes for each port:
disconnectedindicates that even though the serial port is shown to the guest VM, it is not connected. This state is like a physical COM port without a cable attached.serverpipe-namecreates the specified named pipe or local domain socket on the host system and connects the virtual serial device to it.On a Windows host system,
pipe-nameis a named pipe that has a name that uses the following form:\\.\pipe\.pipe-nameOn a Linux host system,
pipe-nameis a local domain socket.clientpipe-nameconnects the virtual serial device to the specified named pipe or local domain socket.Note that the named pipe or local domain socket must already exist.
tcpserverportcreates a TCP socket with the specified TCP port on the host system and connects the virtual serial device to it.For UNIX-like systems, use ports over 1024 for non-root users.
tcpclienthostname:portconnects the virtual serial device to the TCP socket.Note that the TCP socket must already exist.
filefilenameredirects the serial port output to the specified raw file. Ensure thatfilenameis the absolute path of the file on the host system.device-name: specifies the device name of a physical hardware serial port on the specified host system to which the virtual serial port connects.Use this mode to connect a physical serial port to a VM.
On a Windows host system, the device name is a COM port such as
COM1. On a Linux host system, the device name is similar to/dev/ttyS0.
-
--uart-typeN=UART-type Configures the UART type for the specified virtual serial port (
N). Valid values are16450,16550A, and16750. The default value is16550A.-
--lpt-modeN=device-name Specifies the device name of the parallel port to use.
For a Windows host system, use a device name such as lpt1. For a Linux host system, use a device name such as
/dev/lp0.-
--lptN=I/O-baseIRQ Specifies the I/O base address and IRQ of the parallel port.
You can view the I/O base address and IRQ that the VM uses for the parallel port in the Device Manager.
-
--audio-controller=controller-type Specifies the audio controller to be used with the VM. Valid audio controller type values are:
ac97,hda, andsb16.-
--audio-codec=codec-type Specifies the audio codec to be used with the VM. Valid audio codec type values are:
stac9700,ad1980,stac9221, andsb16.-
--audio-driver=type Specifies whether which audio driver (backend) to use.
none,default,null,dsound,was,oss,alsa,pulse, andcoreaudio.Note that the audio driver are dependent on the host operating system. Use the VBoxManage modifyvm command usage output to determine the supported audio types for your host system.
For maximum interoperability between hosts, the default audio driver can be used. The VM will then automatically select the most appropriate audio driver for the current host available.
-
--audio-enabled=on|off Specifies whether to enable or disable audio for the VM.
This option has precedence over the --audio-on and --audio-off options, i.e. turning off audio via this option will turn off both, input and output, audio.
-
--audio-in=on|off Specifies whether to enable or disable audio capture from the host system.
-
--audio-out=on|off Specifies whether to enable or disable audio playback from the guest VM.
-
--clipboard-mode=value Specifies how to share the guest VM or host system OS's clipboard with the host system or guest VM, respectively. Valid values are:
disabled,hosttoguest,guesttohost, andbidirectional. See Section 3.4, “General Settings”.The clipboard feature is available only if you have the Guest Additions be installed in the VM.
-
--drag-and-drop=value Specifies how to use the drag and drop feature between the host system and the VM. Valid values are:
disabled,hosttoguest,guesttohost, andbidirectional. See Section 4.4, “Drag and Drop”.The drag and drop feature is available only if you have the Guest Additions be installed in the VM.
-
--monitor-count=count Enables you to configure multiple monitors. See Section 3.6, “Display Settings”.
-
--usb-ohci=on | off Enables or disables the VM's virtual USB 1.1 controller. See Section 3.11.1, “USB Settings”.
-
--usb-ehci=on | off Enables or disables the VM's virtual USB 2.0 controller. See Section 3.11.1, “USB Settings”.
-
--usb-xhci=on | off Enables or disables the VM's virtual USB 3.0 controller. This is the most efficient option if the VM supports it. See Section 3.11.1, “USB Settings”.
-
--usb-rename=old-namenew-name Rename's the VM's virtual USB controller from
old-nametonew-name.
VBoxManage modifyvm < uuid | vmname > [--recording= on | off ] [--recording-screens= all | none | screen-ID[,screen-ID...] ] [--recording-file=filename] [--recording-max-size=MB] [--recording-max-time=msec] [--recording-opts= key=value[,key=value...] ] [--recording-video-fps=fps] [--recording-video-rate=rate] [--recording-video-res=widthheight]
The following options enable you to modify settings for video recording, audio recording, or both.
-
--recording=on | off Enables or disables the recording of a VM session into a WebM or VP8 file. When set to
on, recording begins when the VM session starts.-
--recording-screens=all | none |screen-ID[,screen-ID... Enables you to specify the VM screens to record. The recording for each screen is output to its own file. Valid values are:
all, which records all screens,none, which records no screens, or one or more specified screens.-
--recording-file=filename Specifies the name of the file in which to save the recording.
-
--recording-max-size=MB Specifies the maximum size of the recorded video file in megabytes. When the file reaches the specified size, recording stops. If the value is
0, recording continues until you manually stop recording.-
--recording-max-time=seconds Specifies the maximum amount of time to record in seconds. When the specified time elapses, recording stops. If the value is
0, recording continues until you manually stop recording.-
--recording-opts=keyword=value Specifies additional video-recording properties as a comma-separated property keyword-value list. For example,
foo=bar,a=b.Only use this option if you are an advanced user. For information about keywords, see the Oracle VM VirtualBox Programming Guide and Reference.
-
--recording-video-fps=fps Specifies the maximum number of video frames per second (FPS) to record. The recording ignores any frames that have a higher frequency. When you increase the FPS, fewer frames are ignored but the recording and the size of the recording file increases.
-
--recording-video-rate=bit-rate Specifies the bit rate of the video in kilobits per second. When you increase the bit rate, the recording appearance improves and the size of the recording file increases.
-
--recording-video-res=widthxheight Specifies the video resolution (width and height) of the recorded video in pixels.
VBoxManage modifyvm < uuid | vmname > [--vrde= on | off ] [--vrde-property=property-name= [property-value]] [--vrde-extpack= default | name ] [--vrde-port=port] [--vrde-address=hostip] [--vrde-auth-type= null | external | guest ] [--vrde-auth-library= default | name ] [--vrde-multi-con= on | off ] [--vrde-reuse-con= on | off ] [--vrde-video-channel= on | off ] [--vrde-video-channel-quality=percent]
The following options enable you to modify the VirtualBox Remote Desktop Extension (VRDE) behavior.
-
--vrde=on | off Enables or disables the VRDE server.
-
--vrde-property=TCP/Ports=port portis the port or port range to which the VRDE server binds. Thedefaultor0value uses port3389, which is the standard RDP port.Also see the
--vrde-portoption description.-
--vrde-property=TCP/Address=IP-address IP-addressis the IP address of the host network interface to which the VRDE server binds. When specified, the server accepts connections only on the host network interface at that IP address.Also see the
--vrde-addressoption description.-
--vrde-property=VideoChannel/Enabled=value Specifies whether the VRDP video channel is on or off.
1meansonand0meansoff. See Section 7.1.9, “VRDP Video Redirection”.-
--vrde-property=Quality=value Specifies a value between 10% and 100%, inclusive, that represents the JPEG compression level on the VRDE server video channel. A lower value produces lower JPEG quality but higher compression. See Section 7.1.9, “VRDP Video Redirection”.
-
--vrde-property=DownscaleProtection=value Enables or disables the video downscale protection feature. Valid values are
1to enable the feature and0to disable the feature.When this feature is enabled, Oracle VM VirtualBox determines whether to display the video:
When the video size equals the size of the shadow buffer, the video is considered to be full screen and is displayed.
When the video size is between full screen and the downscale threshold, the video is not displayed. Such a video might be an application window, which is unreadable when downscaled.
When this feature is disabled, an attempt is always made to display a video.
-
--vrde-property=Client/DisableDisplay=1 Disables the display VRDE server feature.
To reenable a feature, assign an empty value. For example, to reenable the display feature, specify the VBoxManage modifyvm --vrde-property=Client/DisableDisplay= command. See Section 7.1.10, “VRDP Customization”.
-
--vrde-property=DisableInput=1 Disables the input VRDE server feature.
-
--vrde-property=DisableAudio=1 Disables the audio VRDE server feature.
-
--vrde-property=DisableUSB=1 Disables the USB VRDE server feature.
-
--vrde-property=Client/DisableClipboard=1 Disables the clipboard VRDE server feature. To reenable the feature, assign an empty value. See Section 7.1.10, “VRDP Customization”.
-
--vrde-property=DisableUpstreamAudio=1 Disables the upstream audio VRDE server feature. To reenable the feature, assign an empty value. See Section 7.1.10, “VRDP Customization”.
-
--vrde-property=Client/DisableRDPDR=1 Disables the RDP device redirection for smart cards VRDE server feature. To reenable this feature, assign an empty value.
-
--vrde-property=H3DRedirect/Enabled=1 Enables the 3D redirection VRDE server feature. To disable this feature, assign an empty value.
-
--vrde-property=Security/Method=value Specifies the following information that is required for a connection:
Negotiateindicates that both Enhanced (TLS) and Standard RDP Security connections are permitted. The security method is negotiated with the client. This is the default value.RDPindicates that only Standard RDP Security is accepted.TLSindicates that only Enhanced RDP Security is accepted. The client must support TLS.
-
--vrde-property=ServerCertificate=value Specifies the absolute path to the server certificate. See Section 7.1.6, “RDP Encryption”.
-
--vrde-property=ServerPrivateKey=value Specifies the absolute path to the server private key. See Section 7.1.6, “RDP Encryption”.
-
--vrde-property=CACertificate=value Specifies the absolute path to the CA self-signed certificate. See Section 7.1.6, “RDP Encryption”.
-
--vrde-property Audio/RateCorrectionMode=value Specifies the audio connection mode or the path to the audio log file. Valid values are as follows:
VRDP_AUDIO_MODE_VOIDis no mode. Use this value to unset any set audio mode.VRDP_AUDIO_MODE_RCis the rate correction mode.VRDP_AUDIO_MODE_LPFis the low pass filter mode.VRDP_AUDIO_MODE_CSis the client sync sync mode to prevent an underflow or overflow of the client queue.
-
--vrde-property=LogPath=value Specifies the absolute path to the audio log file.
-
--vrde-extpack=default |name Specifies the library to use to access the VM remotely. The
defaultvalue uses the RDP code that is part of the Oracle VM VirtualBox Extension Pack.To use the VRDE module in VNC, specify
VNC. See Section 9.20, “Other Extension Packs”.-
--vrde-port=default |port portis the port or port range to which the VRDE server binds. Thedefaultor0value uses port3389, which is the standard RDP port.You can specify a comma-separated list of ports or port ranges of ports. Use a dash between two port numbers to specify a port range. The VRDE server binds to only one of the available ports from the list. Only one machine can use a given port at a time. For example, the
--vrde-port=5000,5010-5012option specifies that server can bind to one of following ports:5000,5010,5011, or5012.-
--vrde-address=IP-address Specifies the IP address of the host network interface to which the VRDE server binds. If you specify an IP address, the server accepts connections only on the specified host network interface.
Use this option to specify whether the VRDP server should accept IPv4, IPv6, or both type of connections:
Only IPv4: Use the
--vrde-address="0.0.0.0"option.Only IPv6: Use the
--vrde-address="::"option.Both IPv6 and IPv4: Use the
--vrde-address=""option. This is the default value.
-
--vrde-auth-type=null | external | guest Specify whether to use authorization and how to perform authorization. See Section 7.1.5, “RDP Authentication”. Valid values are as follows:
nullprovides no authentication.externalprovides external authentication through an authentication library.guestperforms authentication by using guest user accounts. This unsupported method requires that you install the Guest Additions on the VM.
-
--vrde-auth-library=default |name Specifies the library to use for RDP authentication. The default library for external authentication is
VBoxAuth. See Section 7.1.5, “RDP Authentication”.-
--vrde-multi-con=on | off Enables or disables the multiple connections VRDE server feature, if supported. See Section 7.1.7, “Multiple Connections to the VRDP Server”.
-
--vrde-reuse-con=on | off Specifies how the VRDE server behaves when multiple connections are disabled. When the value is
on, the server permits a new client to connect and drops the existing connection. When the value isoff, a new connection is not accepted if a client is already connected to the server. This is the default value.-
--vrde-video-channel=on | off Enables video redirection if supported by the VRDE server. See Section 7.1.9, “VRDP Video Redirection”.
-
--vrde-video-channel-quality=percent Specifies the image quality for video redirection as a value from 10 to 100 percent. The percentage represents the JPEG compression level where a lower number diminishes quality and provides higher compression. See Section 7.1.9, “VRDP Video Redirection”.
VBoxManage modifyvm < uuid | vmname > [--teleporter= on | off ] [--teleporter-port=port] [--teleporter-address= address | empty ] [--teleporter-password=password] [--teleporter-password-file= filename | stdin ] [--cpuid-portability-level=level] [--cpuid-set=leaf [:subleaf]eax ebx ecx edx] [--cpuid-remove=leaf [:subleaf]] [--cpuid-remove-all]
The following options enable you to configure a machine as a teleporting target. See Section 7.2, “Teleporting” and the teleporting related entries in Section 13.3.4, “Potentially Insecure Operations”.
-
--teleporter=on | off Enables or disables the teleporter. When enabled, a machine starts up and waits to receive a teleporting request from the network instead of booting normally.
Teleporting requests are received on the port and address specified using the following parameters.
-
--teleporter-port=port Specifies the port on which the VM listens to receive a teleporting request from another VM.
portis any free TCP/IP port number, such as6000. You must also specify the--teleporteroption.-
--teleporter-address=IP-address Specifies the IP address on which the VM listens to receive a teleporting request from another VM.
IP-addressis any IP address or host name and specifies the TCP/IP socket on which to bind. The default IP address is0.0.0.0, which represents any IP address. You must also specify the--teleporteroption.-
--teleporter-password=password Specifies the password to use for authentication. When specified, the teleporting request only succeeds if the password on the source machine is the same password as the one you specify.
-
--teleporter-password-file=filename Specifies a file that contains the password to use for authentication. When specified, the teleporting request only succeeds if the password on the source machine is the same password as the one you specify in the password file. A value of
stdinreads the password from standard input.-
--cpuid-portability-level=level Restricts the virtual CPU capabilities that Oracle VM VirtualBox presents to the guest OS by using portability rules. Higher integer values designate more restrictive behavior. The default level of
0indicates that all virtualized features supported by the host are made available to the guest. The value3supresses most features. Values of1and2represent restrictions in between. The behavior may change depending on the product version.-
--cpuid-set=leaf[:subleaf]eaxebxecxedx Advanced users can use this setting before a teleporting operation (in fact before starting the VM) to restrict the virtual CPU capabilities that Oracle VM VirtualBox presents to the guest operating system. This must be run on both the source and the target machines involved in teleporting and will then modify what the guest sees when it executes the CPUID machine instruction. This might help with misbehaving applications that wrongly assume that certain CPU capabilities are present. The meaning of the parameters is hardware dependent. Refer to the AMD or Intel processor documentation.
The values of
leaf,subleaf(optional),eax,ebx,ecxandedxare integers given in hexadecimal format, i.e. using a radix (base) of 16 without requiring any prefix.-
--cpuid-remove=leaf[:subleaf] Removes an adjustment established with
--cpuid-set.-
--cpuid-remove-all Removes all adjustments established with
--cpuid-set.
VBoxManage modifyvm < uuid | vmname > [--tracing-enabled= on | off ] [--tracing-config=string] [--tracing-allow-vm-access= on | off ]
Only use the following options to perform low-level VM debugging. These options are for advanced users only.
-
--tracing-enabled=on | off Enables or disables the trace buffer. Note that when specified, the trace buffer consumes some memory and adds overhead.
-
--tracing-config=config-string Enables a tracing configuration that defines which group of trace points are enabled.
-
--tracing-allow-vm-access=on | off Enables or disables VM access to the trace buffer. The default value is
off, which disables access.
VBoxManage modifyvm < uuid | vmname > [--usb-card-reader= on | off ]
The following options specify the access to a USB Card Reader by the guest environment. A USB card reader can access data on memory cards, such as CompactFlash (CF), Secure Digital (SD), and MultiMediaCard (MMC).
-
--usb-card-reader=on | off Enables or disables the USB card reader interface.
The following options enable you to configure the VM autostart feature, which automatically starts the VM at host system boot-up. You must do some host system configuration before you can use this feature. See Section 9.21, “Starting Virtual Machines During System Boot”.
VBoxManage modifyvm < uuid | vmname > [--autostart-enabled= on | off ] [--autostart-delay=seconds]
-
--autostart-enabled=on | off Enables or disables VM autostart at host system boot-up for the specified users.
-
--autostart-delay=seconds Specifies the number of seconds after host system boot-up to autostart the VM.
These options are for configuring the VMM for guest debugging.
VBoxManage modifyvm < uuid | vmname > [--guest-debug-provider= none | native | gdb | kd ] [--guest-debug-io-provider= none | tcp | udp | ipc ] [--guest-debug-address= IP-Address | path ] [--guest-debug-port=port]
-
--guest-debug-provider=none | native | gdb | kd Selects the given debug stub provider.
-
--guest-debug-io-provider=none | tcp | udp | ipc Selects the given I/O transport backend for the selected provider.
-
--guest-debug-address=IP-Address|path Sets the path the debugger is accessible under, depends on the selected I/O transport.
-
--guest-debug-port=port Sets the port the debugger is accessible under, depends on the selected I/O transport.
The following options enable you to configure the PCI passthrough feature, which currently is not available in Oracle VM VirtualBox. It is planned to bring this functionality back in the future.
VBoxManage modifyvm < uuid | vmname > [--pci-attach=host-PCI-address [@guest-PCI-bus-address]] [--pci-detach=host-PCI-address]
-
--pci-attach=host-PCI-address[@guest-PCI-bus-address] Attaches the specified PCI network controller on the host to the guest VM. You can optionally specify the PCI bus on the guest VM on which to attach the controller.
-
--pci-detach=host-PCI-address Detaches the specified PCI network controller from the attached PCI bus on the guest VM.
These options are for configuring the testing functionality of the VMM device and almost exclusively used by the bootsector testcases in the ValidationKit.
VBoxManage modifyvm < uuid | vmname > [--testing-enabled= on | off ] [--testing-mmio= on | off ] [--testing-cfg-dwordidx=value]
-
--testing-enabled=on | off Enabled the testing functionality of the VMMDev. See VMMDevTesting.h for details.
-
--testing-mmio=on | off Enabled the MMIO region of the VMMDev testing feature.
-
--testing-cfg-dwordidx=value This sets one of the 10 dword configuration values. The
idxmust be in the range 0 thru 9. Thevalueis limited to 32 bits (dword).
Create a clone of an existing virtual machine.
The following list describes the operand and the options that you can use with the VBoxManage clonevm command:
-
vmname|uuid Specifies the name or UUID of the VM to clone.
-
--basefolder=basefolder Specifies the name of the folder in which to save the configuration for the new VM.
-
--groups=group,... Assigns the clone to the specified group or groups. If you specify more than one group, separate each group name with a comma.
Note that each group is identified by a group ID that starts with a slash character (
/) so that groups can be nested. By default, a clone is always assigned membership to the/group.-
--mode=machine|machineandchildren|all Specifies which of the following cloning modes to use:
machinemode clones the current state of the existing VM without any snapshots. This is the default mode.machineandchildrenmode clones the snapshot specified by by the--snapshotoption and all child snapshots.allmode clones all snapshots and the current state of the existing VM.
-
--name=name Specifies a new name for the new VM. The default value is
original-nameCloneoriginal-nameis the original name of the VM.-
--options=option,... Specifies how to create the new clone.
The
--optionsargument can be used multiple times to enable multiple options, or the options can be given as a comma separated list. The options are case insensitive.The following options (case-insensitive) are recognized:
-
Link Creates a linked clone from a snapshot only.
-
KeepAllMACs Specifies that the new clone reuses the MAC addresses of each virtual network card from the existing VM.
If you do not specify this option or the
--options=keepnatmacsoption, the default behavior is to reinitialize the MAC addresses of each virtual network card.-
KeepNATMACs Specifies that the new clone reuses the MAC addresses of each virtual network card from the existing VM when the network type is NAT.
If you do not specify this option or the
KeepAllMACsoption, the default behavior is to reinitialize the MAC addresses of each virtual network card.-
KeepDiskNames Specifies that the new clone reuses the disk image names from the existing VM. By default, disk images are renamed.
-
KeepHwUUIDs Specifies that the new clone reuses the hardware IDs from the existing VM. By default, new UUIDs are used.
-
-
--register Automatically registers the new clone in this Oracle VM VirtualBox installation. You can manually register the new VM later by using the VBoxManage registervm command. See Section 8.7, “VBoxManage registervm”.
-
--snapshot=snapshot-name Specifies the snapshot on which to base the new VM. By default, the clone is created from the current state of the specified VM.
-
--uuid=uuid Specifies the UUID for the new VM. Ensure that this ID is unique for the Oracle VM VirtualBox instance if you decide to register this new VM. By default, Oracle VM VirtualBox provides a new UUID.
The following command creates and registers an exact clone of the
ol7 VM. The clone is called
ol7-dev-001.
The new clone includes all of the source VM's snapshots. The new VM also reuses all network interface MAC addresses, disk names, and UUIDs from the source VM.
$ VBoxManage clonevm ol7 --name="ol7-dev-001" --register --mode=all \
    --options=keepallmacs --options=keepdisknames --options=keephwuuids
The following command creates and registers a clone of the
Snapshot 1 snapshot of the
ol7 VM. The clone is called
ol7-dev-002.
$ VBoxManage clonevm ol7 --name="ol7-dev-002" --register --snapshot="Snapshot 1"
Move a virtual machine to a new location on the host system.
The VBoxManage movevm command moves a virtual machine (VM) to a new location on the host system.
When moved, all of the files that are associated with the VM, such as settings files and disk image files, are moved to the new location. The Oracle VM VirtualBox configuration is updated automatically.
uuid|vmnameSpecifies the Universally Unique Identifier (UUID) or name of the VM to move.
-
--type=basic Specifies the type of the move operation. So far
basicis the only recognized value and also the default if not specified.-
--folder=folder-name Specifies a full path name or relative path name of the new location on the host file system. Not specifying the option or specifying the current location is allowed, and moves disk images and other parts of the VM to this location if they are currently in other locations.
Change encryption and passwords of the VM.
VBoxManage encryptvm < uuid | vmname > setencryption --old-password file --cipher cipher-identifier --new-password file --new-password-id password-identifier --force
VBoxManage encryptvm < uuid | vmname > addpassword --password file --password-id password-identifier
The VBoxManage encryptvm command enables you to change the encryption or add and remove user passwords for the virtual machine (VM). The following sections describe the subcommands that you can use:
VBoxManage encryptvm < uuid | vmname > setencryption --old-password file --cipher cipher-identifier --new-password file --new-password-id password-identifier --force
The VBoxManage encryptvm
vmname setencryption command
changes encryption of a VM.
Use the --old-password to supply old encryption
password. Either specify the absolute pathname of a password file
on the host operating system, or - to prompt
you for the old password.
Use the --cipher option to specify the
new cipher for encryption of the VM. Only AES-128
and AES-256 are supported. Appropriate mode
GCM, CTR or XTS will be selected by VM depending on encrypting
component.
Use the --new-password option to specify the
new password for encryption of the VM. Either specify the absolute
pathname of a password file on the host operating system, or
- to prompt you for the new password.
Use the --new-password-id option to specify the
new id for the password for encryption of the VM.
Use the --force option to make the system
to reencrypt the VM instead of simple changing the password.
VBoxManage encryptvm < uuid | vmname > checkpassword <file>
The VBoxManage encryptvm
vmname checkpassword command
checks the correctness of the supplied password.
The password can be supplied from file. Specify the absolute
pathname of a password file on the host operating system. Also,
you can specify - to prompt you for the password.
VBoxManage encryptvm < uuid | vmname > addpassword --password file --password-id password-identifier
The VBoxManage encryptvm
vmname addpassword command
adds a password for decrypting the VM.
Use the --password to supply the encryption
password. Either specify the absolute pathname of a password file
on the host operating system, or - to prompt
you for the password.
Use the --password-id option to specify the
id the password is supplied for.
VBoxManage encryptvm < uuid | vmname > removepassword <password-identifier>
The VBoxManage encryptvm
vmname removepassword command
removes a password used for decrypting the VM.
Specify the password identifier for removing. The password becomes unknown and the VM can not be decrypted.
Manage the cloud entities.
VBoxManage cloud <--provider=name> <--profile=name>
list instances [--state=string] [--compartment-id=string]
VBoxManage cloud <--provider=name> <--profile=name>
list images <--compartment-id=string> [--state=string]
VBoxManage cloud <--provider=name> <--profile=name>
list vnicattachments <--compartment-id=string> [--filter=string]
VBoxManage cloud <--provider=name> <--profile=name>
instance create <--domain-name=name> <<--image-id=id> | <--boot-volume-id=id>> <--display-name=name> <--shape=type> <--subnet=id> [--boot-disk-size=size in GB] [--publicip=true/false] [--privateip=IP address] [--public-ssh-key=key string...] [--launch-mode=NATIVE/EMULATED/PARAVIRTUALIZED] [--cloud-init-script-path=path to a script]
VBoxManage cloud <--provider=name> <--profile=name>
image create <--display-name=name> [--bucket-name=name] [--object-name=name] [--instance-id=unique id]
VBoxManage cloud <--provider=name> <--profile=name>
image import <--id=unique id> [--bucket-name=name] [--object-name=name]
VBoxManage cloud <--provider=name> <--profile=name>
image export <--id=unique id> <--display-name=name> [--bucket-name=name] [--object-name=name]
VBoxManage cloud <--provider=name> <--profile=name>
network setup [--gateway-os-name=string] [--gateway-os-version=string] [--gateway-shape=string] [--tunnel-network-name=string] [--tunnel-network-range=string] [--proxy=string] [--compartment-id=string]
VBoxManage cloud <--provider=name> <--profile=name>
network create <--name=string> <--network-id=string> [ --enable | --disable ]
VBoxManage cloud <--provider=name> <--profile=name>
list instances [--state=string] [--compartment-id=string]
Displays the list of the instances for a specified compartment.
- --state
"running/paused/terminated" The state of cloud instance. The possible states are "running/paused/terminated" at moment. If the state isn't provided the list of instances with all possible states is returned.
-
--compartment-id A compartment is the logical container used to organize and isolate cloud resources. The different cloud providers can have the different names for this entity.
VBoxManage cloud <--provider=name> <--profile=name>
list images <--compartment-id=string> [--state=string]
Displays the list of the images for a specified compartment.
- --state
"available/disabled/deleted" The state of cloud image. The possible states are "available/disabled/deleted" at moment. If the state isn't provided the list of images with all possible states is returned.
-
--compartment-id A compartment is the logical container used to organize and isolate cloud resources. The different cloud providers can have the different names for this entity.
VBoxManage cloud <--provider=name> <--profile=name>
list vnicattachments <--compartment-id=string> [--filter=string]
Displays the list of the vnic attachments for a specified compartment.
- --filter
"instanceId/vnicId/domainName=string" Filters are used to narrow down the set of Vnic attachments of interest. This parameter is repeatible. The possible filters are "instanceId" or "vnicId" or "availabilityDomain" at moment. The form is "instanceId/vnicId/domainName=[string value]" and can be repeated. In instance, "--filter instanceId=ocid1.instance.oc1.iad.anuwcl...js6 --filter vnicId=ocid1.vnic.oc1.iad.abuwcl...jsm --filter domainName=ergw:US-ASHBURN-AD-2". But in most cases, this is redundant and one filter is enough. If the filter isn't provided the whole list of vnic attachments for a specified compartment is returned.
-
--compartment-id A compartment is the logical container used to organize and isolate cloud resources. The different cloud providers can have the different names for this entity.
VBoxManage cloud <--provider=name> <--profile=name>
instance create <--domain-name=name> <<--image-id=id> | <--boot-volume-id=id>> <--display-name=name> <--shape=type> <--subnet=id> [--boot-disk-size=size in GB] [--publicip=true/false] [--privateip=IP address] [--public-ssh-key=key string...] [--launch-mode=NATIVE/EMULATED/PARAVIRTUALIZED] [--cloud-init-script-path=path to a script]
Creates new instance in the Cloud. There are two standard ways to create an instance in the Cloud: 1. Create an instance from an existing custom image. 2. Create an instance from an existing bootable volume. This bootable volume shouldn't be attached to any instance. For the 1st approach next parameters are required: image-id, boot-disk-size. For the 2nd approach next parameters are required: boot-volume-id. The rest parameters are common for both cases: display-name, launch-mode, subnet-id, publicIP, privateIP, shape, domain.
-
--domain-name Cloud domain where new instance is created.
-
--image-id Unique identifier which fully identifies a custom image in the Cloud.
-
--boot-volume-id Unique identifier which fully identifies a boot volume in the Cloud.
-
--display-name Name for new instance in the Cloud.
-
--shape The shape of instance, defines the number of CPUs and RAM memory.
-
--subnet Unique identifier which fully identifies an existing subnet in the Cloud which will be used by the instance.
-
--boot-disk-size The size of bootable image in GB. Default is 50GB.
-
--publicip Whether the instance will have a public IP or not.
-
--privateip Private IP address for the created instance.
-
--public-ssh-key Public SSH key used to connect to the instance via SSH. This parameter may be repeated if you plan to use more than one key as: "--public-ssh-key=firstSSHKey --public-ssh-key=secondSSHKey".
-
--launch-mode The most known values here may be EMULATED, NATIVE, PARAVIRTUALIZED.
-
--cloud-init-script-path Absolute path to the user cloud-init script.
VBoxManage cloud <--provider=name> <--profile=name>
image create <--display-name=name> [--bucket-name=name] [--object-name=name] [--instance-id=unique id]
Creates new image in the Cloud. There are two standard ways to create an image in the Cloud: 1. Create an image from an object in the Cloud Storage; 2. Create an image from an existing cloud instance. For the 1st approach next parameters are required: bucket-name - cloud bucket name where an object is located; object-name - name of object in the bucket; display-name - name for new image in the Cloud. For the 2d approach next parameters are required: instance-id - Id of instance in the Cloud; display-name - name for new image in the Cloud.
-
--display-name Name for new image in the Cloud.
-
--bucket-name Cloud bucket name where an object is located.
-
--object-name Name of object in the bucket.
-
--instance-id Unique identifier which fully identifies the instance in the Cloud.
VBoxManage cloud <--provider=name> <--profile=name>
image import <--id=unique id> [--bucket-name=name] [--object-name=name]
Import an image with a specified id from the Cloud to a local host. The result is an object in the local "temp" folder on the local host. Possible approach may have two general steps: 1. Create an object from an image in the Cloud Storage; 2. Download the object to the local host. So the next parameters may be required: bucket-name - cloud bucket name where the object will be created; object-name - name of object in the bucket. if parameter "object-name" is absent a displayed image name is used. If the first step isn't needed only the parameter "id" is required.
-
--id Unique identifier which fully identifies the image in the Cloud.
-
--bucket-name Cloud bucket name where an object will be created.
-
--object-name Name of created object in the bucket. The downloaded object will have this name.
VBoxManage cloud <--provider=name> <--profile=name>
image export <--id=unique id> <--display-name=name> [--bucket-name=name] [--object-name=name]
Export an existing VBox image with a specified uuid from a local host to the Cloud. The result is new image in the Cloud. Possible approach may have two general steps: 1. Upload VBox image to the Cloud Storage; 2. Create an image from the uploaded object. So the next parameters may be required: bucket-name -cloud bucket name where the object will be uploaded; object-name - name of object in the bucket. If parameter "object-name" is absent the image id is used; display-name - name for new image in the Cloud. If the first step isn't needed the parameters "id" and "display-name" are required only.
-
--id Unique identifier of the image in the VirtualBox.
-
--display-name Name for new image in the Cloud.
-
--bucket-name Cloud bucket name where the image (object) will be uploaded.
-
--object-name Name of object in the bucket.
VBoxManage cloud <--provider=name> <--profile=name>
network setup [--gateway-os-name=string] [--gateway-os-version=string] [--gateway-shape=string] [--tunnel-network-name=string] [--tunnel-network-range=string] [--proxy=string] [--compartment-id=string]
Set up a cloud network environment for the specified cloud profile.
-
--gateway-os-name The name of OS to use for a cloud gateway.
-
--gateway-os-version The version of OS to use for a cloud gateway.
-
--gateway-shape The instance shape to use for a cloud gateway.
-
--tunnel-network-name The name of VCN/subnet to use for tunneling.
-
--tunnel-network-range The IP address range to use for tunneling.
-
--proxy The proxy URL to be used in local gateway installation.
-
--compartment-id The compartment to create the tunnel network in.
VBoxManage cloud <--provider=name> <--profile=name>
network create <--name=string> <--network-id=string> [ --enable | --disable ]
Create a new cloud network descriptor associated with an existing cloud subnet.
-
--name The name to assign to the cloud network descriptor.
-
--network-id The unique identifier of an existing subnet in the cloud.
--enable, --disableWhether to enable the network descriptor or disable it. If not specified, the network will be enabled.
VBoxManage cloud network update <--name=string> [--network-id=string] [ --enable | --disable ]
Modify an existing cloud network descriptor.
-
--name The name of an existing cloud network descriptor.
-
--network-id The unique identifier of an existing subnet in the cloud.
--enable, --disableWhether to enable the network descriptor or disable it.
Manage the cloud profiles.
VBoxManage cloudprofile <--provider=name> <--profile=name> add [--clouduser=unique id] [--fingerprint=MD5 string] [--keyfile=path] [--passphrase=string] [--tenancy=unique id] [--compartment=unique id] [--region=string]
VBoxManage cloudprofile <--provider=name> <--profile=name> update [--clouduser=unique id] [--fingerprint=MD5 string] [--keyfile=path] [--passphrase=string] [--tenancy=unique id] [--compartment=unique id] [--region=string]
VBoxManage cloudprofile <--provider=name> <--profile=name> add [--clouduser=unique id] [--fingerprint=MD5 string] [--keyfile=path] [--passphrase=string] [--tenancy=unique id] [--compartment=unique id] [--region=string]
Add new cloud profile for a specified cloud provider.
-
--clouduser The name which fully identifies the user in the specified cloud provider.
-
--fingerprint Fingerprint for the key pair being used.
-
--keyfile Full path and filename of the private key.
-
--passphrase Passphrase used for the key, if it is encrypted.
-
--tenancy ID of your tenancy.
-
--compartment ID of your compartment.
-
--region Region name. Region is where you plan to deploy an application.
VBoxManage cloudprofile <--provider=name> <--profile=name> update [--clouduser=unique id] [--fingerprint=MD5 string] [--keyfile=path] [--passphrase=string] [--tenancy=unique id] [--compartment=unique id] [--region=string]
Modify a cloud profile for the specified cloud provider.
-
--clouduser The name which fully identifies the user in the specified cloud provider.
-
--fingerprint Fingerprint for the key pair being used.
-
--keyfile Full path and filename of the private key.
-
--passphrase Passphrase used for the key, if it is encrypted.
-
--tenancy ID of your tenancy.
-
--compartment ID of your compartment.
-
--region Region name. Region is where you plan to deploy an application.
Import a virtual appliance in OVF format or from a cloud service and create virtual machines.
VBoxManage import < ovfname | ovaname > [--dry-run] [--options= keepallmacs | keepnatmacs | importtovdi ] [--vsys=n] [--ostype=ostype] [--vmname=name] [--settingsfile=file] [--basefolder=folder] [--group=group] [--memory=MB] [--cpus=n] [--description=text] [--eula= show | accept ] [--unit=n] [--ignore] [--scsitype= BusLogic | LsiLogic ] [--disk=path] [--controller=index] [--port=n]
The VBoxManage import command imports a virtual appliance either in OVF format or from a cloud service such as Oracle Cloud Infrastructure. The import is performed by copying virtual disk images (by default using the VMDK image format) and by creating virtual machines (VMs) in Oracle VM VirtualBox. See Section 1.15, “Importing and Exporting Virtual Machines”.
You must specify the path name of an OVF file or OVA archive to use as input, or a placeholder for the cloud case. For OVF appliances ensure that any disk images are in the same directory as the OVF file.
Note that any options you specify to control the imported virtual appliance or to modify the import parameters rely on the contents of the OVF file or the information from the cloud service.
Before you use the import operation to create the VM, perform a dry run to verify the correctness of your configuration. This is more useful with an OVF or OVA appliance, because with a cloud service even a dry run needs to perform most of the time consuming steps.
The import from a cloud service downloads a temporary file containing both the boot image and some metadata describing the details of the VM instance. The temporary file is deleted after successful import.
ovfname|ovanameSpecifies the name of the OVF file or OVA archive that describes the appliance. In the cloud case this is usually a fixed string such as
OCI://.-
--dry-run Performs a dry run of the VBoxManage import command before you perform the actual import operation. A dry run operation does the following:
Outputs a description of the appliance's contents based on the specified OVF or OVA file.
Shows how the appliance would be imported into Oracle VM VirtualBox. In addition, the output shows any options that you can use to change the import behavior.
The shortened form of this option is
-n.-
--options=keepallmacs | keepnatmacs | importtovdi Enables you to fine tune the import operation.
Valid arguments are as follows:
keepallmacs: Specifies that the MAC addresses of every virtual network card are left unchanged.keepnatmacs: Specifies that the MAC addresses of every virtual network card are left unchanged if the network type is NAT.importtovdi: Specifies that all new disk images are in VDI file format.
-
--ostype=ostype Specifies the guest operating system (OS) information for the VM. Use the VBoxManage list ostypes command to view the OS type identifiers.
-
--vmname=name Specifies the name of the VM to be used by Oracle VM VirtualBox.
-
--basefolder=folder Specifies the folder where the files of the imported VM are stored.
-
--memory=MB Specifies the memory size in Megabytes for the imported VM.
-
--cpus=n Specifies the number of CPUs for the imported VM.
-
--description=text Specifies the description text visible in the GUI and CLI when checking the VM details.
The following options are specific for importing a virtual appliance in OVF or OVA format. Such an appliance can contain one or more VMs, which requires specifying which VM configuration should be adjusted in case you want to change it. See Section 1.15.2, “Importing an Appliance in OVF Format”.
VBoxManage import < ovfname | ovaname > [--dry-run] [--options= keepallmacs | keepnatmacs | importtovdi ] [--vsys=n] [--ostype=ostype] [--vmname=name] [--settingsfile=file] [--basefolder=folder] [--group=group] [--memory=MB] [--cpus=n] [--description=text] [--eula= show | accept ] [--unit=n] [--ignore] [--scsitype= BusLogic | LsiLogic ] [--disk=path] [--controller=index] [--port=n]
-
--vsys=n Specifies the index selecting a specific VM within the appliance. Affects the following options.
-
--unit=n Specifies the index selecting a specific unit of a VM within the appliance. Affects the following options.
-
--settingsfile=file Specifies the name (with or without path) of the VM config file which will be created as part of the import. Usually the preferred way is overriding the VM name with
--vmnameand if necessary specify the folder in which to create the VM with--basefolder.-
--group=group Specifies the primary group of the imported VM.
-
--eula=show | accept Enables you to show or accept the license conditions of a VM within the appliance,
Valid arguments are as follows:
show: Shows the EULA of a VM.accepts: Accepts the EULA of a VM. Any VMs in an appliance which have an EULA require accepting it, otherwise the import will fail.
-
--ignore Ignores the current unit of an imported VM, effectively removing the associated hardware.
-
--scsitype=BusLogic | LsiLogic Enables you to select the type of the SCSI controller for the current unit of an imported VM.
Valid arguments are as follows:
BusLogic: Uses the (very old) BusLogic SCSI controller type.LsiLogic: Uses the (more modern) LsiLogic SCSI controller type.
The following options are specific for importing a VM instance from a cloud service provider. It always deals with a single VM. See Section 1.16.9, “Importing an Instance from Oracle Cloud Infrastructure”.
VBoxManage import OCI:// --cloud [--ostype=ostype] [--vmname=name] [--basefolder=folder] [--memory=MB] [--cpus=n] [--description=text] <--cloudprofile=profile> <--cloudinstanceid=id> [--cloudbucket=bucket]
-
--cloud Specifies that the import should be from the cloud.
-
--cloudprofile=profile Specifies the cloud profile which is used to connect to the cloud service provider. The cloud profile contains your Oracle Cloud Infrastructure account details, such as your user OCID and the fingerprint for your public key. To use a cloud profile, you must have the required permissions on Oracle Cloud Infrastructure.
-
--cloudinstanceid=id Specifies the ID of an existing instance in the cloud.
-
--cloudbucket=bucket Specifies the bucket name in which to store the object created from the instance. In Oracle Cloud Infrastructure, a bucket is a logical container for storing objects. By default the first bucket available with the cloud profile is used.
The following example performs the dry run of an OVF import operation for a sample appliance that contains a Windows 10 guest:
$ VBoxManage import Windows10.ovf --dry-run
Interpreting Windows10.ovf...
OK.
Virtual system 0:
 0: Suggested OS type: "Windows10_64"
    (change with "--vsys 0 --ostype <type>"; use "list ostypes" to list all)
 1: Suggested VM name "win10-appliance"
    (change with "--vsys 0 --vmname <name>")
 2: Suggested VM group "/"
    (change with "--vsys 0 --group <group>")
 3: Suggested VM settings file name "/home/user1/VirtualBox VMs/win10-appliance/win10-appliance.vbox"
    (change with "--vsys 0 --settingsfile <filename>")
 4: Suggested VM base folder "/home/user1/VirtualBox VMs"
    (change with "--vsys 0 --basefolder <path>")
 5: End-user license agreement
    (display with "--vsys 0 --eula show";
    accept with "--vsys 0 --eula accept")
 6: Number of CPUs: 1
    (change with "--vsys 0 --cpus <n>")
 7: Guest memory: 2048 MB (change with "--vsys 0 --memory <MB>")
 8: Sound card (appliance expects "ensoniq1371", can change on import)
    (disable with "--vsys 0 --unit 8 --ignore")
 9: USB controller
    (disable with "--vsys 0 --unit 9 --ignore")
10: Network adapter: orig bridged, config 2, extra type=bridged
11: Floppy
    (disable with "--vsys 0 --unit 11 --ignore")
12: SCSI controller, type BusLogic
    (change with "--vsys 0 --unit 12 --scsitype {BusLogic|LsiLogic}";
    disable with "--vsys 0 --unit 12 --ignore")
13: IDE controller, type PIIX4
    (disable with "--vsys 0 --unit 13 --ignore")
14: Hard disk image: source image=Windows10.vmdk,
      target path=/home/user1/disks/Windows10.vmdk, controller=12;channel=0
    (change target path with "--vsys 0 --unit 14 --disk <path>";
    change controller with "--vsys 0 --unit 14 --controller <index>";
    change controller port with "--vsys 0 --unit 14 --port <n>";
    disable with "--vsys 0 --unit 14 --ignore")
The dry run output lists and numbers the individual configuration
items that are described in the Windows10.ovf
file. Some of the items include information about how to disable
or change the configuration of the item.
You can disable many of the items by using the --vsys
options. X --unit Y
--ignoreX is the
number of the virtual system. The value is 0
unless the appliance includes several virtual system descriptions.
Y is the configuration item number.
Item 1 in the example command output specifies the name of the target machine. Items 12 and 13 specify the IDE and SCSI hard disk controllers, respectively.
Item 14 indicates the hard disk image and the
--disk option specifies the target path where the
image will be stored, the --controller option specifies
which controller the disk will be attached to, and the
--port option specifies which port on the controller the
disk will be attached to. The default values are specified in the OVF file.
You can combine several items for the same virtual system by
specifying the same value for the --vsys option.
For example use the following command to import a machine as
described in the OVF, exclude the sound card and USB controller
and specify that the disk image is stored with a different name.
$ VBoxManage import Windows10.ovf --vsys 0 --unit 8 --ignore \
  --unit 9 --ignore --unit 14 --disk Windows10_disk0.vmdk
The following example illustrates how to import a VM from Oracle Cloud Infrastructure. To find the Oracle Cloud Infrastructure VM instances and its ID you can list all available instances with:
$ VBoxManage cloud --provider=OCI --profile=cloud-profile-name list instancesOnce you know the ID the following command imports the instance from Oracle Cloud Infrastructure:
$ VBoxManage import OCI:// --cloud --vmname OCI_FreeBSD_VM --memory 4000 \
  --cpus 3 --ostype FreeBSD_64 --cloudprofile "standard user" \
  --cloudinstanceid ocid1.instance.oc1.iad.abuwc... --cloudbucket myBucket
Export one or more virtual machines to a virtual appliance or to a cloud service.
VBoxManage export <machines> <--output=name> [ --legacy09 | --ovf09 | --ovf10 | --ovf20 ] [--manifest] [--options= manifest | iso | nomacs | nomacsbutnat ... ] [--vsys=virtual-system-number] [--description=description-info] [--eula=license-text] [--eulafile=filename] [--product=product-name] [--producturl=product-URL] [--vendor=vendor-name] [--vendorurl=vendor-URL] [--version=version-info] [--vmname=vmname]
VBoxManage export <machine> <--output=cloud-service-provider> [--opc10] [--vmname=vmname] [--cloud=virtual-system-number] [--cloudprofile=cloud-profile-name] [--cloudshape=cloud-shape-name] [--clouddomain=cloud-domain] [--clouddisksize=disk-size-in-GB] [--cloudbucket=bucket-name] [--cloudocivcn=OCI-VCN-ID] [--cloudocisubnet=OCI-subnet-ID] [--cloudkeepobject= true | false ] [--cloudlaunchinstance= true | false ] [--cloudlaunchmode= EMULATED | PARAVIRTUALIZED ] [--cloudpublicip= true | false ]
The VBoxManage export command enables you to export one or more virtual machines (VMs) from Oracle VM VirtualBox. You can export the VM to one of the following:
Virtual appliance in OVF format. Includes the copying of its virtual disk images to compressed VMDK.
Cloud service such as Oracle Cloud Infrastructure. Exports a single VM.
For more information about exporting VMs from Oracle VM VirtualBox, see Section 1.15, “Importing and Exporting Virtual Machines”
VBoxManage export <machines> <--output=name> [ --legacy09 | --ovf09 | --ovf10 | --ovf20 ] [--manifest] [--options= manifest | iso | nomacs | nomacsbutnat ... ] [--vsys=virtual-system-number] [--description=description-info] [--eula=license-text] [--eulafile=filename] [--product=product-name] [--producturl=product-URL] [--vendor=vendor-name] [--vendorurl=vendor-URL] [--version=version-info] [--vmname=vmname]
The VBoxManage export command enables you to export a VM as a virtual appliance in OVF format.
-
machines Specifies a comma-separated list of one or more machines to export to the same OVF file.
-
--output=filename Specifies the target OVF file. The file can be OVF, OVA, or a ZIP file compressed with the gzip command. Because the directory that contains the target OVF file will also store the exported disk images in the compressed VMDK format, ensure that this directory has sufficient disk space in which to store the images.
The short form of this option is
-o.-
--legacy09 Exports in OVF 0.9 legacy mode if the virtualization product is not fully compatible with the OVF 1.0 standard.
-
--ovf09 Exports in OVF 0.9 format.
-
--ovf10 Exports in OVF 1.0 format.
-
--ovf20 Exports in OVF 2.0 format.
-
--manifest Creates a manifest of the exported files.
-
--options=argument,... Specifies information to control the exact content of the appliance file. Specify one or more comma-separated arguments:
-
manifest Produces a manifest file that detects corrupted appliances on import.
-
iso Exports DVD images in an ISO file.
-
nomacs Excludes all MAC addresses.
-
nomacsbutnat Excludes all MAC addresses except for those in a NAT network.
-
-
--description=description-info Specifies a description of the VM.
-
--eula=license-text Specifies end-user license text.
-
--eulafile=filename Specifies an end-user license file.
-
--product=product-name Specifies a product name.
-
--producturl=product-URL Specifies a product URL.
-
--vendor=vendor-name Specifies a vendor name.
-
--vendorurl=vendor-URL Specifies a vendor URL.
-
--version=version-info Specifies version information.
-
--vmname=vmname Specifies the name of the exported VM.
-
--vsys=virtual-system-number Specifies the number of the virtual system.
VBoxManage export <machine> <--output=cloud-service-provider> [--opc10] [--vmname=vmname] [--cloud=virtual-system-number] [--cloudprofile=cloud-profile-name] [--cloudshape=cloud-shape-name] [--clouddomain=cloud-domain] [--clouddisksize=disk-size-in-GB] [--cloudbucket=bucket-name] [--cloudocivcn=OCI-VCN-ID] [--cloudocisubnet=OCI-subnet-ID] [--cloudkeepobject= true | false ] [--cloudlaunchinstance= true | false ] [--cloudlaunchmode= EMULATED | PARAVIRTUALIZED ] [--cloudpublicip= true | false ]
The VBoxManage export command enables you to export a VM to a cloud service provider such as Oracle Cloud Infrastructure. By default, the exported disk image is converted into compressed VMDK format. This minimizes the amount of data to transfer to the cloud service.
Some of the following options are configuration settings for the VM instance. As a result, specify an Oracle Cloud Identifier (OCID) for a resource. Use the Oracle Cloud Infrastructure Console to view OCIDs.
-
--output=cloud-service-provider Specifies the short name of the cloud service provider to which you export the VM. For Oracle Cloud Infrastructure, specify
OCI://.The short form of this option is
-o.-
--opc10 Exports in Oracle Cloud Infrastructure format.
-
--cloud=number-of-virtual-system Specifies a number that identifies the VM to export. Numbering starts at
0for the first VM.-
--vmname=vmname Specifies the name of the exported VM, which is used as the VM instance name in Oracle Cloud Infrastructure.
-
--cloudprofile=cloud-profile-name Specifies the cloud profile to use to connect to the cloud service provider. The cloud profile contains your Oracle Cloud Infrastructure account details, such as your user OCID and the fingerprint for your public key.
To use a cloud profile, you must have the required permissions on Oracle Cloud Infrastructure.
-
--cloudshape=cloud-shape-name Specifies the shape used by the VM instance. The shape defines the number of CPUs and the amount of memory that is allocated to the VM instance. Ensure that the shape is compatible with the exported image.
-
--clouddomain=cloud-domain Specifies the availability domain to use for the VM instance. Enter the full name of the availability domain.
-
--clouddisksize=disk-size-in-GB Specifies the amount of disk space, in gigabytes, to use for the exported disk image. Valid values are from 50 GB to 300 GB.
-
--cloudbucket=bucket-name Specifies the bucket in which to store uploaded files. In Oracle Cloud Infrastructure, a bucket is a logical container for storing objects.
-
--cloudocivcn=OCI-VCN-ID Specifies the OCID of the virtual cloud network (VCN) to use for the VM instance.
-
--cloudocisubnet=OCI-subnet-ID Specifies the OCID of the VCN subnet to use for the VM instance.
-
--cloudkeepobject=true | false Specifies whether to store the exported disk image in Oracle Object Storage.
-
--cloudlaunchinstance=true | false Specifies whether to start the VM instance after the export to Oracle Cloud Infrastructure completes.
-
--cloudlaunchinstance=EMULATED | PARAVIRTUALIZED Specifies the launch mode used for the instance. Paravirtualized mode gives improved performance.
-
--cloudpublicip=true | false Specifies whether to enable a public IP address for the VM instance.
The following example shows how to export the
myVM VM to Oracle Cloud Infrastructure. The command's option
arguments describe the configuration of the
myVM_Cloud VM in Oracle Cloud Infrastructure.
# VBoxManage export myVM --output=OCI:// --cloud=0 --vmname=myVM_Cloud \
--cloudprofile="standard user" --cloudbucket=myBucket \
--cloudshape=VM.Standard2.1 --clouddomain=US-ASHBURN-AD-1 --clouddisksize=50  \
--cloudocivcn=ocid1.vcn.oc1.iad.aaaa... --cloudocisubnet=ocid1.subnet.oc1.iad.aaaa... \
--cloudkeepobject=true --cloudlaunchinstance=true --cloudpublicip=true
Digitally sign an OVA.
The VBoxManage signova command adds a digital signature to an OVA file.
-
ova The OVA file to sign.
-
--certificate=file File containing the certificate that the OVA should be signed with. This can either be in PEM format (base64) or DER (binary), the command will detect which.
-
--private-key=file The file containing the private key. This can either be in PEM (base64) or DER (binary) format, the command will detect which.
-
--private-key-password-file=password-file File containing the private key password.
-
--private-key-password=password The private key password.
-
--digest-type=type Select the cryptographic digest algorithm to use in the signing. Possible values: SHA-256 (default), SHA-512 and SHA-1.
Some older versions of OVFTool and other VMware produces may require
--digest-type=sha-1to accept the OVA.--pkcs7,--no-pkcs7Enables or disables the creation of an additional PKCS#7/CMS signature. This is enabled by default.
-
--intermediate-cert=file File containing an intermediary certificate that should be included in the optional PKCS#7/CMS signature. Like the others, the file can either be in PEM or DER format. This option can be repeated to add multiple intermediate certificates. This option implies the
--pkcs7option.-
--force Overwrite existing signature if present. The default behaviour is to fail if the OVA is already signed.
-
--dry-run Do not actually modify the OVA, just test-run the signing operation.
-v,--verbose,-q,--quietControls the verbositity of the command execution. The
--verboseoption can be used multiple times to get more output.
Start a virtual machine.
The VBoxManage startvm command starts an Oracle VM VirtualBox virtual machine (VM) that is in the Powered Off or Saved state.
uuid|vmnameSpecifies the name or Universally Unique Identifier (UUID) of the VM.
-
--putenv=name=value Assigns a value to an environment variable as a name-value pair. For example, VBOX_DISABLE_HOST_DISK_CACHE=1.
The short form of this option is
-E.-
--type=gui | headless | sdl | separate Specifies the frontend used to start the VM.
You can use the VBoxManage setproperty command to set a global default value for the frontend. Alternatively, you can use the VBoxManage modifyvm command to specify a default frontend value for a specific VM. If neither a global or per-VM default value is set and you do not specify the
--typeoption, then the VM opens in a window on the host desktop.The
--typeoption accepts the following values:-
gui Starts a VM in a graphical user interface (GUI) window. This is the default.
-
headless Starts a VM for remote display only.
-
sdl Starts a VM using the VBoxSDL frontend.
-
separate Starts a VM with a detachable user interface (UI), which means that the VM runs headless with the UI in a separate process.
This is an experimental feature that lacks certain functionality, such as 3D acceleration.
-
-
--password Use the
--passwordto supply the encryption password. Either specify the absolute pathname of a password file on the host operating system, or-to prompt you for the password on the command line.-
--password-id Use the
--password-idoption to specify the id the password is supplied for.
Note
If a VM fails to start with a particular frontend and the error information is inconclusive, consider starting the VM directly by running the frontend. This workaround might provide additional error information.
Change state and settings for a running virtual machine.
VBoxManage controlvm < uuid | vmname > nicN < null | nat | bridged | intnet | hostonly | generic | natnetwork > [device-name]
VBoxManage controlvm < uuid | vmname > natpfN < [rulename] ,tcp | udp, [host-IP], hostport, [guest-IP], guestport >
VBoxManage controlvm < uuid | vmname > clipboard mode < disabled | hosttoguest | guesttohost | bidirectional >
VBoxManage controlvm < uuid | vmname > draganddrop < disabled | hosttoguest | guesttohost | bidirectional >
VBoxManage controlvm < uuid | vmname > setvideomodehint <xres> <yres> <bpp> [[display] [ enabled:yes | no | [x-origin y-origin]]]
VBoxManage controlvm < uuid | vmname > setscreenlayout <display> < on | primary x-origin y-origin x-resolution y-resolution bpp | off >
VBoxManage controlvm < uuid | vmname > setcredentials <username> --passwordfile= < filename | password > <domain-name> --allowlocallogon= < yes | no >
VBoxManage controlvm < uuid | vmname > teleport <--host=host-name> <--port=port-name> [--maxdowntime=msec] [ --passwordfile=filename | --password=password ]
VBoxManage controlvm < uuid | vmname > addencpassword <ID> < password-file | - > [--removeonsuspend= yes | no ]
VBoxManage controlvm < uuid | vmname > changeuartmodeN disconnected | server pipe-name | client pipe-name | tcpserver port | tcpclient hostname:port | file filename | device-name
The VBoxManage controlvm command enables you to change the state of a running virtual machine (VM). The following sections describe the subcommands that you can use:
VBoxManage controlvm < uuid | vmname > pause
The VBoxManage controlvm
vmname pause command
temporarily stops the execution of a VM. When paused, the VM's
state is not permanently changed.
The VM window appears as gray and the title bar of the window indicates that the VM is currently Paused. This action is equivalent to selecting Pause from the Machine menu of the GUI.
VBoxManage controlvm < uuid | vmname > reset
The VBoxManage controlvm
vmname reset command
performs a cold reset the VM. This command has the same effect
on a VM as pressing the Reset button on a physical computer.
The cold reboot immediately restarts and reboots the guest operating system (OS). The state of the VM is not saved prior to the reset, so data might be lost. This action is equivalent to selecting Reset from the Machine menu of the GUI.
VBoxManage controlvm < uuid | vmname > poweroff
The VBoxManage controlvm
vmname poweroff command
powers off the VM. This command has the same effect on a VM as
pulling the power cable on a physical computer.
The state of the VM is not saved prior to poweroff, so data might be lost. This action is equivalent to selecting Close from the Machine menu of the GUI or to clicking the VM window's Close button, and then selecting Power Off the Machine.
When in the powered off state, you can restart the VM. See Section 8.19, “VBoxManage startvm”.
VBoxManage controlvm < uuid | vmname > savestate
The VBoxManage controlvm
vmname savestate command
saves the current state of the VM to disk and then stops the VM.
This action is equivalent to selecting Close from the Machine menu of the GUI or to clicking the VM window's Close button, and then selecting Save the Machine State.
When in the saved state, you can restart the VM. It will continue exactly in the state you saved.
VBoxManage controlvm < uuid | vmname > acpipowerbutton
The VBoxManage controlvm
vmname acpipowerbutton
command sends an ACPI shutdown signal to the VM. This command
has the same effect on a VM as pressing the Power button on a
physical computer.
So long as the VM runs a guest OS that provides appropriately configured ACPI support, this command triggers an operating system shutdown from within the VM.
VBoxManage controlvm < uuid | vmname > acpisleepbutton
The VBoxManage controlvm
vmname acpisleepbutton
command sends an ACPI sleep signal to the VM.
So long as the VM runs a guest OS that provides appropriately configured ACPI support, this command triggers a sleep mechanism from within the VM.
VBoxManage controlvm < uuid | vmname > keyboardputscancode <hex> [hex...]
The VBoxManage controlvm
vmname keyboardputscancode
command sends keyboard scancode commands to the VM.
For information about keyboard scancodes, see http://www.win.tue.nl/~aeb/linux/kbd/scancodes-1.html.
VBoxManage controlvm < uuid | vmname > setlinkstateN < on | off >
VBoxManage controlvm vmname
setlinkstateN command
enables you to connect or disconnect the virtual network cable
from the network interface instance
(N). Valid values are
on and off. The default
value is on.
VBoxManage controlvm < uuid | vmname > nicN < null | nat | bridged | intnet | hostonly | generic | natnetwork > [device-name]
The VBoxManage controlvm
vmname
nicN command specifies the
type of networking to use on the specified VM's virtual network
card. N numbering begins with
1.
The following valid network types are also described in Section 6.2, “Introduction to Networking Modes”:
nullspecifies that the VM is is not connected to the host system.natspecifies that the VM uses network address translation (NAT).bridgedspecifies that the VM uses bridged networking.intnetspecifies that the VM communicates with other VMs by using internal networking.hostonlyspecifies that the VM uses host-only networking.natnetworkspecifies that the VM uses NAT networking.genericspecifies that the VM has access to rarely used submodes
VBoxManage controlvm < uuid | vmname > nictraceN < on | off >
The VBoxManage controlvm
vmname
nictraceN command enables
you to trace the network traffic on the specified virtual
network card (N).
N numbering begins with
1. Valid values are on and
off. The default value is
off.
If you did not configure a file name for the trace file then a default one is used, placing it in the VM subdirectory.
VBoxManage controlvm < uuid | vmname > nictracefileN <filename>
The VBoxManage controlvm
vmname
nictracefileN command
enables you to specify the name of the network traffic trace log
file for the specified virtual network card
(N). N
numbering begins with 1.
VBoxManage controlvm < uuid | vmname > nicpromiscN < deny | allow-vms | allow-all >
The VBoxManage controlvm
vmname
nicpromiscN command enables
you to specify how to handle promiscuous mode for a bridged
network. The default value of deny hides any
traffic that is not intended for this VM. The
allow-vms value hides all host traffic from
this VM but enables the VM to see traffic to and from other VMs.
The allow-all value removes this restriction
completely.
VBoxManage controlvm < uuid | vmname > nicpropertyN <prop-name=prop-value>
The VBoxManage controlvm
vmname
nicpropertyNprop-name=prop-value
command, in combination with nicgenericdrv,
enables you to pass property values to rarely-used network
backends.
Those properties are backend engine-specific, and are different between UDP Tunnel and the VDE backend drivers. See Section 6.8, “UDP Tunnel Networking”.
VBoxManage controlvm < uuid | vmname > natpfN < [rulename] ,tcp | udp, [host-IP], hostport, [guest-IP], guestport >
The VBoxManage controlvm
vmname
natpfN command specifies a
NAT port-forwarding rule. See Section 6.3.1, “Configuring Port Forwarding with NAT”.
VBoxManage controlvm < uuid | vmname > natpfN delete <rulename>
The VBoxManage controlvm
vmname
natpfN delete command deletes
the specified NAT port-forwarding rule. See
Section 6.3.1, “Configuring Port Forwarding with NAT”.
VBoxManage controlvm < uuid | vmname > guestmemoryballoon <balloon-size>
The VBoxManage controlvm
vmname guestmemoryballoon
command changes the size of the guest memory balloon. The guest
memory balloon is the memory allocated by the Oracle VM VirtualBox
Guest Additions from the guest OS and returned to the hypervisor
for reuse by other VMs. The value you specify is in megabytes.
See Section 4.10.1, “Memory Ballooning”.
VBoxManage controlvm < uuid | vmname > usbattach < uuid | address > [--capturefile=filename]
The VBoxManage controlvm
vmname usbattach command
dynamically attaches a host USB device to the VM, which makes it
visible. You do not need to create a filter.
Specify a USB device by its Universally Unique Identifier (UUID) or by its address on the host system. Use the VBoxManage list usbhost command to obtain information about USB devices on the host system.
Use the --capturefile option to specify the
absolute path of a file in which to write logging data.
VBoxManage controlvm < uuid | vmname > usbdetach < uuid | address >
The VBoxManage controlvm
vmname usbdetach command
dynamically detaches a host USB device from the VM, which makes
it invisible. You do not need to create a filter.
Specify a USB device by its UUID or by its address on the host system. Use the VBoxManage list usbhost command to obtain information about USB devices on the host system.
VBoxManage controlvm < uuid | vmname > audioin < on | off >
The VBoxManage controlvm
vmname audioin command
specifies whether to enable or disable audio capture from the
host system. Valid values are on, which
enables audio capture and off, which disables
audio capture. The default value is off.
VBoxManage controlvm < uuid | vmname > audioout < on | off >
The VBoxManage controlvm
vmname audioout command
specifies whether to enable or disable audio playback from the
guest VM. Valid values are on, which enables
audio playback and off, which disables audio
playback. The default value is off.
VBoxManage controlvm < uuid | vmname > clipboard mode < disabled | hosttoguest | guesttohost | bidirectional >
The VBoxManage controlvm
vmname clipboard mode command
specifies how to share the guest or host OS's clipboard with the
host system or VM. Valid values are disabled,
hosttoguest, guesttohost,
and bidirectional. The default value is
disabled. See
Section 3.4, “General Settings”.
This feature requires that the Oracle VM VirtualBox Guest Additions are installed in the VM.
VBoxManage controlvm < uuid | vmname > clipboard filetransfers < on | off >
The VBoxManage controlvm
vmname clipboard filetransfers
command specifies if it is possible to transfer files through the
clipboard between the host and VM, in the direction which is allowed.
Valid values are off and on.
The default value is off.
This feature requires that the Oracle VM VirtualBox Guest Additions are installed in the VM.
VBoxManage controlvm < uuid | vmname > draganddrop < disabled | hosttoguest | guesttohost | bidirectional >
The VBoxManage controlvm
vmname draganddrop command
specifies the current drag and drop mode to use between the host
system and the VM. Valid values are disabled,
hosttoguest, guesttohost,
and bidirectional. The default value is
disabled. See
Section 4.4, “Drag and Drop”.
This feature requires that the Oracle VM VirtualBox Guest Additions are installed in the VM.
VBoxManage controlvm < uuid | vmname > vrdeport <port>
The VBoxManage controlvm
vmname vrdeport command
specifies the port or range of ports to which the VRDE server
can bind. The default value is default or
0, which is the standard RDP port,
3389.
Also see the --vrde-port option description in
Section 8.10.2.6, “Remote Machine Settings”.
VBoxManage controlvm < uuid | vmname > vrdeproperty <prop-name=prop-value>
The VBoxManage controlvm
vmname vrdeproperty command
specifies the port numbers and IP address on the VM to which the
VRDE server can bind.
TCP/Portsspecifies a port or a range of ports to which the VRDE server can bind. The default value isdefaultor0, which is the standard RDP port,3389.Also see the
--vrde-portoption description in Section 8.10.2.6, “Remote Machine Settings”.TCP/Addressspecifies the IP address of the host network interface to which the VRDE server binds. When specified, the server accepts to connect only on the specified host network interface.Also see the
--vrde-addressoption description in Section 8.10.2.6, “Remote Machine Settings”.VideoChannel/Enabledspecifies whether to enable the VirtualBox Remote Desktop Protocol (VRDP) video channel. Valid values are1to enable the video channel and0to disable the video channel. The default value isoff. See Section 7.1.9, “VRDP Video Redirection”.VideoChannel/Qualityspecifies the JPEG compression level on the VRDE server video channel. Valid values are between 10% and 100%, inclusive. Lower values mean lower quality but higher compression. The default value is100. See Section 7.1.9, “VRDP Video Redirection”.VideoChannel/DownscaleProtectionspecifies whether to enable the video channel downscale protection feature. Specify1to enable the feature. This feature is disabled by default.When enabled, if the video's size equals the shadow buffer size, the video is shown in full-screen mode. If the video's size is between full-screen mode and the downscale threshold, the video is not shown as it might be an application window that is unreadable when downscaled. When disabled, the downscale protection feature always attempts to show videos.
Client/DisableDisplayspecifies whether to disable the VRDE server display feature. Valid values are1to disable the feature and an empty string ("") to enable the feature. The default value is an empty string. See Section 7.1.10, “VRDP Customization”.Client/DisableInputspecifies whether to disable the VRDE server input feature. Valid values are1to disable the feature and an empty string ("") to enable the feature. The default value is1. See Section 7.1.10, “VRDP Customization”.Client/DisableAudiospecifies whether to disable the VRDE server audio feature. Valid values are1to disable the feature and an empty string ("") to enable the feature. The default value is1. See Section 7.1.10, “VRDP Customization”.Client/DisableUSBspecifies whether to disable the VRDE server USB feature. Valid values are1to disable the feature and an empty string ("") to enable the feature. The default value is1. See Section 7.1.10, “VRDP Customization”.Client/DisableClipboardspecifies whether to disable the VRDE clipboard feature. Valid values are1to disable the feature and an empty string ("") to enable the feature. To reenable the feature, useClient/DisableClipboard=. The default value is1. See Section 7.1.10, “VRDP Customization”.Client/DisableUpstreamAudiospecifies whether to disable the VRDE upstream audio feature. Valid values are1to disable the feature and an empty string ("") to enable the feature. To reenable the feature, useClient/DisableUpstreamAudio=. The default value is1. See Section 7.1.10, “VRDP Customization”.Client/DisableRDPDRspecifies whether to disable the RDP Device Redirection For Smart Cards feature on the VRDE server. Valid values are1to disable the feature and an empty string ("") to enable the feature. The default value is1. See Section 7.1.10, “VRDP Customization”.H3DRedirect/Enabledspecifies whether to enable the VRDE server 3D redirection feature. Valid values are1to enable the feature and an empty string ("") to disable the feature. See Section 7.1.10, “VRDP Customization”.Security/Methodspecifies the security method to use for a connection. See Section 7.1.6, “RDP Encryption”.Negotiateaccepts both enhanced (TLS) and standard RDP security connections. The security method is negotiated with the client. This is the default value.RDPaccepts only standard RDP security connections.TLSaccepts only enhanced RDP security connections. The client must support TLS.
Security/ServerCertificatespecifies the absolute path of the server certificate to use for a connection. See Section 7.1.6, “RDP Encryption”.Security/ServerPrivateKeyspecifies the absolute path of the server private key. See Section 7.1.6, “RDP Encryption”.Security/CACertificatespecifies the absolute path of the CA self-signed certificate. See Section 7.1.6, “RDP Encryption”.Audio/RateCorrectionModespecifies the rate correction mode to use.VRDP_AUDIO_MODE_VOIDindicates that no mode is specified. Use this value to unset any audio mode that is already set.VRDP_AUDIO_MODE_RCspecifies to use the rate correction mode.VRDP_AUDIO_MODE_LPFspecifies to use the low pass filter mode.VRDP_AUDIO_MODE_CSspecifies to use the client sync mode to prevent underflow or overflow of the client queue.
Audio/LogPathspecifies the absolute path of the audio log file.
VBoxManage controlvm < uuid | vmname > vrdevideochannelquality <percentage>
The VBoxManage controlvm
vmname
vrdevideochannelquality command sets the image
quality, as a JPEG compression level value, for video
redirection. Valid values are between 10% and 100%, inclusive.
Lower values mean lower quality but higher compression. See
Section 7.1.9, “VRDP Video Redirection”.
VBoxManage controlvm < uuid | vmname > setvideomodehint <xres> <yres> <bpp> [[display] [ enabled:yes | no | [x-origin y-origin]]]
The VBoxManage controlvm
vmname setvideomodehint
command specifies the video mode for the guest VM to use. You
must have the Oracle VM VirtualBox Guest Additions installed. Note
that this feature does not work for all guest systems.
VBoxManage controlvm < uuid | vmname > setscreenlayout <display> < on | primary x-origin y-origin x-resolution y-resolution bpp | off >
The VBoxManage controlvm
vmname setscreenlayout
command can be used to configure multiscreen displays. The
specified screen on the guest VM can be enabled or disabled, or
a custom screen layout can be configured.
VBoxManage controlvm < uuid | vmname > screenshotpng <filename> [display]
The VBoxManage controlvm
vmname screenshotpng
command takes a screenshot of the guest display and saves it as
PNG in the specified file.
filenamespecifies the name of the PNG file to create.displayspecifies the display number for the screen shot. For a single monitor guest display, this is0.
VBoxManage controlvm < uuid | vmname > recording < on | off >
The VBoxManage controlvm
vmname recording command
enables or disables the recording of a VM session into a
WebM/VP8 file. Valid values are on, which
begins recording when the VM session starts and
off, which disables recording. The default
value is off.
VBoxManage controlvm < uuid | vmname > recording screens < all | none | screen-ID[,screen-ID...] >
The VBoxManage controlvm
vmname recording screens
command enables you to specify which VM screens to record. The
recording for each screen that you specify is saved to its own
file in the machine folder. You cannot modify this setting while
recording is enabled.
allspecifies that you record all VM screens.nonespecifies that you do not record any VM screens.screen-IDspecifies one or more VM screens to record.
VBoxManage controlvm < uuid | vmname > recording filename <filename>
The VBoxManage controlvm
vmname recording filename
command specifies the file in which to save the recording. You
cannot modify this setting while recording is enabled.
The default setting is to store a recording in the machine
folder, using the VM name as the file name, with a
webm file name extension.
VBoxManage controlvm < uuid | vmname > recording videores <widthxheight>
VBoxManage controlvm vmname
recording videores command specifies the resolution of
the recorded video in pixels. You cannot modify this setting
while recording is enabled.
Use the Settings tool to view the video recording settings, which are based on the resolution (frame size). See the Frame Size field on the Recording tab of the Display page to view the default value.
Specify the resolution as
widthxheight:
widthspecifies the width in pixels.heightspecifies the height in pixels.
VBoxManage controlvm < uuid | vmname > recording videorate <rate>
The VBoxManage controlvm
vmname recording videorate
command specifies the bit rate,
bit-rate, of the video in kilobits
per second. Increasing this value improves the appearance of the
video at the cost of an increased file size. You cannot modify
this setting while recording is enabled.
Use the Settings tool to view the video recording settings, which are based on the frame size. See the Video Quality field on the Recording tab of the Display page to view the default value.
VBoxManage controlvm < uuid | vmname > recording videofps <fps>
The VBoxManage controlvm
vmname recording videofps
command specifies the maximum frequency of the video to record.
Video frequency is measured in frames per second (FPS). The
recording skips any frames that have a frequency higher than the
specified maximum. Increasing the frequency reduces the number
of skipped frames and increases the file size. You cannot modify
this setting while recording is enabled.
Use the Settings tool to view the video recording settings, which are based on the frame size. See the Frame Rate field on the Recording tab of the Display page to view the default value.
VBoxManage controlvm < uuid | vmname > recording maxtime <sec>
The VBoxManage controlvm
vmname recording maxtime
command specifies the maximum amount time to record in seconds.
The recording stops after the specified number of seconds
elapses. If this value is zero, the recording continues until
you stop the recording.
VBoxManage controlvm < uuid | vmname > recording maxfilesize <MB>
The VBoxManage controlvm
vmname recording
maxfilesize command specifies the maximum size of the
recorded video file in megabytes. The recording stops when the
file reaches the specified size. If this value is zero, the
recording continues until you stop the recording. You cannot
modify this setting while recording is enabled.
VBoxManage controlvm < uuid | vmname > setcredentials <username> --passwordfile= < filename | password > <domain-name> --allowlocallogon= < yes | no >
The setcredentials command enables you to specify the credentials for remotely logging in to Windows VMs. See Section 9.1, “Automated Guest Logins”.
usernamespecifies the user name with which to log in to the Windows VM.--passwordfile=specifies the file from which to obtain the password forfilenameusername.The
--passwordfileis mutually exclusive with the--passwordoption.--password=specifies the password forpasswordusername.The
--passwordis mutually exclusive with the--passwordfileoption.--allowlocalloginspecifies whether to enable or disable local logins. Valid values areonto enable local logins andoffto disable local logins.
VBoxManage controlvm < uuid | vmname > teleport <--host=host-name> <--port=port-name> [--maxdowntime=msec] [ --passwordfile=filename | --password=password ]
The VBoxManage controlvm
vmname teleport command
initiates a teleporting operation between the specified VM and
the specified host system. See Section 7.2, “Teleporting”.
If you specify a password, it must match the password you specified when you issued the VBoxManage modifyvm command for the target machine.
-
--host=hostname Specifies the name of the VM.
-
--port=port Specifies the port on the VM that should listen for a teleporting request from other VMs. The port number can be any free TCP/IP port number, such as
6000.-
--maxdowntime=msec Specifies the maximum downtime, in milliseconds, for the teleporting target VM.
-
--password=password Specifies the password that the source machine uses for the teleporting request. The request succeeds only if the source machine specifies the same password.
The
--passwordis mutually exclusive with the--passwordfileoption.-
--passwordfile=filename Specifies the file from which to obtain the password that the source machine uses for the teleporting request. The request succeeds only if the source machine specifies the same password.
When you specify a file name of
stdin, you can read the password from standard input.The
--passwordfileis mutually exclusive with the--passwordoption.
VBoxManage controlvm < uuid | vmname > plugcpu <ID>
The VBoxManage controlvm
vmname plugcpu command adds
a virtual CPU to the specified VM if CPU hot-plugging is
enabled. ID specifies the index of
the virtual CPU to be added and must be a number from 0 to the
maximum number of CPUs configured.
VBoxManage controlvm < uuid | vmname > unplugcpu <ID>
The VBoxManage controlvm
vmname unplugcpu command
removes a virtual CPU from the specified VM if CPU hot-plugging
is enabled. ID specifies the index of
the virtual CPU to be removed and must be a number from 0 to the
maximum number of CPUs configured. You cannot remove CPU 0.
VBoxManage controlvm < uuid | vmname > cpuexecutioncap <num>
The VBoxManage controlvm
vmname cpuexecutioncap
command specifies how the maximum amount of physical CPU time
used by a virtual CPU. Valid values are a percentage between
1 and 100. A value of
50 specifies that a single virtual CPU can
use up to 50% of a physical CPU. The default value is
100.
Use this feature with caution, it can have unexpected results including timekeeping problems and lower performance than specified. If you want to limit the resource usage of a VM it is more reliable to pick an appropriate number of VCPUs.
VBoxManage controlvm < uuid | vmname > vm-process-priority < default | flat | low | normal | high >
The VBoxManage controlvm
vmname vm-process-priority
command specifies the priority scheme of the VM process to use
when starting the specified VM and while the VM runs.
Valid values are:
default– Default process priority determined by the OS.flat– Assumes a scheduling policy which puts the process at the default priority and with all threads at the same priority.low– Assumes a scheduling policy which puts the process mostly below the default priority of the host OS.normal– Assume a scheduling policy which shares the CPU resources fairly with other processes running with the default priority of the host OS.high– Assumes a scheduling policy which puts the task above the default priority of the host OS. This policy might easily cause other tasks in the system to starve.
VBoxManage controlvm < uuid | vmname > webcam attach [pathname [settings]]
The VBoxManage controlvm
vmname webcam attach
command attaches a webcam to a running VM. Specify the webcam as
the absolute path of the webcam on the host OS or as an alias.
Use the VBoxManage list webcams command to
obtain the webcam alias.
Note that the .0 alias is the default video
input device on the host OS. .1 is the first
video input device, .2 is the second video
input device, and so on. The order of the devices is specific to
the host system.
You can specify optional settings in the form of
semi-colon-separated (;) name-value pairs.
These properties enable you to configure the emulated webcam
device.
The following settings are supported:
-
MaxFramerate Specifies the highest rate at which to send video frames to the VM. The rate is in frames per second. Higher frame rates increase CPU load, so you can use this setting to reduce CPU load. The default value is
no maximum
              limit
. This value enables the VM to use any frame rate supported by the webcam.-
MaxPayloadTransferSize Specifies the maximum number of bytes that the VM receives from the emulated webcam in one buffer. The default setting is
3060bytes, which is used by some webcams. If the VM is able to use larger buffers, higher values might reduce CPU load slightly. Note that some guest OSes might not suppport higherMaxPayloadTransferSizevalues.
VBoxManage controlvm < uuid | vmname > webcam detach [pathname]
The VBoxManage controlvm
vmname webcam detach
command detaches a webcam from a running VM. Specify the webcam
as the absolute path of the webcam on the host OS or as an
alias. Use the VBoxManage list webcams to
obtain the webcam alias.
When a webcam device is detached from the host, the host OS determines how the emulated webcam behaves.
Windows hosts: The emulated webcam device is detached from the VM automatically.
Mac OS X hosts that run at least OS X 10.7: The emulated webcam device remains attached to the VM and you must detach it manually by using the VBoxManage controlvm webcam detach command.
Linux hosts: The emulated webcam device is detached from the VM automatically only if the webcam is actively streaming video. If the emulated webcam is inactive, manually detach it by using the VBoxManage controlvm
vmnamewebcam detach command.
VBoxManage controlvm < uuid | vmname > webcam list
The VBoxManage controlvm
vmname webcam list command
lists webcams that are attached to the running VM. The output
shows a list of absolute paths or aliases that attached the
webcams to the VM by using the VBoxManage controlvm
vmname webcam attach
command.
VBoxManage controlvm < uuid | vmname > addencpassword <ID> < password-file | - > [--removeonsuspend= yes | no ]
The VBoxManage controlvm
vmname addencpassword
command provides the vmname encrypted
VM with the encryption password to enable a headless start.
Specify the absolute path of a password file on the host system.
If filename is -,
VBoxManage prompts for the encryption
password.
Use the --removeonsuspend option to specify
whether to save the passsword or clear it from VM memory when
the VM is suspended.
If the VM is suspended and the password is cleared, use the
VBoxManage controlvm vmname
addencpassword to provide the password to resume
execution on the VM. Use this feature when you do not want to
store the password in VM memory while the VM is suspended by a
host suspend event.
Note
You can encrypt data stored on hard disk images used by the VM. Oracle VM VirtualBox uses the AES algorithm in XTS mode and supports 128-bit or 256-bit data encryption keys (DEK). The encrypted DEK is stored in the medium properties and is decrypted during VM startup when you provide the encryption password.
Use the VBoxManage encryptmedium command to create a DEK encrypted medium. See Section 9.29.2, “Encrypting Disk Images”.
The Oracle VM VirtualBox GUI prompts you for the encryption password when you start an encrypted VM.
Use the following command to perform a headless start of an encrypted VM:
$ VBoxManage startvm vmname --type headless
Then, use the following command to provide the encryption password:
          $ VBoxManage vmname controlvm addencpassword vmname -
Password: encryption-passwordVBoxManage controlvm < uuid | vmname > removeencpassword <ID>
The VBoxManage controlvm
vmname removeencpassword
command disables a specific encryption password for all
encrypted media attached to the VM.
ID is the password identifier for the
encryption password that you want to disable.
VBoxManage controlvm < uuid | vmname > changeuartmodeN disconnected | server pipe-name | client pipe-name | tcpserver port | tcpclient hostname:port | file filename | device-name
The VBoxManage controlvm
vmname changeuartmode
command changes the connection mode for the specified virtual
serial port. Valid serial port values are integers that start
from 1.
- disconnected
Disconnects the device.
- server
pipe-name Specifies the pipe name of the server.
- client
pipe-name Specifies the pipe name of the client.
- tcpserver
port Specifies the port number of the TCP server.
- tcpclient
hostname:port Specifies the host name and port number of the TCP client.
- file
filename Specifies the name of the file.
-
device-name Specifies the name of the device.
VBoxManage controlvm < uuid | vmname > autostart-enabledN on | off
The VBoxManage controlvm
vmname autostart-enabled
command specifies whether to enable or disable automatically
start the VM at host system boot-up. You must do some host
system configuration before you can use this feature.
See Section 9.21, “Starting Virtual Machines During System Boot”. Valid values are
on, which enables autostart feature for
the VM and off, which disables it. The
default value is off.
VBoxManage controlvm < uuid | vmname > autostart-delayseconds
The VBoxManage controlvm
vmname autostart-delay
command specifies the delay in seconds before the VM starts
on host system boot-up. See Section 9.21, “Starting Virtual Machines During System Boot”.
The following command temporarily stops the execution of the
ol7 VM.
$ VBoxManage controlvm ol7 pause
The following command configures shared clipboard operation for
the ol7 VM. Copying of clipboard data is
allowed in both directions between the host and guest.
$ VBoxManage controlvm ol7 clipboard mode bidirectional
Unattended guest OS installation.
VBoxManage unattended install <uuid|vmname> <--iso=install-iso> [--user=login] [--password=password] [--password-file=file] [--full-user-name=name] [--key=product-key] [--install-additions] [--no-install-additions] [--additions-iso=add-iso] [--install-txs] [--no-install-txs] [--validation-kit-iso=testing-iso] [--locale=ll_CC] [--country=CC] [--time-zone=tz] [--hostname=fqdn] [--package-selection-adjustment=keyword] [--dry-run] [--auxiliary-base-path=path] [--image-index=number] [--script-template=file] [--post-install-template=file] [--post-install-command=command] [--extra-install-kernel-parameters=params] [--language=lang] [--start-vm=session-type]
VBoxManage unattended detect <--iso=install-iso> [--machine-readable]
Detects the guest operating system (OS) on the specified installation ISO and displays the result. This can be used as input when creating a VM for the ISO to be installed in.
-
--iso=install-iso The installation ISO to run the detection on.
-
--machine-readable Produce output that is simpler to parse from a script.
VBoxManage unattended install <uuid|vmname> <--iso=install-iso> [--user=login] [--password=password] [--password-file=file] [--full-user-name=name] [--key=product-key] [--install-additions] [--no-install-additions] [--additions-iso=add-iso] [--install-txs] [--no-install-txs] [--validation-kit-iso=testing-iso] [--locale=ll_CC] [--country=CC] [--time-zone=tz] [--hostname=fqdn] [--package-selection-adjustment=keyword] [--dry-run] [--auxiliary-base-path=path] [--image-index=number] [--script-template=file] [--post-install-template=file] [--post-install-command=command] [--extra-install-kernel-parameters=params] [--language=lang] [--start-vm=session-type]
Reconfigures the specified VM for installation and optionally starts it up.
-
uuid|vmname Either the UUID or the name (case sensitive) of a VM.
-
--iso=install-iso The installation ISO to run the detection on.
-
--user=login The login name. (default: vboxuser)
-
--password=password The login password. This is used for the user given by
--useras well as the root/administrator user. (default: changeme)-
--password-file=file Alternative to
--passwordfor providing the password. Special filenamestdincan be used to read the password from standard input.-
--full-user-name=name The full user name. (default: --user)
-
--key=product-key The guest OS product key. Not all guest OSes requires this.
--install-additions,--no-install-additionsWhether to install the VirtualBox guest additions. (default: --no-install-addations)
-
--additions-iso=add-iso Path to the VirtualBox guest additions ISO. (default: installed/downloaded GAs)
--install-txs,--no-install-txsWhether to install the test execution service (TXS) from the VirtualBox ValidationKit. This is useful when preparing VMs for testing or similar. (default: --no-install-txs)
-
--validation-kit-iso=testing-iso Path to the VirtualBox ValidationKit ISO. This is required if
--install-txsis specified.-
--locale=ll_CC The base locale specification for the guest, like en_US, de_CH, or nn_NO. (default: host or en_US)
-
--country=CC The two letter country code if it differs from the specified by
--location.-
--time-zone=tz The time zone to set up the guest OS with. (default: host time zone or UTC)
-
--hostname=fqdn The fully qualified domain name of the guest machine. (default:
vmname.myguest.virtualbox.org)-
--package-selection-adjustment=keyword Adjustments to the guest OS packages/components selection. This can be specfied more than once. Currently the only recognized keyword is
minimalwhich triggers a minimal installation for some of the guest OSes.-
--dry-run Do not create any files or make any changes to the VM configuration.
-
--start-vm=session-type Start the VM using the front end given by
session-type. This is the same as the--typeoption for thestartvmcommand, but we have addnonefor indicating that the VM should not be started. (default:none)
Advanced options:
-
--auxiliary-base-path=path The path prefix to the media related files generated for the installation. (default:
vm-config-dir/Unattended-vm-uuid-)-
--image-index=number Windows installation image index. (default: 1)
-
--script-template=file The unattended installation script template. (default: IMachine::OSTypeId dependent)
-
--post-install-template=file The post installation script template. (default: IMachine::OSTypeId dependent)
-
--post-install-command=command A single command to run after the installation is completed. The exact format and exactly when this is run is guest OS installer dependent.
-
--extra-install-kernel-parameters=params List of extra linux kernel parameters to use during the installation. (default: IMachine::OSTypeId dependent)
-
--language=lang Specifies the UI language for a Windows installation. The
langis generally on the form {ll}-{CC}. See detectedOSLanguages results from VBoxManage unattended detect. (default: detectedOSLanguages[0])
Discard the saved state of a virtual machine.
The VBoxManage discardstate command discards the saved state of a virtual machine (VM) that is not currently running. This command causes the VM's operating system to restart the next time you start the VM.
Note
Where possible, avoid performing this action. The effects of this command are equivalent to unplugging the power cable on a physical machine.
uuid|vmnameSpecifies the Universally Unique Identifier (UUID) or name of the VM.
Change a virtual machine's state based on a saved state file.
The VBoxManage adoptstate command enables you
to change the state of a virtual machine (VM) to a state described
in a saved state file (.sav). This action is
referred to as a VM adopting a saved state
file. The saved state file must be separate from the VM
configuration.
When you start the VM after adopting the saved state, the VM restores its state from the saved state file.
Only use this command for custom deployments.
uuid|vmnameSpecifies the Universally Unique Identifier (UUID) or name of the VM.
-
state-filename Specifies the name of the saved state file.
Manage virtual machine snapshots.
VBoxManage snapshot <uuid|vmname> take <snapshot-name> [--description=description] [--live] [--uniquename Number,Timestamp,Space,Force]
VBoxManage snapshot <uuid|vmname> edit < snapshot-name | --current > [--description=description] [--name=new-name]
The VBoxManage snapshot command manages snapshots.
Oracle VM VirtualBox uses the snapshot to capture the state of a virtual machine (VM). You can later use the snapshot to revert to the state described by the snapshot.
A snapshot is a complete copy of a VM's settings. If you take the snapshot while the VM is running, the snapshot also includes the VM's state file.
After you take a snapshot, Oracle VM VirtualBox creates a differencing hard disk for each normal hard disk that is associated with the host machine. When you restore a snapshot, Oracle VM VirtualBox uses these differencing files to quickly reset the contents of the VM's virtual hard disks.
For each VBoxManage snapshot command, you must specify the name or the universal unique identifier (UUID) of the VM for which you want to take a snapshot.
VBoxManage snapshot <uuid|vmname> take <snapshot-name> [--description=description] [--live] [--uniquename Number,Timestamp,Space,Force]
The VBoxManage snapshot take command takes a snapshot of the current state of the VM. You must supply a name for the snapshot and can optionally supply a description. The new snapshot is inserted into the snapshots tree as a child of the current snapshot and then becomes the new current snapshot.
-
--description=description Specifies a description of the snapshot.
-
--live Specifies that the VM is not stopped while you create the snapshot. This operation is know as live snapshotting.
-
--uniquename Number,Timestamp,Space,Force TBD.
-
snapshot-name Specifies the name of the snapshot to create.
VBoxManage snapshot <uuid|vmname> delete <snapshot-name>
The VBoxManage snapshot delete command removes the specified snapshot.
The delete operation may take some time to finish. This is because the differencing images that are associated with the snapshot may need to be merged with their child differencing images.
-
snapshot-name Specifies the UUID or name of the snapshot.
VBoxManage snapshot <uuid|vmname> restore <snapshot-name>
The VBoxManage snapshot restore command restores the specified snapshot. This operation resets the VM's settings and current state to that of the snapshot. The state of the VM on which you restore a snapshot is lost. When restored, the specified snapshot becomes the new current snapshot and subsequent snapshots are children of that snapshot.
-
snapshot-name Specifies the UUID or name of the snapshot.
VBoxManage snapshot <uuid|vmname> restorecurrent
The VBoxManage snapshot restorecurrent command restores the current snapshot. The current snapshot is the one from which the current state is derived. This command is equivalent to using the VBoxManage snapshot restore command and specifying the name or UUID of the current snapshot.
VBoxManage snapshot <uuid|vmname> edit < snapshot-name | --current > [--description=description] [--name=new-name]
The VBoxManage snapshot edit command enables you to change the name or the description of a specified snapshot.
-
snapshot-name Specifies the UUID or name of the snapshot to edit.
This option is mutually exclusive with the
--currentoption.-
--current Specifies that you update the current version of the snapshot.
This option is mutually exclusive with a specific snapshot name or its UUID.
-
--description=description Specifies a new description for the snapshot.
-
--name=new-name Specifies a new name for the snapshot.
VBoxManage snapshot <uuid|vmname> list [[--details] | [--machinereadable]]
The VBoxManage snapshot list command lists all the snapshots for a VM.
-
--details Specifies that the output shows detailed information about the snapshot.
This option is mutually exclusive with the
--machinereadableoption.-
--machinereadable Specifies that the output is shown in a machine-readable format.
This option is mutually exclusive with the
--detailsoption.
The following command creates a snapshot of the
ol7u4 VM. The snapshot is called
ol7u4-snap-001. The command uses
the --description option to provide a description
of the snapshot contents.
$ VBoxManage snapshot ol7u4 take ol7u4-snap-001 \
--description="Oracle Linux 7.4"
The following command lists the snapshots for the
ol7u4 VM.
$ VBoxManage snapshot ol7u4 list
The following command changes the description for the
ol7u4-snap-001 snapshot of the
ol7u4 VM.
$ VBoxManage snapshot ol7u4 edit ol7u4-snap-001 \
--description="Oracle Linux 7.4 with UEK4 kernel"
The following command shows VM settings for the
ol7u1-snap-001 snapshot of the
ol7u4 VM.
$ VBoxManage snapshot ol7u4 showvminfo ol7u4-snap-001
Name:            ol7u4
Groups:          /
Guest OS:        Oracle (64-bit)
UUID:            43349d78-2ab3-4cb8-978f-0e755cd98090
Config file:     C:\Users\user1\VirtualBox VMs\ol7u4\ol7u4.vbox
...
Snapshots:

   Name: ol7u4-snap-001 (UUID: 1cffc37d-5c37-4b86-b9c5-a0f157a55f43)
   Description: Oracle Linux 7.4 with UEK4 kernel
Remove a hard disk, DVD, or floppy image from the media registry.
The VBoxManage closemedium command removes a hard disk, DVD, or floppy image from the list of known media used by Oracle VM VirtualBox. The image is then unavailable for selection in the Virtual Media Manager.
To use this command, the image must not be attached to any VMs.
Optionally, you can request that the image be deleted.
- disk|dvd|floppy
Specifies the type of medium. Valid values are
disk(hard drive),dvd, orfloppy.uuid|filenameSpecifies the Universally Unique Identifier (UUID) or absolute path name of the medium or image.
-
--delete Deletes the image file.
Attach, remove, and modify storage media used by a virtual machine.
VBoxManage storageattach < uuid | vmname > <--storagectl=name> [--bandwidthgroup= name | none ] [--comment=text] [--device=number] [--discard= on | off ] [--encodedlun=lun] [--forceunmount] [--hotpluggable= on | off ] [--initiator=initiator] [--intnet] [--lun=lun] [--medium= none | emptydrive | additions | uuid | filename | host:drive | iscsi ] [--mtype= normal | writethrough | immutable | shareable | readonly | multiattach ] [--nonrotational= on | off ] [--passthrough= on | off ] [--passwordfile=file] [--password=password] [--port=number] [--server= name | ip ] [--setparentuuid=uuid] [--setuuid=uuid] [--target=target] [--tempeject= on | off ] [--tport=port] [--type= dvddrive | fdd | hdd ] [--username=username]
The VBoxManage storageattach command enables you to manage a storage medium that you connected to a storage controller by using the VBoxManage storagectl command.
uuid|vmnameSpecifies the Universally Unique Identifier (UUID) or the name of the virtual machine (VM).
-
--storagectl=name Specifies the name of the storage controller. Use the VBoxManage showvminfo command to list the storage controllers that are attached to the VM.
-
--port=number Specifies the port number of the storage controller to modify. You must specify this option unless the storage controller has only a single port.
-
--device=number Specifies the port's device number to modify. You must specify this option unless the storage controller has only one device per port.
-
--type=dvddrive | fdd | hdd Specifies the drive type to which the medium is associated. Only omit this option if the medium type can be determined by using the
--mediumoption or by information provided by an earlier medium attachment command.-
--medium=none | emptydrive | additions |uuid|filename| host:drive| iscsi Specifies one of the following values:
-
none Removes any existing device from the specified slot.
-
emptydrive For a virtual DVD or floppy drive only.
Makes the device slot behave like a removeable drive into which no media has been inserted.
-
additions For a virtual DVD drive only.
Attaches the VirtualBox Guest Additions image to the specified device slot.
-
uuid Specifies the UUID of a storage medium to attach to the specified device slot. The storage medium must already be known to Oracle VM VirtualBox, such as a storage medium that is attached to another VM. Use the VBoxManage list command to list media.
-
filename Specifies the full path of an existing disk image to attach to the specified device slot. The disk image can be in ISO, RAW, VDI, VMDK, or other format.
-
host:drive For a virtual DVD or floppy drive only.
Connects the specified device slot to the specified DVD or floppy drive on the host computer.
-
iscsi For virtual hard disks only.
Specifies an iSCSI target for which you must specify additional information. See Section 5.10, “iSCSI Servers”.
For removeable media such as floppies and DVDs, you can make configuration changes while a VM is running. Changes to devices or hard disk device slots require that the VM be powered off.
-
-
--mtype=normal | writethrough | immutable | shareable | readonly | multiattach Specifies how this medium behaves with respect to snapshots and write operations. See Section 5.4, “Special Image Write Modes”.
-
--comment=text Specifies an optional description to store with the medium.
-
--setuuid=uuid Modifies the UUID of a medium before attaching it to a VM.
This is an expert option. Inappropriate values might make the medium unusable or lead to broken VM configurations if another VM already refers to the same medium.
Using the
--setuuid=""option assigns a new random UUID to an image, which can resolve duplicate UUID errors if you used a file copy utility to duplicate an image.-
--setparentuuid=uuid Modifies the parent UUID of a medium before attaching it to a VM.
This is an expert option. Inappropriate values might make the medium unusable or lead to broken VM configurations if another VM already refers to the same medium.
-
--passthrough=on | off For a virtual DVD drive only.
Enables writing to a DVD. This feature is experimental, see Section 5.9, “CD/DVD Support”.
-
--tempeject=on | off For a virtual DVD drive only.
Specifies whether to permit a temporary guest-triggered medium eject operation. When set to
on, you can eject a medium. The ability for a guest-triggered eject operation does not persist if the VM is powered off and restarted. So, when you set this option toonand the VM is restarted, the originally configured medium is still in the drive.-
--nonrotational=on | off Enables you to specify that the virtual hard disk is non-rotational. Some guest OSes, such as Windows 7 or later, treat such disks as solid state drives (SSDs) and do not perform disk fragmentation on them.
-
--discard=on | off Specifies whether to enable the auto-discard feature for a virtual hard disk. When set to
on, a VDI image is shrunk in response to a trim command from the guest OS.The virtual hard disk must meet the following requirements:
The disk format must be VDI.
The size of the cleared area of the disk must be at least 1 MB.
Ensure that the space being trimmed is at least a 1 MB contiguous block at a 1 MB boundary.
Consider running defragmentation commands as background cron jobs to save space. On Windows, run the defrag.exe /D command. On Linux, run the btrfs filesystem defrag command.
Note
When you configure the guest OS to issue the trim command, the guest OS typically sees the disk as an SSD.
Ext4 supports the
-o discardmount option. Mac OS X might require additional settings. Windows 7, 8, and 10 automatically detect and support SSDs. The Linux exFAT driver from Samsung supports the trim command.The Microsoft implementation of exFAT might not support this feature.
You can use other methods to issue trim commands. The Linux fstrim command is part of the
util-linuxpackage. Earlier solutions required you to zero out unused areas by using the zerofree or a similar command, and then to compact the disk. You can only perform these steps when the VM is offline.-
--bandwidthgroup=name Specifies the bandwidth group to use for the device. See Section 5.8, “Limiting Bandwidth for Disk Images”.
-
--forceunmount For a virtual DVD or floppy drive only.
Forcibly unmounts the DVD, CD, or floppy or mounts a new DVD, CD, or floppy even if the previous removable storage is locked by the guest for reading. See Section 5.9, “CD/DVD Support”.
The following options are applicable when you specify the
--medium=iscsi option:
-
--server=hostname|IP-address Specifies the host name or IP address of the iSCSI target.
-
--target=target Specifies the target name string, which is determined by the iSCSI target and is used to identify the storage resource.
-
--tport=port Specifies the TCP/IP port number of the iSCSI service on the target.
-
--lun=LUN Specifies the logical unit number (LUN) of the target resource. For a single disk drive, the value is zero.
-
--encodedlun=LUN Specifies the hexadecimal-encoded of the target resource. For a single disk drive, the value is zero.
-
--username=username Specifies the user name to use for target authentication.
Note
Unless you provide a settings password, the user name is stored as clear text in the XML machine configuration file.
-
--password=password Specifies the password used for target authentication.
Note
Unless you provide a settings password, this password is stored as clear text in the XML machine configuration file. When you specify a settings password for the first time, the target authentication password is stored in encrypted form.
-
--passwordfile=password-filename Specifies a file that contains the target authentication password as clear text.
Note
Use permission and ownership settings to ensure that the contents of this file cannot be read by unauthorized users.
-
--initiator=initiator Specifies the iSCSI initiator.
The Microsoft iSCSI Initiator is a system, such as a server, that attaches to an IP network and initiates requests and receives responses from an iSCSI target. The SAN components in the iSCSI initiator are largely analogous to Fibre Channel SAN components, and they include the following:
iSCSI driver. Transports blocks of iSCSI commands over the IP network. This iSCSI driver is installed on the iSCSI host and is included with the Microsoft iSCSI Initiator.
Gigabit Ethernet adapter. Connects to an iSCSI target. Use an Ethernet adapter that can transmit 1000 megabits per second (Mbps). Like standard 10/100 adapters, most gigabit adapters use a preexisting Category 5 or Category 6E cable. Each port on the adapter is identified by a unique IP address.
iSCSI target. Is any device that receives iSCSI commands. The device can be an end node such as a storage device, or it can be an intermediate device such as a network bridge between IP and Fibre Channel devices. Each port on the storage array controller or network bridge is identified by one or more IP addresses.
-
--intnet Specifies whether to connect to the iSCSI target that uses internal networking. This configuration requires further configuration. See Section 9.7.3, “Access iSCSI Targets Using Internal Networking”.
The following command attaches the o7.vdi
disk image to the specified SATA storage controller on the
ol7 VM.
$ storageattach ol7 --storagectl "SATA Controller" --port 0 --device 0 \
--type hdd --medium /VirtualBox/ol7/ol7.vdi
The following command attaches the
o7-r6-dvd.iso DVD image to the specified IDE
storage controller on the ol7 VM.
$ VBoxManage storageattach ol7 --storagectl "IDE Controller" --port 0 --device 0 \
--type dvddrive --medium ol7-r6-dvd.iso
Manage a storage controller.
VBoxManage storagectl < uuid | vmname > <--name=controller-name> [--add= floppy | ide | pcie | sas | sata | scsi | usb ] [--controller= BusLogic | I82078 | ICH6 | IntelAhci | LSILogic | LSILogicSAS | NVMe | PIIX3 | PIIX4 | USB | VirtIO ] [--bootable= on | off ] [--hostiocache= on | off ] [--portcount=count] [--remove] [--rename=new-controller-name]
The VBoxManage storagectl command enables you to attach, modify, and remove a storage controller. After you configure the storage controller, you can use the VBoxManage storageattach command to attach virtual media to the controller.
uuid|vmnameSpecifies the Universally Unique Identifier (UUID) or name of the virtual machine (VM).
-
--name=controller-name Specifies the name of the storage controller.
-
--add=system-bus-type Specifies the type of the system bus to which to connect the storage controller. Valid values are
floppy,ide,pcie,sas,sata,scsi, andusb.-
--controller=chipset-type Specifies the chipset type to emulate for the specified storage controller. Valid values are
BusLogic,I82078,ICH6,IntelAHCI,LSILogic,LSILogicSAS,NVMe,PIIX3,PIIX4, andUSB.The default value varies, according to the type of storage controller.
-
--portcount=count Specifies the number of ports that the storage controller supports. Valid values depend on the type of storage controller.
-
--hostiocache=on|off Specifies whether to use the host I/O cache for all disk images attached to this storage controller. Valid values are
onandoff. See Section 5.7, “Host Input/Output Caching”.-
--bootable=on|off Specifies whether this controller is bootable. Valid values are
onandoff.-
--rename=new-controller-name Specifies a new name for the storage controller.
-
--remove Removes a storage controller from the VM configuration.
The following command creates a SATA storage controller called
sata01 and adds it to the
ol7 VM. The storage controller emulates the
IntelAHCI chipset.
$ VBoxManage storagectl ol7 --name "sata01" --add sata --controller IntelAHCI
The following command creates an IDE storage controller called
ide01 and adds it to the ol7
VM.
$ VBoxManage storagectl ol7 --name "ide01" --add ide
Manage bandwidth groups.
VBoxManage bandwidthctl < uuid | vmname > add <bandwidth-group-name> <--limit=bandwidth-limit[k|m|g|K|M|G]> <--type=disk|network>
The VBoxManage bandwidthctl command enables you to manage bandwidth groups for virtual machines (VMs). A bandwidth group specifies the bandwidth limit for the disks or for the network adapters of a VM.
Note that a network bandwidth limit applies only to the outbound traffic from the VM. The inbound traffic is unlimited.
VBoxManage bandwidthctl < uuid | vmname > add <bandwidth-group-name> <--limit=bandwidth-limit[k|m|g|K|M|G]> <--type=disk|network>
The VBoxManage bandwidthctl add command creates a bandwidth group for the specified VM. You must specify whether the bandwidth group is for disks or for networks, and specify the bandwidth limit.
uuid|vmnameSpecifies the Universally Unique Identifier (UUID) or the name of the VM.
-
bandwidth-group-name Specifies the name of the bandwidth group.
-
--type=disk|network Specifies the type of the bandwidth group:
diskandnetwork. For more information, see Section 5.8, “Limiting Bandwidth for Disk Images” or Section 6.12, “Limiting Bandwidth for Network Input/Output”.-
--limit=bandwidth-limit[k|m|g|K|M|G] Specifies the bandwidth limit for a bandwidth group. The default unit is megabytes per second. You can modify this value while the VM is running.
You can change the unit by appending one of the following unit specifiers to the bandwidth limit:
k– kilobits per secondm– megabits per secondg– gigabits per secondK– kilobytes per secondM– megabytes per secondG– gigabytes per second
VBoxManage bandwidthctl < uuid | vmname > list [--machinereadable]
The VBoxManage bandwidthctl list command
lists the all the bandwidth groups that have been defined for
the specified VM. Use the --machinereadable
option to produce the output in a machine-readable format, which
uses name-value pairs.
uuid|vmnameSpecifies the UUID or the name of the VM.
-
--machinereadable Outputs the information about the bandwidth groups in name-value pairs.
VBoxManage bandwidthctl < uuid | vmname > remove <bandwidth-group-name>
The VBoxManage bandwidthctl remove command removes a bandwidth group.
Note
To successfully remove a bandwidth group, ensure that it is not referenced by any disk or adapter in the running VM.
uuid|vmnameSpecifies the UUID or the name of the VM.
-
bandwidth-group-name Specifies the name of the bandwidth group.
VBoxManage bandwidthctl < uuid | vmname > set <bandwidth-group-name> <--limit=bandwidth-limit[k|m|g|K|M|G]>
The VBoxManage bandwidthctl set command modifies the bandwidth limit for a bandwidth group.
uuid|vmnameSpecifies the UUID or the name of the VM.
-
bandwidth-group-name Specifies the name of the bandwidth group.
-
--limit=bandwidth-limit[k|m|g|K|M|G] Specifies the bandwidth limit for a bandwidth group. The default unit is megabytes per second. You can modify this value while the VM is running.
You can change the unit by appending one of the following unit specifiers to the bandwidth limit:
k– kilobits per secondm– megabits per secondg– gigabits per secondK– kilobytes per secondM– megabytes per secondG– gigabytes per second
The following example shows how to use the VBoxManage
bandwidthctl command to create the
Limit bandwidth group and set the limit to 20
Mbps. Then use the VBoxManage modifyvm command
to assign this bandwidth group to the first and second adapters of
the vm1 VM.
$ VBoxManage bandwidthctl "vm1" add Limit --type network --limit 20m
$ VBoxManage modifyvm "vm1" --nicbandwidthgroup1 Limit
$ VBoxManage modifyvm "vm1" --nicbandwidthgroup2 Limit
You can dynamically modify the limit of a bandwidth group while
the VM is running. The following example shows how to modify the
limit for the Limit bandwidth group from 20
Mbps to 100 kbps:
$ VBoxManage bandwidthctl "vm1" set Limit --limit 100k
The following command disables shaping for all adapters in the
Limit bandwidth group by specifying a limit of
zero (0):
$ VBoxManage bandwidthctl "vm1" set Limit --limit 0
Show information about a medium.
The VBoxManage showmediuminfo command shows the following information about a medium:
Size
Size on disk
Type
In use by virtual machines (VMs)
The medium must be specified either by its UUID, if the medium is registered, or by its filename. Registered images can be listed using VBoxManage list hdds, VBoxManage list dvds, or VBoxManage list floppies, as appropriate.
For backward compatibility, you can also use the showvdiinfo command to obtain information about the medium.
disk|dvd|floppySpecifies the type of medium. Valid values are
disk(hard drive),dvd, orfloppy.uuid|filenameSpecifies the Universally Unique Identifier (UUID) or absolute path name of the medium or image.
If the medium is registered, you can specify the UUID. You can also list registered images by using the VBoxManage list hdds, VBoxManage list dvds, or VBoxManage list floppies command.
Create a new medium.
VBoxManage createmedium [ disk | dvd | floppy ] <--filename=filename> [ --size=megabytes | --sizebyte=bytes ] [--diffparent= UUID | filename ] [--format= VDI | VMDK | VHD ] [--variant Standard,Fixed,Split2G,Stream,ESX,Formatted,RawDisk] --property
name=value... --property-file
name=/path/to/file/with/value...
The VBoxManage createmedium command creates a new medium, such as a disk image file.
Note
For compatibility with earlier versions of Oracle VM VirtualBox, you can use the createvdi and createhd commands instead of the createmedium command.
- disk | dvd | floppy
Specifies the media type. The default value is
disk.-
--filename=filename Specifies the absolute path name to a file on the host file system.
-
--size=megabytes Specifies the image capacity in one megabyte units.
-
--sizebyte=bytes Specifies the image capacity in one byte units.
-
--diffparent=UUID|filename Specifies the Universally Unique Identifier (UUID) or absolute path name of a differencing image parent file on the host file system.
Use this file to share a base box disk image among VMs.
-
--format=VDI | VMDK | VHD Specifies the file format of the output file. Valid formats are
VDI,VMDK, andVHD. The default format isVDI.-
--variant=Standard,Fixed,Split2G,Stream,ESX,Formatted,RawDisk Specifies the file format variant for the target medium, which is a comma-separated list of variants. Following are the valid values:
Standardis the default disk image type, which has a dynamically allocated file size.Fixeduses a disk image that has a fixed file size.Split2Gindicates that the disk image is split into 2GB segments. This value is valid for VMDK disk images only.Streamoptimizes the disk image for downloading. This value is valid for VMDK disk images only.ESXis used for some VMWare products. This value is valid for VMDK disk images only.Formattedformats the medium automatically. This value is valid for floppy images only.RawDiskis used for creating a VMDK image which provides direct access to the hard disk on the host using its raw interface. This value is valid for VMDK disk images only. For detailed information about raw disk access, see Section 9.7, “Advanced Storage Configuration”.
Note that not all variant combinations are valid. Specifying incompatible variant values in the list will produce an error message.
-
--propertyname=value Specifies any required file format dependent parameters in
key=valueform. Optional.-
--property-filename=/path/to/file/with/value Specifies any required file format dependent parameters in
key=file/with/valueform. The value is taken from the file. Optional.
The following command creates a new disk image file named
disk01.vdi. The file size is 1024 megabytes.
$ VBoxManage createmedium --filename disk01.vdi --size 1024
The following command creates a new floppy disk image file named
floppy01.vdi. The file size is 1 megabyte.
$ VBoxManage createmedium floppy --filename floppy01.img --size 1
The following command creates a raw disk image of an entire physical disk on a Linux host.
$ VBoxManage createmedium disk --filename=/path/to/rawdisk.vmdk --variant=RawDisk --format=VMDK --property RawDrive=/dev/sda
Change the characteristics of an existing disk image.
VBoxManage modifymedium [ disk | dvd | floppy ] < uuid | filename > [--autoreset=on | off] [--compact] [--description=description] [--move=pathname] [--property=name=[value]] [--resize=megabytes | --resizebyte=bytes] [--setlocation=pathname] [--type=normal | writethrough | immutable | shareable | readonly | multiattach]
The VBoxManage modifymedium command enables you to change the characteristics of an existing disk image.
Note
For compatibility with earlier versions of Oracle VM VirtualBox, you can use the modifyvdi and modifyhd commands.
- disk | dvd | floppy
Specifies the media type of the image.
-
filename Specifies the Universally Unique Identifier (UUID) or path name of the disk image on the host file system. You can specify the UUID only if the medium is registered. Use the VBoxManage list hdds command to list the registered images. You can specfy an absolute or relative path to the medium.
-
--autoreset=on | off Specifies whether to automatically reset an immutable hard disk on every virtual machine (VM) startup. This option is only for immutable hard disks and the default value is
on. See Section 5.4, “Special Image Write Modes”.-
--compact Compresses disk images by removing blocks that contain only zeroes. This option shrinks a dynamically allocated image and reduces the physical size of the image without affecting the logical size of the virtual disk.
You can use this option for base images and for differencing images that are created as part of a snapshot.
Note
Before you compress the image, you must use a suitable software tool to zero out free space in the guest system. For example:
Windows guests. Run the sdelete -z command.
Linux guests. Use the zerofree utility, which supports
ext2andext3file systems.Mac OS X guests. Use the diskutil secureErase freespace 0 / command.
Note that you can only use this option to compress VDI images. To compress non-VID images, you can zero out free blocks and then clone the disk to any other dynamically allocated format.
-
--description=description Specifies a text description of the medium.
-
--move=pathname Specifies a relative or absolute path to a medium on the host system. Use this option to relocate a medium to a different location on the host system.
-
--property=name=value Specifies a property name and value for the medium.
-
--resize=size Specifes the new capacity of an existing image in MB. You can use this option only to expand the capacity of an image. You can cannot shrink the capacity of an image.
Note that you can resize only dynamically allocated disk images that use the VDI and VHD formats. This option adjusts the logical size of a virtual disk and has only a minor affect on the physical size.
For example, if your dynamically allocated 10 GB disk is full, you can use the
--resize 15360option to increase the capacity of the existing disk to 15 GB (15,360 MB). This operation enables you to avoid having to create a new image and copy all data from within a VM.Note that using this option only changes the capacity of the drive. So, you might need to subsequently use a partition management tool in the guest to adjust the main partition to fill the drive.
-
--resizebyte=size Specifes the new capacity of an existing image in bytes. This option is similar to the
--resizeoption, but you specify the size in bytes instead of megabytes.-
--setlocation=pathname Specifies the new location of the medium on the host system after the medium has been moved. The path name can be relative to the current directory or be absolute to the root.
Note that the VBoxManage modifymedium command does not perform any sanity checks on the path name you specify. Ensure that the path name is valid.
-
--type Specifies the new mode type of an existing image. Valid values are
normal,immutable,writethrough,multi-attach,shareable, andreadonly. For descriptions of these mode types, see Section 5.4, “Special Image Write Modes”.
The following command modifies the description for the disk image
file called disk01.vdi.
$ VBoxManage modifymedium disk disk01.vdi --description "Oracle Linux 7 image"
The following command modifies the write mode for the disk image
file called disk01.vdi.
$ VBoxManage modifymedium disk disk01.vdi --type writethrough
Create a clone of a medium.
The VBoxManage clonemedium command enables you to clone an existing medium (virtual disk, DVD, or floppy), which is typically an image file. Only the Universally Unique Identifier (UUID) differs between the original image and the cloned image.
You can use the Virtual Media Manager to transfer the cloned image to another host system or reimport it into Oracle VM VirtualBox. See Section 5.3, “The Virtual Media Manager” and Section 5.6, “Cloning Disk Images”.
uuid|source-mediumSpecifies the UUID or the absolute or relative file name of the source medium to clone. You can specify the UUID of the medium only if it is registered. Use the VBoxManage list hdds command to list registered images.
uuid|target-mediumSpecifies the UUID or the absolute or relative file name of the target (clone) medium. You can specify the UUID of the target medium only if it is registered. Use the VBoxManage list hdds command to list registered images.
disk|dvd|floppySpecifies the type of the medium to clone. Valid values are
disk,dvd, andfloppy. The default value isdisk.-
--existing Performs the clone operation by overwriting an existing target medium. The result is that only the portion of the source medium that fits into the existing target medium is copied.
If the target medium is smaller than the source, only the portion of the source medium up to the size of the target medium is copied.
If the target medium is larger than the source, the remaining part of the target medium is unchanged.
-
--format Specifies the file format of the target medium if it differs from the format of the source medium. Valid values are
VDI,VMDK,VHD,RAW, andother.-
--variant=Standard,Fixed,Split2G,Stream,ESX Specifies the file format variant for the target medium, which is a comma-separated list of variants. Following are the valid values:
Standardis the default disk image type, which has a dynamically allocated file size.Fixeduses a disk image that has a fixed file size.Split2Gindicates that the disk image is split into 2GB segments. This value is for VMDK only.Streamoptimizes the disk image for downloading. This value is for VMDK only.ESXis used for some VMWare products. This value is for VMDK only.
Note that not all variant combinations are valid. Specifying incompatible variant values in the list will produce an error message.
Note
For compatibility with earlier versions of Oracle VM VirtualBox, you can use the clonevdi and clonehd commands instead of the clonemedium command.
The following command creates a clone of the
disk01.vdi disk image file. The clone is
called disk02.vdi.
$ VBoxManage clonemedium disk01.vdi disk02.vdi
The following command creates a clone of the
disk01.vdi disk image file. The clone is in
VMDK format and is called disk02.vmdk.
$ VBoxManage clonemedium disk01.vdi disk02.vmdk --format VMDK
Manage medium properties.
The VBoxManage mediumproperty command enables you to set, retrieve, or delete a medium property.
VBoxManage mediumproperty [ disk | dvd | floppy ] set < uuid | filename > <property-name> <property-value>
The VBoxManage mediumproperty set command enables you to set a medium property.
-
disk | dvd | floppy Specifies the type of medium. Valid values are
disk(hard drive),dvd, orfloppy.uuid|filenameSpecifies the Universally Unique Identifier (UUID) or absolute path name of the medium or image.
-
property-name Specifies the name of the property.
-
property-value Specifies the value of the specified property.
VBoxManage mediumproperty [ disk | dvd | floppy ] get < uuid | filename > <property-name>
The VBoxManage mediumproperty get command enables you to retrieve the value of a medium property.
-
disk | dvd | floppy Specifies the type of medium. Valid values are
disk(hard drive),dvd, orfloppy.uuid|filenameSpecifies the Universally Unique Identifier (UUID) or absolute path name of the medium or image.
-
property-name Specifies the name of the property.
VBoxManage mediumproperty [ disk | dvd | floppy ] delete < uuid | filename > <property-name>
The VBoxManage mediumproperty delete command enables you to delete a medium property.
-
disk | dvd | floppy Specifies the type of medium. Valid values are
disk(hard drive),dvd, orfloppy.uuid|filenameSpecifies the Universally Unique Identifier (UUID) or absolute path name of the medium or image.
-
property-name Specifies the name of the property.
Manage a DEK-encrypted medium or image.
The VBoxManage encryptmedium command enables you to create and manage a DEK-encrypted medium or image. You can encrypt an image, decrypt an image, and change the encryption password of an image. See Section 9.29.2, “Encrypting Disk Images”.
uuid|filenameSpecifies the Universally Unique Identifier (UUID) or the absolute path name of the medium or image to encrypt.
-
--newpassword=password Specifies the new encryption password.
passwordis either the absolute path name of a password file on the host operating system or-, which prompts you for the password.You must use the
--newpasswordidoption with this--newpasswordoption.-
--oldpassword=password Specifies the original encryption password.
passwordis either the absolute path name of a password file on the host operating system or-, which prompts you for the original password.This option enables you to gain access to an encrypted medium or image to do the following:
Decrypt an encrypted image by using this option by itself.
Change the password of the encrypted image by using the
--newpasswordoption.Change the encryption cipher of the image by using the
--cipheroption.
-
--cipher=cipher-ID Specifies the cipher to use for encryption. Valid values are
AES-XTS128-PLAIN64orAES-XTS256-PLAIN64.This option enables you to set up or change encryption on the medium or image.
-
--newpasswordid=password-ID Specifies a new password identifier that is used for correct identification when supplying multiple passwords during VM startup.
If you use the same password and password identifier when encrypting multiple images, you need to supply the password only one time during VM startup.
The following example shows how to encrypt the
ol7u4-1.vdi image by using the
AES-XTS128-PLAIN64 cipher, specifying a
password identifier of 1001, and using the
$HOME/pwfile password file:
$ VBoxManage encryptmedium "$HOME/VirtualBox VMs/ol7u4/ol7u4-1.vdi" \
  --cipher="AES-XTS128-PLAIN64" --newpasswordid="1001" --newpassword=$HOME/pwfile
The following example shows how to decrypt an encrypted image
called ol7u4-2.vdi:
$ VBoxManage encryptmedium "$HOME/VirtualBox VMs/ol7u4/ol7u4-2.vdi" \
  --oldpassword=-
  Password: original-password
The following example shows how to change the password for an
encrypted image called ol7u4-3.vdi. The
command reads the original password from the
$HOME/pwfile.orig file, reads the new
password from the $HOME/pwfile file, and
assigns a password identifier of 1001.
$ VBoxManage encryptmedium "$HOME/VirtualBox VMs/ol7u4/ol7u4-3.vdi" \
  --oldpassword=$HOME/pwfile.orig --newpassword=$HOME/pwfile --newpasswordid="1001"
Check encryption password on a DEK-encrypted medium or a disk image.
The VBoxManage checkmediumpwd command checks the current encryption password on a DEK-encrypted medium or a disk image. See Section 9.29.2, “Encrypting Disk Images”.
The command response indicates if the specified password is correct.
uuid|filenameSpecifies the Universally Unique Identifier (UUID) or the absolute path name of the medium or image.
-
password-file Specifies the password to check. The password can be the absolute path name of a password file on the host OS or the dash character (
-) to prompt you for the password on the command line.
The following example checks the encryption password for the
ol7u4-1.vdi disk image. The password
is contained in a file called pwfile.
The command returns a message indicating that the specified password is correct.
$ VBoxManage checkmediumpwd "$HOME/VirtualBox VMs/ol7u4/ol7u4-1.vdi" /home/user/pwfile
  The given password is correct
Convert a raw disk image to a virtual disk image.
The VBoxManage convertfromraw command enables you to convert a raw disk image to an Oracle VM VirtualBox virtual disk image (VDI).
Note
For compatibility with earlier versions of Oracle VM VirtualBox, you can use the VBoxManage convertdd command instead of the VBoxManage convertfromraw command.
VBoxManage convertfromraw <inputfile> <outputfile> [--format= VDI | VMDK | VHD ] [--uuid=uuid] [--variant=Standard,Fixed,Split2G,Stream,ESX]
The VBoxManage convertfromraw command converts the specified raw disk image input file to an Oracle VM VirtualBox VDI file.
-
inputfile Specifies the name of the raw disk image file to convert.
-
outputfile Specifies the name of the file in which to write the VDI output.
-
--format=VDI | VMDK | VHD Specifies the format of the disk image to create. Valid values are
VDI,VMDK, andVHD. The default format isVDI.-
--uuid=uuid Specifies the Universally Unique Identifier (UUID) of the output file.
-
--variant=Standard,Fixed,Split2G,Stream,ESX Specifies any required file format variants for the output file. This is a comma-separated list of variant values. Following are the valid values:
Standardis the default disk image type, which has a dynamically allocated file size.Fixeduses a disk image that has a fixed file size.Split2Gindicates that the disk image is split into 2GB segments. This value is for VMDK only.Streamoptimizes the disk image for downloading. This value is for VMDK only.ESXis used for some VMWare products. This value is for VMDK only.
Note that not all variant combinations are valid. Specifying incompatible variant values in the list will produce an error message.
VBoxManage convertfromraw stdin <outputfile> <bytes> [--format= VDI | VMDK | VHD ] [--uuid=uuid] [--variant=Standard,Fixed,Split2G,Stream,ESX]
The VBoxManage convertfromraw stdin command reads the content of the disk image from standard input. Consider using this form of the command in a pipe sequence.
-
outputfile Specifies the name of the file in which to write the disk image output.
-
bytes Specifies the capacity of the targe image name. Needs to be given explicitly, because generally pipes do not support querying the overall size of the data stream.
-
--format=VDI | VMDK | VHD Specifies the format of the disk image to create. Valid values are
VDI,VMDK, andVHD. The default format isVDI.-
--uuid=uuid Specifies the UUID of the output file.
-
--variant=Standard,Fixed,Split2G,Stream,ESX Specifies any required file format variants for the output file. This is a comma-separated list of variant values. Following are the valid values:
Standardis the default disk image type, which has a dynamically allocated file size.Fixeduses a disk image that has a fixed file size.Split2Gindicates that the disk image is split into 2GB segments. This value is for VMDK only.Streamoptimizes the disk image for downloading. This value is for VMDK only.ESXis used for some VMWare products. This value is for VMDK only.
Note that not all variant combinations are valid. Specifying incompatible variant values in the list will produce an error message.
The following command converts the raw disk image input file
disk01.raw. The output file is a VDI disk
image called disk02.vdi.
$ VBoxManage convertfromraw disk01.raw disk02.vdi
The following command converts the raw disk image input file
disk01.raw. The output file is a VMDK disk
image called disk02.vmdk.
$ VBoxManage convertfromraw disk01.raw disk02.vmdk --format VMDK
The following command reads from disk /dev/sda
using a pipe and therefore needs the exact disk size in bytes as an
additional parameter, which is assumed to be 10737418240.
The output file is a VDI disk image called disk.vdi.
$ dd if=/dev/sda bs=512 | VBoxManage convertfromraw stdin disk.vdi 10737418240
Medium content access.
VBoxManage mediumio < --disk=uuid|filename | --dvd=uuid|filename | --floppy=uuid|filename > [--password-file=-|filename] formatfat [--quick]
VBoxManage mediumio < --disk=uuid|filename | --dvd=uuid|filename | --floppy=uuid|filename > [--password-file=-|filename] cat [--hex] [--offset=byte-offset] [--size=bytes] [--output=-|filename]
The subcommands of mediumio all operate on a medium which need to be specified, optionally with an encryption password. The following common options can be placed before or after the sub-command:
- --disk=
uuid|filename Either the UUID or filename of a harddisk image, e.g. VDI, VMDK, VHD, ++.
- --dvd=
uuid|filename Either the UUID or filename of a DVD image, e.g. ISO, DMG, CUE.
- --floppy=
uuid|filename Either the UUID or filename of a floppy image, e.g. IMG.
- --password-file=
-|filename The name of a file containing the medium encryption password. If
-is specified, the password will be read from stdin.
VBoxManage mediumio < --disk=uuid|filename | --dvd=uuid|filename | --floppy=uuid|filename > [--password-file=-|filename] cat [--hex] [--offset=byte-offset] [--size=bytes] [--output=-|filename]
Dumps the medium content to stdout or the specified file.
-
--hex Dump as hex bytes.
-
--offset The byte offset in the medium to start.
-
--size The number of bytes to dump.
-
--output The output filename. As usual
-is take to mean stdout.
VBoxManage mediumio < --disk=uuid|filename | --dvd=uuid|filename | --floppy=uuid|filename > [--password-file=-|filename] stream [--format=image-format] [--variant=image-variant] [--output=-|filename]
Converts the medium to a streamable format and dumps it to the given output.
-
--format The format of the destination image.
-
--variant The medium variant for the destination.
-
--output The output filename. As usual
-is take to mean stdout.
Set a keyword value that is associated with a virtual machine or configuration.
The VBoxManage setextradata command enables you to set a keyword value that is associated with a virtual machine (VM) or with an Oracle VM VirtualBox configuration.
-
global Sets information about the configuration rather than a VM.
uuid|vmnameSpecifies the Universally Unique Identifier (UUID) or name of the VM.
-
keyword Specifies the keyword for which to set its value.
-
value Specifies the keyword value. Specifying no value removes the keyword.
View keyword values that are associated with a virtual machine or configuration.
The VBoxManage getextradata command enables you to retrieve keyword data that is associated with a virtual machine (VM) or with an Oracle VM VirtualBox configuration.
-
global Specifies to retrieve information about the configuration rather than a VM.
uuid|vmnameSpecifies the Universally Unique Identifier (UUID) or name of the VM.
-
enumerate Shows all keyword values for the specified VM or configuration.
-
keyword Specifies the keyword for which to retrieve its value.
The following command retrieves the installdate
keyword value for the Fedora5 VM:
$ VBoxManage getextradata Fedora5 installdate
VirtualBox Command Line Management Interface Version version-number
Copyright (C) 2005-2023 Oracle and/or its affiliates

Value: 2006.01.01
The following command retrieves the information for all keywords
of the OracleLinux7u4 VM:
$ VBoxManage getextradata OracleLinux7u4 enumerate
Key: GUI/LastCloseAction, Value: PowerOff
Key: GUI/LastGuestSizeHint, Value: 1048,696
Key: GUI/LastNormalWindowPosition, Value: 851,286,1048,738
The following command retrieves the information for all keywords in the configuration:
$ VBoxManage getextradata global enumerate
Key: GUI/Details/Elements, Value: general,system,preview,display,storage,audio,network,usb,sharedFolders,description
Key: GUI/DetailsPageBoxes, Value: general,system,preview,display,storage,audio,network,usb,sharedFolders,description
Key: GUI/GroupDefinitions/, Value: m=43349dd8-2aa3-41b8-988f-0e255ce68090,m=9ebcd81e-5231-48ce-a27d-28218757f3fe,m=c690e8b1-93a0-4c95-9cd7-6437fff93251,m=f7c1e10d-3722-4891-887e-07b3c4104946
Key: GUI/HideDescriptionForWizards, Value: NewVM
Key: GUI/LastItemSelected, Value: m=ol7u4
Key: GUI/LastWindowPosition, Value: 951,510,960,520
Key: GUI/RecentFolderCD, Value: C:/Users/user1
Key: GUI/RecentListCD, Value: C:\Users\user1\V1.iso,C:\Users\user1\V2.iso,C:\Users\user1\V3.iso
Key: GUI/SplitterSizes, Value: 318,637
Key: GUI/SuppressMessages, Value: remindAboutMouseIntegration,remindAboutAutoCapture
Key: GUI/Toolbar/MachineTools/Order, Value: Details
Key: GUI/Tools/LastItemsSelected, Value: Welcome,Details
Key: GUI/UpdateCheckCount, Value: 71
Key: GUI/UpdateDate, Value: 1 d, 2019-04-10, stable, 5.2.22
Key: GUI/VirtualMediaManager/Details/Expanded, Value: true
Change global settings.
The VBoxManage setproperty command enables you to change global settings that affect the entire Oracle VM VirtualBox installation. Some of these settings correspond to the settings in the Preferences dialog in the VirtualBox Manager.
The following properties are available:
-
autostartdbpath Specifies the path to the autostart database. Valid values are
null, which disables the autostart database, or the name of the folder that contains the database. See Section 9.21, “Starting Virtual Machines During System Boot”.-
defaultfrontend Specifies the global default VM frontend. Valid values are
default, which specifies the default frontend, or the name of the frontend to use.-
hwvirtexclusive Specifies whether Oracle VM VirtualBox makes exclusive use of the Intel VT-x or AMD-V hardware virtualization extensions of the host system's processor. See Section 10.3, “Hardware Virtualization”.
Valid values are as follows:
onenables Oracle VM VirtualBox to make exclusive use of these extensions. This is the default value.offshares these extensions with other hypervisors that run simultaneously. Note that disabling this setting has negative performance implications.
-
language Specifies the user language used to translate API messages. Valid values are
C, which means no translation or language code in form eitherllorll_CC, wherellis language 2 letters code in lower case andCCis country 2 letter code in upper case.-
logginglevel Specifies the VBoxSVC release logging details. See http://www.virtualbox.org/wiki/VBoxLogging.
-
loghistorycount Specifies the number of rotated VM logs to retain.
-
machinefolder Specifies the default folder in which virtual machine (VM) definitions are stored. Valid values are
default, which specifies the default storage folder, or the name of the folder to use. See Section 10.1, “Where Oracle VM VirtualBox Stores its Files”.-
proxymode Configures the mode for an HTTP proxy server. Valid values are as follows:
-
manual Configure the URL of a HTTP proxy server manually, using the
proxyurlproperty value.-
noproxy Do not use an HTTP proxy server. A direct connection to the Internet is used.
-
system Detect the proxy settings automatically for the host network. This is the default value.
-
-
proxyurl Specifies the URL for an HTTP proxy server when you specify a manual proxy by setting the
proxymodeproperty tomanual.-
vrdeauthlibrary Specifies which library to use when external authentication has been configured for a particular VM. Valid values are
default, which specifies the default library, or the name of the library to use. See Section 7.1.5, “RDP Authentication”.-
vrdeextpack Specifies the library that implements the VirtualBox Remote Desktop Extension (RDE). Valid values are
null, which disables the RDE, or the name of the library to use.-
websrvauthlibrary Specifies which library the web service uses to authenticate users. Valid values are
default, which specifies the default library,null, which disables authentication, or the name of the library to use. For information about the Oracle VM VirtualBox web service, see Chapter 11, Oracle VM VirtualBox Programming Interfaces.
Manage USB filters.
VBoxManage usbfilter add <index,0-N> <--target= < uuid | vmname | global >> <--name=string> <--action=ignore | hold> [--active=yes | no] [--vendorid=XXXX] [--productid=XXXX] [--revision=IIFF] [--manufacturer=string] [--product=string] [--port=hex] [--remote=yes | no] [--serialnumber=string] [--maskedinterfaces=XXXXXXXX]
VBoxManage usbfilter modify <index,0-N> <--target= < uuid | vmname | global >> [--name=string] [--action=ignore | hold] [--active=yes | no] [--vendorid=XXXX | ""] [--productid=XXXX | ""] [--revision=IIFF | ""] [--manufacturer=string | ""] [--product=string | ""] [--port=hex] [--remote=yes | no] [--serialnumber=string | ""] [--maskedinterfaces=XXXXXXXX]
The VBoxManage usbfilter command enables you to manage USB filters for a specific virtual machine (VM), or global USB filters that affect the entire Oracle VM VirtualBox configuration.
Global filters are applied before VM-specific filters. This means that you can use a global filter to prevent devices from being captured by any VM.
Global filters are applied in a particular order. Only the first filter that fits a device is applied. For example, the first global filter makes a specific Kingston memory stick device available while the second filter ignores all Kingston devices. The result of applying these filters is that the specific Kingston memory stick is made available to any machine that has the appropriate filter, but no other Kingston devices are made available.
- index,0-
N Specifies a single integer that indicates the position of the filter in the list. Zero (
0) represents the first position in the list. If a filter already exists at the specified position, the existing filter and any existing filters that follow are moved down the list. Otherwise, the new filter is appended to the list.-
--action=ignore | hold Specifies whether to permit VMs access to devices that fit the filter description (
hold) or to deny them access (ignore). This option applies only to global filters.-
--active=yes | no Specifies whether the USB filter is active or temporarily disabled. Valid values are
yes, which activates the filter, andno, which disables the filter. The default value isyes.-
--manufacturer=string Specifies a manufacturer ID filter as a string. The default value is an empty string (
"").-
--maskedinterfaces=XXXXXXXX Specifies a masked interface filter that is used to hide one or more USB interfaces from the guest. The value is a bit mask where the set bits correspond to the USB interfaces to hide, or mask off. This feature is supported on Linux host systems only.
-
--name=filter-name Specifies the name of the filter.
-
--port=hex Specifies a hub port number filter as a string. The default value is an empty string (
"").-
--product=string Specifies a product ID filter as a string. The default value is an empty string (
"").-
--productid=XXXX Specifies a product ID filter. The string representation for an exact match has the form
XXXX, whereXis a hexadecimal digit including leading zeroes. The default value is an empty string ("").-
--remote=yes | no Specifies a remote filter that indicates whether the device is physically connected to a remote VRDE client or to a local host system. This option applies to VM filters only. The default value is an empty string (
"").-
--revision=IIFF Specifies a revision ID filter. The string representation for an exact match has the form
IIFF.Iis a decimal digit of the integer part of the revision.Fis a decimal digit of its fractional part that includes leading and trailing zeros. The default value is an empty string ("").To specify a range of revision IDs, ensure that you use the hexadecimal form so that the revision is stored as a 16-bit packed BCD value. For example, the
int:0x0100-0x0199expression matches any revision from 1.0 to 1.99, inclusive.-
--serialnumber=string Specifies a serial number filter as a string. The default value is an empty string (
"").-
--target=uuid|vmname| global Specifies the VM that the filter is attached to. You can specify the Universally Unique Identifier (UUID) or the name of the VM. To apply the filter description to all VMs, specify
global.-
--vendorid=XXXX Specifies a vendor ID filter, which is a string representation of a four-digit hexadecimal number.
Xis the hexadecimal digit including leading zeroes. The default value is an empty string ("").
VBoxManage usbfilter add <index,0-N> <--target= < uuid | vmname | global >> <--name=string> <--action=ignore | hold> [--active=yes | no] [--vendorid=XXXX] [--productid=XXXX] [--revision=IIFF] [--manufacturer=string] [--product=string] [--port=hex] [--remote=yes | no] [--serialnumber=string] [--maskedinterfaces=XXXXXXXX]
Use the VBoxManage usbfilter add command to create a new USB filter.
In addition, specify parameters by which to filter. You can use the VBoxManage list usbhost command to view the parameters for devices that are attached to your system.
VBoxManage usbfilter modify <index,0-N> <--target= < uuid | vmname | global >> [--name=string] [--action=ignore | hold] [--active=yes | no] [--vendorid=XXXX | ""] [--productid=XXXX | ""] [--revision=IIFF | ""] [--manufacturer=string | ""] [--product=string | ""] [--port=hex] [--remote=yes | no] [--serialnumber=string | ""] [--maskedinterfaces=XXXXXXXX]
Use the VBoxManage usbfilter modify command to modify a USB filter. You can use the VBoxManage list usbfilters command to list global filter indexes and the VBoxManage showvminfo command to list indexes for a specific machine.
The following command lists the available USB devices on the host system.
$ VBoxManage list usbhost
The following command adds a USB filter called
filter01 to the ol7 VM.
The filter specifies a Kingston DataTraveler memory stick and is
placed first in the list of USB filters for the VM.
$ VBoxManage usbfilter add 0 --target ol7 --name filter01 --vendorid 0x0930 --productid 0x6545
The following command removes the USB filter that is second in the
list for the ol7 VM.
$ VBoxManage usbfilter remove 1 --target ol7
Add and remove shared folders.
Shared folders enable you to share data between the host system and guests. To use shared folders, you must first install the Oracle VM VirtualBox Guest Additions software on the guest OS.
The shared folder is associated with a share name and the full path name of the folder or directory on the host system. The share name is a unique name within the namespace of the host OS.
VBoxManage sharedfolder add < uuid | vmname > <--name=name> <--hostpath=hostpath> [--readonly] [--transient] [--automount] [--auto-mount-point=path]
The VBoxManage sharedfolder add command creates a shared folder. The folder you specify is on the host computer. When configured, the contents of the folder on the host system can be shared with the guest OS.
uuid|vmnameSpecifies the name or UUID of the guest VM that shares a folder with the host system.
- --name=
name Specifies the name of the share, which is a unique name within the namespace of the host OS.
- --hostpath=
hostpath Specifies the absolute path of the folder or directory on the host OS to share with the guest OS.
- --readonly
Specifies that the share has only read-only access to files at the host path.
By default, shared folders have read-write access to the files at the host path. However on Linux distributions, shared folders are mounted with 770 file permissions with the
rootuser and thevboxsfgroup. By using this option, the file permissions become 700.- --transient
Specifies that the share is transient, which means that it can be added and removed at runtime and does not persist after the VM stops.
- --automount
Specifies that the share is automatically mounted.
- --auto-mount-point=
path Specifies the mount point of the share. This guest OS specific.
For Windows and OS/2 guest this must be an unused drive letter. If left blank (or if the drive letter is already in use), the last unused drive letter is used instead (i.e. searching from
Z:thruA:).For Linux, Solaris and other unix guest, it must be an absolute path like
/mnt/mysharedfolder. If left empty the default location is/media/sf_.sharename
VBoxManage sharedfolder remove < uuid | vmname > <--name=name> [--transient]
The VBoxManage sharedfolder remove command removes a shared folder.
uuid|vmnameSpecifies the name or UUID of the guest VM that shares a folder with the host system.
- --name=
name Specifies the name of the share to remove.
- --transient
Specifies that the share is transient, which means that it can be added and removed at runtime and does not persist after the VM stops.
The following command creates a shared folder called
o7share for the ol7 VM.
The share is mounted automatically when the VM is started.
$ VBoxManage sharedfolder add ol7 --name ol7share --hostpath "/home/user/ol7share" --automount
The following command removes the shared folder called
o7share for the ol7 VM.
$ VBoxManage sharedfolder remove ol7 --name ol7share
Manage virtual machine guest properties.
VBoxManage guestproperty enumerate < uuid | vmname > [--no-timestamp] [--no-flags] [--relative] [--old-format] [patterns...]
The VBoxManage guestproperty command enables
you to set or retrieve the properties of a running virtual machine
(VM). See Section 4.7, “Guest Properties”. Guest properties
are arbitrary name-value string pairs that can be written to and
read from by either the guest or the host. As a result, these
properties can be used as a low-volume communication channel for
strings provided that a guest is running and has the Guest
Additions installed. In addition, the Guest Additions
automatically set and maintain values whose keywords begin with
/VirtualBox/.
VBoxManage guestproperty enumerate < uuid | vmname > [--no-timestamp] [--no-flags] [--relative] [--old-format] [patterns...]
The VBoxManage guestproperty enumerate command lists each guest property and value for the specified VM. Note that the output is limited if the guest's service is not updating the properties, for example because the VM is not running or because the Guest Additions are not installed.
-
--relative Display the timestamp relative to current time.
-
--no-timestamp Do not display the timestamp of the last update.
-
--no-flags Do not display the flags.
-
--old-format Use the output format from VirtualBox 6.1 and earlier.
-
pattern Filters the list of properties based on the specified pattern, which can contain the following wildcard characters:
*(asterisk)Represents any number of characters. For example, the
/VirtualBox*pattern matches all properties that begin with/VirtualBox.?(question mark)Represents a single arbitrary character. For example, the
fo?pattern matches bothfooandfor.|(pipe)Specifies multiple alternative patterns. For example, the
s*|t*pattern matches any property that begins withsort.
VBoxManage guestproperty get < uuid | vmname > <property-name> [--verbose]
The VBoxManage guestproperty get command retrieves the value of the specified property. If the property cannot be found, for example because the guest is not running, the command issues the following message:
No value set!
-
property-name Specifies the name of the property.
-
--verbose Provides the property value, timestamp, and any specified value attributes.
VBoxManage guestproperty set < uuid | vmname > <property-name> [property-value [--flags=flags]]
The VBoxManage guestproperty set command enables you to set a guest property by specifying the property and its value. If you omit the value, the property is deleted.
-
property-name Specifies the name of the property.
-
property-value Specifies the value of the property. If no value is specified, any existing value is removed.
-
--flags=flags Specify the additional attributes of the value. The following attributes can be specified as a comma-separated list:
-
TRANSIENT Removes the value with the VM data when the VM exits.
-
TRANSRESET Removes the value when the VM restarts or exits.
-
RDONLYGUEST Specifies that the value can be changed only by the host and that the guest can read the value.
-
RDONLYHOST Specifies that the value can be changed only by the guest and that the host can read the value.
-
READONLY Specifies that the value cannot be changed.
-
VBoxManage guestproperty wait < uuid | vmname > <patterns> [--timeout=msec] [--fail-on-timeout]
The VBoxManage guestproperty wait command waits for a particular value that is described by the pattern string to change, to be deleted, or to be created.
-
patterns Specifies a pattern that matches the properties on which you want to wait. For information about the pattern wildcards, see the description of the
--patternsoption.-
--timeoutmsec Specifies the number of microseconds to wait.
-
--fail-on-timeout Specifies that the command fails if the timeout is reached.
The following command lists the guest properties and their values
for the win8 VM.
$ VBoxManage guestproperty enumerate win8
The following command creates a guest property called
region for the win8 VM. The
value of the property is set to west.
$ VBoxManage guestproperty set win8 region west
Control a virtual machine from the host system.
VBoxManage guestcontrol < uuid | vmname > run [--arg0=argument 0] [--domain=domainname] [--dos2unix] [--exe=filename] [--ignore-orphaned-processes] [ --no-wait-stderr | --wait-stderr ] [ --no-wait-stdout | --wait-stdout ] [ --passwordfile=password-file | --password=password ] [--profile] [--putenv=var-name=[value]] [--quiet] [--timeout=msec] [--unix2dos] [--unquoted-args] [--username=username] [--verbose] <-- [argument...]>
VBoxManage guestcontrol < uuid | vmname > start [--arg0=argument 0] [--domain=domainname] [--exe=filename] [--ignore-orphaned-processes] [ --passwordfile=password-file | --password=password ] [--profile] [--putenv=var-name=[value]] [--quiet] [--timeout=msec] [--unquoted-args] [--username=username] [--verbose] <-- [argument...]>
VBoxManage guestcontrol < uuid | vmname > copyfrom [--dereference] [--domain=domainname] [ --passwordfile=password-file | --password=password ] [--quiet] [--no-replace] [--recursive] [--target-directory=host-destination-dir] [--update] [--username=username] [--verbose] <guest-source0> guest-source1 [...] <host-destination>
VBoxManage guestcontrol < uuid | vmname > copyto [--dereference] [--domain=domainname] [ --passwordfile=password-file | --password=password ] [--quiet] [--no-replace] [--recursive] [--target-directory=guest-destination-dir] [--update] [--username=username] [--verbose] <host-source0> host-source1 [...]
VBoxManage guestcontrol < uuid | vmname > mkdir [--domain=domainname] [--mode=mode] [--parents] [ --passwordfile=password-file | --password=password ] [--quiet] [--username=username] [--verbose] <guest-directory...>
VBoxManage guestcontrol < uuid | vmname > rmdir [--domain=domainname] [ --passwordfile=password-file | --password=password ] [--quiet] [--recursive] [--username=username] [--verbose] <guest-directory...>
VBoxManage guestcontrol < uuid | vmname > rm [--domain=domainname] [--force] [ --passwordfile=password-file | --password=password ] [--quiet] [--username=username] [--verbose] <guest-directory...>
VBoxManage guestcontrol < uuid | vmname > mv [--domain=domainname] [ --passwordfile=password-file | --password=password ] [--quiet] [--username=username] [--verbose] <source...> <destination-directory>
VBoxManage guestcontrol < uuid | vmname > mktemp [--directory] [--domain=domainname] [--mode=mode] [ --passwordfile=password-file | --password=password ] [--quiet] [--secure] [--tmpdir=directory-name] [--username=username] [--verbose] <template-name>
VBoxManage guestcontrol < uuid | vmname > stat [--domain=domainname] [ --passwordfile=password-file | --password=password ] [--quiet] [--username=username] [--verbose] <filename>
VBoxManage guestcontrol < uuid | vmname > list < all | files | processes | sessions > [--quiet] [--verbose]
VBoxManage guestcontrol < uuid | vmname > closeprocess [ --session-id=ID | --session-name=name-or-pattern ] [--quiet] [--verbose] <PID...>
VBoxManage guestcontrol < uuid | vmname > closesession [ --all | --session-id=ID | --session-name=name-or-pattern ] [--quiet] [--verbose]
VBoxManage guestcontrol < uuid | vmname > updatega [--quiet] [--verbose] [--source=guest-additions.ISO] [--wait-start] [-- [argument...]]
The VBoxManage guestcontrol command enables you to control a guest (VM) from the host system. See Section 4.9, “Guest Control of Applications”.
The following options can be used by any of the VBoxManage guestcontrol subcommands:
uuid|vmnameSpecifies the Universally Unique Identifier (UUID) or name of the VM.
-
--quiet Specifies that the command produce quieter output.
The short form of this option is
-q.-
--verbose Specifies that the command produce more detailed output.
The short form of this option is
-v.
Some of the VBoxManage guestcontrol subcommands require that you provide guest credentials for authentication. The subcommands are: copyfrom, copyto, mkdir, mktemp, mv, rmdir, rm, run, start, and stat.
While you cannot perform anonymous executions, a user account password is optional and depends on the guest's OS security policy. If a user account does not have an associated password, specify an empty password. On OSes such as Windows, you might need to adjust the security policy to permit user accounts with an empty password. In additional, global domain rules might apply and therefore cannot be changed.
The following options are used for authentication on the guest VM:
-
--domain=domainname Specifies the user domain for Windows guest VMs.
-
--password=password Specifies the password for the specified user. If you do not specify a password on the command line or if the password file is empty, the specified user needs to have an empty password.
-
--passwordfile=filename Specifies the absolute path to a file on the guest OS that contains the password for the specified user. If the password file is empty or if you do not specify a password on the command line, the specified user needs to have an empty password.
-
--username=username Specifies an existing user on the guest OS that runs the process. If unspecified, the host user runs the process.
By default, you can run up to five guest processes simultaneously. If a new guest process starts and would exceed this limit, the oldest not-running guest process is discarded to run the new process. You cannot retrieve output from a discarded guest process. If all five guest processes are active and running, attempting to start a new guest process fails.
You can modify the guest process execution limit in two ways:
Use the VBoxManage setproperty command to update the
/VirtualBox/GuestAdd/VBoxService/--control-procs-max-keptguest property value.Use the VBoxService command and specify the
--control-procs-max-kept=option.value
After you change the limit, you must restart the guest OS.
You can serve an unlimited number guest processes by specifing a
value of 0, however this action is not
recommended.
VBoxManage guestcontrol < uuid | vmname > run [--arg0=argument 0] [--domain=domainname] [--dos2unix] [--exe=filename] [--ignore-orphaned-processes] [ --no-wait-stderr | --wait-stderr ] [ --no-wait-stdout | --wait-stdout ] [ --passwordfile=password-file | --password=password ] [--profile] [--putenv=var-name=[value]] [--quiet] [--timeout=msec] [--unix2dos] [--unquoted-args] [--username=username] [--verbose] <-- [argument...]>
The VBoxManage guestcontrol
vmname run command enables
you to execute a program on the guest VM. Standard input,
standard output, and standard error are redirected from the VM
to the host system until the program completes.
Note
The Windows OS imposes certain limitations for graphical applications. See Chapter 14, Known Limitations.
-
--exe=path-to-executable Specifies the absolute path of the executable program to run on the guest VM. For example:
C:\Windows\System32\calc.exe.-
--timeout=msec Specifies the maximum amount of time, in milliseconds, that the program can run. While the program runs, VBoxManage receives its output.
If you do not specify a timeout value, VBoxManage waits indefinitely for the process to end, or for an error to occur.
-
--putenv=NAME=[value] Sets, modifies, and unsets environment variables in the guest VM environment.
When you create a guest process, it runs with the default standard guest OS environment. Use this option to modify environment variables in that default environment.
Use the
--putenv=option to set or modify the environment variable specified byNAME=[value]NAME.Use the
--putenv=option to unset the environment variable specified byNAME=[value]NAME.Ensure that any environment variable name or value that includes spaces is enclosed by quotes.
Specify a
--putenvoption for each environment variable that you want to modify.The short form of this option is
-E.-
--unquoted-args Disables the escaped double quoting of arguments that you pass to the program. For example,
\"fred\".-
--ignore-orphaned-processes Ignores orphaned processes. Not yet implemented.
-
--profile Uses a shell profile to specify the environment to use. Not yet implemented.
-
--no-wait-stdout Does not wait for the guest process to end or receive its exit code and any failure explanation.
-
--wait-stdout Waits for the guest process to end to receive its exit code and any failure explanation. The VBoxManage command receives the standard output of the guest process while the process runs.
-
--no-wait-stderr Does not wait for the guest process to end to receive its exit code, error messages, and flags.
-
--wait-stderr Waits for the guest process to end to receive its exit code, error messages, and flags. The VBoxManage command receives the standard error of the guest process while the process runs.
-
--dos2unix Transform DOS or Windows guest output to UNIX or Linux output. This transformation changes CR + LF line endings to LF. Not yet implemented.
-
--unix2dos Transform UNIX or Linux guest output to DOS or Windows output. This transformation changes LF line endings to CR + LF.
-
--[argument...] Specifies the name of the program and any arguments to pass to the program.
Ensure that any command argument that includes spaces is enclosed by quotes.
VBoxManage guestcontrol < uuid | vmname > start [--arg0=argument 0] [--domain=domainname] [--exe=filename] [--ignore-orphaned-processes] [ --passwordfile=password-file | --password=password ] [--profile] [--putenv=var-name=[value]] [--quiet] [--timeout=msec] [--unquoted-args] [--username=username] [--verbose] <-- [argument...]>
The VBoxManage guestcontrol
vmname start command
enables you to execute a guest program until it completes.
Note
The Windows OS imposes certain limitations for graphical applications. See Chapter 14, Known Limitations.
VBoxManage guestcontrol < uuid | vmname > copyfrom [--dereference] [--domain=domainname] [ --passwordfile=password-file | --password=password ] [--quiet] [--no-replace] [--recursive] [--target-directory=host-destination-dir] [--update] [--username=username] [--verbose] <guest-source0> guest-source1 [...] <host-destination>
The VBoxManage guestcontrol
vmname copyfrom command
enables you to copy a file from the guest VM to the host system.
-
--dereference Enables following of symbolic links on the guest file system.
-
--no-replace Only copies a file if it does not exist on the host yet.
The short form of this option is
-n.-
--recursive Recursively copies files and directories from the specified guest directory to the host.
The short form of this option is
-R.-
--target-directory=host-dst-dir Specifies the absolute path of the destination directory on the host system. For example,
C:\Temp.-
--update Only copies a file if the guest file is newer than on the host.
The short form of this option is
-u.-
guest-source0[guest-source1[...]] Specifies the absolute path of one or more files to copy from the guest VM. For example,
C:\Windows\System32\calc.exe. You can use wildcards to specify multiple files. For example,C:\Windows\System*\*.dll.
VBoxManage guestcontrol < uuid | vmname > copyto [--dereference] [--domain=domainname] [ --passwordfile=password-file | --password=password ] [--quiet] [--no-replace] [--recursive] [--target-directory=guest-destination-dir] [--update] [--username=username] [--verbose] <host-source0> host-source1 [...]
The VBoxManage guestcontrol
vmname copyto command
enables you to copy a file from the host system to the guest VM.
-
--dereference Enables following of symbolic links on the host system.
-
--no-replace Only copies a file if it does not exist on the guest yet.
The short form of this option is
-n.-
--recursive Recursively copies files and directories from the specified host directory to the guest.
The short form of this option is
-R.-
--target-directory=guest-dst-dir Specifies the absolute path of the destination directory on the guest. For example,
/home/myuser/fromhost.-
--update Only copies a file if the host file is newer than on the guest.
The short form of this option is
-u.-
host-source0[host-source1[...]] Specifies the absolute path of a file to copy from the host system. For example,
C:\Windows\System32\calc.exe. You can use wildcards to specify multiple files. For example,C:\Windows\System*\*.dll.
VBoxManage guestcontrol < uuid | vmname > mkdir [--domain=domainname] [--mode=mode] [--parents] [ --passwordfile=password-file | --password=password ] [--quiet] [--username=username] [--verbose] <guest-directory...>
The VBoxManage guestcontrol
vmname mkdir command
enables you to create one or more directories on the guest VM.
Alternate forms of this subcommand are md, createdir, and createdirectory.
-
--parents Creates any of the missing parent directories of the specified directory.
For example, if you attempt to create the
D:\Foo\Bardirectory and theD:\Foodirectory does not exist, using the--parentscreates the missingD:\Foodirectory. However, if you attempt to create theD:\Foo\Barand do not specify the--parentsoption, the command fails.-
--mode=mode Specifies the permission mode to use for the specified directory. If you specify the
--parentsoption, the mode is used for the associated parent directories, as well.modeis a four-digit octal mode such as0755.-
guest-dir[guest-dir...] Specifies an absolute path of one or more directories to create on the guest VM. For example,
D:\Foo\Bar.If all of the associated parent directories do not exist on the guest VM, you must specify the
--parentsoption.You must have sufficient rights on the guest VM to create the specified directory and its parent directories.
VBoxManage guestcontrol < uuid | vmname > rmdir [--domain=domainname] [ --passwordfile=password-file | --password=password ] [--quiet] [--recursive] [--username=username] [--verbose] <guest-directory...>
The VBoxManage guestcontrol
vmname rmdir command
enables you to delete the specified directory from the guest VM.
Alternate forms of this subcommand are removedir and removedirectory.
-
--recursive Recursively removes directories from the specified from the guest VM.
The short form of this option is
-R.-
guest-dir[guest-dir...] Specifies an absolute path of one or more directories to remove from the guest VM. You can use wildcards to specify the directory names. For example,
D:\Foo\*Bar.You must have sufficient rights on the guest VM to remove the specified directory and its parent directories.
VBoxManage guestcontrol < uuid | vmname > rm [--domain=domainname] [--force] [ --passwordfile=password-file | --password=password ] [--quiet] [--username=username] [--verbose] <guest-directory...>
The VBoxManage guestcontrol
vmname rm command enables
you to delete the specified files from the guest VM.
The alternate form of this subcommand is removefile.
-
--force Forces the operation and overrides any confirmation requests.
The short form of this option is
-f.-
guest-file[guest-file...] Specifies an absolute path of one or more file to remove from the guest VM. You can use wildcards to specify the file names. For example,
D:\Foo\Bar\text*.txt.You must have sufficient rights on the guest VM to remove the specified file.
VBoxManage guestcontrol < uuid | vmname > mv [--domain=domainname] [ --passwordfile=password-file | --password=password ] [--quiet] [--username=username] [--verbose] <source...> <destination-directory>
The VBoxManage guestcontrol
vmname mv command enables
you to rename files and directories on the guest VM.
Alternate forms of this subcommand are move, ren, and rename.
-
guest-source[guest-source...] Specifies an absolute path of a file or a single directory to move or rename on the guest VM. You can use wildcards to specify the file names.
You must have sufficient rights on the guest VM to access the specified file or directory.
-
dest Specifies the absolute path of the renamed file or directory, or the destination directory to which to move the files. If you move only one file,
destcan be a file or a directory, otherwisedestmust be a directory.You must have sufficient rights on the guest VM to access the destination file or directory.
VBoxManage guestcontrol < uuid | vmname > mktemp [--directory] [--domain=domainname] [--mode=mode] [ --passwordfile=password-file | --password=password ] [--quiet] [--secure] [--tmpdir=directory-name] [--username=username] [--verbose] <template-name>
The VBoxManage guestcontrol
vmname mktemp command
enables you to create a temporary file or temporary directory on
the guest VM. You can use this command to assist with the
subsequent copying of files from the host system to the guest
VM. By default, this command creates the file or directory in
the guest VM's platform-specific temp
directory.
Alternate forms of this subcommand are createtemp and createtemporary.
-
--directory Creates a temporary directory that is specified by the
templateoperand.-
--secure Enforces secure file and directory creation by setting the permission mode to
0755. Any operation that cannot be performed securely fails.-
--mode=mode Specifies the permission mode to use for the specified directory.
modeis a four-digit octal mode such as0755.-
--tmpdir=directory Specifies the absolute path of the directory on the guest VM in which to create the specified file or directory. If unspecified,
directoryis the platform-specifictempdirectory.-
template Specifies a template file name for the temporary file, without a directory path. The template file name must contain at least one sequence of three consecutive X characters, or must end in X.
VBoxManage guestcontrol < uuid | vmname > stat [--domain=domainname] [ --passwordfile=password-file | --password=password ] [--quiet] [--username=username] [--verbose] <filename>
The VBoxManage guestcontrol
vmname stat command enables
you to show the status of files or file systems on the guest VM.
-
file[file...] Specifies an absolute path of a file or file system on the guest VM. For example,
/home/foo/a.out.You must have sufficient rights on the guest VM to access the specified files or file systems.
VBoxManage guestcontrol < uuid | vmname > list < all | files | processes | sessions > [--quiet] [--verbose]
The VBoxManage guestcontrol
vmname list command enables
you to list guest control configuration and status information.
For example, the output shows open guest sessions, guest
processes, and files.
all|sessions|processes|filesIndicates the type of information to show.
allshows all available data,sessionsshows guest sessions,processesshows processes, andfilesshows files.
VBoxManage guestcontrol < uuid | vmname > closeprocess [ --session-id=ID | --session-name=name-or-pattern ] [--quiet] [--verbose] <PID...>
The VBoxManage guestcontrol
vmname closeprocess command
enables you to terminate a guest process that runs in a guest
session. Specify the process by using a process identifier (PID)
and the session by using the session ID or name.
-
--session-id=ID Specifies the ID of the guest session.
-
--session-name=name|pattern Specifies the name of the guest session. Use a pattern that contains wildcards to specify multiple sessions.
-
PID[PID...] Specifies the list of PIDs of guest processes to terminate.
VBoxManage guestcontrol < uuid | vmname > closesession [ --all | --session-id=ID | --session-name=name-or-pattern ] [--quiet] [--verbose]
The VBoxManage guestcontrol
vmname closesession command
enables you to close a guest session. Specify the guest session
either by session ID or by name.
-
--session-id=ID Specifies the ID of the guest session.
-
--session-name=name|pattern Specifies the name of the guest session. Use a pattern that contains wildcards to specify multiple sessions.
-
--all Closes all guest sessions.
VBoxManage guestcontrol < uuid | vmname > updatega [--quiet] [--verbose] [--source=guest-additions.ISO] [--wait-start] [-- [argument...]]
The VBoxManage guestcontrol
vmname updatega command
enables you to update the Guest Additions software installed in
the specified guest VM.
Alternate forms of this subcommand are updateadditions and updateguestadditions.
-
--source=new-iso-path Specifies the absolute path of the Guest Additions update
.ISOfile on the guest VM.-
--reboot Automatically reboots the guest after a successful Guest Additions update.
-
--timeout=ms Sets the timeout (in ms) to wait for the overall Guest Additions update to complete. By default no timeout is being used.
-
--verify Verifies whether the Guest Additions were updated successfully after a successful installation. A guest reboot is mandatory.
-
--wait-ready Waits for the current Guest Additions being ready to handle the Guest Additions update.
-
--wait-start Starts the VBoxManage update process on the guest VM and then waits for the Guest Additions update to begin before terminating the VBoxManage process.
By default, the VBoxManage command waits for the Guest Additions update to complete before it terminates. Use this option when a running VBoxManage process affects the interaction between the installer and the guest OS.
-
--argument[argument...] Specifies optional command-line arguments to pass to the Guest Additions updater. You might use the
--option to pass the appropriate updater arguments to retrofit features that are not yet installed.Ensure that any command argument that includes spaces is enclosed by quotes.
The VBoxManage guestcontrol
vmname waitrunlevel command
enables you to wait for a guest run level being reached.
-
--timeout=ms Sets the timeout (in ms) to wait for reaching the run level. By default no timeout is being used.
-
system|userland|desktop Specifies the run level to wait for.
The following VBoxManage guestcontrol run
command executes the ls -l /usr command on the
My OL VM Oracle Linux VM as the
user1 user.
$ VBoxManage --nologo guestcontrol "My OL VM" run --exe "/bin/ls" \
--username user1 --passwordfile pw.txt --wait-stdout -- -l /usr
The --exe option specifies the absolute path of
the command to run in the guest VM, /bin/ls.
Use the -- option to pass any arguments that
follow it to the ls command.
Use the --username option to specify the user
name, user1 and use the
--passwordfile option to specify the name of a
file that includes the password for the user1
user, pw.txt.
The --wait-stdout option waits for the
ls guest process to complete before providing
the exit code and the command output. The
--nologo option suppresses the output of the logo
information.
The following VBoxManage guestcontrol run
command executes the ipconfig command on the
My Win VM Windows VM as the
user1 user. Standard input, standard output,
and standard error are redirected from the VM to the host system
until the program completes.
$ VBoxManage --nologo guestcontrol "My Win VM" run \
--exe "c:\\windows\\system32\\ipconfig.exe" \
--username user1 --passwordfile pw.txt --wait-stdout
The --exe specifies the absolute path of command
to run in the guest VM,
c:\windows\system32\ipconfig.exe. The double
backslashes shown in this example are required only on UNIX host
systems.
Use the --username option to specify the user
name, user1 and use the
--passwordfile option to specify the name of a
file that includes the password for the user1
user, pw.txt.
The --wait-stdout option waits for the
ls guest process to complete before providing
the exit code and the command output. The
--nologo option to suppress the output of the
logo information.
The following VBoxManage guestcontrol start
command executes the ls -l /usr command on the
My OL VM Oracle Linux VM until the program
completes.
$ VBoxManage --nologo guestcontrol "My Win VM" start \
--exe "c:\\windows\\system32\\ipconfig.exe" \
--username user1 --passwordfile pw.txt
The following VBoxManage guestcontrol run
command executes a /usr/bin/busybox -l /usr
command on the My OL VM Oracle Linux VM as the
user1 user, explicitly using ls
as argument 0.
$ VBoxManage --nologo guestcontrol "My OL VM" run --exe "/usr/bin/busybox" \
--username user1 --passwordfile pw.txt --wait-stdout --arg0 ls -- -l /usr
The --exe option specifies the absolute path of
the command to run in the guest VM, /usr/bin/busybox.
Use the -- option to pass any arguments that
follow it to the busybox command.
Use the --username option to specify the user
name, user1 and use the
--passwordfile option to specify the name of a
file that includes the password for the user1
user, pw.txt.
The --wait-stdout option waits for the
ls guest process to complete before providing
the exit code and the command output. The
--nologo option suppresses the output of the logo
information.
The --arg0 option explicitly specifies the argument 0
to use for the command to execute.
Note
If this option is not set, argument 0 will be taken from
the value of --exe, or, if
--exe is also not set, the first value
passed after --.
Use --verbose to see the effective
command line passed to the guest.
The default behavior of argument 0 is to either use
the value from --exe, or, if not set, the first
value passed after --.
Introspection and guest debugging.
VBoxManage debugvm <uuid|vmname> show [[--human-readable] | [--sh-export] | [--sh-eval] | [--cmd-set]] [settings-item...]
The "debugvm" commands are for experts who want to tinker with the exact details of virtual machine execution. Like the VM debugger described in Section 12.1.4, “The Built-In VM Debugger”, these commands are only useful if you are very familiar with the details of the PC architecture and how to debug software.
VBoxManage debugvm <uuid|vmname> dumpvmcore [--filename=name]
Creates a system dump file of the specified VM. This file will have the standard ELF core format (with custom sections); see Section 12.1.5, “VM Core Format”.
This corresponds to the writecore command in the debugger.
-
--filename=filename The name of the output file.
VBoxManage debugvm <uuid|vmname> info <item> [args...]
Displays info items relating to the VMM, device emulations and associated drivers.
This corresponds to the info command in the debugger.
-
item Name of the info item to display. The special name
helpwill list all the available info items and hints about optional arguments.-
args Optional argument string for the info item handler. Most info items does not take any extra arguments. Arguments not recognized are generally ignored.
VBoxManage debugvm <uuid|vmname> injectnmi
Causes a non-maskable interrupt (NMI) to be injected into the guest. This might be useful for certain debugging scenarios. What happens exactly is dependent on the guest operating system, but an NMI can crash the whole guest operating system. Do not use unless you know what you're doing.
VBoxManage debugvm <uuid|vmname> log [[--release] | [--debug]] [group-settings...]
Changes the group settings for either debug (--debug)
or release (--release) logger of the VM process.
The group-settings are typically strings on the form
em.e.f.l, hm=~0
and -em.f. Basic wildcards are supported for
group matching. The all group is an alias for
all the groups.
Please do keep in mind that the group settings are applied as modifications to the current ones.
This corresponds to the log command in the debugger.
VBoxManage debugvm <uuid|vmname> logdest [[--release] | [--debug]] [destinations...]
Changes the destination settings for either debug (--debug)
or release (--release) logger of the VM process. For details
on the destination format, the best source is src/VBox/Runtime/common/log/log.cpp.
The destinations is one or more mnemonics, optionally
prefixed by "no" to disable them. Some of them take values after a ":" or "="
separator. Multiple mnemonics can be separated by space or given as separate
arguments on the command line.
List of available destination:
-
file[=file], nofile Specifies a log file. If no filename is given, one will be generated based on the current UTC time and VM process name and placed in the current directory of the VM process. Note that this will currently not have any effect if the log file has already been opened.
-
dir=directory, nodir Specifies the output directory for log files. Note that this will currently not have any effect if the log file has already been opened.
-
history=count, nohistory A non-zero value enables log historization, with the value specifying how many old log files to keep.
-
histsize=bytes The max size of a log file before it is historized. Default is infinite.
-
histtime=seconds The max age (in seconds) of a log file before it is historized. Default is infinite.
-
ringbuffer, noringbuffer Only log to the log buffer until an explicit flush (e.g. via an assertion) occurs. This is fast and saves diskspace.
-
stdout, nostdout Write the log content to standard output.
-
stdout, nostdout Write the log content to standard error.
-
debugger, nodebugger Write the log content to the debugger, if supported by the host OS.
-
com, nocom Writes logging to the COM port. This is only applicable for raw-mode and ring-0 logging.
-
user, nouser Custom destination which has no meaning to VM processes..
This corresponds to the logdest command in the debugger.
VBoxManage debugvm <uuid|vmname> logflags [[--release] | [--debug]] [flags...]
Changes the flags on either debug (--debug) or release
(--release) logger of the VM process. Please note that the
modifications are applied onto the existing changes, they are not replacing them.
The flags are a list of flag mnemonics, optionally
prefixed by a "no", "!", "~" or "-" to negate their meaning. The "+" prefix
can be used to undo previous negation or use as a separator, though better use
whitespace or separate arguments for that.
List of log flag mnemonics, with their counter form where applicable (asterisk indicates defaults):
-
enabled*, disabled Enables or disables logging.
-
buffered, unbuffered* Enabling buffering of log output before it hits the destinations.
-
writethrough(/writethru) Whether to open the destination file with writethru buffering settings or not.
-
flush Enables flushing of the output file (to disk) after each log statement.
-
lockcnts Prefix each log line with lock counts for the current thread.
-
cpuid Prefix each log line with the ID of the current CPU.
-
pid Prefix each log line with the current process ID.
-
flagno Prefix each log line with the numberic flags corresponding to the log statement.
-
flag Prefix each log line with the flag mnemonics corresponding to the log statement.
-
groupno Prefix each log line with the log group number for the log statement producing it.
-
group Prefix each log line with the log group name for the log statement producing it.
-
tid Prefix each log line with the current thread identifier.
-
thread Prefix each log line with the current thread name.
-
time Prefix each log line with the current UTC wall time.
-
timeprog Prefix each log line with the current monotonic time since the start of the program.
-
msprog Prefix each log line with the current monotonic timestamp value in milliseconds since the start of the program.
-
ts Prefix each log line with the current monotonic timestamp value in nanoseconds.
-
tsc Prefix each log line with the current CPU timestamp counter (TSC) value.
-
rel, abs* Selects the whether
tsandtscprefixes should be displayed as relative to the previous log line or as absolute time.-
hex*, dec Selects the whether the
tsandtscprefixes should be formatted as hexadecimal or decimal.-
custom Custom log prefix, has by default no meaning for VM processes.
-
usecrlf, uself* Output with DOS style (CRLF) or just UNIX style (LF) line endings.
-
overwrite*, append Overwrite the destination file or append to it.
This corresponds to the logflags command in the debugger.
VBoxManage debugvm <uuid|vmname> getregisters [--cpu=id] [reg-set.reg-name...]
Retrieves register values for guest CPUs and emulated devices.
-
reg-set.reg-name One of more registers, each having one of the following forms:
register-set.register-name.sub-field
register-set.register-name
cpu-register-name.sub-field
cpu-register-name
all
The
allform will cause all registers to be shown (no sub-fields). The registers names are case-insensitive.-
--cpu=id Selects the CPU register set when specifying just a CPU register (3rd and 4th form). The default is 0.
VBoxManage debugvm <uuid|vmname> setregisters [--cpu=id] [reg-set.reg-name=value...]
Changes register values for guest CPUs and emulated devices.
-
reg-set.reg-name=value One of more register assignment, each having one of the following forms:
register-set.register-name.sub-field=value
register-set.register-name=value
cpu-register-name.sub-field=value
cpu-register-name=value
The value format should be in the same style as what getregisters displays, with the exception that both octal and decimal can be used instead of hexadecimal.
-
--cpu=id Selects the CPU register set when specifying just a CPU register (3rd and 4th form). The default is 0.
VBoxManage debugvm <uuid|vmname> show [[--human-readable] | [--sh-export] | [--sh-eval] | [--cmd-set]] [settings-item...]
Shows logging settings for the VM.
-
--human-readable Selects human readable output.
-
--sh-export Selects output format as bourne shell style export commands.
-
--sh-eval Selects output format as bourne shell style eval command input.
-
--cmd-set Selects output format as DOS style SET commands.
-
settings-item What to display. One or more of the following:
logdbg-settings - debug log settings.
logrel-settings - release log settings.
log-settings - alias for both debug and release log settings.
VBoxManage debugvm <uuid|vmname> stack [--cpu=id]
Unwinds the guest CPU stacks to the best of our ability. It is recommended to first run the osdetect command, as this gives both symbols and perhaps unwind information.
-
--cpu=id Selects a single guest CPU to display the stack for. The default is all CPUs.
VBoxManage debugvm <uuid|vmname> statistics [--reset] [--descriptions] [--pattern=pattern]
Displays or resets VMM statistics.
Retrieves register values for guest CPUs and emulated devices.
-
--pattern=pattern DOS/NT-style wildcards patterns for selecting statistics. Multiple patterns can be specified by using the '|' (pipe) character as separator.
-
--reset Select reset instead of display mode.
VBoxManage debugvm <uuid|vmname> guestsample [--filename=filename] [--sample-interval-us=interval] [--sample-time-us=time]
Creates a sample report of the guest activity.
Retrieves the filename to dump the report to.
-
--filename=filename The filename to dump the sample report to.
-
--sample-interval-us=interval The interval in microseconds between guest samples.
-
--sample-time-us=time The amount of microseconds to take guest samples.
Monitor system resource usage.
VBoxManage metrics collect [--detach] [--list] [--period=seconds] [--samples=count] [ * | host | vmname [metric-list] ]
The VBoxManage metrics command enables you to
monitor system resource usage for the host system and for virtual
machines (VMs). For example, you can monitor particular metrics,
such as the percentage of time CPUs spend executing in user mode
(CPU/Load/User) over a specified sampling
period.
While it runs, the VBoxSVC process collects and saves the specified metric data internally. The VBoxSVC process runs until shortly after you close all VMs and frontends. Use the VBoxManage metrics query command to retrieve data at any time.
By default, metrics are not collected unless you run the VBoxManage metrics setup command to specify a sampling interval in seconds and the number of metrics to save.
Note that you can enable metric collection only for started VMs. Collected data and collection settings for a VM are discarded when the VM shuts down.
The host and VMs have different sets of associated metrics, which you can view by running the VBoxManage metrics list command.
Each metric is represented as a string that is composed of a category and a metric. Optionally, the metric string can include any of the following: a submetric, a sub-submetric, and an aggregate. The metric string has the following format:
category/metric[/submetric[/sub-submetric]][:aggregate]
categoryis the resource type, such asCPU,RAM,FS,Net.metricis a measurement type that is associated with the resource category. For example, theLoadandMHzmetrics are associated with theCPUresource category.submetricis an optional measurement type that is associated with the metric. For example, theUser,Kernel, andIdlesubmetrics are associated with theLoadmetric.sub-submetricis an optional measurement type that is associated with the submetric. For example, theRxandTxsub-submetrics are associated with theRatesubmetric of theNetresource category. The associated metric is the network interface.aggregateis an optional function to provide minimum, maximum, and average measurements for a resource category. For example, theRAM/Usage/Free:minmetric represents the minimum amount of available memory found in all saved data on the host system.
By default, the VBoxManage metrics commands operate on the host system and all VMs, and report on all metrics. You can optionally limit these commands to operate on the host system or on a particular VM, and report on a list of one or more metrics.
*|host|vmnameSpecifies the component on which to operate. By default, this command operates on the host system and all running VMs.
If you specify
host, the VBoxManage metrics command operates on the host system only. If you specify an asterisk (*), the command operates on all VMs. If you specify the name of a VM, the VBoxManage metrics command operates on that VM.-
metric-list Specifies a comma-separated list of one or more metrics.
The form of the metric must include the
categoryandmetricpart of the metric string separated by a slash.Note that the VBoxManage metrics enable and VBoxManage metrics disable commands require that you specify metrics as parameters. The metrics must include only the resource category and metric part, such as
CPU/LoadandRAM/Usage.
VBoxManage metrics collect [--detach] [--list] [--period=seconds] [--samples=count] [ * | host | vmname [metric-list] ]
The VBoxManage metrics collect command collects and outputs data periodically until you stop the process by pressing Ctrl+C.
-
--detach Disables the collection of metric data, so no data is output. Using this option is the same as running the VBoxManage metrics setup command.
-
--list Shows which metrics match the specified filter.
-
--period=seconds Specifies the number of seconds to wait between collecting metric data samples. The default value is 1.
-
--samples=count Specifies the number of metric data samples to save. To view the saved data, use the VBoxManage metrics query command. The default value is 1.
VBoxManage metrics disable [--list] [ * | host | vmname [metric-list] ]
The VBoxManage metrics disable command suspends data collection. This action does not affect the data collection properties or the collected data. Note that specifying a submetric in the metric list does not disable its underlying metrics.
Note that the VBoxManage metrics disable
command requires that you specify metrics as parameters. The
metrics must include only the resource category and metric part,
such as CPU/Load and
RAM/Usage.
-
--list Shows whether the command succeeded as expected.
VBoxManage metrics enable [--list] [ * | host | vmname [metric-list] ]
The VBoxManage metrics enable command resumes data collection after it has been suspended by using the VBoxManage metrics disable command. Note that specifying a submetric in the metric list does not enable its underlying metrics.
Unlike the VBoxManage metrics setup command, the VBoxManage metrics enable command does not discard previously collected samples for the specified set of objects and metrics.
Note that the VBoxManage metrics enable
command requires that you specify metrics as parameters. The
metrics must include only the resource category and metric part,
such as CPU/Load and
RAM/Usage.
-
--list Shows whether the command succeeded as expected.
VBoxManage metrics query [ * | host | vmname [metric-list] ]
The VBoxManage metrics query command retrieves and shows the saved metric data.
Note that the VBoxManage metrics query command does not remove or flush saved data but older samples are replaced by newer samples over time.
VBoxManage metrics setup [--list] [--period seconds] [--samples count] [ * | host | vmname [metric-list] ]
The VBoxManage metrics setup command configures metric-gathering properties.
Note that this command discards any previously collected samples for the specified set of objects and metrics. To enable or disable metrics collection without discarding the data, use the VBoxManage metrics enable command or the VBoxManage metrics disable command, respectively.
-
--list Shows which metrics have been modified as a result of the command execution.
-
--period=seconds Specifies the number of seconds to wait between collecting metric data samples. The default value is 1.
-
--samples=count Specifies the number of metric data samples to save. To view the saved data, use the VBoxManage metrics query command. The default value is 1.
The following example command enables the collection of host
processor and memory usage metrics every second. The
--samples option saves the five latest samples.
$ VBoxManage metrics setup --period 1 --samples 5 host CPU/Load,RAM/Usage
The following command lists the metrics that are available to the host system and VMs:
$ VBoxManage metrics list
Note that the host system and VMs have different sets of metrics.
The following example shows how to query metric data about the CPU
time spent in user and kernel modes for the
test VM:
$ VBoxManage metrics query test CPU/Load/User,CPU/Load/Kernel
Create, modify, and manage a NAT network.
VBoxManage natnetwork add [ --disable | --enable ] <--netname=name> <--network=network> [--dhcp=on|off] [--ipv6=on|off] [--loopback-4=rule] [--loopback-6=rule] [--port-forward-4=rule] [--port-forward-6=rule]
VBoxManage natnetwork modify [--dhcp=on|off] [ --disable | --enable ] <--netname=name> <--network=network> [--ipv6=on|off] [--loopback-4=rule] [--loopback-6=rule] [--port-forward-4=rule] [--port-forward-6=rule]
The VBoxManage natnetwork command enables you to create, modify and manage a NAT network.
NAT networks use the Network Address Translation (NAT) service. The service groups systems into a network and prevents external systems from directly accessing the systems in the network. The service also enables the systems in the network to communicate with each other and with external systems by means of TCP and UDP over IPv4 and IPv6.
A NAT service is attached to an internal network. For a VM to use the NAT service, you must attach the VM to the internal network. Specify the name of the internal network when you create the NAT service. Note that the internal network is created if it does not already exist.
VBoxManage natnetwork add [ --disable | --enable ] <--netname=name> <--network=network> [--dhcp=on|off] [--ipv6=on|off] [--loopback-4=rule] [--loopback-6=rule] [--port-forward-4=rule] [--port-forward-6=rule]
The VBoxManage natnetwork add command creates a new internal network interface, and adds a NAT network service. You must use this command before you can attach the VM to the NAT network.
-
--disable Disables the NAT network service.
-
--enable Enables the NAT network service.
-
--netname=name Specifies the name of the new internal network interface on the host OS.
-
--network Specifies the static or DHCP network address and mask of the NAT service interface. By default, this value specifies the static network address.
-
--dhcp Enables or disables the DHCP server that you specify by using the
--netnameoption.-
--ipv6 Enables or disables IPv6. By default, IPv6 is disabled and IPv4 is enabled.
-
--loopback-4=rule Enables an IPv4 loopback interface by using the specified rule.
-
--loopback-6=rule Enables an IPv6 loopback interface by using the specified rule.
-
--port-forward-4=rule Enables IPv4 port forwarding by using the rule specified by
rule.-
--port-forward-6=rule Enables IPv6 port forwarding by using the rule specified by
rule.
VBoxManage natnetwork modify [--dhcp=on|off] [ --disable | --enable ] <--netname=name> <--network=network> [--ipv6=on|off] [--loopback-4=rule] [--loopback-6=rule] [--port-forward-4=rule] [--port-forward-6=rule]
The VBoxManage natnetwork modify command modifies the settings of an existing internal network interface.
-
--disable Disables the NAT network service.
-
--enable Enables the NAT network service.
-
--netname=name Specifies the name of the new internal network interface on the host OS.
-
--network Specifies the static or DHCP network address and mask of the NAT service interface. By default, this value specifies the static network address.
-
--dhcp Enables or disables the DHCP server that you specify by using the
--netnameoption.-
--ipv6 Enables or disables IPv6. By default, IPv6 is disabled and IPv4 is enabled.
-
--loopback-4=rule Enables an IPv4 loopback interface by using the specified rule.
-
--loopback-6=rule Enables an IPv6 loopback interface by using the specified rule.
-
--port-forward-4=rule Enables IPv4 port forwarding by using the rule specified by
rule.-
--port-forward-6=rule Enables IPv6 port forwarding by using the rule specified by
rule.
The following command shows how to create a NAT network for the
natnet1 internal network that uses the
192.168.15.0/24 network address and mask of the
NAT service interface. In this static configuration, the gateway
is assigned the 192.168.15.1 IP address by
default. Note that this IP address is the next address after the
network address that you specify with the
--network option.
$ VBoxManage natnetwork add --netname natnet1 --network "192.168.15.0/24" --enable
The following command shows how to add a DHCP server to the
natnet1 NAT network after creation:
$ VBoxManage natnetwork modify --netname natnet1 --dhcp on
Manage host-only network interfaces.
The VBoxManage hostonlyif command enables you to change the IP configuration of a host-only network interface. For a description of host-only networking, see Section 6.7, “Host-Only Networking”. Each host-only network interface is identified by a name and can either use the internal DHCP server or a manual IP configuration, both IPv4 and IPv6.
VBoxManage hostonlyif ipconfig <ifname> [ --dhcp | --ip=IPv4-address [--netmask=IPv4-netmask] | --ipv6=IPv6-address [--netmasklengthv6=length] ]
The VBoxManage hostonlyif ipconfig command configures a host-only interface.
-
ifname Specifies the name of the network interface. The name is of the form
vboxnetNwhereNis the interface instance.-
--dhcp Uses DHCP for the network interface.
You cannot use this option with the
--ip,--ipv6,--netmask, and--netmasklengthv6options.-
--ip=IPv4-address Specifies the IPv4 IP address for the network interface.
You cannot use this option with the
--dhcp,--ipv6, and--netmasklengthv6options.-
--netmask=IPv4-netmask Specifies the IPv4 netmask of the network interface. The default value is
255.255.255.0.You can use this option only with the
--ipoption.-
--ipv6=IPv6-address Specifies the IPv6 IP address for the network interface.
You cannot use this option with the
--dhcp,--ip, and--netmaskoptions.-
--netmasklengthv6=length Specifies the length of the IPv6 network interface. The default value is
64.You can use this option only with the
--ipv6option.
VBoxManage hostonlyif create
The VBoxManage hostonlyif create command
creates a new host-only network interface on the host operating
system (OS). The network interface name is of the form
vboxnetN where
N is the interface instance. You must
run this command before you can attach virtual machines (VMs) to
the host-only network.
VBoxManage hostonlyif remove <ifname>
The VBoxManage hostonlyif remove command removes the specified host-only network interface from the host OS.
-
ifname Specifies the name of the network interface. The name is of the form
vboxnetNwhereNis the interface instance.
The following command creates a new host-only network interface.
$ VBoxManage hostonlyif create
0%...10%...20%...30%...40%...50%...60%...70%...80%...90%...100%
Interface 'vboxnet2' was successfully created
The following command configures the IPv4 address for the
vboxnet2 host-only network interface.
$ VBoxManage hostonlyif ipconfig vboxnet2 --ip 10.0.2.18
Host Only Network management.
VBoxManage hostonlynet add <--name=netname> [--id=netid] <--netmask=mask> <--lower-ip=address> <--upper-ip=address> [ --enable | --disable ]
VBoxManage hostonlynet modify < --name=netname | --id=netid > [--lower-ip=address] [--upper-ip=address] [--netmask=mask] [ --enable | --disable ]
The hostonlynet commands enable you to control host-only networks.
The subcommands of hostonlynet all operate on an host-only network that can be identified via its name or uuid:
- --name=
netname The host-only network name. You see it as VBoxNetworkName in the output from VBoxManage list hostonlynets.
- --id=
netid The host-only network uuid. If not specified when adding a new network, one will be generated automatically.
VBoxManage hostonlynet add <--name=netname> [--id=netid] <--netmask=mask> <--lower-ip=address> <--upper-ip=address> [ --enable | --disable ]
Adds a new host-only network.
Options configuring the host-only network:
-
--netmask=mask The network mask. Typically 255.255.255.0.
--lower-ip=,address--upper-ip=addressThe IP address range for handing out via DHCP. The upper boundrary is inclusive while the lower one is not, so the upper address will be handed out to a client, while the lower address will be used by the host itself.
--enable, --disableWhether to enable the host-only network or disable it. If not specified, the network will be created in enabled state.
DHCP server management.
VBoxManage dhcpserver add < --network=netname | --interface=ifname > <--server-ip=address> <--netmask=mask> <--lower-ip=address> <--upper-ip=address> < --enable | --disable >
[[--global] | [--set-opt=dhcp-opt-no value...] | [--set-opt-hex=dhcp-opt-no hexstring...] | [--force-opt=dhcp-opt-no...] | [--supress-opt=dhcp-opt-no...] | [--min-lease-time=seconds] | [--default-lease-time=seconds] | [--max-lease-time=seconds]...]
[<--group=name> | [--set-opt=dhcp-opt-no value...] | [--set-opt-hex=dhcp-opt-no hexstring...] | [--force-opt=dhcp-opt-no...] | [--supress-opt=dhcp-opt-no...] | [--incl-mac=address...] | [--excl-mac=address...] | [--incl-mac-wild=pattern...] | [--excl-mac-wild=pattern...] | [--incl-vendor=string...] | [--excl-vendor=string...] | [--incl-vendor-wild=pattern...] | [--excl-vendor-wild=pattern...] | [--incl-user=string...] | [--excl-user=string...] | [--incl-user-wild=pattern...] | [--excl-user-wild=pattern...] | [--min-lease-time=seconds] | [--default-lease-time=seconds] | [--max-lease-time=seconds]...]
[<--vm=name|uuid> | [--nic=1-N] | [--set-opt=dhcp-opt-no value...] | [--set-opt-hex=dhcp-opt-no hexstring...] | [--force-opt=dhcp-opt-no...] | [--supress-opt=dhcp-opt-no...] | [--min-lease-time=seconds] | [--default-lease-time=seconds] | [--max-lease-time=seconds] | [--fixed-address=address]...]
[<--mac-address=address> | [--set-opt=dhcp-opt-no value...] | [--set-opt-hex=dhcp-opt-no hexstring...] | [--force-opt=dhcp-opt-no...] | [--supress-opt=dhcp-opt-no...] | [--min-lease-time=seconds] | [--default-lease-time=seconds] | [--max-lease-time=seconds] | [--fixed-address=address]...]
VBoxManage dhcpserver modify < --network=netname | --interface=ifname > [--server-ip=address] [--lower-ip=address] [--upper-ip=address] [--netmask=mask] [ --enable | --disable ]
[[--global] | [--del-opt=dhcp-opt-no...] | [--set-opt=dhcp-opt-no value...] | [--set-opt-hex=dhcp-opt-no hexstring...] | [--force-opt=dhcp-opt-no...] | [--unforce-opt=dhcp-opt-no...] | [--supress-opt=dhcp-opt-no...] | [--unsupress-opt=dhcp-opt-no...] | [--min-lease-time=seconds] | [--default-lease-time=seconds] | [--max-lease-time=seconds] | [--remove-config]...]
[<--group=name> | [--set-opt=dhcp-opt-no value...] | [--set-opt-hex=dhcp-opt-no hexstring...] | [--force-opt=dhcp-opt-no...] | [--unforce-opt=dhcp-opt-no...] | [--supress-opt=dhcp-opt-no...] | [--unsupress-opt=dhcp-opt-no...] | [--del-mac=address...] | [--incl-mac=address...] | [--excl-mac=address...] | [--del-mac-wild=pattern...] | [--incl-mac-wild=pattern...] | [--excl-mac-wild=pattern...] | [--del-vendor=string...] | [--incl-vendor=string...] | [--excl-vendor=string...] | [--del-vendor-wild=pattern...] | [--incl-vendor-wild=pattern...] | [--excl-vendor-wild=pattern...] | [--del-user=string...] | [--incl-user=string...] | [--excl-user=string...] | [--del-user-wild=pattern...] | [--incl-user-wild=pattern...] | [--excl-user-wild=pattern...] | [--zap-conditions] | [--min-lease-time=seconds] | [--default-lease-time=seconds] | [--max-lease-time=seconds] | [--remove-config]...]
[<--vm=name|uuid> | [--nic=1-N] | [--del-opt=dhcp-opt-no...] | [--set-opt=dhcp-opt-no value...] | [--set-opt-hex=dhcp-opt-no hexstring...] | [--force-opt=dhcp-opt-no...] | [--unforce-opt=dhcp-opt-no...] | [--supress-opt=dhcp-opt-no...] | [--unsupress-opt=dhcp-opt-no...] | [--min-lease-time=seconds] | [--default-lease-time=seconds] | [--max-lease-time=seconds] | [--fixed-address=address] | [--remove-config]...]
[<--mac-address=address> | [--del-opt=dhcp-opt-no...] | [--set-opt=dhcp-opt-no value...] | [--set-opt-hex=dhcp-opt-no hexstring...] | [--force-opt=dhcp-opt-no...] | [--unforce-opt=dhcp-opt-no...] | [--supress-opt=dhcp-opt-no...] | [--unsupress-opt=dhcp-opt-no...] | [--min-lease-time=seconds] | [--default-lease-time=seconds] | [--max-lease-time=seconds] | [--fixed-address=address] | [--remove-config]...]
The dhcpserver commands enable you to control the DHCP server that is built into VirtualBox. You may find this useful when using internal or host-only networking. Theoretically, you can also enable it for a bridged network, but that may cause conflicts with other DHCP servers in your physical network.
The subcommands of dhcpserver all operate on an internal network that can be identified via its name or in the host-only case via the host-only interface name:
- --network=
netname The internal network name. This is the same as you would use as value to the VBoxManage modifyvm --intnet option when configuring a VM for internal networking. Or you see as VBoxNetworkName in the output from VBoxManage list intnets, VBoxManage list natnets, or VBoxManage list hostonlyifs.
- --interface=
ifname The host only interface name. This would be same value as you would use for the VBoxManage modifyvm --host-only-adapter option when configuring a VM to use a host-only network. The value can also be found in the Name row in VBoxManage list hostonlyifs.
VBoxManage dhcpserver add < --network=netname | --interface=ifname > <--server-ip=address> <--netmask=mask> <--lower-ip=address> <--upper-ip=address> < --enable | --disable >
[[--global] | [--set-opt=dhcp-opt-no value...] | [--set-opt-hex=dhcp-opt-no hexstring...] | [--force-opt=dhcp-opt-no...] | [--supress-opt=dhcp-opt-no...] | [--min-lease-time=seconds] | [--default-lease-time=seconds] | [--max-lease-time=seconds]...]
[<--group=name> | [--set-opt=dhcp-opt-no value...] | [--set-opt-hex=dhcp-opt-no hexstring...] | [--force-opt=dhcp-opt-no...] | [--supress-opt=dhcp-opt-no...] | [--incl-mac=address...] | [--excl-mac=address...] | [--incl-mac-wild=pattern...] | [--excl-mac-wild=pattern...] | [--incl-vendor=string...] | [--excl-vendor=string...] | [--incl-vendor-wild=pattern...] | [--excl-vendor-wild=pattern...] | [--incl-user=string...] | [--excl-user=string...] | [--incl-user-wild=pattern...] | [--excl-user-wild=pattern...] | [--min-lease-time=seconds] | [--default-lease-time=seconds] | [--max-lease-time=seconds]...]
[<--vm=name|uuid> | [--nic=1-N] | [--set-opt=dhcp-opt-no value...] | [--set-opt-hex=dhcp-opt-no hexstring...] | [--force-opt=dhcp-opt-no...] | [--supress-opt=dhcp-opt-no...] | [--min-lease-time=seconds] | [--default-lease-time=seconds] | [--max-lease-time=seconds] | [--fixed-address=address]...]
[<--mac-address=address> | [--set-opt=dhcp-opt-no value...] | [--set-opt-hex=dhcp-opt-no hexstring...] | [--force-opt=dhcp-opt-no...] | [--supress-opt=dhcp-opt-no...] | [--min-lease-time=seconds] | [--default-lease-time=seconds] | [--max-lease-time=seconds] | [--fixed-address=address]...]
Adds a new DHCP server to a network or host-only interface.
Options configuring the DHCP server core:
-
--server-ip=address The IP address the DHCP server should use.
--lower-ip=,address--upper-ip=addressThe IP address range for the DHCP server to manage. This should not include the address of the DHCP server itself, but it must be in the same network as it. The boundraries are inclusive, so both the lower and upper addresses will be handed out to clients.
-
--netmask=mask The network mask. Typically 255.255.255.0.
--enable, --disableWhether to enable the DHCP server or disable it. If not specified, the server will be created in disabled state and no IP addresses handed out.
Options selecting the scope:
-
--global Set the configuration scope to global. Any subsequent
--set-optoptions will be apply to all the DHCP clients.-
--vm=vmname|uuid Set the configuration scope to the first NIC of the specified VM. Any subsequent
--set-optoptions will apply just to that interface, nothing else.-
--nic=1-N Set the configuration scope to a NIC other than first of the VM specified the in
--vm.-
--mac-address=address Set the configuration scope to the specified MAC address.
-
--group=name Set the configuration scope to the specified group.
Options configuring the currently selected scope:
-
--set-opt=dhcp-opt-no value Adds the specified DHCP option number (0-255) and value. The value format is option specific (typically human readable) and will be validated by the API and the DHCP server.
-
--set-opt-hex=dhcp-opt-no hexstring Adds the specified DHCP option number (0-255) and value. The option value is specified as a raw series of hex bytes, optionally separated by colons. No validation is performed on these by the API or the DHCP server, they will be pass as specified to the client.
-
--force-opt=dhcp-opt-no Forces the specified DHCP option number (0-255) onto to be sent to the client whether it requested it or not (provided the option is configured with a value at some level).
-
--suppress-opt=dhcp-opt-no Prevents the specified DHCP option number (0-255) from being sent to the client when present in this or a high configuration scope.
-
--min-lease-time=seconds Sets the minimum lease time for the current scope in seconds. Zero means taking the value from a higher option level or use default.
-
--default-lease-time=seconds Sets the default lease time for the current scope in seconds. Zero means taking the value from a higher option level or use default.
-
--max-lease-time=seconds Sets the maximum lease time for the current scope in seconds. Zero means taking the value from a higher option level or use default.
-
--fixed-address=address Fixed address assignment for a
--vmor--mac-addressconfiguration scope. Any emptyaddressturns it back to dynamic address assignment.
Options configuring group membership conditions (excludes overrides includes):
-
--incl-mac=address Include the specific MAC address in the group.
-
--excl-mac=address Exclude the specific MAC address from the group.
-
--incl-mac-wild=pattern Include the specific MAC address pattern in the group.
-
--excl-mac-wild=pattern Exclude the specific MAC address pattern from the group.
-
--incl-vendor=string Include the specific vendor class ID in the group.
-
--excl-vendor=string Exclude the specific vendor class ID from the group.
-
--incl-vendor-wild=pattern Include the specific vendor class ID pattern in the group.
-
--excl-vendor-wild=pattern Exclude the specific vendor class ID pattern from the group.
-
--incl-user=string Include the specific user class ID in the group.
-
--excl-user=string Exclude the specific user class ID from the group.
-
--incl-user-wild=pattern Include the specific user class ID pattern in the group.
-
--excl-user-wild=pattern Exclude the specific user class ID pattern from the group.
VBoxManage dhcpserver modify < --network=netname | --interface=ifname > [--server-ip=address] [--lower-ip=address] [--upper-ip=address] [--netmask=mask] [ --enable | --disable ]
[[--global] | [--del-opt=dhcp-opt-no...] | [--set-opt=dhcp-opt-no value...] | [--set-opt-hex=dhcp-opt-no hexstring...] | [--force-opt=dhcp-opt-no...] | [--unforce-opt=dhcp-opt-no...] | [--supress-opt=dhcp-opt-no...] | [--unsupress-opt=dhcp-opt-no...] | [--min-lease-time=seconds] | [--default-lease-time=seconds] | [--max-lease-time=seconds] | [--remove-config]...]
[<--group=name> | [--set-opt=dhcp-opt-no value...] | [--set-opt-hex=dhcp-opt-no hexstring...] | [--force-opt=dhcp-opt-no...] | [--unforce-opt=dhcp-opt-no...] | [--supress-opt=dhcp-opt-no...] | [--unsupress-opt=dhcp-opt-no...] | [--del-mac=address...] | [--incl-mac=address...] | [--excl-mac=address...] | [--del-mac-wild=pattern...] | [--incl-mac-wild=pattern...] | [--excl-mac-wild=pattern...] | [--del-vendor=string...] | [--incl-vendor=string...] | [--excl-vendor=string...] | [--del-vendor-wild=pattern...] | [--incl-vendor-wild=pattern...] | [--excl-vendor-wild=pattern...] | [--del-user=string...] | [--incl-user=string...] | [--excl-user=string...] | [--del-user-wild=pattern...] | [--incl-user-wild=pattern...] | [--excl-user-wild=pattern...] | [--zap-conditions] | [--min-lease-time=seconds] | [--default-lease-time=seconds] | [--max-lease-time=seconds] | [--remove-config]...]
[<--vm=name|uuid> | [--nic=1-N] | [--del-opt=dhcp-opt-no...] | [--set-opt=dhcp-opt-no value...] | [--set-opt-hex=dhcp-opt-no hexstring...] | [--force-opt=dhcp-opt-no...] | [--unforce-opt=dhcp-opt-no...] | [--supress-opt=dhcp-opt-no...] | [--unsupress-opt=dhcp-opt-no...] | [--min-lease-time=seconds] | [--default-lease-time=seconds] | [--max-lease-time=seconds] | [--fixed-address=address] | [--remove-config]...]
[<--mac-address=address> | [--del-opt=dhcp-opt-no...] | [--set-opt=dhcp-opt-no value...] | [--set-opt-hex=dhcp-opt-no hexstring...] | [--force-opt=dhcp-opt-no...] | [--unforce-opt=dhcp-opt-no...] | [--supress-opt=dhcp-opt-no...] | [--unsupress-opt=dhcp-opt-no...] | [--min-lease-time=seconds] | [--default-lease-time=seconds] | [--max-lease-time=seconds] | [--fixed-address=address] | [--remove-config]...]
This modifies an existing DHCP server configuration. It takes the same options as the add command with the addition of the following on scope configuration:
-
--del-opt=dhcp-opt-no Counterpart to
--set-optthat will cause the specified DHCP option number (0-255) to be deleted from the server settings. Like with--set-optthe scope of the deletion is governed by the--global,--vm,--mac-addressand--groupoptions.-
--unforce-opt=dhcp-opt-no Removes the specified DHCP option number (0-255) from the forced option list (i.e. the reverse of
--force-opt). Like with--set-optthe scope of the deletion is governed by the--global,--vm,--mac-addressand--groupoptions.-
--unsuppress-opt=dhcp-opt-no Removes the specified DHCP option number (0-255) from the supressed option list (i.e. the reverse of
--suppress-opt). Like with--set-optthe scope of the deletion is governed by the--global,--vm,--mac-addressand--groupoptions.-
--remove-config Removes the configuration currently being scoped. The
--globalscope is not removable. The configuration scope will change to--globalafter this option.
And the addition of these group membership condition options:
-
--del-mac=address Delete the specific MAC address from the group conditions.
-
--del-mac-wild=pattern Delete the specific MAC address pattern from the group conditions.
-
--del-vendor=string Delete the specific vendor class ID from the group conditions.
-
--del-vendor-wild=pattern Delete the specific vendor class ID pattern from the group conditions.
-
--del-user=string Delete the specific user class ID from the group conditions.
-
--del-user-wild=pattern Delete the specific user class ID pattern from the group conditions.
-
--zap-conditions Deletes all the group conditions.
- 1 - SubnetMask
IPv4 netmask. Set to the value of the --netmask option by default.
- 2 - TimeOffset
UTC offset in seconds (32-bit decimal value).
- 3 - Routers
Space separated list of IPv4 router addresses.
- 4 - TimeServers
Space separated list of IPv4 time server (RFC 868) addresses.
- 5 - NameServers
Space separated list of IPv4 name server (IEN 116) addresses.
- 6 - DomainNameServers
Space separated list of IPv4 DNS addresses.
- 7 - LogServers
Space separated list of IPv4 log server addresses.
- 8 - CookieServers
Space separated list of IPv4 cookie server (RFC 865) addresses.
- 9 - LPRServers
Space separated list of IPv4 line printer server (RFC 1179) addresses.
- 10 - ImpressServers
Space separated list of IPv4 imagen impress server addresses.
- 11 - ResourseLocationServers
Space separated list of IPv4 resource location (RFC 887) addresses.
- 12 - HostName
The client name. See RFC 1035 for character limits.
- 13 - BootFileSize
Number of 512 byte blocks making up the boot file (16-bit decimal value).
- 14 - MeritDumpFile
Client core file.
- 15 - DomainName
Domain name for the client.
- 16 - SwapServer
IPv4 address of the swap server that the client should use.
- 17 - RootPath
The path to the root disk the client should use.
- 18 - ExtensionPath
Path to a file containing additional DHCP options (RFC2123).
- 19 - IPForwarding
Whether IP forwarding should be enabled by the client (boolean).
- 20 - OptNonLocalSourceRouting
Whether non-local datagrams should be forwarded by the client (boolean)
- 21 - PolicyFilter
List of IPv4 addresses and masks paris controlling non-local source routing.
- 22 - MaxDgramReassemblySize
The maximum datagram size the client should reassemble (16-bit decimal value).
- 23 - DefaultIPTTL
The default time-to-leave on outgoing (IP) datagrams (8-bit decimal value).
- 24 - PathMTUAgingTimeout
RFC1191 path MTU discovery timeout value in seconds (32-bit decimal value).
- 25 - PathMTUPlateauTable
RFC1191 path MTU discovery size table, sorted in ascending order (list of 16-bit decimal values).
- 26 - InterfaceMTU
The MTU size for the interface (16-bit decimal value).
- 27 - AllSubnetsAreLocal
Indicates whether the MTU size is the same for all subnets (boolean).
- 28 - BroadcastAddress
Broadcast address (RFC1122) for the client to use (IPv4 address).
- 29 - PerformMaskDiscovery
Whether to perform subnet mask discovery via ICMP (boolean).
- 30 - MaskSupplier
Whether to respond to subnet mask requests via ICMP (boolean).
- 31 - PerformRouterDiscovery
Whether to perform router discovery (RFC1256) (boolean).
- 32 - RouterSolicitationAddress
Where to send router solicitation requests (RFC1256) (IPv4 address).
- 33 - StaticRoute
List of network and router address pairs addresses.
- 34 - TrailerEncapsulation
Whether to negotiate the use of trailers for ARP (RTF893) (boolean).
- 35 - ARPCacheTimeout
The timeout in seconds for ARP cache entries (32-bit decimal value).
- 36 - EthernetEncapsulation
Whether to use IEEE 802.3 (RTF1042) rather than of v2 (RFC894) ethernet encapsulation (boolean).
- 37 - TCPDefaultTTL
Default time-to-live for TCP sends (non-zero 8-bit decimal value).
- 38 - TCPKeepaliveInterval
The interface in seconds between TCP keepalive messages (32-bit decimal value).
- 39 - TCPKeepaliveGarbage
Whether to include a byte of garbage in TCP keepalive messages for backward compatibility (boolean).
- 40 - NISDomain
The NIS (Sun Network Information Services) domain name (string).
- 41 - NISServers
Space separated list of IPv4 NIS server addresses.
- 42 - NTPServers
Space separated list of IPv4 NTP (RFC1035) server addresses.
- 43 - VendorSpecificInfo
Vendor specific information. Only accessible using --set-opt-hex.
- 44 - NetBIOSNameServers
Space separated list of IPv4 NetBIOS name server (NBNS) addresses (RFC1001,RFC1002).
- 45 - NetBIOSDatagramServers
Space separated list of IPv4 NetBIOS datagram distribution server (NBDD) addresses (RFC1001,RFC1002).
- 46 - NetBIOSNodeType
NetBIOS node type (RFC1001,RFC1002): 1=B-node, 2=P-node, 4=M-node, and 8=H-node (8-bit decimal value).
- 47 - NetBIOSScope
NetBIOS scope (RFC1001,RFC1002). Only accessible using --set-opt-hex.
- 48 - XWindowsFontServers
Space separated list of IPv4 X windows font server addresses.
- 49 - XWindowsDisplayManager
Space separated list of IPv4 X windows display manager addresses.
- 62 - NetWareIPDomainName
Netware IP domain name (RFC2242) (string).
- 63 - NetWareIPInformation
Netware IP information (RFC2242). Only accessible using --set-opt-hex.
- 64 - NISPlusDomain
The NIS+ domain name (string).
- 65 - NISPlusServers
Space separated list of IPv4 NIS+ server addresses.
- 66 - TFTPServerName
TFTP server name (string).
- 67 - BootfileName
Bootfile name (string).
- 68 - MobileIPHomeAgents
Space separated list of IPv4 mobile IP agent addresses.
- 69 - SMTPServers
Space separated list of IPv4 simple mail transport protocol (SMPT) server addresses.
- 70 - POP3Servers
Space separated list of IPv4 post office protocol 3 (POP3) server addresses.
- 71 - NNTPServers
Space separated list of IPv4 network news transport protocol (NTTP) server addresses.
- 72 - WWWServers
Space separated list of default IPv4 world wide web (WWW) server addresses.
- 73 - FingerServers
Space separated list of default IPv4 finger server addresses.
- 74 - IRCServers
Space separated list of default IPv4 internet relay chat (IRC) server addresses.
- 75 - StreetTalkServers
Space separated list of IPv4 StreetTalk server addresses.
- 76 - STDAServers
Space separated list of IPv4 StreetTalk directory assistance (STDA) server addresses.
- 78 - SLPDirectoryAgent
Addresses of one or more service location protocol (SLP) directory agent, and an indicator of whether their use is mandatory. Only accessible using --set-opt-hex.
- 79 - SLPServiceScope
List of service scopes for the service location protocol (SLP) and whether using the list is mandator. Only accessible using --set-opt-hex.
- 119 - DomainSearch
Domain search list, see RFC3397 and section 4.1.4 in RFC1035 for encoding. Only accessible using --set-opt-hex.
Add and remove USB device sources.
The VBoxManage usbdevsource command adds a USB device source and makes it available to the guests on the host system. You can also use this command to remove the USB device source.
VBoxManage usbdevsource add <source-name> <--backend=backend> <--address=address>
The VBoxManage usbdevsource add command adds a USB device source, which is available to all guests on the host system.
-
source-name Specifies a unique name for the USB device source.
- --address=
address Specifies the address of the USB backend.
- --backend=
backend Specifies the USB proxy service backend to use.
For now only USBIP is supported to specify a remote server using the USB/IP protocol.
Extension package management.
VBoxManage extpack install [--replace] [--accept-license=sha256] <tarball>
Installs a new extension pack on the system. This command will fail if an older
version of the same extension pack is already installed. The
--replace option can be used to uninstall any
old package before the new one is installed.
-
--replace Uninstall existing extension pack version.
-
--accept-license=sha256 Accept the license text with the given SHA-256 hash value.
VBoxManage will display the SHA-256 value when performing a manual installation. The hash can of course be calculated by looking inside the extension pack and using sha256sum or similar on the license file.
-
tarball The file containing the extension pack to be installed.
VBoxManage extpack uninstall [--force] <name>
Uninstalls an extension pack from the system. The subcommand will also succeed
in the case where the specified extension pack is not present on the system.
You can use VBoxManage list extpacks to show
the names of the extension packs which are currently installed.
-
--force Overrides most refusals to uninstall an extension pack
-
name The name of the extension pack to be uninstalled.
How to list extension packs:
$ VBoxManage list extpacks
Extension Packs: 1
Pack no. 0:   Oracle VM VirtualBox Extension Pack
Version:      4.1.12
Revision:     77218
Edition:
Description:  USB 2.0 Host Controller, VirtualBox RDP, PXE ROM with E1000 support.
VRDE Module:  VBoxVRDP
Usable:       true
Why unusable:
How to remove an extension pack:
$ VBoxManage extpack uninstall "Oracle VM VirtualBox Extension Pack"
0%...10%...20%...30%...40%...50%...60%...70%...80%...90%...100%
Successfully uninstalled "Oracle VM VirtualBox Extension Pack".
Checks for a newer version of VirtualBox.
The updatecheck subcommand is used to check if a newer version of VirtualBox is available. The two subcommand options of updatecheck are used for modifying or viewing the settings associated with checking for a newer version of VirtualBox.
VBoxManage updatecheck modify [ --disable | --enable ] [--channel=stable | withbetas | all] [--frequency=days]
Modifies the settings used for specifying when to check for a newer version of VirtualBox.
-
--enable Enable the update check service.
-
--disable Disable the update check service.
-
--channel=stable | withbetas | all The preferred release type used for determining whether a newer version of VirtualBox is available. The default is 'stable'.
-
stable Checks for newer stable releases (maintenance and minor releases within the same major release) of VirtualBox.
-
all Checks for newer stable releases (maintenance and minor releases within the same major release) and major releases of VirtualBox.
-
withbetas Checks for newer stable releases (maintenance and minor releases within the same major release), major releases, and beta releases of VirtualBox.
-
-
--frequency=days Specifies how often in days to check for a newer version of VirtualBox.
-
--proxy-mode=system | manual | none Specifies the proxy mode to use.
-
--proxy-url=<address> Specifies the proxy address to use. Set to empty string to clear proxy address.
List and modify the NVRAM content of a virtual machine.
The "modifynvram" commands are for experts who want to inspect and modify the UEFI variable store of a virtual machine. Any mistakes done here can bring the virtual machine in a non working state.
VBoxManage modifynvram <uuid|vmname> enrollpk [--platform-key=filename] [--owner-uuid=uuid]
Enrolls a custom platform key provided by the user required for UEFI secure boot. The following commands use openssl to generate a new platform key:
$ openssl req -new -x509 -newkey rsa:2048 -keyout PK.key -out PK.crt
$ openssl x509 -in PK.crt -out PK.cer -outform DER
-
--platform-key=filename The platform key provided as a DER encoded X.509 signature.
-
--owner-uuid=uuid The UUID identifying the owner of the platform key.
VBoxManage modifynvram <uuid|vmname> queryvar [--name=name] [--filename=filename]
Queries the content of a given UEFI variable identified by its name.
-
--name=name UEFI variable name to query.
-
--filename=filename Where to store the content of the variable upon success. This is optional, if omitted the content will be dumped to the terminal as a hex dump.
FUSE mount a virtual disk image for Mac OS and Linux hosts.
The vboximg-mount command enables you to make Oracle VM VirtualBox disk images available to a Mac OS or Linux host operating system (OS) for privileged or non-priviliged access. You can mount any version of the disk from its available history of snapshots. Use this command to mount, view, and optionally modify the contents of an Oracle VM VirtualBox virtual disk image, and you can also use this command to view information about registered virtual machines (VMs).
This command uses the Filesystem in Userspace (FUSE) technology to provide raw access to an Oracle VM VirtualBox virtual disk image.
When you use the --image option to specify a base
image identifier, only the base image is mounted. Any related
snapshots are disregarded. Alternatively, if you use the
--image option to specify a snapshot, the state
of the FUSE-mounted virtual disk is synthesized from the implied
chain of snapshots, including the base image.
The vboximg-mount command includes experimental
read-only access to file systems inside a VM disk image. This
feature enables you to extract some files from the VM disk image
without starting the VM and without requiring third-party file
system drivers on the host system. Oracle VM VirtualBox supports the
FAT, NTFS, ext2, ext3,
and ext4 file systems.
The virtual disk is exposed as a device node within a FUSE-based file system that overlays the specified mount point.
The FUSE file system includes a directory that contains a number of files. The file system can also contain a directory that includes a symbolic link that has the same base name (see the basename(1) man page) as the virtual disk base image and points to the location of the virtual disk base image. The directory can be of the following types:
vhddprovides access to the raw disk image data as a flat imagevolprovides access to an individual volume on the specified disk imageIDfsprovides access to a supported file system without requiring a host file system driverID
vboximg-mount <--image=image-UUID> [--guest-filesystem] [-o=FUSE-option[,FUSE-option]] [--root] [--rw] <mountpoint>
Use the vboximg-mount command to mount an Oracle VM VirtualBox virtual disk image on a Mac OS or Linux host system. When mounted, you can view the contents of the disk image or modify the contents of the disk image.
You can use the vboximg-mount command to restrict FUSE-based access to a subsection of the virtual disk.
-
--image=disk-image Specifies the Universally Unique Identifier (UUID), name, or path of the Oracle VM VirtualBox disk image.
The short form of the
--imageoption is-i.-
--guest-filesystem Enables experimental read-only support for guest file systems. When you specify this option, all known file systems are made available to access.
The short form of the
--guest-filesystemoption is-g.-
-o=FUSE-option[,FUSE-option...] Specifies FUSE mount options.
The vboximg-mount command enables you to use the FUSE mount options that are described in the mount.fuse(8) man page.
-
--root Overrides the security measure that restricts file access to the file system owner by also granting file access to the
rootuser.Same as the
-o allow_rootoption. See the-ooption description.This option is incompatible with the
-o allow_otheroption.-
--rw Mounts the specified image as read-write, which is required if you want to modify its contents. By default, images are mounted as read-only.
-
mount-point Specifies the path name of a directory on which to mount the Oracle VM VirtualBox disk image.
vboximg-mount <--list> [--image=image-UUID] [--guest-filesystem] [--verbose] [--vm=vm-UUID] [--wide]
Use the vboximg-mount command to view information about registered VMs or an Oracle VM VirtualBox virtual disk image.
-
--image=disk-image Specifies the UUID, name, or path of the Oracle VM VirtualBox disk image.
The short form of the
--imageoption is-i.-
--guest-filesystem Enables experimental read-only support for guest file systems. When you specify this option, all known file systems are made available to access.
The short form of the
--guest-filesystemoption is-g.-
--list Shows information about the disks that are associated with the registered VMs. If you specify a disk image, this option shows information about the partitions of the specified image.
When you specify the
--verboseoption, the output includes detailed information about the VMs and media, including snapshot images and file paths.The short form of the
--listoption is-l.-
--verbose Shows or logs detailed information.
The short form of the
--verboseoption is-v.-
--vm=vm-UUID Outputs information about the VM that is associated with the specified UUID.
-
--wide Outputs information in a wide format. This output includes the lock state information of running VMs. For VMs that are not running, the state is
created.The wide output uses a tree-like structure in the VM column to show the relationship between a VM base image and its snapshots.
The following example shows how to mount a virtual disk image on the host operating system (OS).
$ mkdir fuse_mount_point
$ vboximg-mount --image=b490e578-08be-4f7d-98e9-4c0ef0952377 fuse_mount_point
$ ls fuse_mount_point
ubu.vdi[32256:2053029880]   vhdd
$ sudo mount fuse_mount_point/vhdd /mnt
The mkdir command creates a mount point called
fuse_mount_point on the host OS. The
vboximg-mount command is then used to mount the
specified disk image on the fuse_mount_point
mount point. The mount includes all snapshots for the disk image.
The ls command shows the contents of
fuse_mount_point. The
mount command is then used to mount the
FUSE-mounted device node, vhdd, on the
/mnt mount point. The vhdd
device node represents the virtual disk image.
The following example shows how to make the known file systems of
the b490e578-08be-4f7d-98e9-4c0ef0952377 disk
image accessible when the image is mounted on the
fuse_mount_point mount point:
$ vboximg-mount --image=b490e578-08be-4f7d-98e9-4c0ef0952377 \
--guest-filesystem fuse_mount_point
The following command outputs detailed information about all registered VMs and their snapshots:
$ vboximg-mount --list --verbose
The following command shows an excerpt of the list output in wide format.
$ vboximg-mount --list --wide

VM  Image                 Size Type State   UUID (hierarchy)
------------------------------------------  ------------------------------------
Proxy                                       0833f5bc-6304-42e1-b799-cdc81c576c60
 |
 +- Proxy.vdi             4.8G VDI  rlock   d5f84afb-0794-4952-ab71-6bbcbee07737
 |  +- <snapshot>        12.3G VDI  rlock     dffc67aa-3023-477f-8033-b27e3daf4f54
 |  +- <snapshot>         8.8G VDI  rlock       3b2755bd-5f2a-4171-98fe-647d510b6274
 |  +- <snapshot>        14.6G VDI  rlock         e2ccdb5f-49e8-4123-8623-c61f363cc5cf
 |  +- <snapshot>         7.4G VDI  wlock           3c1e6794-9091-4be3-9e80-11aba40c2649

------------------------------------------  ------------------------------------
Oracle Linux 7                              5365ab5f-470d-44c0-9863-dad532ee5905
 |
 +- Oracle Linux 7.vdi     7.0G VDI created 96d2e92e-0d4e-46ab-a0f1-008fdbf997e7
 | +- <snapshot>          15.9G VDI created   f9cc866a-9166-42e9-a503-bbfe9b7312e8
 |
 +- kernel.vdi            11.1G VDI created 79a370bd-0c4f-480a-30bb-10cdea68423f
The output shows that the Proxy VM is running the fourth snapshot of the Proxy.vdi virtual disk image. The running state is indicated by the wlock value in the State column.
The Oracle Linux 7 VM is not running. It has two images: Oracle Linux 7.vdi and kernel.vdi. The Oracle Linux 7.vdi image has a snapshot.
The following command shows information about the VM with the specified UUID:
$ vboximg-mount --list --vm=b1d5563b-2a5b-4013-89f1-26c81d6bbfa0
-----------------------------------------------------------------
VM:   ubu
UUID: b1d5563b-2a5b-4013-89f1-26c81d6bbfa0

  Image:   ubu.vdi
  UUID:    b490e578-08be-4f7d-98e9-4c0ef0952377

       Snapshot: 35afe1e0-0a51-44f3-a228-caf172f3306f
       Size:     12.1G

       Snapshot: 874279c1-4425-4282-ada8-a9c07c00bbf9
       Size:     13.6G

  Image:   kernel.vdi
UUID: 79a370bd-6eb7-4dbf-8bc6-d29118f127e0Table of Contents
- 9.1. Automated Guest Logins
- 9.2. Advanced Configuration for Windows Guests
- 9.3. Advanced Configuration for Linux and Oracle Solaris Guests
- 9.4. CPU Hot-Plugging
- 9.5. Webcam Passthrough
- 9.6. Advanced Display Configuration
- 9.7. Advanced Storage Configuration
- 9.8. Fine Tuning the Oracle VM VirtualBox NAT Engine
- 9.8.1. Configuring the Address of a NAT Network Interface
- 9.8.2. Configuring the Boot Server (Next Server) of a NAT Network Interface
- 9.8.3. Tuning TCP/IP Buffers for NAT
- 9.8.4. Binding NAT Sockets to a Specific Interface
- 9.8.5. Enabling DNS Proxy in NAT Mode
- 9.8.6. Using the Host's Resolver as a DNS Proxy in NAT Mode
- 9.8.7. Configuring Aliasing of the NAT Engine
- 9.9. Configuring the BIOS DMI Information
- 9.10. Configuring Custom ACPI Tables
- 9.11. Fine Tuning Timers and Time Synchronization
- 9.12. Installing the Alternate Bridged Networking Driver on Oracle Solaris 11 Hosts
- 9.13. Oracle VM VirtualBox VNIC Templates for VLANs on Oracle Solaris 11 Hosts
- 9.14. Configuring Multiple Host-Only Network Interfaces on Oracle Solaris Hosts
- 9.15. Configuring the Oracle VM VirtualBox CoreDumper on Oracle Solaris Hosts
- 9.16. Oracle VM VirtualBox and Oracle Solaris Kernel Zones
- 9.17. Locking Down VirtualBox Manager
- 9.17.1. Customizing VirtualBox Manager
- 9.17.2. VM Selector Customization
- 9.17.3. Configure VM Selector Menu Entries
- 9.17.4. Configure VM Window Menu Entries
- 9.17.5. Configure VM Window Status Bar Entries
- 9.17.6. Configure VM Window Visual Modes
- 9.17.7. Host Key Customization
- 9.17.8. Action when Terminating the VM
- 9.17.9. Default Action when Terminating the VM
- 9.17.10. Action for Handling a Guru Meditation
- 9.17.11. Configuring Automatic Mouse Capturing
- 9.17.12. Requesting Legacy Full-Screen Mode
- 9.17.13. Removing Certain Modes of Networking From the GUI
- 9.18. Starting the Oracle VM VirtualBox Web Service Automatically
- 9.19. Oracle VM VirtualBox Watchdog
- 9.20. Other Extension Packs
- 9.21. Starting Virtual Machines During System Boot
- 9.22. Encryption of VMs
- 9.23. Oracle VM VirtualBox Expert Storage Management
- 9.24. Handling of Host Power Management Events
- 9.25. Passing Through SSE4.1/SSE4.2 Instructions
- 9.26. Support for Keyboard Indicator Synchronization
- 9.27. Capturing USB Traffic for Selected Devices
- 9.28. Configuring the Heartbeat Service
- 9.29. Encryption of Disk Images
- 9.30. Paravirtualized Debugging
- 9.31. PC Speaker Passthrough
- 9.32. Accessing USB devices Exposed Over the Network with USB/IP
- 9.33. Using Hyper-V with Oracle VM VirtualBox
- 9.34. Nested Virtualization
- 9.35. VBoxSVC running in Windows Session 0
- 9.36. VISO file format / RTIsoMaker
Oracle VM VirtualBox provides Guest Addition modules for Windows, Linux, and Oracle Solaris to enable automated logins on the guest.
When a guest operating system is running in a virtual machine, it might be desirable to perform coordinated and automated logins using credentials passed from the host. Credentials are user name, password, and domain name, where each value might be empty.
Windows provides a modular system login subsystem, called Winlogon, which can be customized and extended by means of so-called GINA (Graphical Identification and Authentication) modules. In Windows Vista and later releases, the GINA modules were replaced with a new mechanism called credential providers. The Oracle VM VirtualBox Guest Additions for Windows come with both, a GINA and a credential provider module, and therefore enable any Windows guest to perform automated logins.
To activate the Oracle VM VirtualBox GINA or credential provider
module, install the Guest Additions using the command line
switch /with_autologon. All the following
manual steps required for installing these modules will be then
done by the installer.
To manually install the Oracle VM VirtualBox GINA module, extract the
Guest Additions as shown in
Section 4.2.1.4, “Manual File Extraction”, and copy the
VBoxGINA.dll file to the Windows
SYSTEM32 directory. In the registry, create
the following key with a value of
VBoxGINA.dll:
HKEY_LOCAL_MACHINE\SOFTWARE\Microsoft\Windows NT\CurrentVersion\Winlogon\GinaDLL
Note
The Oracle VM VirtualBox GINA module is implemented as a wrapper
around the MSGINA.DLL standard Windows
GINA module. As a result, it might not work correctly with
third-party GINA modules.
To manually install the Oracle VM VirtualBox credential provider
module, extract the Guest Additions as shown in
Section 4.2.1.4, “Manual File Extraction” and copy the
VBoxCredProv.dll file to the Windows
SYSTEM32 directory. In the registry, create
the following keys:
HKEY_LOCAL_MACHINE\SOFTWARE\Microsoft\Windows\CurrentVersion\
Authentication\Credential Providers\{275D3BCC-22BB-4948-A7F6-3A3054EBA92B}

HKEY_CLASSES_ROOT\CLSID\{275D3BCC-22BB-4948-A7F6-3A3054EBA92B}

HKEY_CLASSES_ROOT\CLSID\{275D3BCC-22BB-4948-A7F6-3A3054EBA92B}\InprocServer32
All default values, the key named Default,
must be set to VBoxCredProv.
Create the following string and assign it a value of
Apartment.
HKEY_CLASSES_ROOT\CLSID\{275D3BCC-22BB-4948-A7F6-3A3054EBA92B}\InprocServer32\ThreadingModelTo set credentials, use the following command on a running VM:
$ VBoxManage controlvm "Windows XP" setcredentials "John Doe" "secretpassword" "DOMTEST"
While the VM is running, the credentials can be queried by the Oracle VM VirtualBox login modules, GINA or credential provider, using the Oracle VM VirtualBox Guest Additions device driver. When Windows is in logged out mode, the login modules will constantly poll for credentials and if they are present, a login will be attempted. After retrieving the credentials, the login modules will erase them so that the above command will have to be repeated for subsequent logins.
For security reasons, credentials are not stored in any persistent manner and will be lost when the VM is reset. Also, the credentials are write-only. There is no way to retrieve the credentials from the host side. Credentials can be reset from the host side by setting empty values.
Depending on the Windows guest version, the following restrictions apply:
For Windows XP guests. The login subsystem needs to be configured to use the classic login dialog, as the Oracle VM VirtualBox GINA module does not support the Windows XP-style welcome dialog.
Windows Vista, Windows 7, Windows 8, and Windows 10 guests. The login subsystem does not support the so-called Secure Attention Sequence,
Ctrl+Alt+Del. As a result, the guest's group policy settings need to be changed to not use the Secure Attention Sequence. Also, the user name given is only compared to the true user name, not the user friendly name. This means that when you rename a user, you still have to supply the original user name as Windows never renames user accounts internally.Automatic login handling of the built-in Windows Remote Desktop Service, formerly known as Terminal Services, is disabled by default. To enable it, create the following registry key with a
DWORDvalue of1.HKEY_LOCAL_MACHINE\SOFTWARE\Oracle\VirtualBox Guest Additions\AutoLogon
The following command forces Oracle VM VirtualBox to keep the credentials after they were read by the guest and on VM reset:
$ VBoxManage setextradata "Windows XP" VBoxInternal/Devices/VMMDev/0/Config/KeepCredentials 1
Note that this is a potential security risk, as a malicious application running on the guest could request this information using the proper interface.
Oracle VM VirtualBox provides a custom PAM module (Pluggable Authentication Module) which can be used to perform automated guest logins on platforms which support this framework. Virtually all modern Linux and UNIX distributions rely on PAM.
For automated logins on Ubuntu, or Ubuntu-derived, distributions using LightDM as the display manager. See Section 9.1.2.1, “Oracle VM VirtualBox Greeter for Ubuntu/LightDM”.
The pam_vbox.so module itself
does not do an actual verification of the
credentials passed to the guest OS. Instead it relies on other
modules such as pam_unix.so or
pam_unix2.so down in the PAM stack to do
the actual validation using the credentials retrieved by
pam_vbox.so. Therefore
pam_vbox.so has to be on top of the
authentication PAM service list.
Note
The pam_vbox.so module only supports the
auth primitive. Other primitives such as
account, session, or
password are not supported.
The pam_vbox.so module is shipped as part
of the Guest Additions but it is not installed and/or activated
on the guest OS by default. In order to install it, it has to be
copied from
/opt/VBoxGuestAdditions-
to the security modules directory. This is usually
version/other//lib/security/ on 32-bit Linux guests or
/lib64/security/ on 64-bit Linux guests.
Please refer to your guest OS documentation for the correct PAM
module directory.
For example, to use pam_vbox.so with a
Ubuntu Linux guest OS and the GNOME Desktop Manager (GDM) to log
in users automatically with the credentials passed by the host,
configure the guest OS as follows:
Copy the
pam_vbox.somodule to the security modules directory. In this case,/lib/security.Edit the PAM configuration file for GDM, found at
/etc/pam.d/gdm. Add the lineauth requisite pam_vbox.soat the top. Additionally, in most Linux distributions there is a file called/etc/pam.d/common-auth. This file is included in many other services, like the GDM file mentioned above. There you also have to add the lineauth requisite pam_vbox.so.If authentication against the shadow database using
pam_unix.soorpam_unix2.sois desired, the argumenttry_first_passforpam_unix.sooruse_first_passforpam_unix2.sois needed in order to pass the credentials from the Oracle VM VirtualBox module to the shadow database authentication module. For Ubuntu, this needs to be added to/etc/pam.d/common-auth, to the end of the line referencingpam_unix.so. This argument tells the PAM module to use credentials already present in the stack, such as the ones provided by the Oracle VM VirtualBox PAM module.
Warning
An incorrectly configured PAM stack can effectively prevent you from logging into your guest system.
To make deployment easier, you can pass the argument
debug right after the
pam_vbox.so statement. Debug log output
will then be recorded using syslog.
Note
By default, pam_vbox does not wait for credentials to arrive from the host. When a login prompt is shown, for example by GDM/KDM or the text console, and pam_vbox does not yet have credentials it does not wait until they arrive. Instead the next module in the PAM stack, depending on the PAM configuration, will have the chance for authentication.
pam_vbox supports various guest property
parameters that are located in
/VirtualBox/GuestAdd/PAM/. These parameters
allow pam_vbox to wait for credentials to be
provided by the host and optionally can show a message while
waiting for those. The following guest properties can be set:
CredsWait: Set to 1 if pam_vbox should start waiting until credentials arrive from the host. Until then no other authentication methods such as manually logging in will be available. If this property is empty or gets deleted no waiting for credentials will be performed and pam_vbox will act like before. This property must be set read-only for the guest (RDONLYGUEST).CredsWaitAbort: Aborts waiting for credentials when set to any value. Can be set from host and the guest.CredsWaitTimeout: Timeout, in seconds, to let pam_vbox wait for credentials to arrive. When no credentials arrive within this timeout, authentication of pam_vbox will be set to failed and the next PAM module in chain will be asked. If this property is not specified, set to 0 or an invalid value, an infinite timeout will be used. This property must be set read-only for the guest (RDONLYGUEST).
To customize pam_vbox further there are the following guest properties:
CredsMsgWaiting: Custom message showed while pam_vbox is waiting for credentials from the host. This property must be set read-only for the guest (RDONLYGUEST).CredsMsgWaitTimeout: Custom message showed when waiting for credentials by pam_vbox has timed out. For example, they did not arrive within time. This property must be set read-only for the guest (RDONLYGUEST).
Note
If a pam_vbox guest property does not have
the correct flag set (RDONLYGUEST) the
property is ignored and, depending on the property, a default
value will be used. This can result in pam_vbox not waiting
for credentials. Consult the appropriate syslog file for more
information and use the debug option.
Oracle VM VirtualBox comes with a greeter module, named vbox-greeter, that can be used with LightDM. LightDM is the default display manager for Ubuntu Linux and therefore can also be used for automated guest logins.
vbox-greeter does not need the pam_vbox module described in Section 9.1.2, “Automated Linux and UNIX Guest Logins”in order to function. It comes with its own authentication mechanism provided by LightDM. However, to provide maximum flexibility both modules can be used together on the same guest.
As with the pam_vbox module,
vbox-greeter is shipped as part of the
Guest Additions but it is not installed or activated on the
guest OS by default. To install
vbox-greeter automatically upon Guest
Additions installation, use the
--with-autologon option when starting the
VBoxLinuxAdditions.run file:
# ./VBoxLinuxAdditions.run -- --with-autologon
For manual or postponed installation, copy the
vbox-greeter.desktop file from
/opt/VBoxGuestAdditions-<version>/other/
to the xgreeters directory, which is
usually /usr/share/xgreeters/. See your
guest OS documentation for the name of the correct LightDM
greeter directory.
The vbox-greeter module is installed by the
Oracle VM VirtualBox Guest Additions installer and is located in
/usr/sbin/. To enable
vbox-greeter as the standard greeter
module, edit the file
/etc/lightdm/lightdm.conf as follows:
[SeatDefaults]
greeter-session=vbox-greeter
Note
The LightDM server must be fully restarted in order for vbox-greeter to be used as the default greeter. As
rooton Ubuntu, run service lightdm --full-restart or restart the guest.vbox-greeter is independent of the graphical session you choose, such as Gnome, KDE, or Unity. However, vbox-greeter does require FLTK 1.3 or later to implement its own user interface.
There are numerous guest properties which can be used to further customize the login experience. For automatically logging in users, the same guest properties apply as for pam_vbox. See Section 9.1.2, “Automated Linux and UNIX Guest Logins”.
In addition to the previously mentioned guest properties,
vbox-greeter enables you to further
customize its user interface. The following guest properties
are located in the
/VirtualBox/GuestAdd/Greeter/ directory:
HideRestart: Set to 1 if vbox-greeter should hide the button to restart the guest. This property must be set read-only for the guest (RDONLYGUEST).HideShutdown: Set to 1 if vbox-greeter should hide the button to shutdown the guest. This property must be set read-only for the guest (RDONLYGUEST).BannerPath: Path to a.PNGfile to use as a banner image on the top of the greeter. The image size must be 460 x 90 pixels, any bit depth. This property must be set read-only for the guest (RDONLYGUEST).UseTheming: Set to 1 for turning on the following theming options. This property must be set read-only for the guest (RDONLYGUEST).Theme/BackgroundColor: Hexadecimal RRGGBB color for the background. This property must be set read-only for the guest (RDONLYGUEST).Theme/LogonDialog/HeaderColor: Hexadecimal RRGGBB foreground color for the header text. This property must be set read-only for the guest (RDONLYGUEST).Theme/LogonDialog/BackgroundColor: Hexadecimal RRGGBB color for the login dialog background. This property must be set read-only for the guest (RDONLYGUEST).Theme/LogonDialog/ButtonColor: Hexadecimal RRGGBB background color for the login dialog button. This property must be set read-only for the guest (RDONLYGUEST).
Note
The same restrictions for the guest properties above apply
as for the ones specified in the pam_vbox
section.
Microsoft offers a system preparation tool called Sysprep, to prepare a Windows system for deployment or redistribution. Some Windows releases include Sysprep on the installation medium, but the tool is also available for download from the Microsoft web site. In a standard For most Windows versions, Sysprep is included in a default installation. Sysprep mainly consists of an executable called sysprep.exe which is invoked by the user to put the Windows installation into preparation mode.
The Guest Additions offer a way to launch a system preparation
on the guest operating system in an automated way, controlled
from the host system. See
Section 4.9, “Guest Control of Applications” for details of how to
use this feature with the special identifier
sysprep as the program to execute, along with
the user name sysprep and password
sysprep for the credentials. Sysprep is then
started with the required system rights.
Note
Specifying the location of sysprep.exe is not possible. Instead the following paths are used, based on the Windows release:
C:\sysprep\sysprep.exefor Windows XP and earlier%WINDIR%\System32\sysprep\sysprep.exefor Windows Vista and later
The Guest Additions will automatically use the appropriate path to execute the system preparation tool.
The Oracle VM VirtualBox Guest Additions contain several different drivers. If you do not want to configure them all, use the following command to install the Guest Additions:
$ sh ./VBoxLinuxAdditions.run no_setup
After running this script, run the rcvboxadd
setup command as root to compile
the kernel modules.
On some 64-bit guests, you must replace lib
with lib64. On older guests that do not run
the udev service, you must add the
vboxadd service to the default runlevel to
ensure that the modules are loaded.
To set up the time synchronization service, add the vboxadd-service service to the default runlevel. To set up the X11 and OpenGL part of the Guest Additions, run the rcvboxadd-x11 setup command. Note that you do not need to enable additional services.
Use the rcvboxadd setup to recompile the guest kernel modules.
After compilation, reboot your guest to ensure that the new modules are loaded.
This section assumes that you are familiar with configuring the X.Org server using xorg.conf and optionally the newer mechanisms using hal or udev and xorg.conf.d. If not you can learn about them by studying the documentation which comes with X.Org.
The Oracle VM VirtualBox Guest Additions includes drivers for X.Org. By default these drivers are in the following directory:
/opt/VBoxGuestAdditions-
version/other/
The correct versions for the X server are symbolically linked into the X.Org driver directories.
For graphics integration to work correctly, the X server must
load the vboxvideo driver. Many recent X
server versions look for it automatically if they see that they
are running in Oracle VM VirtualBox. For an optimal user experience,
the guest kernel drivers must be loaded and the Guest Additions
tool VBoxClient must be running as a client
in the X session.
For mouse integration to work correctly, the guest kernel
drivers must be loaded. In addition, for legacy X servers the
correct vboxmouse driver must be loaded and
associated with /dev/mouse or
/dev/psaux. For most guests, a driver for a
PS/2 mouse must be loaded and the correct vboxmouse driver must
be associated with /dev/vboxguest.
The Oracle VM VirtualBox guest graphics driver can use any graphics configuration for which the virtual resolution fits into the virtual video memory allocated to the virtual machine, minus a small amount used by the guest driver, as described in Section 3.6, “Display Settings”. The driver will offer a range of standard modes at least up to the default guest resolution for all active guest monitors. The default mode can be changed by setting the output property VBOX_MODE to "<width>x<height>" for any guest monitor. When VBoxClient and the kernel drivers are active this is done automatically when the host requests a mode change. The driver for older versions can only receive new modes by querying the host for requests at regular intervals.
With legacy X Servers before version 1.3, you can also add your own modes to the X server configuration file. Add them to the "Modes" list in the "Display" subsection of the "Screen" section. For example, the following section has a custom 2048x800 resolution mode added:
Section "Screen"
        Identifier    "Default Screen"
        Device        "VirtualBox graphics card"
        Monitor       "Generic Monitor"
        DefaultDepth  24
        SubSection "Display"
                Depth         24
                Modes         "2048x800" "800x600" "640x480"
        EndSubSection
EndSectionWith virtual machines running modern server operating systems, Oracle VM VirtualBox supports CPU hot-plugging.
On a physical computer CPU hot-plugging would mean that a CPU can be added or removed while the machine is running. Oracle VM VirtualBox supports adding and removing of virtual CPUs while a virtual machine is running.
CPU hot-plugging works only with guest operating systems that support the feature. So far this applies only to Linux and Windows Server. Windows supports only hot-add, while Linux supports hot-add and hot-remove. To use this feature with more than 8 CPUs, a 64-bit Linux guest is required.
CPU hot-plugging is done using the VBoxManage command-line interface. First, hot-plugging needs to be enabled for a virtual machine:
$ VBoxManage modifyvm VM-name --cpu-hotplug on
The --cpus option is used to specify the maximum
number of CPUs that the virtual machine can have:
$ VBoxManage modifyvm VM-name --cpus 8When the VM is off, you can then add and remove virtual CPUs with the VBoxManage modifyvm --plug-cpu and VBoxManage modifyvm --unplug-cpu commands, which take the number of the virtual CPU as a parameter, as follows:
$ VBoxManage modifyvmVM-name--plug-cpu 3 $ VBoxManage modifyvmVM-name--unplug-cpu 3
Note that CPU 0 can never be removed.
While the VM is running, CPUs can be added and removed with the VBoxManage controlvm plugcpu and VBoxManage controlvm unplugcpu commands instead, as follows:
$ VBoxManage controlvmVM-nameplugcpu 3 $ VBoxManage controlvmVM-nameunplugcpu 3
See Section 8.10, “VBoxManage modifyvm” and Section 8.20, “VBoxManage controlvm” for details.
With Linux guests, the following applies:
To prevent ejection while the CPU is still used it has to be ejected from within the guest before. The Linux Guest Additions contain a service which receives hot-remove events and ejects the CPU. Also, after a CPU is added to the VM it is not automatically used by Linux. The Linux Guest Additions service will take care of that if installed. If not a CPU can be started with the following command:
$ echo 1 > /sys/devices/system/cpu/cpu<id>/online
Oracle VM VirtualBox includes a feature called webcam passthrough, which enables a guest to use a host webcam. This complements the general USB passthrough support which was the typical way of using host webcams in legacy releases. The webcam passthrough support can handle non-USB video sources in theory, but this is completely untested.
Note
The webcam passthrough module is shipped as part of the Oracle VM VirtualBox extension pack, which must be installed separately. See Section 1.5, “Installing Oracle VM VirtualBox and Extension Packs”.
The host webcam can be attached to the VM using the Devices menu in the VM menu bar. The Webcams menu contains a list of available video input devices on the host. Clicking on a webcam name attaches or detaches the corresponding host device.
The VBoxManage command line tool can be used to enable webcam passthrough. Please see the host-specific sections below for additional details. The following commands are available:
Get a list of host webcams, or other video input devices:
$ VBoxManage list webcams
The output format is as follows:
alias "user friendly name"
host path or identifier
The alias can be used as a shortcut in other commands. Alias '.0' means the default video input device on the host. Alias '.1', '.2'means first, second video input device, and so on. The device order is host-specific.
Attach a webcam to a running VM, as follows:
VBoxManage controlvm
VM namewebcam attach [host_path|alias[settings]]This attaches a USB webcam device to the guest.
The
settingsparameter is a stringSetting1=Value1;Setting2=Value2, which enables you to configure the emulated webcam device. The following settings are supported:MaxFramerate: The highest rate at which video frames are sent to the guest. A higher frame rate requires more CPU power. Therefore sometimes it is useful to set a lower limit. Default is no limit and allow the guest to use all frame rates supported by the host webcam.MaxPayloadTransferSize: How many bytes the emulated webcam can send to the guest at a time. Default value is 3060 bytes, which is used by some webcams. Higher values can slightly reduce CPU load, if the guest is able to use larger buffers. However, a highMaxPayloadTransferSizemight be not supported by some guests.
Detach a webcam from a running VM, as follows:
VBoxManage controlvm
VM-namewebcam detach [host_path|alias]List the webcams attached to a running VM, as follows:
VBoxManage controlvm
VM-namewebcam listThe output contains the path or alias which was used in the webcam attach command for each attached webcam.
When the webcam device is detached from the host, the emulated webcam device is automatically detached from the guest.
When the webcam device is detached from the host, the emulated
webcam device remains attached to the guest and must be manually
detached using the VBoxManage controlvm
VM-name webcam detach
command.
When the webcam is detached from the host the emulated webcam
device is automatically detached from the guest only if the
webcam is streaming video. If the emulated webcam is inactive it
should be manually detached using the VBoxManage
controlvm VM-name webcam
detach command.
Aliases .0 and .1 are
mapped to /dev/video0, alias
.2 is mapped to
/dev/video1 and so forth.
Apart from the standard VESA resolutions, the Oracle VM VirtualBox VESA BIOS enables you to add up to 16 custom video modes which will be reported to the guest operating system. When using Windows guests with the Oracle VM VirtualBox Guest Additions, a custom graphics driver will be used instead of the fallback VESA solution so this information does not apply.
Additional video modes can be configured for each VM using the
extra data facility. The extra data key is called
CustomVideoMode
with xx being a number from 1 to 16.
Please note that modes will be read from 1 until either the
following number is not defined or 16 is reached. The following
example adds a video mode that corresponds to the native display
resolution of many notebook computers:
$ VBoxManage setextradata VM-name "CustomVideoMode1" "1400x1050x16"
The VESA mode IDs for custom video modes start at
0x160. In order to use the above defined
custom video mode, the following command line has to be supplied
to Linux:
vga = 0x200 | 0x160
vga = 864
For guest operating systems with Oracle VM VirtualBox Guest Additions, a custom video mode can be set using the video mode hint feature.
When guest systems with the Guest Additions installed are started using the graphical frontend, the normal Oracle VM VirtualBox application, they will not be allowed to use screen resolutions greater than the host's screen size unless the user manually resizes them by dragging the window, switching to full screen or seamless mode or sending a video mode hint using VBoxManage. This behavior is what most users will want, but if you have different needs, you can change it by issuing one of the following commands from the command line:
Remove all limits on guest resolutions.
VBoxManage setextradata global GUI/MaxGuestResolution any
Manually specify a maximum resolution.
VBoxManage setextradata global GUI/MaxGuestResolution
widthxheightRestore the default settings to all guest VMs.
VBoxManage setextradata global GUI/MaxGuestResolution auto
As an alternative to using virtual disk images as described in Chapter 5, Virtual Storage, Oracle VM VirtualBox can also present either entire physical hard disks or selected partitions as virtual disks to virtual machines.
With Oracle VM VirtualBox, this type of access is called raw hard disk access. It enables a guest operating system to access its virtual hard disk without going through the host OS file system. The actual performance difference for image files compared to raw disk varies greatly depending on the overhead of the host file system, whether dynamically growing images are used, and on host OS caching strategies. The caching indirectly also affects other aspects such as failure behavior. For example, whether the virtual disk contains all data written before a host OS crash. Consult your host OS documentation for details on this.
Warning
Raw hard disk access is for expert users only. Incorrect use or use of an outdated configuration can lead to total loss of data on the physical disk. Most importantly, do not attempt to boot the partition with the currently running host operating system in a guest. This will lead to severe data corruption.
Raw hard disk access, both for entire disks and individual partitions, is implemented as part of the VMDK image format support. As a result, you will need to create a special VMDK image file which defines where the data will be stored. After creating such a special VMDK image, you can use it like a regular virtual disk image. For example, you can use the Virtual Media Manager, see Section 5.3, “The Virtual Media Manager”, or VBoxManage to assign the image to a virtual machine.
While this variant is the simplest to set up, you must be aware that this will give a guest operating system direct and full access to an entire physical disk. If your host operating system is also booted from this disk, please take special care to not access the partition from the guest at all. On the positive side, the physical disk can be repartitioned in arbitrary ways without having to recreate the image file that gives access to the raw disk.
On a Linux host, to create an image that represents an entire physical hard disk which will not contain any actual data, as this will all be stored on the physical disk, use the following command:
$ VBoxManage createmedium disk --filename path-to-file.vmdk --format=VMDK
 --variant RawDisk --property RawDrive=/dev/sda
This creates the
path-to-file.vmdk/dev/sda.
On a Windows host, instead of the above device specification,
for example use \\.\PhysicalDrive0. On a
macOS host, instead of the above device specification use for
example /dev/rdisk1. Note that on Mac OS
X you can only get access to an entire disk if no volume is
mounted from it.
Creating the image requires read/write access for the given device. Read/write access is also later needed when using the image from a virtual machine. On some host platforms, such as Windows, raw disk access may be restricted and not permitted by the host OS in some situations.
Just like with regular disk images, this does not automatically attach the newly created image to a virtual machine. This can be done as follows:
$ VBoxManage storageattach WindowsXP --storagectl "IDE Controller" \
 --port 0 --device 0 --type hdd --medium path-to-file.vmdk
When this is done the selected virtual machine will boot from the specified physical disk.
This raw partition support is quite similar to the full hard disk access described above. However, in this case, any partitioning information will be stored inside the VMDK image. This means that you can install a different boot loader in the virtual hard disk without affecting the host's partitioning information. While the guest will be able to see all partitions that exist on the physical disk, access will be filtered in that reading from partitions for which no access is allowed the partitions will only yield zeroes, and all writes to them are ignored.
To create a special image for raw partition support, which will contain a small amount of data, on a Linux host, use the command:
$ VBoxManage createmedium disk --filename path-to-file.vmdk --format=VMDK
--variant RawDisk --property RawDrive=/dev/sda --property Partitions=1,5
The command is identical to the one for full hard disk access,
except for the additional --property
Partitions=1,5 parameter. This example would create
the image
path-to-file.vmdk/dev/sda would be made accessible to the
guest.
Oracle VM VirtualBox uses the same partition numbering as your Linux host. As a result, the numbers given in the above example would refer to the first primary partition and the first logical drive in the extended partition, respectively.
On a Windows host, instead of the above device specification,
use for example \\.\PhysicalDrive0. On a
macOS host, instead of the above device specification use
/dev/rdisk1, for example. Note that on OS
X you can only use partitions which are not mounted. Unmount
the respective disk first using diskutil unmountDisk
/dev/diskX. Partition numbers
are the same on Linux, Windows, and macOS hosts.
The numbers for the list of partitions can be taken from the output of the following command:
$ VBoxManage list hostdrives
The output lists available drives and their partitions with the partition types and sizes to give the user enough information to identify the partitions necessary for the guest.
Images which give access to individual partitions are specific to a particular host disk setup. You cannot transfer these images to another host. Also, whenever the host partitioning changes, the image must be recreated.
Creating the image requires read/write access for the given device. Read/write access is also later needed when using the image from a virtual machine. If this is not feasible, there is a special variant for raw partition access, currently only available on Linux hosts, that avoids having to give the current user access to the entire disk. To set up such an image, use:
$ VBoxManage createmedium disk --filename path-to-file.vmdk --format=VMDK
--variant RawDisk --property RawDrive=/dev/sda --property Partitions=1,5
--property Relative=1
When used from a virtual machine, the image will then refer
not to the entire disk, but only to the individual partitions.
In this example, /dev/sda1 and
/dev/sda5. As a consequence, read/write
access is only required for the affected partitions, not for
the entire disk. During creation however, read-only access to
the entire disk is required to obtain the partitioning
information.
In some configurations it may be necessary to change the MBR
code of the created image. For example, to replace the Linux
boot loader that is used on the host by another boot loader.
This enables for example the guest to boot directly to
Windows, while the host boots Linux from the "same" disk. For
this purpose the --property-file
BootSector=
parameter is provided. It specifies a file name from which to
take the MBR code. The partition table is not modified at all,
so a MBR file from a system with totally different
partitioning can be used. An example of this is:
path-to-file-with-boot-sector
$ VBoxManage createmedium disk --filename path-to-file.vmdk --format=VMDK
--variant RawDisk --property RawDrive=/dev/sda --property Partitions=1,5
--property-file BootSector=winxp.mbr
The modified MBR will be stored inside the image, not on the host disk.
The created image can be attached to a storage controller in a VM configuration as usual.
Oracle VM VirtualBox reports vendor product data for its virtual hard disks which consist of hard disk serial number, firmware revision and model number. These can be changed using the following commands:
$ VBoxManage setextradataVM-name\ "VBoxInternal/Devices/ahci/0/Config/Port0/SerialNumber" "serial" $ VBoxManage setextradataVM-name\ "VBoxInternal/Devices/ahci/0/Config/Port0/FirmwareRevision" "firmware" $ VBoxManage setextradataVM-name\ "VBoxInternal/Devices/ahci/0/Config/Port0/ModelNumber" "model"
The serial number is a 20 byte alphanumeric string, the firmware revision an 8 byte alphanumeric string and the model number a 40 byte alphanumeric string. Instead of Port0, referring to the first port, specify the desired SATA hard disk port.
The above commands apply to virtual machines with an AHCI (SATA) controller. The commands for virtual machines with an IDE controller are:
$ VBoxManage setextradataVM-name\ "VBoxInternal/Devices/piix3ide/0/Config/PrimaryMaster/SerialNumber" "serial" $ VBoxManage setextradataVM-name\ "VBoxInternal/Devices/piix3ide/0/Config/PrimaryMaster/FirmwareRevision" "firmware" $ VBoxManage setextradataVM-name\ "VBoxInternal/Devices/piix3ide/0/Config/PrimaryMaster/ModelNumber" "model"
For hard disks, you can mark the drive as having a non-rotational medium by using the following command:
$ VBoxManage setextradata VM-name \
"VBoxInternal/Devices/ahci/0/Config/Port0/NonRotational" "1"
Additional three parameters are needed for CD/DVD drives to report the vendor product data:
$ VBoxManage setextradataVM-name\ "VBoxInternal/Devices/ahci/0/Config/Port0/ATAPIVendorId" "vendor" VBoxManage setextradataVM-name\ "VBoxInternal/Devices/ahci/0/Config/Port0/ATAPIProductId" "product" VBoxManage setextradataVM-name\ "VBoxInternal/Devices/ahci/0/Config/Port0/ATAPIRevision" "revision"
The vendor id is an 8 byte alphanumeric string, the product id an 16 byte alphanumeric string and the revision a 4 byte alphanumeric string. Instead of Port0, referring to the first port, specify the desired SATA hard disk port.
As an experimental feature, Oracle VM VirtualBox enables access to an iSCSI target running in a virtual machine which is configured to use Internal Networking mode. See Section 5.10, “iSCSI Servers”, Section 6.6, “Internal Networking”, and Section 8.26, “VBoxManage storageattach”.
The IP stack accessing Internal Networking must be configured in the virtual machine which accesses the iSCSI target. A free static IP and a MAC address not used by other virtual machines must be chosen. In the example below, adapt the name of the virtual machine, the MAC address, the IP configuration, and the Internal Networking name (MyIntNet) according to your needs. The following eight commands must first be issued:
$ VBoxManage setextradataVM-name\ VBoxInternal/Devices/IntNetIP/0/Trusted 1 $ VBoxManage setextradataVM-name\ VBoxInternal/Devices/IntNetIP/0/Config/MAC 08:00:27:01:02:0f $ VBoxManage setextradataVM-name\ VBoxInternal/Devices/IntNetIP/0/Config/IP 10.0.9.1 $ VBoxManage setextradataVM-name\ VBoxInternal/Devices/IntNetIP/0/Config/Netmask 255.255.255.0 $ VBoxManage setextradataVM-name\ VBoxInternal/Devices/IntNetIP/0/LUN#0/Driver IntNet $ VBoxManage setextradataVM-name\ VBoxInternal/Devices/IntNetIP/0/LUN#0/Config/Network MyIntNet $ VBoxManage setextradataVM-name\ VBoxInternal/Devices/IntNetIP/0/LUN#0/Config/TrunkType 2 $ VBoxManage setextradataVM-name\ VBoxInternal/Devices/IntNetIP/0/LUN#0/Config/IsService 1
Finally the iSCSI disk must be attached with the
--intnet option to tell the iSCSI initiator to
use internal networking, as follows:
$ VBoxManage storageattach ... --medium iscsi --server 10.0.9.30 \
--target iqn.2008-12.com.sun:sampletarget --intnet
Compared to a regular iSCSI setup, the IP address of the target must be specified as a numeric IP address, as there is no DNS resolver for internal networking.
The virtual machine with the iSCSI target should be started before the VM using it is powered on. If a virtual machine using an iSCSI disk is started without having the iSCSI target powered up, it can take up to 200 seconds to detect this situation. The VM will fail to power up.
In NAT mode, the guest network interface is assigned to the IPv4
range 10.0.
by default where x.0/24x corresponds to the
instance of the NAT interface +2. So
x is 2 when there is only one NAT
instance active. In that case the guest is assigned to the
address 10.0.2.15, the gateway is set to
10.0.2.2 and the name server can be found at
10.0.2.3.
If the NAT network needs to be changed, use the following command:
$ VBoxManage modifyvm VM-name \
--natnet1 "192.168/16"
This command would reserve the network addresses from
192.168.0.0 to
192.168.254.254 for the first NAT network
instance of VM-name The guest IP
would be assigned to 192.168.0.15 and the
default gateway could be found at
192.168.0.2.
For network booting in NAT mode, by default Oracle VM VirtualBox uses a built-in TFTP server at the IP address 10.0.2.4. This default behavior should work fine for typical remote-booting scenarios. However, it is possible to change the boot server IP and the location of the boot image with the following commands:
$ VBoxManage modifyvmVM-name\ --nattftpserver1 10.0.2.2 $ VBoxManage modifyvmVM-name\ --nattftpfile1 /srv/tftp/boot/MyPXEBoot.pxe
The Oracle VM VirtualBox NAT stack performance is often determined by
its interaction with the host's TCP/IP stack and the size of
several buffers, SO_RCVBUF and
SO_SNDBUF. For certain setups users might
want to adjust the buffer size for a better performance. This
can by achieved using the following commands, where values are
in kilobytes and can range from 8 to 1024:
$ VBoxManage modifyvm VM-name \
--natsettings1 16000,128,128,0,0
This example illustrates tuning the NAT settings. The first parameter is the MTU, then the size of the socket's send buffer and the size of the socket's receive buffer, the initial size of the TCP send window, and lastly the initial size of the TCP receive window. Note that specifying zero means fallback to the default value.
Each of these buffers has a default size of 64KB and default MTU is 1500.
By default, Oracle VM VirtualBox's NAT engine will route TCP/IP packets through the default interface assigned by the host's TCP/IP stack. The technical reason for this is that the NAT engine uses sockets for communication. If you want to change this behavior, you can tell the NAT engine to bind to a particular IP address instead. For example, use the following command:
$ VBoxManage modifyvm VM-name \
--natbindip1 "10.45.0.2"
After this, all outgoing traffic will be sent through the interface with the IP address 10.45.0.2. Ensure that this interface is up and running before changing the NAT bind address.
The NAT engine by default offers the same DNS servers to the guest that are configured on the host. In some scenarios, it can be desirable to hide the DNS server IPs from the guest, for example when this information can change on the host due to expiring DHCP leases. In this case, you can tell the NAT engine to act as DNS proxy using the following command:
$ VBoxManage modifyvm VM-name --natdnsproxy1 onFor resolving network names, the DHCP server of the NAT engine offers a list of registered DNS servers of the host. If for some reason you need to hide this DNS server list and use the host's resolver settings, thereby forcing the Oracle VM VirtualBox NAT engine to intercept DNS requests and forward them to host's resolver, use the following command:
$ VBoxManage modifyvm VM-name --natdnshostresolver1 onNote that this setting is similar to the DNS proxy mode, however whereas the proxy mode just forwards DNS requests to the appropriate servers, the resolver mode will interpret the DNS requests and use the host's DNS API to query the information and return it to the guest.
In some cases it might be useful to intercept the name resolving mechanism, providing a user-defined IP address on a particular DNS request. The intercepting mechanism enables the user to map not only a single host but domains and even more complex naming conventions if required.
The following command sets a rule for mapping a name to a specified IP:
VBoxManage setextradataVM-name\ "VBoxInternal/Devices/{pcnet,e1000}/0/LUN#0/AttachedDriver/Config/HostResolverMappings/ \unique-rule-name-of-interception-rule/HostIP"IPv4VBoxManage setextradataVM-name\ "VBoxInternal/Devices/{pcnet,e1000}/0/LUN#0/AttachedDriver/Config/HostResolverMappings/ \unique-rule-name/HostName"hostname
The following command sets a rule for mapping a pattern name to a specified IP:
VBoxManage setextradataVM-name\ "VBoxInternal/Devices/{pcnet,e1000}/0/LUN#0/AttachedDriver/Config/HostResolverMappings/ \unique-rule-name/HostIP"IPv4VBoxManage setextradataVM-name\ "VBoxInternal/Devices/{pcnet,e1000}/0/LUN#0/AttachedDriver/Config/HostResolverMappings/ \unique-rule-name/HostNamePattern"hostpattern
The host name pattern can include the following wildcard
characters: pipe (|), question mark
(?), and asterisk (*).
This example demonstrates how to instruct the host-resolver mechanism to resolve all domain and probably some mirrors of www.blocked-site.info site with IP 127.0.0.1:
$ VBoxManage setextradataVM-name\ "VBoxInternal/Devices/e1000/0/LUN#0/AttachedDriver/Config/HostResolverMappings/all_blocked_site/HostIP" 127.0.0.1 $ VBoxManage setextradataVM-name\ "VBoxInternal/Devices/e1000/0/LUN#0/AttachedDriver/Config/HostResolverMappings/all_blocked_site/HostNamePattern" "*.blocked-site.*|*.fb.org"
The host resolver mechanism should be enabled to use user-defined mapping rules, otherwise they do not have any effect.
By default, the NAT core uses aliasing and uses random ports when generating an alias for a connection. This works well for the most protocols like SSH, FTP and so on. Though some protocols might need a more transparent behavior or may depend on the real port number the packet was sent from. You can change the NAT mode by using the following commands:
$ VBoxManage modifyvm VM-name \
--nataliasmode1 proxyonly
$ VBoxManage modifyvm "Linux Guest" --nataliasmode1 sameports
The first example disables aliasing and switches NAT into transparent mode, the second example enforces preserving of port values. These modes can be combined if necessary.
The DMI data that Oracle VM VirtualBox provides to guests can be changed
for a specific VM. Use the following commands to configure the DMI
BIOS information. In case your VM is configured to use EFI
firmware you need to replace pcbios by
efi in the keys.
DMI BIOS information (type 0)
$ VBoxManage setextradata
VM-name\ "VBoxInternal/Devices/pcbios/0/Config/DmiBIOSVendor" "BIOS Vendor" $ VBoxManage setextradataVM-name\ "VBoxInternal/Devices/pcbios/0/Config/DmiBIOSVersion" "BIOS Version" $ VBoxManage setextradataVM-name\ "VBoxInternal/Devices/pcbios/0/Config/DmiBIOSReleaseDate" "BIOS Release Date" $ VBoxManage setextradataVM-name\ "VBoxInternal/Devices/pcbios/0/Config/DmiBIOSReleaseMajor" 1 $ VBoxManage setextradataVM-name\ "VBoxInternal/Devices/pcbios/0/Config/DmiBIOSReleaseMinor" 2 $ VBoxManage setextradataVM-name\ "VBoxInternal/Devices/pcbios/0/Config/DmiBIOSFirmwareMajor" 3 $ VBoxManage setextradataVM-name\ "VBoxInternal/Devices/pcbios/0/Config/DmiBIOSFirmwareMinor" 4DMI system information (type 1)
$ VBoxManage setextradata
VM-name\ "VBoxInternal/Devices/pcbios/0/Config/DmiSystemVendor" "System Vendor" $ VBoxManage setextradataVM-name\ "VBoxInternal/Devices/pcbios/0/Config/DmiSystemProduct" "System Product" $ VBoxManage setextradataVM-name\ "VBoxInternal/Devices/pcbios/0/Config/DmiSystemVersion" "System Version" $ VBoxManage setextradataVM-name\ "VBoxInternal/Devices/pcbios/0/Config/DmiSystemSerial" "System Serial" $ VBoxManage setextradataVM-name\ "VBoxInternal/Devices/pcbios/0/Config/DmiSystemSKU" "System SKU" $ VBoxManage setextradataVM-name\ "VBoxInternal/Devices/pcbios/0/Config/DmiSystemFamily" "System Family" $ VBoxManage setextradataVM-name\ "VBoxInternal/Devices/pcbios/0/Config/DmiSystemUuid" \ "9852bf98-b83c-49db-a8de-182c42c7226b"DMI board information (type 2)
$ VBoxManage setextradata
VM-name\ "VBoxInternal/Devices/pcbios/0/Config/DmiBoardVendor" "Board Vendor" $ VBoxManage setextradataVM-name\ "VBoxInternal/Devices/pcbios/0/Config/DmiBoardProduct" "Board Product" $ VBoxManage setextradataVM-name\ "VBoxInternal/Devices/pcbios/0/Config/DmiBoardVersion" "Board Version" $ VBoxManage setextradataVM-name\ "VBoxInternal/Devices/pcbios/0/Config/DmiBoardSerial" "Board Serial" $ VBoxManage setextradataVM-name\ "VBoxInternal/Devices/pcbios/0/Config/DmiBoardAssetTag" "Board Tag" $ VBoxManage setextradataVM-name\ "VBoxInternal/Devices/pcbios/0/Config/DmiBoardLocInChass" "Board Location" $ VBoxManage setextradataVM-name\ "VBoxInternal/Devices/pcbios/0/Config/DmiBoardBoardType" 10DMI system enclosure or chassis (type 3)
$ VBoxManage setextradata
VM-name\ "VBoxInternal/Devices/pcbios/0/Config/DmiChassisVendor" "Chassis Vendor" $ VBoxManage setextradataVM-name\ "VBoxInternal/Devices/pcbios/0/Config/DmiChassisType" 3 $ VBoxManage setextradataVM-name\ "VBoxInternal/Devices/pcbios/0/Config/DmiChassisVersion" "Chassis Version" $ VBoxManage setextradataVM-name\ "VBoxInternal/Devices/pcbios/0/Config/DmiChassisSerial" "Chassis Serial" $ VBoxManage setextradataVM-name\ "VBoxInternal/Devices/pcbios/0/Config/DmiChassisAssetTag" "Chassis Tag"DMI processor information (type 4)
$ VBoxManage setextradata
VM-name\ "VBoxInternal/Devices/pcbios/0/Config/DmiProcManufacturer" "GenuineIntel" $ VBoxManage setextradataVM-name\ "VBoxInternal/Devices/pcbios/0/Config/DmiProcVersion" "Pentium(R) III"DMI OEM strings (type 11)
$ VBoxManage setextradata
VM-name\ "VBoxInternal/Devices/pcbios/0/Config/DmiOEMVBoxVer" "vboxVer_1.2.3" $ VBoxManage setextradataVM-name\ "VBoxInternal/Devices/pcbios/0/Config/DmiOEMVBoxRev" "vboxRev_12345"
If a DMI string is not set, the default value of Oracle VM VirtualBox is
used. To set an empty string use
"<EMPTY>".
Note that in the above list, all quoted parameters (DmiBIOSVendor,
DmiBIOSVersion but not DmiBIOSReleaseMajor) are expected to be
strings. If such a string is a valid number, the parameter is
treated as number and the VM will most probably refuse to start
with an VERR_CFGM_NOT_STRING error. In that
case, use
"string:. For
example:
value"
$ VBoxManage setextradata VM-name \
"VBoxInternal/Devices/pcbios/0/Config/DmiSystemSerial"      "string:1234"
Changing this information can be necessary to provide the DMI information of the host to the guest to prevent Windows from asking for a new product key. On Linux hosts, the DMI BIOS information can be obtained with the following command:
$ dmidecode -t0
The DMI system information can be obtained as follows:
$ dmidecode -t1
You can configure Oracle VM VirtualBox to present up to four custom ACPI
tables to the guest. Use a command such as the following to
configure custom ACPI tables. Note that
CustomTable1, CustomTable2,
and CustomTable3 are available in addition to
CustomTable0.
$ VBoxManage setextradataVM-name\ "VBoxInternal/Devices/acpi/0/Config/CustomTable0" "/path-to-table.bin"
Configuring custom ACPI tables can for example avoid the need for
asking for a new product key on Windows Vista, Windows 7, Windows
8 and later guests. On Linux hosts, one of the system's ACPI
tables can be read from
/sys/firmware/acpi/tables/.
By default, Oracle VM VirtualBox keeps all sources of time visible to the guest synchronized to a single time source, the monotonic host time. This reflects the assumptions of many guest operating systems, which expect all time sources to reflect "wall clock" time. In special circumstances it may be useful however to make the time stamp counter (TSC) in the guest reflect the time actually spent executing the guest.
This special TSC handling mode can be enabled on a per-VM basis, and for best results must be used only in combination with hardware virtualization. To enable this mode use the following command:
$ VBoxManage setextradata VM-name "VBoxInternal/TM/TSCTiedToExecution" 1To revert to the default TSC handling mode use:
$ VBoxManage setextradata VM-name "VBoxInternal/TM/TSCTiedToExecution"Note that if you use the special TSC handling mode with a guest operating system which is very strict about the consistency of time sources you may get a warning or error message about the timing inconsistency. It may also cause clocks to become unreliable with some guest operating systems depending on how they use the TSC.
For certain purposes it can be useful to accelerate or to slow down the virtual guest clock. This can be achieved as follows:
$ VBoxManage setextradata VM-name "VBoxInternal/TM/WarpDrivePercentage" 200The above example will double the speed of the guest clock while
$ VBoxManage setextradata VM-name "VBoxInternal/TM/WarpDrivePercentage" 50will halve the speed of the guest clock. Note that changing the rate of the virtual clock can confuse the guest and can even lead to abnormal guest behavior. For instance, a higher clock rate means shorter timeouts for virtual devices with the result that a slightly increased response time of a virtual device due to an increased host load can cause guest failures. Note further that any time synchronization mechanism will frequently try to resynchronize the guest clock with the reference clock, which is the host clock if the Oracle VM VirtualBox Guest Additions are active. Therefore any time synchronization should be disabled if the rate of the guest clock is changed as described above. See Section 9.11.3, “Tuning the Guest Additions Time Synchronization Parameters”.
The Oracle VM VirtualBox Guest Additions ensure that the guest's system time is synchronized with the host time. There are several parameters which can be tuned. The parameters can be set for a specific VM using the following command:
$ VBoxManage guestproperty setVM-name"/VirtualBox/GuestAdd/VBoxService/property"value
property is one of the following:
-
--timesync-interval Specifies the interval at which to synchronize the time with the host. The default is 10000 ms (10 seconds).
-
--timesync-min-adjust The minimum absolute drift value measured in milliseconds to make adjustments for. The default is 1000 ms on OS/2 and 100 ms elsewhere.
-
--timesync-latency-factor The factor to multiply the time query latency with to calculate the dynamic minimum adjust time. The default is 8 times, which means as follows:
Measure the time it takes to determine the host time, the guest has to contact the VM host service which may take some time. Multiply this value by 8 and do an adjustment only if the time difference between host and guest is bigger than this value. Do not do any time adjustment otherwise.
-
--timesync-max-latency The max host timer query latency to accept. The default is 250 ms.
-
--timesync-set-threshold The absolute drift threshold, given as milliseconds where to start setting the time instead of trying to smoothly adjust it. The default is 20 minutes.
-
--timesync-set-start Set the time when starting the time sync service.
-
--timesync-set-on-restore 0|1 Set the time after the VM was restored from a saved state when passing 1 as parameter. This is the default. Disable by passing 0. In the latter case, the time will be adjusted smoothly, which can take a long time.
All these parameters can be specified as command line parameters to VBoxService as well.
Once installed and started, the Oracle VM VirtualBox Guest Additions will try to synchronize the guest time with the host time. This can be prevented by forbidding the guest service from reading the host clock:
$ VBoxManage setextradata VM-name "VBoxInternal/Devices/VMMDev/0/Config/GetHostTimeDisabled" 1Oracle VM VirtualBox includes a network filter driver that utilizes Oracle Solaris 11's Crossbow functionality. By default, this new driver is installed for Oracle Solaris 11 hosts that have support for it.
To force installation of the older STREAMS based network filter driver, execute as root the following command before installing the Oracle VM VirtualBox package:
$ touch /etc/vboxinst_vboxflt
To force installation of the Crossbow based network filter driver, execute as root the following command before installing the Oracle VM VirtualBox package:
$ touch /etc/vboxinst_vboxbow
To check which driver is currently being used by Oracle VM VirtualBox, execute:
$ modinfo | grep vbox
If the output contains "vboxbow", it indicates Oracle VM VirtualBox is using the Crossbow network filter driver, while the name "vboxflt" indicates usage of the older STREAMS network filter.
Oracle VM VirtualBox supports Virtual Network Interface (VNIC) templates
for configuring VMs over VLANs. An Oracle VM VirtualBox VNIC template is
a VNIC whose name starts with
vboxvnic_template. The string is
case-sensitive.
On Oracle Solaris 11 hosts, when Crossbow-based bridged networking is used, a VNIC template may be used to specify the VLAN ID to use while bridging over a network link.
The following is an example of how to use a VNIC template to configure a VM over a VLAN. Create an Oracle VM VirtualBox VNIC template, by executing as root:
# dladm create-vnic -t -l nge0 -v 23 vboxvnic_template0
This will create a temporary VNIC template over interface
nge0 with the VLAN ID 23. To create VNIC
templates that are persistent across host reboots, skip the
-t parameter in the above command. You may check
the current state of links using the following command:
$ dladm show-link
LINK        CLASS     MTU    STATE    BRIDGE     OVER
nge0        phys      1500   up       --         --
nge1        phys      1500   down     --         --
vboxvnic_template0 vnic 1500 up       --         nge0

$ dladm show-vnic
LINK         OVER         SPEED  MACADDRESS        MACADDRTYPE         VID
vboxvnic_template0 nge0   1000   2:8:20:25:12:75   random              23
Once the VNIC template is created, any VMs that need to be on VLAN 23 over the interface nge0 can be configured to bridge using this VNIC template.
VNIC templates makes managing VMs on VLANs simpler and efficient. The VLAN details are not stored as part of every VM's configuration but rather inherited from the VNIC template while starting the VM. The VNIC template itself can be modified anytime using the dladm command.
VNIC templates can be created with additional properties such as bandwidth limits and CPU fanout. Refer to your Oracle Solaris network documentation for details. The additional properties are also applied to VMs which bridge using the VNIC template.
By default Oracle VM VirtualBox provides you with one host-only network interface. Adding more host-only network interfaces on Oracle Solaris hosts requires manual configuration. Here is how to add another host-only network interface.
Begin by stopping all running VMs. Then, unplumb the existing "vboxnet0" interface by execute the following command as root:
# ifconfig vboxnet0 unplumb
If you have several vboxnet interfaces, you will need to unplumb all of them. Once all vboxnet interfaces are unplumbed, remove the driver by executing the following command as root:
# rem_drv vboxnet
Edit the file
/platform/i86pc/kernel/drv/vboxnet.conf and
add a line for the new interface we want to add as shown below:
name="vboxnet" parent="pseudo" instance=1;
name="vboxnet" parent="pseudo" instance=2;
Add as many of these lines as required with each line having a unique instance number.
Next, reload the vboxnet driver by executing the following command as root:
# add_drv vboxnet
On Oracle Solaris 11.1 and newer hosts you may want to rename the default vanity interface name. To check what name has been assigned, execute:
$ dladm show-phys
LINK              MEDIA                STATE      SPEED  DUPLEX    DEVICE
net0              Ethernet             up         100    full      e1000g0
net2              Ethernet             up         1000   full      vboxnet1
net1              Ethernet             up         1000   full      vboxnet0
In the above example, we can rename "net2" to "vboxnet1" before proceeding to plumb the interface. This can be done by executing as root:
# dladm rename-link net2 vboxnet1
Now plumb all the interfaces using ifconfig
vboxnetX plumb, where
X would be 1 in this case. Once the
interface is plumbed, it may be configured like any other network
interface. Refer to the ifconfig documentation
for further details.
To make the settings for the newly added interfaces persistent
across reboots, you will need to edit the files
/etc/inet/netmasks, and if you are using NWAM
/etc/nwam/llp and add the appropriate entries
to set the netmask and static IP for each of those interfaces. The
Oracle VM VirtualBox installer only updates these configuration files
for the one "vboxnet0" interface it creates by default.
Oracle VM VirtualBox is capable of producing its own core files for extensive debugging when things go wrong. Currently this is only available on Oracle Solaris hosts.
The Oracle VM VirtualBox CoreDumper can be enabled using the following command:
$ VBoxManage setextradata VM-name VBoxInternal2/CoreDumpEnabled 1You can specify which directory to use for core dumps with this command, as follows:
$ VBoxManage setextradataVM-nameVBoxInternal2/CoreDumpDirpath-to-directory
Make sure the directory you specify is on a volume with sufficient free space and that the Oracle VM VirtualBox process has sufficient permissions to write files to this directory. If you skip this command and do not specify any core dump directory, the current directory of the Oracle VM VirtualBox executable will be used. This would most likely fail when writing cores as they are protected with root permissions. It is recommended you explicitly set a core dump directory.
You must specify when the Oracle VM VirtualBox CoreDumper should be triggered. This is done using the following commands:
$ VBoxManage setextradataVM-nameVBoxInternal2/CoreDumpReplaceSystemDump 1 $ VBoxManage setextradataVM-nameVBoxInternal2/CoreDumpLive 1
At least one of the above two commands will have to be provided if you have enabled the Oracle VM VirtualBox CoreDumper.
Setting CoreDumpReplaceSystemDump sets up the
VM to override the host's core dumping mechanism and in the event
of any crash only the Oracle VM VirtualBox CoreDumper would produce the
core file.
Setting CoreDumpLive sets up the VM to produce
cores whenever the VM process receives a
SIGUSR2 signal. After producing the core file,
the VM will not be terminated and will continue to run. You can
thus take cores of the VM process using the following command:
$ kill -s SIGUSR2 VM-process-id
The Oracle VM VirtualBox CoreDumper creates core files of the form
core.vb.
such as process-name.process-IDcore.vb.VBoxHeadless.11321.
Oracle Solaris kernel zones on x86-based systems make use of hardware-assisted virtualization features like Oracle VM VirtualBox does. However, for kernel zones and Oracle VM VirtualBox to share this hardware resource, they need to cooperate.
By default, due to performance reasons, Oracle VM VirtualBox acquires the hardware-assisted virtualization resource (VT-x/AMD-V) globally on the host machine and uses it until the last Oracle VM VirtualBox VM that requires it is powered off. This prevents other software from using VT-x/AMD-V during the time Oracle VM VirtualBox has taken control of it.
Oracle VM VirtualBox can be instructed to relinquish use of hardware-assisted virtualization features when not executing guest code, thereby allowing kernel zones to make use of them. To do this, shutdown all Oracle VM VirtualBox VMs and execute the following command:
$ VBoxManage setproperty hwvirtexclusive off
This command needs to be executed only once as the setting is stored as part of the global Oracle VM VirtualBox settings which will continue to persist across host-reboots and Oracle VM VirtualBox upgrades.
There are several advanced customization settings for locking down VirtualBox Manager. Locking down means removing some features that the user should not see.
VBoxManage setextradata global GUI/Customizationsproperty[,property...]
property is one of the following
properties:
-
noSelector Do not allow users to start VirtualBox Manager. Trying to do so will show a window containing a proper error message.
-
noMenuBar VM windows will not contain a menu bar.
-
noStatusBar VM windows will not contain a status bar.
To disable any of these VirtualBox Manager customizations use the following command:
$ VBoxManage setextradata global GUI/Customizations
The following per-machine VM extradata settings can be used to change the behavior of the VM selector window in respect of certain VMs:
$ VBoxManage setextradataVM-namepropertytrue
property can be any of the following:
-
GUI/HideDetails Do not show the VM configuration of a certain VM. The details window will remain just empty if this VM is selected.
-
GUI/PreventReconfiguration Do not allow the user to open the Settings dialog for a certain VM.
-
GUI/PreventSnapshotOperations Prevent snapshot operations for a VM from the GUI, either at runtime or when the VM is powered off.
-
GUI/HideFromManager Hide a certain VM in the VM selector window.
-
GUI/PreventApplicationUpdate Disable the automatic update check and hide the corresponding menu item.
Note that these settings do not prevent the user from reconfiguring the VM by using the VBoxManage modifyvm command.
You can disable certain entries in the global settings page of the VM selector:
$ VBoxManage setextradata global GUI/RestrictedGlobalSettingsPagesproperty[,property...]
property is one of the following:
-
General Do not show the General settings pane.
-
Input Do not show the Input settings pane.
-
Update Do not show the Update settings pane.
-
Language Do not show the Language settings pane.
-
Display Do not show the Display settings pane.
-
Network Do not show the Network settings pane.
-
Extensions Do not show the Extensions settings pane.
-
Proxy Do not show the Proxy settings pane.
This is a global setting. You can specify any combination of properties. To restore the default behavior, use the following command:
$ VBoxManage setextradata global GUI/RestrictedGlobalSettingsPages
You can disable certain menu actions in the VM window:
VBoxManage setextradata "VM name"|global GUI/RestrictedRuntimeMenus OPTION[,OPTION...]
where OPTION is one of the following
keywords:
-
All Do not show any menu in the VM window.
-
Application Do not show Application/File menu in the VM window.
-
Machine Do not show the Machine menu in the VM window.
-
View Do not show the View menu in the VM window.
-
Input Do not show Input menu in the VM window.
-
Devices Do not show the Devices menu in the VM window.
-
Help Do not show the Help menu in the VM window.
-
Debug Do not show the Debug menu in the VM window. The Debug menu is only visible if the GUI was started with special command line parameters or environment variable settings.
This is a per-VM or global setting. Any combination of the above is allowed. To restore the default behavior, use the following command:
VBoxManage setextradata "VM name"|global GUI/RestrictedRuntimeMenus
You can also disable certain menu actions of certain menus. Use the following command to disable certain actions of the Application menu. This is only available on macOS hosts.
VBoxManage setextradata "VM name"|global GUI/RestrictedRuntimeApplicationMenuActions OPTION[,OPTION...]
where OPTION is one of the following
keywords:
-
All Do not show any menu item in this menu.
-
About Do not show the About menu item in this menu.
-
Preferences Do not show the Preferences menu item in this menu.
-
NetworkAccessManager Do not show the Network Operations Manager menu item in this menu.
-
ResetWarnings Do not show the Reset All Warnings menu item in this menu.
-
Close Do not show the Close menu item in this menu.
This is a per-VM or global setting. Any combination of the above is allowed. To restore the default behavior, use the following command:
VBoxManage setextradata "VM name"|global GUI/RestrictedRuntimeMenus
Use the following command to disable certain actions of the Machine menu:
VBoxManage setextradata "VM name"|global GUI/RestrictedRuntimeMachineMenuActions OPTION[,OPTION...]
where OPTION is one of the following
keywords:
-
All Do not show any menu item in this menu.
-
SettingsDialog Do not show the Settings menu item in this menu.
-
TakeSnapshot Do not show the Take Snapshot... menu item in this menu.
-
InformationDialog Do not show the Session Information... menu item in this menu.
-
FileManagerDialog Do not show the File Manager... menu item in this menu.
-
Pause Do not show the Pause menu item in this menu.
-
Reset Do not show the Reset menu item in this menu.
-
Shutdown Do not show the ACPI Shutdown menu item in this menu.
This is a per-VM or global setting. Any combination of the above is allowed. To restore the default behavior, use
VBoxManage setextradata "VM name"|global GUI/RestrictedRuntimeMachineMenuActions
Use the following command to disable certain actions of the View menu:
VBoxManage setextradata "VM name"|global GUI/RestrictedRuntimeViewMenuActions OPTION[,OPTION...]
where OPTION is one of the following
keywords:
-
All Do not show any menu item in this menu.
-
Fullscreen Do not show the Full-screen Mode menu item in this menu.
-
Seamless Do not show the Seamless Mode menu item in this menu.
-
Scale Do not show the Scaled Mode menu item in this menu.
-
GuestAutoresize Do not show the Auto-resize Guest Display menu item in this menu.
-
AdjustWindow Do not show the Adjust Window Size menu item in this menu.
-
TakeScreenshot Do not show the Take Screenshot... menu item in this menu.
-
Recording Do not show the Recording menu item in this menu.
-
VRDEServer Do not show the Remote Display menu item in this menu.
-
MenuBar Do not show the Menu Bar menu item in this menu.
-
MenuBarSettings Do not show the Menu Bar Settings... menu item in this menu.
-
StatusBar Do not show the Status Bar menu item in this menu.
-
StatusbarSettings Do not show the Statusbar Settings... menu item in this menu.
This is a per-VM or global setting. Any combination of the above is allowed. To restore the default behavior, use
VBoxManage setextradata "VM name"|global GUI/RestrictedRuntimeViewMenuActions
Use the following command to disable certain actions of the Input menu:
VBoxManage setextradata "VM name"|global GUI/RestrictedRuntimeInputMenuActions OPTION[,OPTION...]
where OPTION is one of the following
keywords:
-
All Do not show any menu item in this menu.
-
Keyboard Do not show the Keyboard menu item in this menu.
-
KeyboardSettings Do not show the Keyboard Settings... menu item in this menu.
-
SoftKeyboard Do not show the Soft Keyboard... menu item in this menu.
-
TypeCAD Do not show the Insert Ctrl-Alt-Del menu item in this menu.
-
TypeCABS Do not show the Insert Ctrl-Alt-Backspace menu item in this menu.
-
TypeCtrlBreak Do not show the Insert Ctrl-Break menu item in this menu.
-
TypeInsert Do not show the Insert Insert menu item in this menu.
-
TypePrintScreen Do not show the Insert Print Screen menu item in this menu.
-
TypeAltPrintScreen Do not show the Insert Alt Print Screen menu item in this menu.
-
TypeHostKeyCombo Do not show the Insert Host Key Combo menu item in this menu.
-
MouseIntegration Do not show the MouseIntegration menu item in this menu.
This is a per-VM or global setting. Any combination of the above is allowed. To restore the default behavior, use
VBoxManage setextradata "VM name"|global GUI/RestrictedRuntimeInputMenuActions
Use the following command to disable certain actions of the Devices menu:
VBoxManage setextradata "VM name"|global GUI/RestrictedRuntimeDevicesMenuActions OPTION[,OPTION...]
where OPTION is one of the following keywords
to disable actions in the
Devices menu:
-
All Do not show any menu item in this menu.
-
HardDrives Do not show the Hard Disks menu item in this menu.
-
OpticalDevices Do not show the Optical Devices menu item in this menu.
-
FloppyDevices Do not show the Floppy Drives menu item in this menu.
-
Audio Do not show the Audio menu item in this menu.
-
Network Do not show the Network menu item in this menu.
-
NetworkSettings Do not show the Network Settings menu item in this menu.
-
USBDevices Do not show the USB menu item in this menu.
-
WebCams Do not show the WebCams menu item in this menu.
-
SharedFolders Do not show the Shared Folders menu item in this menu.
-
SharedFoldersSettings Do not show the Shared Folders Settings... menu item in this menu.
-
SharedClipboard Do not show the Shared Clipboard menu item in this menu.
-
DragAndDrop Do not show the Drag and Drop menu item in this menu.
-
InstallGuestTools Do not show the Insert Guest Additions CD image... menu item in this menu.
This is a per-VM or global or global setting. Any combination of the above is allowed. To restore the default behavior, use
VBoxManage setextradata "VM name"|global GUI/RestrictedRuntimeDevicesMenuActions
Use the following command to disable certain actions of the Debug menu:
VBoxManage setextradata "VM name"|global GUI/RestrictedRuntimeDebuggerMenuActions OPTION[,OPTION...]
where OPTION is one of the following keywords
to disable actions in the Debug menu, which
is normally completely disabled:
-
All Do not show any menu item in this menu.
-
Statistics Do not show the Statistics... menu item in this menu.
-
CommandLine Do not show the Command Line... menu item in this menu.
-
Logging Do not show the Logging... menu item in this menu.
-
LogDialog Do not show the Show Log... menu item in this menu.
-
GuestControlConsole Do not show the Guest Control Terminal... menu item in this menu.
This is a per-VM or global setting. Any combination of the above is allowed. To restore the default behavior, use
VBoxManage setextradata "VM name"|global GUI/RestrictedRuntimeDebuggerMenuActions
Use the following command to disable certain actions of the View menu:
VBoxManage setextradata "VM name"|global GUI/RestrictedRuntimeHelpMenuActions OPTION[,OPTION...]
where OPTION is one of the following keywords
to disable actions in the Help
menu, which is normally completely disabled:
-
All Do not show any menu item in this menu.
-
Contents Do not show the Contents... menu item in this menu.
-
WebSite Do not show the VirtualBox Web Site... menu item in this menu.
-
BugTracker Do not show the VirtualBox Bug Tracker... menu item in this menu.
-
Forums Do not show the VirtualBox Forums... menu item in this menu.
-
Oracle Do not show the Oracle Web Site... menu item in this menu.
-
About Do not show the About VirtualBox... menu item in this menu. Only for non-macOS hosts.
This is a per-VM or global setting. Any combination of the above is allowed. To restore the default behavior, use
VBoxManage setextradata "VM name"|global GUI/RestrictedRuntimeHelpMenuActions
You can disable certain status bar items:
VBoxManage setextradata "VM name"|global GUI/RestrictedStatusBarIndicators OPTION[,OPTION...]
where OPTION is one of the following
keywords:
-
HardDisks Do not show the hard disk icon in the VM window status bar. By default the hard disk icon is only shown if the VM configuration contains one or more hard disks.
-
OpticalDisks Do not show the CD icon in the VM window status bar. By default the CD icon is only shown if the VM configuration contains one or more CD drives.
-
FloppyDisks Do not show the floppy icon in the VM window status bar. By default the floppy icon is only shown if the VM configuration contains one or more floppy drives.
-
Network Do not show the network icon in the VM window status bar. By default the network icon is only shown if the VM configuration contains one or more active network adapters.
-
USB Do not show the USB icon in the status bar.
-
SharedFolders Do not show the shared folders icon in the status bar.
-
Capture Do not show the capture icon in the status bar.
-
Features Do not show the CPU features icon in the status bar.
-
Mouse Do not show the mouse icon in the status bar.
-
Keyboard Do not show the keyboard icon in the status bar.
This is a per-VM or global setting. Any combination of the above is allowed. If all options are specified, no icons are displayed in the status bar of the VM window. To restore the default behavior, use
VBoxManage setextradata "VM name"|global GUI/RestrictedStatusBarIndicators
You can disable certain VM visual modes:
$ VBoxManage setextradataVM-nameGUI/RestrictedVisualStatesproperty[,property...]
property is one of the following:
-
Fullscreen Do not allow to switch the VM into full screen mode.
-
Seamless Do not allow to switch the VM into seamless mode.
-
Scale Do not allow to switch the VM into scale mode.
This is a per-VM setting. You can specify any combination of properties. To restore the default behavior, use the following command:
$ VBoxManage setextradata VM-name GUI/RestrictedVisualStatesTo disable all Host key combinations, open the preferences and change the Host key to None. This might be useful when using Oracle VM VirtualBox in a kiosk mode.
To redefine or disable certain Host key actions, use the following command:
$ VBoxManage setextradata global GUI/Input/MachineShortcuts "FullscreenMode=F,...."
The following table shows the possible Host key actions, together with their default Host key shortcut. Setting an action to None will disable that Host key action.
Table 9.1. Host Key Customization
Action | Default Key | Action |
|---|---|---|
| T | Take a snapshot |
| E | Take a screenshot |
| I | Toggle mouse integration |
| Del | Inject Ctrl+Alt+Del |
| Backspace | Inject Ctrl+Alt+Backspace |
| P | Pause the VM |
| R | Hard reset the guest |
| Save the VM state and terminate the VM | |
| H | Press the virtual ACPI power button |
| Power off the VM without saving the state | |
| Q | Show the Close VM dialog |
| F | Switch the VM into full screen mode |
| L | Switch the VM into seamless mode |
| C | Switch the VM into scaled mode |
| G | Automatically resize the guest window |
| A | Immediately resize the guest window |
| Home | Show the popup menu in full screen mode and seamless mode |
| S | Open the VM Settings dialog |
| N | Show the VM Session Information window |
| Show the VM Network Adapters dialog | |
| Show the VM Shared Folders dialog | |
| D | Mount the ISO containing the Guest Additions |
To disable full screen mode and seamless mode, use the following command:
$ VBoxManage setextradata global GUI/Input/MachineShortcuts "FullscreenMode=None,SeamlessMode=None"
You can disallow certain actions when terminating a VM. To disallow specific actions, use the following command:
$ VBoxManage setextradataVM-nameGUI/RestrictedCloseActionsproperty[,property...]
property is one of the following:
-
SaveState Do not allow the user to save the VM state when terminating the VM.
-
Shutdown Do not allow the user to shutdown the VM by sending the ACPI power-off event to the guest.
-
PowerOff Do not allow the user to power off the VM.
-
PowerOffRestoringSnapshot Do not allow the user to return to the last snapshot when powering off the VM.
-
Detach Do not allow the user to detach from the VM process if the VM was started in separate mode.
This is a per-VM setting. You can specify any combination of properties. If all properties are specified, the VM cannot be shut down.
You can define a specific action for terminating a VM. In contrast to the setting decribed in the previous section, this setting allows only one action when the user terminates the VM. No exit menu is shown. Use the following command:
$ VBoxManage setextradataVM-nameGUI/DefaultCloseActionaction
action is one of the following:
-
SaveState Save the VM state before terminating the VM process.
-
Shutdown The VM is shut down by sending the ACPI power-off event to the guest.
-
PowerOff The VM is powered off.
-
PowerOffRestoringSnapshot The VM is powered off and the saved state returns to the last snapshot.
-
Detach Terminate the frontend but leave the VM process running.
This is a per-VM setting. You can specify any combination of properties. If all properties are specified, the VM cannot be shut down.
A VM runs into a Guru Meditation if there is a problem which cannot be fixed by other means than terminating the process. The default is to show a message window which instructs the user to open a bug report.
This behavior can be configured as follows:
$ VBoxManage setextradataVM-nameGUI/GuruMeditationHandlermode
mode is one of the following:
-
Default A message window is shown. After the user confirmed, the VM is terminated.
-
PowerOff The VM is immediately powered-off without showing any message window. The VM logfile will show information about what happened.
-
Ignore The VM is left in stuck mode. Execution is stopped but no message window is shown. The VM has to be powered off manually.
This is a per-VM setting.
By default, the mouse is captured if the user clicks on the guest window and the guest expects relative mouse coordinates at this time. This happens if the pointing device is configured as PS/2 mouse and the guest has not yet started the Oracle VM VirtualBox Guest Additions. For instance, the guest is booting or the Guest Additions are not installed, or if the pointing device is configured as a USB tablet but the guest has no USB driver loaded yet. Once the Guest Additions become active or the USB guest driver is started, the mouse capture is automatically released.
The default behavior is sometimes not desired. Therefore it can be configured as follows:
VBoxManage setextradataVM-nameGUI/MouseCapturePolicymode
mode is one of the following:
-
Default The default behavior as described above.
-
HostComboOnly The mouse is only captured if the Host Key is toggled.
-
Disabled The mouse is never captured, also not by toggling the Host Key
This is a per-VM setting.
Oracle VM VirtualBox uses special window manager facilities to switch a multi-screen machine to full-screen on a multi-monitor host system. However, not all window managers provide these facilities correctly. Oracle VM VirtualBox can be configured to use a legacy method of switching to full-screen mode instead, by using the command:
VBoxManage setextradata global GUI/Fullscreen/LegacyMode true
You can go back to the default method by using the following command:
VBoxManage setextradata global GUI/Fullscreen/LegacyMode
This is a global setting.
It is possible to remove networking modes from Oracle VM VirtualBox GUI. To do this, use the following command:
VBoxManage setextradata global GUI/RestrictedNetworkAttachmentTypesproperty[,property...]
property is one of the following:
-
NAT Remove the NAT option from the GUI.
-
NATNetwork Remove the NAT network option from the GUI.
-
BridgedAdapter Remove the Bridged networking option from the GUI.
-
InternalNetwork Remove the Internal networking option from the GUI.
-
HostOnlyAdapter Remove the Host Only networking option from the GUI.
-
GenericDriver Remove the Generic networking option from the GUI.
This is a global setting. You can specify any combination of properties. To restore the default behavior, use the following command:
VBoxManage setextradata global GUI/RestrictedNetworkAttachmentTypes
The Oracle VM VirtualBox web service, vboxwebsrv, is used for controlling Oracle VM VirtualBox remotely. It is documented in detail in the Oracle VM VirtualBox Software Development Kit (SDK). See Chapter 11, Oracle VM VirtualBox Programming Interfaces. Web service start scripts are available for supported host operating systems. The following sections describe how to use the scripts. The Oracle VM VirtualBox web service is never started automatically as a result of a standard installation.
On Linux, the web service can be automatically started during
host boot by adding appropriate parameters to the file
/etc/default/virtualbox. There is one
mandatory parameter, VBOXWEB_USER, which must
be set to the user which will later start the VMs. The
parameters in the following table all start with the
VBOXWEB_ prefix string. For example:
VBOXWEB_HOST and
VBOXWEB_PORT.
Table 9.2. Web Service Configuration Parameters
Parameter | Description | Default |
|---|---|---|
| The user which the web service runs as | |
| The host to bind the web service to | localhost |
| The port to bind the web service to | 18083 |
| Server key and certificate file, in PEM format | |
| File name for password to server key | |
| CA certificate file, in PEM format | |
| CA certificate path | |
| DH file name or DH key length in bits | |
| File containing seed for random number generator | |
| Session timeout in seconds, 0 disables timeouts | 300 |
| Frequency of timeout checks in seconds | 5 |
| Maximum number of worker threads to run in parallel | 100 |
| Maximum number of requests before a socket will be closed | 100 |
| Number of log files, 0 disables log rotation | 10 |
| Maximum log file size to trigger rotation, in bytes | 1MB |
| Maximum time interval to trigger log rotation, in seconds | 1 day |
Setting the parameter SSL_KEYFILE enables the
SSL/TLS support. Using encryption is strongly encouraged, as
otherwise everything, including passwords, is transferred in
clear text.
On Oracle Solaris hosts, the Oracle VM VirtualBox web service daemon is integrated into the SMF framework. You can change the parameters, but do not have to if the defaults below already match your needs:
svccfg -s svc:/application/virtualbox/webservice:default setprop config/host=localhost
svccfg -s svc:/application/virtualbox/webservice:default setprop config/port=18083
svccfg -s svc:/application/virtualbox/webservice:default setprop config/user=root
The table in Section 9.18.1, “Linux: Starting the Web Service With init” showing the
parameter names and defaults also applies for Oracle Solaris.
The parameter names must be changed to lowercase and a prefix of
config/ has to be added. For example:
config/user or
config/ssl_keyfile. If you make any change,
do not forget to run the following command to put the changes
into effect immediately:
svcadm refresh svc:/application/virtualbox/webservice:default
If you forget the above command then the previous settings are used when enabling the service. Check the current property settings as follows:
svcprop -p config svc:/application/virtualbox/webservice:default
When everything is configured correctly you can start the Oracle VM VirtualBox web service with the following command:
svcadm enable svc:/application/virtualbox/webservice:default
For more information about SMF, please refer to the Oracle Solaris documentation.
On macOS, launchd is used to start the Oracle VM VirtualBox
webservice. An example configuration file can be found in
$HOME/Library/LaunchAgents/org.virtualbox.vboxwebsrv.plist.
It can be enabled by changing the Disabled
key from true to false. To
manually start the service use the following command:
launchctl load ~/Library/LaunchAgents/org.virtualbox.vboxwebsrv.plist
For additional information on how launchd services could be configured see:
The memory ballooning service, formerly known as VBoxBalloonCtrl, was renamed to VBoxWatchdog. This service now incorporates the following host services that are meant to be run in a server environment:
Memory ballooning control. This service automatically takes care of a VM's configured memory balloon. See Section 4.10.1, “Memory Ballooning”. This service is useful for server environments where VMs may dynamically require more or less memory during runtime.
The service periodically checks a VM's current memory balloon and its free guest RAM and automatically adjusts the current memory balloon by inflating or deflating it accordingly. This handling only applies to running VMs having recent Guest Additions installed.
Host isolation detection. This service provides a way to detect whether the host cannot reach the specific Oracle VM VirtualBox server instance anymore and take appropriate actions, such as shutting down, saving the current state or even powering down certain VMs.
All configuration values can be either specified using the command line or global extradata, whereas command line values always have a higher priority when set. Some of the configuration values also be specified on a per-VM basis. So the overall lookup order is: command line, per-VM basis extradata if available, global extradata.
The memory ballooning control inflates and deflates the memory balloon of VMs based on the VMs free memory and the desired maximum balloon size.
To set up the memory ballooning control the maximum ballooning size a VM can reach needs to be set. This can be specified using the command line, as follows:
--balloon-max <Size in MB>
Using a per-VM basis extradata value, as follows:
VBoxManage setextradata <VM-Name> VBoxInternal2/Watchdog/BalloonCtrl/BalloonSizeMax <Size in MB>
Using a global extradata value, as follows:
VBoxManage setextradata global VBoxInternal2/Watchdog/BalloonCtrl/BalloonSizeMax <Size in MB>
Note
If no maximum ballooning size is specified by at least one of the parameters above, no ballooning will be performed at all.
Setting the ballooning increment in MB can be either done using command line, as follows:
--balloon-inc <Size in MB>
Using a global extradata value, as follows:
VBoxManage setextradata global VBoxInternal2/Watchdog/BalloonCtrl/BalloonIncrementMB <Size in MB>
The default ballooning increment is 256 MB if not specified.
The same options apply for a ballooning decrement. Using the command line, as follows:
--balloon-dec <Size in MB>
Using a global extradata value, as follows:
VBoxManage setextradata global VBoxInternal2/Watchdog/BalloonCtrl/BalloonDecrementMB <Size in MB>
The default ballooning decrement is 128 MB if not specified.
The lower limit in MB for a balloon can be defined using the command line, as follows:
--balloon-lower-limit <Size in MB>
Using a global extradata value, as follows:
VBoxManage setextradata global VBoxInternal2/Watchdog/BalloonCtrl/BalloonLowerLimitMB <Size in MB>
The default lower limit is 128 MB if not specified.
To detect whether a host is being isolated, that is, the host cannot reach the Oracle VM VirtualBox server instance anymore, the host needs to set an alternating value to a global extradata value within a time period. If this value is not set within that time period a timeout occurred and the so-called host isolation response will be performed to the VMs handled. Which VMs are handled can be controlled by defining VM groups and assigning VMs to those groups. By default no groups are set, meaning that all VMs on the server will be handled when no host response is received within 30 seconds.
Set the groups handled by the host isolation detection using the following command line:
--apimon-groups=<string[,stringN]>
Using a global extradata value, as follows:
VBoxManage setextradata global VBoxInternal2/Watchdog/APIMonitor/Groups <string[,stringN]>
Set the host isolation timeout using the following command line:
--apimon-isln-timeout=<ms>
Using a global extradata value, as follows:
VBoxManage setextradata global VBoxInternal2/Watchdog/APIMonitor/IsolationTimeoutMS <ms>
Set the actual host isolation response using the following command line:
--apimon-isln-response=<cmd>
Using a global extradata value, as follows:
VBoxManage setextradata global VBoxInternal2/Watchdog/APIMonitor/IsolationResponse <cmd>
The following response commands are available:
none. This has no effect.pause. Pauses the execution of a VM.poweroff. Shuts down the VM by pressing the virtual power button. The VM will not have the chance of saving any data or veto the shutdown process.save. Saves the current machine state and powers off the VM afterwards. If saving the machine state fails the VM will be paused.shutdown. Shuts down the VM in a gentle way by sending anACPIshutdown event to the VM's operating system. The OS then has the chance of doing a clean shutdown.
For more advanced options and parameters like verbose logging
check the built-in command line help accessible with
--help.
On Linux, the watchdog service can be automatically started
during host boot by adding appropriate parameters to the file
/etc/default/virtualbox. There is one
mandatory parameter, VBOXWATCHDOG_USER, which
must be set to the user which will later start the VMs. For
backward compatibility you can also specify
VBOXBALLOONCTRL_USER.
The parameters in the following table all start with the
VBOXWATCHDOG_ prefix string. For example:
VBOXWATCHDOG_BALLOON_INTERVAL and
VBOXWATCHDOG_LOGSIZE. Legacy parameters such
as VBOXBALLOONCTRL_INTERVAL can still be
used.
Table 9.3. Oracle VM VirtualBox Watchdog Configuration Parameters
Parameter | Description | Default |
|---|---|---|
| The user which the watchdog service runs as | |
| Number of log files, 0 disables log rotation | 10 |
| Maximum log file size to trigger rotation, in bytes | 1MB |
| Maximum time interval to trigger log rotation, in seconds | 1 day |
| Interval for checking the balloon size, in milliseconds | 30000 |
| Balloon size increment, in megabytes | 256 |
| Balloon size decrement, in megabytes | 128 |
| Balloon size lower limit, in megabytes | 64 |
| Free memory required for decreasing the balloon size, in megabytes | 1024 |
On Oracle Solaris hosts, the Oracle VM VirtualBox watchdog service daemon is integrated into the SMF framework. You can change the parameters, but do not have to if the defaults already match your needs:
svccfg -s svc:/application/virtualbox/balloonctrl:default setprop \
  config/balloon_interval=10000
svccfg -s svc:/application/virtualbox/balloonctrl:default setprop \
config/balloon_safetymargin=134217728
Table 9.3, “Oracle VM VirtualBox Watchdog Configuration Parameters” also applies
for Oracle Solaris. The parameter names must be changed to
lowercase and a prefix of config/ has to be
added. For example: config/user or
config/balloon_safetymargin. If you made any
change, do not forget to run the following command to put the
changes into effect immediately:
svcadm refresh svc:/application/virtualbox/balloonctrl:default
If you forget the above command then the previous settings will be used when enabling the service. Check the current property settings with the following command:
svcprop -p config svc:/application/virtualbox/balloonctrl:default
When everything is configured correctly you can start the Oracle VM VirtualBox watchdog service with the following command:
svcadm enable svc:/application/virtualbox/balloonctrl:default
For more information about SMF, please refer to the Oracle Solaris documentation.
Another extension pack called VNC is available. This extension pack is open source and replaces the previous integration of the VNC remote access protocol. This is experimental code, and is initially available in the Oracle VM VirtualBox source code package only. It is to a large portion code contributed by users, and is not supported in any way by Oracle.
The keyboard handling is severely limited, and only the US keyboard layout works. Other keyboard layouts will have at least some keys which produce the wrong results, often with quite surprising effects, and for layouts which have significant differences to the US keyboard layout it is most likely unusable.
It is possible to install both the Oracle VM VirtualBox Extension Pack and VNC, but only one VRDE module can be active at any time. The following command switches to the VNC VRDE module in VNC:
VBoxManage setproperty vrdeextpack VNC
Configuring the remote access works very similarly to VRDP, see Section 7.1, “Remote Display (VRDP Support)”, with some limitations. VNC does not support specifying several port numbers, and the authentication is done differently. VNC can only deal with password authentication, and there is no option to use password hashes. This leaves no other choice than having a clear-text password in the VM configuration, which can be set with the following command:
VBoxManage modifyvm VM-name --vrde-property VNCPassword=secretThe user is responsible for keeping this password secret, and it should be removed when a VM configuration is passed to another person, for whatever purpose. Some VNC servers claim to have encrypted passwords in the configuration. This is not true encryption, it is only concealing the passwords, which is only as secure as using clear-text passwords.
The following command switches back to VRDP, if installed:
VBoxManage setproperty vrdeextpack "Oracle VM VirtualBox Extension Pack"
You can start VMs automatically during system boot on Linux, Oracle Solaris, and macOS platforms for all users.
On Linux, the autostart service is activated by setting two
variables in /etc/default/virtualbox. The
first one is VBOXAUTOSTART_DB which contains
an absolute path to the autostart database directory. The
directory should have write access for every user who should be
able to start virtual machines automatically. Furthermore the
directory should have the sticky bit set. The second variable is
VBOXAUTOSTART_CONFIG which points the service
to the autostart configuration file which is used during boot to
determine whether to allow individual users to start a VM
automatically and configure startup delays. The configuration
file can be placed in /etc/vbox and
contains several options. One is
default_policy which controls whether the
autostart service allows or denies to start a VM for users which
are not in the exception list. The exception list starts with
exception_list and contains a comma separated
list with usernames. Furthermore a separate startup delay can be
configured for every user to avoid overloading the host. A
sample configuration is given below:
# Default policy is to deny starting a VM, the other option is "allow".
default_policy = deny

# Bob is allowed to start virtual machines but starting them
# will be delayed for 10 seconds
bob = {
    allow = true
    startup_delay = 10
}

# Alice is not allowed to start virtual machines, useful to exclude certain users
# if the default policy is set to allow.
alice = {
    allow = false
}
Any user who wants to enable autostart for individual machines must set the path to the autostart database directory with the following command:
VBoxManage setproperty autostartdbpath autostart-directoryOn Oracle Solaris hosts, the Oracle VM VirtualBox autostart daemon is integrated into the SMF framework. To enable it you must point the service to an existing configuration file which has the same format as on Linux, see Section 9.21.1, “Linux: Starting the Autostart Service With init”. For example:
# svccfg -s svc:/application/virtualbox/autostart:default setprop \
  config/config=/etc/vbox/autostart.cfg
When everything is configured correctly you can start the Oracle VM VirtualBox autostart service with the following command:
# svcadm enable svc:/application/virtualbox/autostart:default
For more information about SMF, see the Oracle Solaris documentation.
On macOS, launchd is used to start the Oracle VM VirtualBox autostart
service. An example configuration file can be found in
/Applications/VirtualBox.app/Contents/MacOS/org.virtualbox.vboxautostart.plist.
To enable the service copy the file to
/Library/LaunchDaemons and change the
Disabled key from true to
false. Furthermore replace the second
parameter to an existing configuration file which has the same
format as on Linux, see Section 9.21.1, “Linux: Starting the Autostart Service With init”.
To manually start the service use the following command:
# launchctl load /Library/LaunchDaemons/org.virtualbox.vboxautostart.plist
For additional information on how launchd services can be configured see:
On Windows, autostart functionality consist of two components.
The first component is a configuration file where the
administrator can both set a delayed start for the VMs and
temporarily disable autostarting for a particular user. The
configuration file should be located in a folder accessible by
all required users but it should have permissions allowing only
reading by everyone but administrators. The configuration file
contains several options. The default_policy
controls whether the autostart service allows or denies starting
of a VM for users that are not in the exception list. The
exception list starts with exception_list and
contains a comma separated list with usernames. Furthermore, a
separate startup delay can be configured for every user to avoid
overloading the host. A sample configuration is given below:
    # Default policy is to deny starting a VM, the other option is "allow".
    default_policy = deny

    # Bob is allowed to start virtual machines but starting them
    # will be delayed for 10 seconds
    bob = {
        allow = true
        startup_delay = 10
    }

    # Alice is not allowed to start virtual machines, useful to exclude certain users
    # if the default policy is set to allow.
    alice = {
        allow = false
    }
The user name can be specified using the following forms:
"user", "domain\user", ".\user" and "user@domain". An
administrator must add the
VBOXAUTOSTART_CONFIG environment variable
into system variables containing the path to the configuration
file described above. The environment variable tells the
autostart services which configuration file is used.
The second component of autostart functionality is a Windows service. Every instance of this works on behalf of a particular user using their credentials.
To enable autostarting for a particular user, a member of the administrators group must run the following command:
VBoxAutostartSvc install --user=user[--password-file=password_file]
The password file should contain the password followed by a line break. The rest of the file is ignored. The user will be asked for a password if the password file is not specified.
To disable autostarting for particular user, a member of the administrators group must run the following command:
VBoxAutostartSvc delete --user=userIf a user has changed their password then a member of the administrators group must either reinstall the service or change the service credentials using Windows Service Manager. Due to Windows security policies, the autostart service cannot be installed for users with empty passwords.
Finally, the user should define which VMs should be started at boot. The user should run the following command for every VM they wish to start at boot:
VBoxManage modifyvm VM name or UUID --autostart-enabled onThe user can remove a particular VM from the VMs starting at boot by running the following command:
VBoxManage modifyvm VM name or UUID --autostart-enabled offNote
On Windows hosts, starting VMs via the autostart service might cause some issues, as the virtual machines are starting within the same session as VBoxSVC. For more information see Section 9.35, “VBoxSVC running in Windows Session 0”.
Oracle VM VirtualBox enables you to transparently encrypt the VM data stored in the configuration file, saved state, and EFI boot data for the guest.
Oracle VM VirtualBox uses the AES algorithm in various modes. The selected mode depends on the encrypting component of the VM. Oracle VM VirtualBox supports 128-bit or 256-bit data encryption keys (DEK). The DEK is stored encrypted in the VM configuration file and is decrypted during VM startup.
Since the DEK is stored as part of the VM configuration file, it is important that the file is kept safe. Losing the DEK means that the data stored in the VM is lost irrecoverably. Having complete and up to date backups of all data related to the VM is the responsibility of the user.
The VM, even if it is encrypted, may contain media encrypted with different passwords. To deal with this, the password for the VM has a password identifier, in the same way as passwords for media. The password ID is an arbitrary string which uniquely identifies the password in the VM and its media. You can use the same password and ID for both the VM and its media.
There are some limitations the user needs to be aware of when using this feature:
Exporting appliances containing an encrypted VM is not possible, because the OVF specification does not support this. The VM is therefore decrypted during export.
The DEK is kept in memory while the VM is running to be able to encrypt and decrypt VM data. While this should be obvious the user needs to be aware of this because an attacker might be able to extract the key on a compromised host and decrypt the data.
When encrypting or decrypting the VM, the password is passed in clear text using the Oracle VM VirtualBox API. This needs to be kept in mind, especially when using third party API clients which make use of the web service where the password might be transmitted over the network. The use of HTTPS is mandatory in such a case.
Encrypting a VM can be done either using VirtualBox Manager or the VBoxManage. To encrypt an unencrypted VM with VBoxManage, use:
VBoxManage encryptvmuuid|vmnamesetencryption --new-passwordfilename|- \ --ciphercipher-ID--new-password-idID
To supply the encryption password, point
VBoxManage to the file where the password is
stored or specify - to let
VBoxManage prompt for the password on the
command line.
The cipher parameter specifies the cipher to use for encryption
and can be either AES-128 or
AES-256. The appropriate mode of operation,
such as GCM, CTR, or XTS will be selected by the VM depending on
the encrypting component. The specified password identifier can
be freely chosen by the user and is used for correct
identification when supplying multiple passwords for the VM.
When Oracle VM VirtualBox has just started up the encrypted VM cannot be opened and it stays inaccessible. Also, the encrypted VM stays inaccessible if it was just registered without a password or the password is incorrect. The user needs to provide the password using VirtualBox Manager or with the following VBoxManage command:
VBoxManage encryptvmuuid|vmnameaddpassword --passwordfilename|- --password-idID
To supply the encryption password point
VBoxManage to the file where the password is
stored or specify - to let
VBoxManage prompt for the password on the
command line.
If ID is the same as the password
identifier supplied when encrypting the VM it updates the
accessibility state.
To remove the entered password from the VM memory, use VBoxManage as follows:
VBoxManage encryptvmuuid|vmnameremovepasswordID
If ID is the same as the password
identifier supplied when encrypting the VM it updates the
accessibility state.
Note
If a machine becomes inaccessible all passwords are purged.
You have to add required passwords again, using the
VBoxManage encryptvm
vmname addpassword
command. See Section 9.22.3, “Opening the Encrypted VM”.
In some circumstances it might be required to decrypt previously encrypted VMs. This can be done in VirtualBox Manager or using VBoxManage with the following command:
VBoxManage encryptvmuuid|vmnamesetencryption --old-passwordfile|-
The only required parameter is the password the VM was encrypted with. The options are the same as for encrypting VMs.
In case the snapshot model of Oracle VM VirtualBox is not sufficient it is possible to enable a special mode which makes it possible to reconfigure storage attachments while the VM is paused. The user has to make sure that the disk data stays consistent to the guest because unlike with hotplugging the guest is not informed about detached or newly attached media.
The expert storage management mode can be enabled per VM executing:
$ VBoxManage setextradata VM-name "VBoxInternal2/SilentReconfigureWhilePaused" 1You can reconfigure storage attachments later while the VM is paused by using the VBoxManage storageattach command.
Some host power management events are handled by Oracle VM VirtualBox. The actual behavior depends on the platform:
Host Suspends. This event is generated when the host is about to suspend, that is, the host saves the state to some non-volatile storage and powers off.
This event is currently only handled on Windows hosts and Mac OS X hosts. When this event is generated, Oracle VM VirtualBox will pause all running VMs.
Host Resumes. This event is generated when the host woke up from the suspended state.
This event is currently only handled on Windows hosts and Mac OS X hosts. When this event is generated, Oracle VM VirtualBox will resume all VMs which are where paused before.
Battery Low. The battery level reached a critical level, usually less than 5 percent charged.
This event is currently only handled on Windows hosts and Mac OS X hosts. When this event is generated, Oracle VM VirtualBox will save the state and terminate all VMs in preparation of a potential host powerdown.
The behavior can be configured. By executing the following command, no VM is saved:
$ VBoxManage setextradata global "VBoxInternal2/SavestateOnBatteryLow" 0
This is a global setting as well as a per-VM setting. The per-VM value has higher precedence than the global value. The following command will save the state of all VMs but will not save the state of VM "foo":
$ VBoxManage setextradata global "VBoxInternal2/SavestateOnBatteryLow" 1
$ VBoxManage setextradata "foo" "VBoxInternal2/SavestateOnBatteryLow" 0
The first line is actually not required as by default the savestate action is performed.
To provide SSE 4.1/SSE 4.2 support to guests, the host CPU has to implement these instruction sets. The instruction sets are exposed to guests by default, but it is possible to disable the instructions for certain guests by using the following commands:
$ VBoxManage setextradataVM-name\ VBoxInternal/CPUM/IsaExts/SSE4.1 0 $ VBoxManage setextradataVM-name\ VBoxInternal/CPUM/IsaExts/SSE4.2 0
These are per-VM settings which are enabled by default.
This feature makes the host keyboard indicators (LEDs) match those of the VM's emulated keyboard when the machine window is active. It is currently implemented for macOS and Windows hosts. This feature is enabled by default on supported host OSes. You can disable this feature by running the following command:
$ VBoxManage setextradata VM-name GUI/HidLedsSync 0This is a per-VM setting that is enabled by default.
You can capture USB traffic for single USB devices or on the root hub level, which captures the traffic of all USB devices attached to the root hub. Oracle VM VirtualBox stores the traffic in a format which is compatible with Wireshark. To capture the traffic of a specific USB device it must be attached to the VM with VBoxManage using the following command:
VBoxManage controlvmVM-nameusbattachdevice uuid|address--capturefilefilename
In order to enable capturing on the root hub use the following command while the VM is not running:
VBoxManage setextradataVM-name\ VBoxInternal/Devices/usb-ehci/0/LUN#0/Config/CaptureFilenamefilename
The command above enables capturing on the root hub attached to
the EHCI controller. To enable it for the OHCI or XHCI controller
replace usb-ehci with
usb-ohci or usb-xhci,
respectively.
Oracle VM VirtualBox ships a simple heartbeat service. Once the Guest Additions are active, the guest sends frequent heartbeat pings to the host. If the guest stops sending the heartbeat pings without properly terminating the service, the VM process will log this event in the VBox.log file. In the future it might be possible to configure dedicated actions but for now there is only a warning in the log file.
There are two parameters to configure. The heartbeat interval defines the time between two heartbeat pings. The default value is 2 seconds, that is, the heartbeat service of the Oracle VM VirtualBox Guest Additions will send a heartbeat ping every two seconds. The value in nanoseconds can be configured like this:
VBoxManage setextradata VM-name \
VBoxInternal/Devices/VMMDev/0/Config/HeartbeatInterval 2000000000
The heartbeat timeout defines the time the host waits starting from the last heartbeat ping before it defines the guest as unresponsive. The default value is 2 times the heartbeat interval (4 seconds) and can be configured as following, in nanoseconds:
VBoxManage setextradata VM-name \
VBoxInternal/Devices/VMMDev/0/Config/HeartbeatTimeout 4000000000
If the heartbeat timeout expires, there will be a log message like VMMDev: HeartBeatCheckTimer: Guest seems to be unresponsive. Last heartbeat received 5 seconds ago. If another heartbeat ping arrives after this warning, there will be a log message like VMMDev: GuestHeartBeat: Guest is alive.
Oracle VM VirtualBox enables you to transparently encrypt the data stored in hard disk images for the guest. It does not depend on a specific image format to be used. Images which have the data encrypted are not portable between Oracle VM VirtualBox and other virtualization software.
Oracle VM VirtualBox uses the AES algorithm in XTS mode and supports 128-bit or 256-bit data encryption keys (DEK). The DEK is stored encrypted in the medium properties and is decrypted during VM startup by entering a password which was chosen when the image was encrypted.
Since the DEK is stored as part of the VM configuration file, it is important that it is kept safe. Losing the DEK means that the data stored in the disk images is lost irrecoverably. Having complete and up to date backups of all data related to the VM is the responsibility of the user.
There are some limitations the user needs to be aware of when using this feature:
This feature is part of the Oracle VM VirtualBox Extension Pack, which needs to be installed. Otherwise disk encryption is unavailable.
Since encryption works only on the stored user data, it is currently not possible to check for metadata integrity of the disk image. Attackers might destroy data by removing or changing blocks of data in the image or change metadata items such as the disk size.
Exporting appliances which contain encrypted disk images is not possible because the OVF specification does not support this. All images are therefore decrypted during export.
The DEK is kept in memory while the VM is running to be able to decrypt data read and encrypt data written by the guest. While this should be obvious the user needs to be aware of this because an attacker might be able to extract the key on a compromised host and decrypt the data.
When encrypting or decrypting the images, the password is passed in clear text using the Oracle VM VirtualBox API. This needs to be kept in mind, especially when using third party API clients which make use of the webservice where the password might be transmitted over the network. The use of HTTPS is mandatory in such a case.
Encrypting images with differencing images is only possible if there are no snapshots or a linear chain of snapshots. This limitation may be addressed in a future Oracle VM VirtualBox version.
The disk encryption feature can protect the content of the disks configured for a VM only. It does not cover any other data related to a VM, including saved state or the configuration file itself.
Encrypting disk images can be done either using VirtualBox Manager or the VBoxManage. While VirtualBox Manager is easier to use, it works on a per VM basis and encrypts all disk images attached to the specific VM. With VBoxManage one can encrypt individual images, including all differencing images. To encrypt an unencrypted medium with VBoxManage, use:
VBoxManage encryptmediumuuid|filename\ --newpasswordfilename|- --ciphercipher-ID--newpasswordid "ID
To supply the encryption password point
VBoxManage to the file where the password is
stored or specify - to let VBoxManage ask you
for the password on the command line.
The cipher parameter specifies the cipher to use for encryption
and can be either AES-XTS128-PLAIN64 or
AES-XTS256-PLAIN64. The specified password
identifier can be freely chosen by the user and is used for
correct identification when supplying multiple passwords during
VM startup.
If the user uses the same password when encrypting multiple images and also the same password identifier, the user needs to supply the password only once during VM startup.
When a VM is started using VirtualBox Manager, a dialog will open where the user needs to enter all passwords for all encrypted images attached to the VM. If another frontend like VBoxHeadless is used, the VM will be paused as soon as the guest tries to access an encrypted disk. The user needs to provide the passwords through VBoxManage using the following command:
VBoxManage controlvmuuid|vmnameaddencpasswordIDpassword[--removeonsuspend yes|no]
ID must be the same as the password
identifier supplied when encrypting the images.
password is the password used when
encrypting the images. Optionally, you can specify
--removeonsuspend yes|no to specify whether to
remove the password from VM memory when the VM is suspended.
Before the VM can be resumed, the user needs to supply the
passwords again. This is useful when a VM is suspended by a host
suspend event and the user does not want the password to remain
in memory.
In some circumstances it might be required to decrypt previously encrypted images. This can be done in VirtualBox Manager for a complete VM or using VBoxManage with the following command:
VBoxManage encryptmediumuuid|filename--oldpasswordfile|-
The only required parameter is the password the image was encrypted with. The options are the same as for encrypting images.
This section covers debugging of guest operating systems using interfaces supported by paravirtualization providers.
Note
Paravirtualized debugging significantly alter guest operating system behaviour and should only be used by expert users for debugging and diagnostics.
These debug options are specified as a string of key-value pairs separated by commas. An empty string disables paravirtualized debugging.
All of the options listed below are optional, and thus the default value specified will be used when the corresponding key-value pair is not specified.
Key:
enabledValue:
0or1Default:
0Specify
1to enable the Hyper-V debug interface. If this key-value pair is not specified or the value is not1, the Hyper-V debug interface is disabled regardless of other key-value pairs being present.Key:
addressValue: IPv4 address
Default: 127.0.0.1
Specify the IPv4 address where the remote debugger is connected.
Key:
portValue: UDP port number
Default: 50000
Specify the UDP port number where the remote debugger is connected.
Key:
vendorValue: Hyper-V vendor signature reported by CPUID to the guest
Default: When debugging is enabled:
Microsoft
            Hv
, otherwise:VBoxVBoxVBoxSpecify the Hyper-V vendor signature which is exposed to the guest by CPUID. For debugging Microsoft Windows guests, it is required the hypervisor reports the Microsoft vendor.
Key:
hypercallinterfaceValue:
0or1Default:
0Specify whether hypercalls should be suggested for initiating debug data transfers between host and guest rather than MSRs when requested by the guest.
Key:
vsinterfaceValue:
0or1Default: When debugging is enabled,
1, otherwise0Specify whether to expose the VS#1 virtualization service interface to the guest. This interface is required for debugging Microsoft Windows 10 32-bit guests, but is optional for other Windows versions.
Windows supports debugging over a serial cable, USB, IEEE 1394 Firewire, and Ethernet. USB and IEEE 1394 are not applicable for virtual machines, and Ethernet requires Windows 8 or later. While a serial connection is universally usable, it is slow.
Debugging using the Hyper-V debug transport, supported on Windows Vista and later, offers significant benefits. It provides excellent performance due to direct host-to-guest transfers, it is easy to set up and requires minimal support from the hypervisor. It can be used with the debugger running on the same host as the VM or with the debugger and VM on separate machines connected over a network.
Prerequisites
A VM configured for Hyper-V paravirtualization running a Windows Vista or newer Windows guest. You can check the effective paravirtualization provider for your VM with the output of the following VBoxManage command:
$ VBoxManage showvminfo
VM-nameA sufficiently up-to-date version of the Microsoft WinDbg debugger required to debug the version of Windows in your VM.
While Windows 8 and newer Windows guests ship with Hyper-V debug support, Windows 7 and Vista do not. To use Hyper-V debugging with a Windows 7 or Vista guest, copy the file
kdvm.dllfrom a Windows 8.0 installation. This file is typically located inC:\Windows\System32. Copy it to the same location in your Windows 7/Vista guest. Make sure you copy the 32-bit or 64-bit version of the DLL which matches your guest OS.Note
Only Windows 8.0 ships
kdvm.dll. Windows 8.1 and newer Windows versions do not.
VM and Guest Configuration
Power off the VM.
Enable the debug options with the following VBoxManage command:
$ VBoxManage modifyvm
VM-name--paravirt-debug "enabled=1"The above command assumes your debugger will connect to your host machine on UDP port 50000. However, if you need to run the debugger on a remote machine you may specify the remote address and port here. For example:
$ VBoxManage modifyvm
VM-name\ --paravirt-debug "enabled=1,address=192.168.32.1,port=55000"See Section 9.30.1, “Hyper-V Debug Options” for the complete set of options.
Start the VM.
In the guest, start an elevated command prompt and execute the following commands:
For a Windows 8 or newer Windows guest:
bcdedit /dbgsettings net hostip:5.5.5.5 port:50000 key:1.2.3.4
For a Windows 7 or Vista guest:
bcdedit /set loadoptions host_ip=5.5.5.5,host_port=50000,encryption_key=1.2.3.4
bcdedit /set dbgtransport kdvm.dll
The IP address and port in the bcdedit command are ignored when using the Hyper-V debug transport. Any valid IP and a port number greater than 49151 and lower than 65536 can be entered.
The encryption key in the bcdedit command is relevant and must be valid. The key "1.2.3.4" used in the above example is valid and may be used if security is not a concern. If you do not specify any encryption key, bcdedit will generate one for you and you will need to copy this key to later enter in Microsoft WinDbg on the remote end. This encryption key is used to encrypt the debug data exchanged between Windows and the debugger.
Run one or more of the following commands to enable debugging for the appropriate phase or component of your Windows guest:
bcdedit /set debug on
bcdedit /set bootdebug on
bcdedit /set {bootmgr} bootdebug onPlease note that the bootdebug options are only effective on Windows 8 or newer when using the Hyper-V debug transport. Refer to Microsoft Windows documentation for detailed explanation of bcdedit options.
Start Microsoft WinDbg on your host machine or remote host.
From the File menu, select Kernel Debug. On the NET tab, specify the UDP port number you used in the
paravirtdebugoptions. If you did not specify any, leave it as 50000. Ensure that the UDP port is not blocked by a firewall or other security software.In the Key field, enter
1.2.3.4or the encryption key from the bcdedit command in your Windows guest.Click OK to start listening for connections. Microsoft WinDbg typically shows a Waiting to Reconnect message during this phase.
Alternatively, to directly start a debug session, run WinDbg from the command line as follows :
windbg.exe -k net:port=50000,key=1.2.3.4
See the WinDbg documentation for the complete command line syntax.
Reboot your Windows guest and it should then connect as a debuggee with Microsoft WinDbg.
As an experimental feature, primarily due to being limited to Linux host only and unknown Linux distribution coverage, Oracle VM VirtualBox supports passing through the PC speaker to the host. The PC speaker, sometimes called the system speaker, is a way to produce audible feedback such as beeps without the need for regular audio and sound card support.
The PC speaker passthrough feature in Oracle VM VirtualBox handles beeps only. Advanced PC speaker use by the VM, such as PCM audio, will not work, resulting in undefined host behavior.
Producing beeps on Linux is a very complex topic. Oracle VM VirtualBox offers a collection of options, in an attempt to make this work deterministically and reliably on as many Linux distributions and system configurations as possible. These are summarized in the following table.
Table 9.4. PC Speaker Configuration Options
Code | Device | Notes |
|---|---|---|
1 |
| Direct host PC speaker use. |
2 | /dev/tty | Uses the terminal association of the VM process. VM needs to be started on a virtual console. |
3 |
|
Can only be used by user |
9 | A user-specified console or evdev device path. | As for codes 1 to 3, but with a custom device path. |
70 |
| Standard beep only. Loses frequency and length. See code 2. |
79 | A user-specified terminal device path. | As for code 70, but with a custom device path. |
100 | All of the above. | Tries all the available codes. |
To enable PC speaker passthrough use the following command:
VBoxManage setextradataVM-name"VBoxInternal/Devices/i8254/0/Config/PassthroughSpeaker"N
Replace N with the code representing
the case you want to use. Changing this setting takes effect when
you next start the VM. It is safe to enable PC speaker passthrough
on all host OSes. It will only have an effect on Linux.
The VM log file, VBox.log, contains lines
with the prefix PIT: speaker: showing the PC
speaker passthrough setup activities. It gives hints which device
it picked or why it failed.
Enabling PC speaker passthrough for the VM is usually the simple
part. The real difficulty is making sure that Oracle VM VirtualBox can
access the necessary device, because in a typical Linux install
most of them can only be accessed by user root.
You should follow the preferred way to persistently change this,
such as by referring to your distribution's documentation. Since
there are countless Linux distribution variants, we can only give
the general hints that there is often a way to give the X11
session user access to additional devices, or you need to find a
working solution using a udev configuration file. If everything
fails you might try setting the permissions using a script which
is run late enough in the host system startup.
Sometimes additional rules are applied by the kernel to limit access. For example, that the VM process must have the same controlling terminal as the device configured to be used for beeping, something which is often very difficult to achieve for GUI applications such as Oracle VM VirtualBox. The table above contains some hints, but in general refer to the Linux documentation.
If you have trouble getting any beeps even if the device permissions are set up and VBox.log confirms that it uses evdev or console for the PC speaker control, check if your system has a PC speaker. Some systems do not have one. Other complications can arise from Linux rerouting the PC speaker output to a sound card. Check if the beeps are audible if you connect speakers to your sound card. Today almost all systems have one. Finally, check if the audio mixer control has a channel named "beep", which could be hidden in the mixer settings, and that it is not muted.
Oracle VM VirtualBox supports passing through USB devices which are exposed over the network using the USB over IP protocol without the need to configure the client side provided by the kernel and usbip tools. Furthermore, this feature works with Oracle VM VirtualBox running on any supported host, rather than just Linux alone, as is the case with the official client.
To enable support for passing through USB/IP devices, use the following command to add the device server that exports the devices:
VBoxManage usbdevsource addunique-name--backendUSBIP--addressdevice-server[:port]
USB devices exported on the device server are then accessible through VirtualBox Manager or VBoxManage, like any USB devices attached locally. This can be used multiple times to access different device servers.
To remove a device server, the following command can be used:
$ VBoxManage usbdevsource remove unique-name
This section gives a brief overview on how to set up a Linux
based system to act as a USB device server. The system on the
server requires that the usbip-core.ko and
usbip-host.ko kernel drivers are available,
and that the USB/IP tools package is installed. The particular
installation method for the necessary tools depends on which
distribution is used. For example, for Debian based systems, use
the following command to install the required tools:
$ apt-get install usbip-utils
To check whether the necessary tools are already installed use the following command:
$ usbip list -l
This should produce output similar to that shown in the example below:
 - busid 4-2 (0bda:0301)
   Realtek Semiconductor Corp. : multicard reader (0bda:0301)

 - busid 5-1 (046d:c52b)
   Logitech, Inc. : Unifying Receiver (046d:c52b)
If everything is installed, the USB/IP server needs to be
started as root using the following command:
# usbipd -D
See the documentation for the installed distribution to determine how to start the service when the system boots.
By default, no device on the server is exported. This must be done manually for each device. To export a device use the following command:
# usbip bind -b "bus identifier"
To export the multicard reader in the previous example:
# usbip bind -b 4-2
The communication between the server and client is unencrypted and there is no authorization required to access exported devices. An attacker might sniff sensitive data or gain control over a device. To mitigate this risk, the device should be exposed over a local network to which only trusted clients have access. To access the device remotely over a public network, a VPN solution should be used to provide the required level of security protection.
Oracle VM VirtualBox can be used on a Windows host where Hyper-V is running. This is an experimental feature.
No configuration is required. Oracle VM VirtualBox detects Hyper-V automatically and uses Hyper-V as the virtualization engine for the host system. The CPU icon in the VM window status bar indicates that Hyper-V is being used.
Note
When using this feature, some host systems might experience significant Oracle VM VirtualBox performance degradation.
Oracle VM VirtualBox supports nested virtualization. This feature enables the passthrough of hardware virtualization functions to the guest VM. That means that you can install a hypervisor, such as Oracle VM VirtualBox, Oracle VM Server or KVM, on an Oracle VM VirtualBox guest. You can then create and run VMs within the guest VM.
Hardware virtualization features not present on the host CPU will not be exposed to the guest. In addition, some features such as nested paging are not yet supported for passthrough to the guest.
You can enable the nested virtualization feature in one of the following ways:
From VirtualBox Manager, select the Enable Nested VT-x/AMD-V check box on the Processor tab. To disable the feature, deselect the check box.
Use the
--nested-hw-virtoption of the VBoxManage modifyvm command to enable or disable nested virtualization. See Section 8.10, “VBoxManage modifyvm”.
Oracle VM VirtualBox supports executing the VBoxSVC in Windows session 0. This allows VBoxSVC to run like a regular Windows service, which in turn enables headless VMs to continue running even if the user logs out.
Note
This is currently an experimental feature.
The feature is disabled by default and can be enabled by creating
a REG_DWORD value ServerSession0 in the key
HKEY_LOCAL_MACHINE\Software\Oracle\VirtualBox\VBoxSDS
of the Windows registry. Specify 1 as the
value's data to enable the feature, or 0 to
disable the feature. A host reboot is needed in order to make the
change effective.
Due to different Windows sessions having their own set of resources, there might be some issues with accessing network shares created in the interactive user session when at least one of the Oracle VM VirtualBox processes are running in session 0.
For accessing network shares within session 0, a possible workaround is to establish permanent access to the share and then restart the host.
ISO image maker.
Construct a virtual ISO 9660 / Joliet / UDF / HFS hybrid image and either write it to a file (RTIsoMaker) or serve it as a virtual image (VISO).
A VISO file is a virtual ISO image, i.e. constructed in memory from a bunch of files on the host. A VISO is just the recipe describing how to go about this using a syntax vaguely similar to mkisofs and genisoimage.
One requirement is that the VISO file must start with one of the
--iprt-iso-maker-file-marker options. Which of the options you use will
dictate the quoting and escaping rules used when reading the file. The option takes the
image UUID as an argument.
The VISO files are treated as UTF-8 and must not contain any byte order marker (BOM). There is currently no way to comment out lines in a VISO file.
All non-options that does not start with '@' are taken to indicate a file, directory, or similar that is should be added to the ISO image. Directories are added recursively and content is subject to filtering options.
Since there can be up to six different namespaces on an ISO, it is handy to be able to
control the names used in each and be able to exclude an object from one or more namespaces.
The --name-setup option specifies the file specification format to use
forthwith.
The default setup is:
--name-setup iso+joliet+udf+hfs
Which means you specify one on-ISO name for all namespaces followed by '=' and the source file system name. Only specifying the source file system will add the file/dir/whatever to the root of the ISO image.
Lets look at the following two examples:
/docs/readme.txt=/home/user/Documents/product-x-readme.txt
/home/user/Documents/product-x-readme.txt
In the first case the file '/home/user/Documents/product-x-readme.txt'
is added to the ISO image as '/docs/readme.txt' in all
enabled namespaces. In the primary ISO 9660 namespace, the filename will by default be
converted to upper case because it's required by the spec.
In the second case the file is added to the root under the name
'product-x-readme.txt' in all namespaces. Though, in the
primary ISO 9660 namespace the name will be transformed to apply with the current ISO level,
probably uppercased, possibly truncated too.
Given --name-setup iso,joliet,udf you can specify the name individually
for each of the three namespace, if you like. If you omit any, they will use last name given.
Any names left blank (==) will be considered omitted.
A different name in each namespace:
/ISO.TXT=/Joliet.TxT=/UDF.txt=/tmp/iso/real.txt
Specific name in the ISO 9660 namespace, same in the rest:
/ISO.TXT=/OtherNamespaces.TxT=/tmp/iso/real.txt
Omit the file from the ISO 9660 namespace:
=/OtherNamespaces.TxT=/tmp/iso/real.txt
Omit the file from the joliet namespace:
/ISO.TXT==/UDF.TxT=/tmp/iso/real.txt
Use the same filename as the source everywhere:
/tmp/iso/real.txt
Using for instance --name-setup udf you can add a files/dirs/whatever
to select namespace(s) without the more complicated empty name syntax above.
When adding directories, you can only control the naming and omitting of the directory itself, not any recursively added files and directories below it.
-
-o,output-file--output=output-file The output filename. This option is not supported in VISO mode.
-
--name-setup=spec Configures active namespaces and how file specifications are to be interpreted. The specification is a comma separated list. Each element in the list is a sub-list separated by space,
'+'or'|'giving the namespaces that elements controls. Namespaces are divied into two major and minor ones, you cannot specifying a minor before the major it belongs to.Major namespaces and aliases in parentheses:
iso (primary, iso9660, iso-9660, primary-iso, iso-primary)
joliet
udf
hfs (hfs-plus)
Minor namespaces:
rock: rock ridge on previous major namespace (iso / joliet)
iso-rock: rock ridge extensions on primary ISO 9660 namespace
joliet-rock: rock ridge on joliet namespace (just for fun)
trans-tbl: translation table file on previous major namespace
iso-trans-tbl
joliet-trans-tbl
udf-trans-tbl
hfs-trans-tbl
-
--name-setup-from-import This is for use following one or more
--import-isooperations and will pick a configuration matching the imported content as best we can. If the imported ISOs only had a iso9660 namespace, the joliet, udf and hfs namespaces will be removed. This is useful when adding additional files to the ISO and will prevent guest from picking a namespace without the imported ISO content when mounting it.-
--push-iso=,iso-file--push-iso-no-joliet=,iso-file--push-iso-no-rock-,iso-file--push-iso-no-rock-no-joliet=iso-file Open the specified ISO file and use it as source file system until the corresponding
--popoptions is encountered. The variations are for selecting which namespace on the ISO to (not) access. These options are handy for copying files/directories/stuff from an ISO without having to extract them first or using the:iprtvfs:syntax.-
--pop Pops a
--push-isoof the source file system stack.-
--import-iso=iso-file Imports everything on the given ISO file, including boot configuration and system area (first 16 sectors) content. You can use
--name-setupto omit namespaces.
-
--iso-level=0|1|2|3 Sets the ISO level:
0: Disable primary ISO namespace.
1: ISO level 1: Filenames 8.3 format and limited to 4GB - 1.
2: ISO level 2: 31 char long names and limited to 4GB - 1.
3: ISO level 3: 31 char long names and support for >=4GB files. (default)
4: Fictive level used by other tools. Not yet implemented.
-
--rock-ridge,--limited-rock-ridge,--no-rock-ridge Enables or disables rock ridge support for the primary ISO 9660 namespace. The
--limited-rock-ridgeoption omits a couple of bits in the root directory that would make Linux pick rock ridge over joliet.Default:
--limited-rock-ridge-
-J,--joliet,--no-joliet Enables or disable the joliet namespace. This option must precede any file specifications.
Default:
--joliet-
--joliet-ucs-level=,1|2|3--ucs-level=1|2|3 Set the Joliet UCS support level. This is currently only flagged in the image but not enforced on the actual path names.
Default level: 3
-
--rational-attribs Enables rational file attribute handling (default):
Owner ID is set to zero
Group ID is set to zero
Mode is set to 0444 for non-executable files.
Mode is set to 0555 for executable files.
Mode is set to 0555 for directories, preserving stick bits.
-
--strict-attribs Counters
--rational-attribsand causes attributes to be recorded exactly as they appear in the source.-
--file-mode=,mode--no-file-mode Controls the forced file mode mask for rock ridge, UDF and HFS.
-
--dir-mode=,mode--no-dir-mode Controls the forced directory mode mask for rock ridge, UDF and HFS.
-
--new-dir-mode=mode Controls the default mode mask (rock ridge, UDF, HFS) for directories that are created implicitly. The
--dir-modeoption overrides this.-
--chmod=mode:on-iso-file Explictily sets the rock ridge, UDF and HFS file mode for a file/dir/whatever that has already been added to the ISO. The mode can be octal,
ra+x,a+r, ora+rx. (Support for more complicated mode specifications may be implemented at a later point.)Note that only namespaces in the current --name-setup are affected.
-
--chown=owner-id:on-iso-file Explictily sets the rock ridge, UDF and HFS file owner ID (numeric) for a file/dir/whatever that has already been added to the ISO.
Note that only namespaces in the current --name-setup are affected.
- --chgrp=
group-id:on-iso-file Explictily sets the rock ridge, UDF and HFS file group ID (numeric) for a file/dir/whatever that has already been added to the ISO.
Note that only namespaces in the current --name-setup are affected.
-
--eltorito-new-entry,--eltorito-alt-boot Starts a new El Torito boot entry.
-
--eltorito-add-image=filespec File specification of a file that should be added to the image and used as the El Torito boot image of the current boot entry.
-
-b,on-iso-file--eltorito-boot=on-iso-file Specifies a file on the ISO as the El Torito boot image for the current boot entry.
-
--eltorito-floppy-12,--eltorito-floppy-144,--eltorito-floppy-288,--no-emulation-boot,--hard-disk-boot Sets the boot image emulation type of the current El Torito boot entry.
-
--boot-load-seg=seg Specify the image load segment for the current El Torito boot entry.
Default: 0x7c0
-
--boot-load-size=sectors Specify the image load size in emulated sectors for the current El Torito boot entry.
Default: 4 (sectors of 512 bytes)
-
--no-boot Indicates that the current El Torito boot entry isn't bootable. (The BIOS will allegedly configure the emulation, but not attempt booting.)
-
--boot-info-table Write a isolinux/syslinux boot info table into the boot image for the current El Torito boot entry.
-
--eltorito-platform-id=id Set the El Torito platform ID of the current entry, a new entry of the verification entry depending on when it's used. The ID must be one of:
x86,PPC,Mac,efi-
-c,namespec--boot-catalog=namespec Enters the El Torito boot catalog into the namespaces as a file. The
namespecuses the same format as a 'filespec', but omits the final source file system name component.-
-G,file--generic-boot=file Specifies a file that should be loaded at offset 0 in the ISO image. The file must not be larger than 32KB. When creating a hybrid image, parts of this may be regenerated by partition tables and such.
-
--abstract=file-id The name of the abstract file in the root dir.
-
-A,text|_file-id--application-id=text|_file-id Application ID string or root file name. The latter must be prefixed with an underscore.
-
--biblio=file-id The name of the bibliographic file in the root dir.
-
--copyright=file-id The name of the copyright file in the root dir.
-
-P,text|_file-id--publisher=text|_file-id Publisher ID string or root file name. The latter must be prefixed with an underscore.
-
-p,text|_file-id--preparer=text|_file-id Data preparer ID string or root file name. The latter must be prefixed with an underscore.
-
--sysid=text System ID string.
-
--volid=,text--volume-id=text Volume ID string (label). (It is possible to set different labels for primary ISO 9660, joliet, UDF and HFS by changing the active namespaces using the
--name-setupoption between--volume-idoccurences.)-
--volset=text Volume set ID string.
-
--iprt-iso-maker-file-marker=,UUID--iprt-iso-maker-file-marker-bourne=,UUID--iprt-iso-maker-file-marker-bourne-sh=UUID Used as first option in a VISO file to specify the file UUID and that it is formatted using bourne-shell argument quoting & escaping style.
-
--iprt-iso-maker-file-marker-ms=,UUID--iprt-iso-maker-file-marker-ms-sh=UUID Used as first option in a VISO file to specify the file UUID and that it is formatted using microsoft CRT argument quoting & escaping style.
-
--output-buffer-size=bytes Selects a specific output buffer size for testing virtual image reads.
-
--random-output-buffer-size Enables randomized buffer size for each virtual image read, using the current output buffer size (
--output-buffer-size) as maximum.-
--random-order-verification=size Enables verification pass of the image that compares blocks of the given size in random order from the virtual and output images.
Table of Contents
This chapter provides additional information for readers who are familiar with computer architecture and technology and wish to find out more about how Oracle VM VirtualBox works under the hood. The contents of this chapter are not required reading in order to use Oracle VM VirtualBox successfully.
In Oracle VM VirtualBox, a virtual machine and its settings are described in a virtual machine settings file in XML format. In addition, most virtual machines have one or more virtual hard disks. These are typically represented by disk images, such as those in VDI format. The location of these files may vary, depending on the host operating system. See Section 10.1.1, “The Machine Folder”.
Global configuration data for Oracle VM VirtualBox is maintained in another location on the host. See Section 10.1.2, “Global Settings”.
By default, each virtual machine has a directory on your host
computer where all the files of that machine are stored: the XML
settings file, with a .vbox file extension,
and its disk images. This is called the machine
folder.
By default, this machine folder is located in a common folder
called VirtualBox VMs, which Oracle VM VirtualBox
creates in the current system user's home directory. The
location of this home directory depends on the conventions of
the host operating system, as follows:
On Windows, this is the location returned by the
SHGetFolderPathfunction of the Windows system library Shell32.dll, asking for the user profile. A typical location isC:\Users\.usernameOn Linux, macOS, and Oracle Solaris, this is generally taken from the environment variable
$HOME, except for the userrootwhere it is taken from the account database. This is a workaround for the frequent trouble caused by users using Oracle VM VirtualBox in combination with the tool sudo, which by default does not reset the environment variable$HOME.A typical location on Linux and Oracle Solaris is
/home/and on macOS isusername/Users/.username
For simplicity, we abbreviate the location of the home directory
as $HOME. Using that convention, the common
folder for all virtual machines is $HOME/VirtualBox
VMs.
As an example, when you create a virtual machine called "Example VM", Oracle VM VirtualBox creates the following:
A machine folder:
$HOME/VirtualBox VMs/Example VM/In the machine folder, a settings file:
Example
            VM.vbox
In the machine folder, a virtual disk image:
Example VM.vdi.
This is the default layout if you use the
Create New Virtual Machine
wizard described in Section 1.8, “Creating Your First Virtual Machine”. Once you
start working with the VM, additional files are added. Log files
are in a subfolder called Logs, and if you
have taken snapshots, they are in a
Snapshots subfolder. For each VM, you can
change the location of its snapshots folder in the VM settings.
You can change the default machine folder by selecting Preferences from the File menu in the Oracle VM VirtualBox main window. Then, in the displayed window, click on the General tab. Alternatively, use the VBoxManage setproperty machinefolder command. See Section 8.40, “VBoxManage setproperty”.
In addition to the files for the virtual machines, Oracle VM VirtualBox maintains global configuration data in the following directory:
Linux and Oracle Solaris:
$HOME/.config/VirtualBox.Windows:
$HOME/.VirtualBox.macOS:
$HOME/Library/VirtualBox.
Oracle VM VirtualBox creates this configuration directory
automatically, if necessary. You can specify an alternate
configuration directory by either setting the
VBOX_USER_HOME environment variable, or on
Linux or Oracle Solaris by using the standard
XDG_CONFIG_HOME variable. Since the global
VirtualBox.xml settings file points to all
other configuration files, this enables switching between
several Oracle VM VirtualBox configurations.
In this configuration directory, Oracle VM VirtualBox stores its
global settings file, an XML file called
VirtualBox.xml. This file includes global
configuration options and a list of registered virtual machines
with pointers to their XML settings files.
The following table gives a brief overview of the configuration data locations on an Oracle VM VirtualBox host.
Table 10.1. Configuration File Locations
Setting | Location |
|---|---|
Default machines folder |
|
Default disk image location | In each machine's folder |
Machine settings file extension |
|
Media registry | Each machine settings file Media registration is done automatically when a storage medium is attached to a VM |
Oracle VM VirtualBox uses XML for both the machine settings files and
the global configuration file,
VirtualBox.xml.
All Oracle VM VirtualBox XML files are versioned. When a new settings file is created, for example because a new virtual machine is created, Oracle VM VirtualBox automatically uses the settings format of the current Oracle VM VirtualBox version. These files may not be readable if you downgrade to an earlier version of Oracle VM VirtualBox. However, when Oracle VM VirtualBox encounters a settings file from an earlier version, such as after upgrading Oracle VM VirtualBox, it attempts to preserve the settings format as much as possible. It will only silently upgrade the settings format if the current settings cannot be expressed in the old format, for example because you enabled a feature that was not present in an earlier version of Oracle VM VirtualBox.
In such cases, Oracle VM VirtualBox backs up the old settings file in the virtual machine's configuration directory. If you need to go back to the earlier version of Oracle VM VirtualBox, then you will need to manually copy these backup files back.
We intentionally do not document the specifications of the Oracle VM VirtualBox XML files, as we must reserve the right to modify them in the future. We therefore strongly suggest that you do not edit these files manually. Oracle VM VirtualBox provides complete access to its configuration data through its the VBoxManage command line tool, see Chapter 8, VBoxManage and its API, see Chapter 11, Oracle VM VirtualBox Programming Interfaces.
Oracle VM VirtualBox was designed to be modular and flexible. When the Oracle VM VirtualBox graphical user interface (GUI) is opened and a VM is started, at least the following three processes are running:
VBoxSVC, the Oracle VM VirtualBox service process which always runs in the background. This process is started automatically by the first Oracle VM VirtualBox client process and exits a short time after the last client exits. The first Oracle VM VirtualBox service can be VirtualBox Manager, VBoxManage, VBoxHeadless, the web service amongst others. The service is responsible for bookkeeping, maintaining the state of all VMs, and for providing communication between Oracle VM VirtualBox components. This communication is implemented using COM/XPCOM.
Note
When we refer to clients here, we mean the local clients of a particular VBoxSVC server process, not clients in a network. Oracle VM VirtualBox employs its own client/server design to allow its processes to cooperate, but all these processes run under the same user account on the host operating system, and this is totally transparent to the user.
The GUI process, VirtualBoxVM, a client application based on the cross-platform Qt library. When started without the
--startvmoption, this application acts as VirtualBox Manager, displaying the VMs and their settings. It then communicates settings and state changes to VBoxSVC and also reflects changes effected through other means, such as the VBoxManage command.If the VirtualBoxVM client application is started with the
--startvmargument, it loads the VMM library which includes the actual hypervisor and then runs a virtual machine and provides the input and output for the guest.
Any Oracle VM VirtualBox front-end, or client, will communicate with the service process and can both control and reflect the current state. For example, either the VM selector or the VM window or VBoxManage can be used to pause the running VM, and other components will always reflect the changed state.
The Oracle VM VirtualBox GUI application, called VirtualBox Manager, is only one of several available front ends, or clients. The complete list shipped with Oracle VM VirtualBox is as follows:
VirtualBoxVM: The Qt front end implementing VirtualBox Manager and running VMs.
VBoxManage: A less user-friendly but more powerful alternative. See Chapter 8, VBoxManage.
VBoxHeadless: A VM front end which does not directly provide any video output and keyboard or mouse input, but enables redirection through the VirtualBox Remote Desktop Extension. See Section 7.1.2, “VBoxHeadless, the Remote Desktop Server”.
vboxwebsrv: The Oracle VM VirtualBox web service process which enables control of an Oracle VM VirtualBox host remotely. This is described in detail in the Oracle VM VirtualBox Software Development Kit (SDK) reference. See Chapter 11, Oracle VM VirtualBox Programming Interfaces.
The Oracle VM VirtualBox Python shell: A Python alternative to VBoxManage. This is also described in the SDK reference.
Internally, Oracle VM VirtualBox consists of many more or less separate components. You may encounter these when analyzing Oracle VM VirtualBox internal error messages or log files. These include the following:
IPRT: A portable runtime library which abstracts file access, threading, and string manipulation. Whenever Oracle VM VirtualBox accesses host operating features, it does so through this library for cross-platform portability.
VMM (Virtual Machine Monitor): The heart of the hypervisor.
EM (Execution Manager): Controls execution of guest code.
TRPM (Trap Manager): Intercepts and processes guest traps and exceptions.
HM (Hardware Acceleration Manager): Provides support for VT-x and AMD-V.
GIM (Guest Interface Manager): Provides support for various paravirtualization interfaces to the guest.
PDM (Pluggable Device Manager): An abstract interface between the VMM and emulated devices which separates device implementations from VMM internals and makes it easy to add new emulated devices. Through PDM, third-party developers can add new virtual devices to Oracle VM VirtualBox without having to change Oracle VM VirtualBox itself.
PGM (Page Manager): A component that controls guest paging.
TM (Time Manager): Handles timers and all aspects of time inside guests.
CFGM (Configuration Manager): Provides a tree structure which holds configuration settings for the VM and all emulated devices.
SSM (Saved State Manager): Saves and loads VM state.
VUSB (Virtual USB): A USB layer which separates emulated USB controllers from the controllers on the host and from USB devices. This component also enables remote USB.
DBGF (Debug Facility): A built-in VM debugger.
Oracle VM VirtualBox emulates a number of devices to provide the hardware environment that various guests need. Most of these are standard devices found in many PC compatible machines and widely supported by guest operating systems. For network and storage devices in particular, there are several options for the emulated devices to access the underlying hardware. These devices are managed by PDM.
Guest Additions for various guest operating systems. This is code that is installed from within a virtual machine. See Chapter 4, Guest Additions.
The "Main" component is special. It ties all the above bits together and is the only public API that Oracle VM VirtualBox provides. All the client processes listed above use only this API and never access the hypervisor components directly. As a result, third-party applications that use the Oracle VM VirtualBox Main API can rely on the fact that it is always well-tested and that all capabilities of Oracle VM VirtualBox are fully exposed. It is this API that is described in the Oracle VM VirtualBox SDK. See Chapter 11, Oracle VM VirtualBox Programming Interfaces.
Oracle VM VirtualBox enables software in the virtual machine to run directly on the processor of the host, but an array of complex techniques is employed to intercept operations that would interfere with your host. Whenever the guest attempts to do something that could be harmful to your computer and its data, Oracle VM VirtualBox steps in and takes action. In particular, for lots of hardware that the guest believes to be accessing, Oracle VM VirtualBox simulates a certain virtual environment according to how you have configured a virtual machine. For example, when the guest attempts to access a hard disk, Oracle VM VirtualBox redirects these requests to whatever you have configured to be the virtual machine's virtual hard disk. This is normally an image file on your host.
Unfortunately, the x86 platform was never designed to be virtualized. Detecting situations in which Oracle VM VirtualBox needs to take control over the guest code that is executing, as described above, is difficult. To achieve this, Oracle VM VirtualBox uses hardware virtualization.
Intel and AMD processors have support for hardware virtualization. This means that these processors can help Oracle VM VirtualBox to intercept potentially dangerous operations that a guest operating system may be attempting and also makes it easier to present virtual hardware to a virtual machine.
These hardware features differ between Intel and AMD processors. Intel named its technology VT-x, AMD calls theirs AMD-V. The Intel and AMD support for virtualization is very different in detail, but not very different in principle.
Note
On many systems, the hardware virtualization features first need to be enabled in the BIOS before Oracle VM VirtualBox can use them.
Enabling hardware virtualization is required in the following scenarios:
Certain rare guest operating systems like OS/2 make use of very esoteric processor instructions. For virtual machines that are configured to use such an operating system, hardware virtualization is enabled automatically.
Oracle VM VirtualBox's 64-bit guest and multiprocessing (SMP) support both require hardware virtualization to be enabled. This is not much of a limitation since the vast majority of 64-bit and multicore CPUs ship with hardware virtualization. The exceptions to this rule are some legacy Intel and AMD CPUs.
Warning
Do not run other hypervisors, either open source or commercial virtualization products, together with Oracle VM VirtualBox. While several hypervisors can normally be installed in parallel, do not attempt to run several virtual machines from competing hypervisors at the same time. Oracle VM VirtualBox cannot track what another hypervisor is currently attempting to do on the same host, and especially if several products attempt to use hardware virtualization features such as VT-x, this can crash the entire host.
See Section 10.4, “Details About Hardware Virtualization” for a technical discussion of hardware virtualization.
With Intel VT-x, there are two distinct modes of CPU operation: VMX root mode and non-root mode.
In root mode, the CPU operates much like older generations of processors without VT-x support. There are four privilege levels, called rings, and the same instruction set is supported, with the addition of several virtualization specific instruction. Root mode is what a host operating system without virtualization uses, and it is also used by a hypervisor when virtualization is active.
In non-root mode, CPU operation is significantly different. There are still four privilege rings and the same instruction set, but a new structure called VMCS (Virtual Machine Control Structure) now controls the CPU operation and determines how certain instructions behave. Non-root mode is where guest systems run.
Switching from root mode to non-root mode is called "VM entry", the switch back is "VM exit". The VMCS includes a guest and host state area which is saved/restored at VM entry and exit. Most importantly, the VMCS controls which guest operations will cause VM exits.
The VMCS provides fairly fine-grained control over what the guests can and cannot do. For example, a hypervisor can allow a guest to write certain bits in shadowed control registers, but not others. This enables efficient virtualization in cases where guests can be allowed to write control bits without disrupting the hypervisor, while preventing them from altering control bits over which the hypervisor needs to retain full control. The VMCS also provides control over interrupt delivery and exceptions.
Whenever an instruction or event causes a VM exit, the VMCS contains information about the exit reason, often with accompanying detail. For example, if a write to the CR0 register causes an exit, the offending instruction is recorded, along with the fact that a write access to a control register caused the exit, and information about source and destination register. Thus the hypervisor can efficiently handle the condition without needing advanced techniques such as CSAM and PATM described above.
VT-x inherently avoids several of the problems which software virtualization faces. The guest has its own completely separate address space not shared with the hypervisor, which eliminates potential clashes. Additionally, guest OS kernel code runs at privilege ring 0 in VMX non-root mode, obviating the problems by running ring 0 code at less privileged levels. For example the SYSENTER instruction can transition to ring 0 without causing problems. Naturally, even at ring 0 in VMX non-root mode, any I/O access by guest code still causes a VM exit, allowing for device emulation.
The biggest difference between VT-x and AMD-V is that AMD-V provides a more complete virtualization environment. VT-x requires the VMX non-root code to run with paging enabled, which precludes hardware virtualization of real-mode code and non-paged protected-mode software. This typically only includes firmware and OS loaders, but nevertheless complicates VT-x hypervisor implementation. AMD-V does not have this restriction.
Of course hardware virtualization is not perfect. Compared to software virtualization, the overhead of VM exits is relatively high. This causes problems for devices whose emulation requires high number of traps. One example is a VGA device in 16-color mode, where not only every I/O port access but also every access to the framebuffer memory must be trapped.
Oracle VM VirtualBox enables the exposure of a paravirtualization interface, to facilitate accurate and efficient execution of software within a virtual machine. These interfaces require the guest operating system to recognize their presence and make use of them in order to leverage the benefits of communicating with the Oracle VM VirtualBox hypervisor.
Most modern, mainstream guest operating systems, including Windows and Linux, ship with support for one or more paravirtualization interfaces. Hence, there is typically no need to install additional software in the guest to take advantage of this feature.
Exposing a paravirtualization provider to the guest operating system does not rely on the choice of host platforms. For example, the Hyper-V paravirtualization provider can be used for VMs to run on any host platform supported by Oracle VM VirtualBox and not just Windows.
Oracle VM VirtualBox provides the following interfaces:
Minimal: Announces the presence of a virtualized environment. Additionally, reports the TSC and APIC frequency to the guest operating system. This provider is mandatory for running any Mac OS X guests.
KVM: Presents a Linux KVM hypervisor interface which is recognized by Linux kernels version 2.6.25 or later. Oracle VM VirtualBox's implementation currently supports paravirtualized clocks and SMP spinlocks. This provider is recommended for Linux guests.
Hyper-V: Presents a Microsoft Hyper-V hypervisor interface which is recognized by Windows 7 and newer operating systems. Oracle VM VirtualBox's implementation currently supports paravirtualized clocks, APIC frequency reporting, guest debugging, guest crash reporting and relaxed timer checks. This provider is recommended for Windows guests.
In addition to normal hardware virtualization, your processor may also support the following additional sophisticated techniques:
Nested paging implements some memory management in hardware, which can greatly accelerate hardware virtualization since these tasks no longer need to be performed by the virtualization software.
With nested paging, the hardware provides another level of indirection when translating linear to physical addresses. Page tables function as before, but linear addresses are now translated to "guest physical" addresses first and not physical addresses directly. A new set of paging registers now exists under the traditional paging mechanism and translates from guest physical addresses to host physical addresses, which are used to access memory.
Nested paging eliminates the overhead caused by VM exits and page table accesses. In essence, with nested page tables the guest can handle paging without intervention from the hypervisor. Nested paging thus significantly improves virtualization performance.
On AMD processors, nested paging has been available starting with the Barcelona (K10) architecture. They now call it rapid virtualization indexing (RVI). Intel added support for nested paging, which they call extended page tables (EPT), with their Core i7 (Nehalem) processors.
If nested paging is enabled, the Oracle VM VirtualBox hypervisor can also use large pages to reduce TLB usage and overhead. This can yield a performance improvement of up to 5%. To enable this feature for a VM, you use the VBoxManage modifyvm --large-pages command. See Section 8.10, “VBoxManage modifyvm”.
If you have an Intel CPU with EPT, please consult Section 13.4.1, “CVE-2018-3646” for security concerns regarding EPT.
On Intel CPUs, a hardware feature called Virtual Processor Identifiers (VPIDs) can greatly accelerate context switching by reducing the need for expensive flushing of the processor's Translation Lookaside Buffers (TLBs).
To enable these features for a VM, you use the VBoxManage modifyvm --vtx-vpid and VBoxManage modifyvm --large-pages commands. See Section 8.10, “VBoxManage modifyvm”.
Oracle VM VirtualBox comes with comprehensive support for third-party developers. The so-called Main API of Oracle VM VirtualBox exposes the entire feature set of the virtualization engine. It is completely documented and available to anyone who wishes to control Oracle VM VirtualBox programmatically.
The Main API is made available to C++ clients through COM on Windows hosts or XPCOM on other hosts. Bridges also exist for SOAP, Java and Python.
All programming information such as documentation, reference information, header and other interface files, as well as samples have been split out to a separate Software Development Kit (SDK). The SDK is available for download from http://www.virtualbox.org. In particular, the SDK comes with a Programming Guide and Reference manual in PDF format. This manual contains, among other things, the information that was previously in this chapter of the User Manual.
Table of Contents
- 12.1. Procedures and Tools
- 12.2. General Troubleshooting
- 12.2.1. Guest Shows IDE/SATA Errors for File-Based Images on Slow Host File System
- 12.2.2. Responding to Guest IDE/SATA Flush Requests
- 12.2.3. Performance Variation with Frequency Boosting
- 12.2.4. Frequency Scaling Effect on CPU Usage
- 12.2.5. Inaccurate Windows CPU Usage Reporting
- 12.2.6. Poor Performance Caused by Host Power Management
- 12.2.7. GUI: 2D Video Acceleration Option is Grayed Out
- 12.3. Windows Guests
- 12.3.1. No USB 3.0 Support in Windows 7 Guests
- 12.3.2. Windows Bluescreens After Changing VM Configuration
- 12.3.3. Windows 0x101 Bluescreens with SMP Enabled (IPI Timeout)
- 12.3.4. Windows 2000 Installation Failures
- 12.3.5. How to Record Bluescreen Information from Windows Guests
- 12.3.6. No Networking in Windows Vista Guests
- 12.3.7. Windows Guests may Cause a High CPU Load
- 12.3.8. Long Delays When Accessing Shared Folders
- 12.3.9. USB Tablet Coordinates Wrong in Windows 98 Guests
- 12.3.10. Windows Guests are Removed From an Active Directory Domain After Restoring a Snapshot
- 12.3.11. Windows 3.x Limited to 64 MB RAM
- 12.4. Linux and X11 Guests
- 12.5. Oracle Solaris Guests
- 12.6. Windows Hosts
- 12.6.1. Drag'n Drop not Working
- 12.6.2. VBoxSVC Out-of-Process COM Server Issues
- 12.6.3. CD and DVD Changes Not Recognized
- 12.6.4. Sluggish Response When Using Microsoft RDP Client
- 12.6.5. Running an iSCSI Initiator and Target on a Single System
- 12.6.6. Bridged Networking Adapters Missing
- 12.6.7. Host-Only Networking Adapters Cannot be Created
- 12.7. Linux Hosts
- 12.8. Oracle Solaris Hosts
This chapter provides answers to commonly asked questions. In order to improve your user experience with Oracle VM VirtualBox, it is recommended to read this section to learn more about common pitfalls and get recommendations on how to use the product.
More often than not, a virtualized guest behaves like a physical system. Any problems that a physical machine would encounter, a virtual machine will encounter as well. If, for example, Internet connectivity is lost due to external issues, virtual machines will be affected just as much as physical ones.
If a true Oracle VM VirtualBox problem is encountered, it helps to categorize and isolate the problem first. Here are some of the questions that should be answered before reporting a problem:
Is the problem specific to a certain guest OS? Or a specific release of a guest OS? Especially with Linux guest related problems, the issue may be specific to a certain distribution and version of Linux.
Is the problem specific to a certain host OS? Problems are usually not host OS specific, because most of the Oracle VM VirtualBox code base is shared across all supported platforms, but especially in the areas of networking and USB support, there are significant differences between host platforms. Some GUI related issues are also host specific.
Is the problem specific to certain host hardware? This category of issues is typically related to the host CPU. Because of significant differences between VT-x and AMD-V, problems may be specific to one or the other technology. The exact CPU model may also make a difference because different CPUs support different features, which may affect certain aspects of guest CPU operation.
Is the problem specific to guest SMP? That is, is it related to the number of virtual CPUs (VCPUs) in the guest? Using more than one CPU usually significantly affects the internal operation of a guest OS.
Is the problem specific to the Guest Additions? In some cases, this is obvious, such as a shared folders problem. In other cases such as display problems, it may be less obvious. If the problem is Guest Additions specific, is it also specific to a certain version of the Guest Additions?
Is the problem specific to a certain environment? Some problems are related to a particular environment external to the VM. This usually involves network setup. Certain configurations of external servers such as DHCP or PXE may expose problems which do not occur with other, similar servers.
Is the problem a regression? Knowing that an issue is a regression usually makes it significantly easier to find the solution. In this case, it is crucial to know which version is affected and which is not.
For problem determination, it is often important to collect debugging information which can be analyzed by Oracle VM VirtualBox support. This section contains information about what kind of information can be obtained.
Every time Oracle VM VirtualBox starts up a VM, a so-called
release log file is created, containing
lots of information about the VM configuration and runtime
events. The log file is called VBox.log and
resides in the VM log file folder, which is
$HOME/VirtualBox
VMs/ by
default.
VM-name/Logs
When starting a VM, the configuration file of the last run will
be renamed to .1, up to
.3. Sometimes when there is a problem, it
is useful to have a look at the logs. Also when requesting
support for Oracle VM VirtualBox, supplying the corresponding log file
is mandatory.
For convenience, for each virtual machine, VirtualBox Manager can show these logs in a window. Select a virtual machine from the machine list on the left and click Logs in the machine tools menu.
The release log file, VBox.log, contains a
wealth of diagnostic information, such as Host OS type and
version, Oracle VM VirtualBox version and build. It also includes a
complete dump of the guest's configuration (CFGM), detailed
information about the host CPU type and supported features,
whether hardware virtualization is enabled, information about
VT-x/AMD-V setup, state transitions (such as creating, running,
paused, stopping), guest BIOS messages, Guest Additions
messages, device-specific log entries and, at the end of
execution, final guest state and condensed statistics.
In case of crashes, it is very important to collect crash dumps. This is true for both host and guest crashes. For information about enabling core dumps on Linux, Oracle Solaris, and macOS systems, refer to the following core dump article on the Oracle VM VirtualBox website:
http://www.virtualbox.org/wiki/Core_dump.
You can also use VBoxManage debugvm to create a dump of a complete virtual machine. See Section 8.45, “VBoxManage debugvm”.
For network related problems, it is often helpful to capture a trace of network traffic. If the traffic is routed through an adapter on the host, it is possible to use Wireshark or a similar tool to capture the traffic there. However, this often also includes a lot of traffic unrelated to the VM.
Oracle VM VirtualBox provides an ability to capture network traffic only on a specific VM's network adapter. Refer to the following network tracing article on the Oracle VM VirtualBox website for information on enabling this capture:
http://www.virtualbox.org/wiki/Network_tips.
The trace files created by Oracle VM VirtualBox are in
.pcap format and can be easily analyzed
with Wireshark.
The VBoxBugReport command is used to collect debug information automatically for an Oracle VM VirtualBox installation. This command can be useful when you need to gather information to send to Oracle Support.
The following examples show how to use VBoxBugReport.
By default, the command collects VBoxSVC process logs, device settings, and global configuration data for an Oracle VM VirtualBox host.
$ VBoxBugReport
  ...
  0% - collecting VBoxSVC.log.10...
  7% - collecting VBoxSVC.log.9...
  ...
 64% - collecting VBoxSVC.log.1...
 71% - collecting VBoxSVC.log...
 78% - collecting VirtualBox.xml...
 85% - collecting HostUsbDevices...
 92% - collecting HostUsbFilters...
100% - compressing...

Report was written to '2019-03-26-13-32-02-bugreport.tgz'
The results are saved as a compressed tar file archive in the same directory where the command is run.
To specify a different output file location:
$ VBoxBugReport --output ~/debug/bug004.tgz
To output all debug information to a single text file, rather
than a tgz file:
$ VBoxBugReport --text
To collect information for a specific VM, called
Windows_10:
$ VBoxBugReport Windows_10
This command collects machine settings, guest properties, and log files for the specified VM. Global configuration information for the host is also included.
To collect information for several VMs, called
Windows_7, Windows_8, and
Windows_10:
$ VBoxBugReport Windows_7 Windows_8 Windows_10
To collect information for all VMs:
$ VBoxBugReport --all
To show a full list of the available command options, run VBoxBugReport --help.
Oracle VM VirtualBox includes a built-in VM debugger, which advanced users may find useful. This debugger enables you to examine and, to some extent, control the VM state.
Warning
Use the VM debugger at your own risk. There is no support for it, and the following documentation is only made available for advanced users with a very high level of familiarity with the x86/AMD64 machine instruction set, as well as detailed knowledge of the PC architecture. A degree of familiarity with the internals of the guest OS in question may also be very helpful.
The VM debugger is available in all regular production versions of Oracle VM VirtualBox, but it is disabled by default because the average user will have little use for it. There are two ways to access the debugger:
Using a debugger console window displayed alongside the VM
Using the telnet protocol on port 5000
The debugger can be enabled in the following ways:
Start the VM directly using VirtualBoxVM --startvm, with an additional
--dbg,--debug, or--debug-command-lineargument. See the VirtualBoxVM --help command usage help for details.Set the
VBOX_GUI_DBG_ENABLEDorVBOX_GUI_DBG_AUTO_SHOWenvironment variable totruebefore launching the Oracle VM VirtualBox process. Setting these variables, only their presence is checked, is effective even when the first Oracle VM VirtualBox process is the VM selector window. VMs subsequently launched from the selector will have the debugger enabled.Set the
GUI/Dbg/Enabledextra data item totruebefore launching the VM. This can be set globally or on a per VM basis.
A new Debug menu entry is added to the Oracle VM VirtualBox application. This menu enables the user to open the debugger console.
The VM debugger command syntax is loosely modeled on Microsoft and IBM debuggers used on DOS, OS/2, and Windows. Users familiar with symdeb, CodeView, or the OS/2 kernel debugger will find the Oracle VM VirtualBox VM debugger familiar.
The most important command is help. This will print brief usage help for all debugger commands. The set of commands supported by the VM debugger changes frequently and the help command is always up-to-date.
A brief summary of frequently used commands is as follows:
stop: Stops the VM execution and enables single stepping
g: Continue VM execution
t: Single step an instruction
rg, rh, and r: Print the guest, hypervisor, and current registers
kg, kh, and k: Print the guest, hypervisor, and current call stack
da, db, dw, dd, dq: Print memory contents as ASCII, bytes, words, dwords, and qwords
u: Unassemble memory
dg: Print the guest's GDT
di: Print the guest's IDT
dl: Print the guest's LDT
dt: Print the guest's TSS
dp*: Print the guest's page table structures
bp and br: Set a normal and recompiler breakpoint
bl: List breakpoints
bc: Clear a breakpoint
writecore: Write a VM core file to disk. See Section 12.1.5, “VM Core Format”
See the built-in help for other available commands.
The VM debugger supports symbolic debugging, although symbols
for guest code are often not available. For Oracle Solaris
guests, the detect command automatically
determines the guest OS version and locates kernel symbols in
guest's memory. Symbolic debugging is then available. For Linux
guests, the detect commands also determines
the guest OS version, but there are no symbols in the guest's
memory. Kernel symbols are available in the file
/proc/kallsyms on Linux guests. This file
must be copied to the host, for example using
scp. The loadmap debugger
command can be used to make the symbol information available to
the VM debugger. Note that the kallsyms
file contains the symbols for the currently loaded modules. If
the guest's configuration changes, the symbols will change as
well and must be updated.
For all guests, a simple way to verify that the correct symbols are loaded is the k command. The guest is normally idling and it should be clear from the symbolic information that the guest operating system's idle loop is being executed.
Another group of debugger commands is the set of info commands. Running info help provides complete usage information. The information commands provide ad-hoc data pertinent to various emulated devices and aspects of the VMM. There is no general guideline for using the info commands, the right command to use depends entirely on the problem being investigated. Some of the info commands are as follows:
cfgm: Print a branch of the configuration tree
cpuid: Display the guest CPUID leaves
ioport: Print registered I/O port ranges
mmio: Print registered MMIO ranges
mode: Print the current paging mode
pit: Print the i8254 PIT state
pic: Print the i8259A PIC state
ohci, ehci, xhci: Print a subset of the OHCI, EHCI, and xHCI USB controller state
pcnet0: Print the PCnet state
vgatext: Print the contents of the VGA framebuffer formatted as standard text mode
timers: Print all VM timers
The output of the info commands generally requires in-depth knowledge of the emulated device or Oracle VM VirtualBox VMM internals. However, when used properly, the information provided can be invaluable.
Oracle VM VirtualBox uses the 64-bit ELF format for its VM core files created by VBoxManage debugvm, see Section 8.45, “VBoxManage debugvm”. The VM core file contain the memory and CPU dumps of the VM and can be useful for debugging your guest OS. The 64-bit ELF object format specification can be obtained at:
http://downloads.openwatcom.org/ftp/devel/docs/elf-64-gen.pdf.
The overall layout of the VM core format is as follows:
[ ELF 64 Header]
[ Program Header, type PT_NOTE ]
  → offset to COREDESCRIPTOR
[ Program Header, type PT_LOAD ] - one for each contiguous physical memory range
  → Memory offset of range
  → File offset
[ Note Header, type NT_VBOXCORE ]
[ COREDESCRIPTOR ]
  → Magic
  → VM core file version
  → VBox version
  → Number of vCPUs etc.
[ Note Header, type NT_VBOXCPU ] - one for each vCPU
[ vCPU 1 Note Header ]
  [ DBGFCORECPU - vCPU 1 dump ]
[ Additional Notes + Data ] - currently unused
[ Memory dump ]
The memory descriptors contain physical addresses relative to the guest and not virtual addresses. Regions of memory such as MMIO regions are not included in the core file.
The relevant data structures and definitions can be found in the
Oracle VM VirtualBox sources under the following header files:
include/VBox/dbgfcorefmt.h,
include/iprt/x86.h and
src/VBox/Runtime/include/internal/ldrELFCommon.h.
The VM core file can be inspected using elfdump and GNU readelf or other similar utilities.
Occasionally, some host file systems provide very poor writing performance and as a consequence cause the guest to time out IDE/SATA commands. This is normal behavior and should normally cause no real problems, as the guest should repeat commands that have timed out. However, guests such as some Linux versions have severe problems if a write to an image file takes longer than about 15 seconds. Some file systems however require more than a minute to complete a single write, if the host cache contains a large amount of data that needs to be written.
The symptom for this problem is that the guest can no longer access its files during large write or copying operations, usually leading to an immediate hang of the guest.
In order to work around this problem, the true fix is to use a faster file system that does not exhibit such unacceptable write performance, it is possible to flush the image file after a certain amount of data has been written. This interval is normally infinite, but can be configured individually for each disk of a VM.
For IDE disks use the following command:
VBoxManage setextradataVM-name"VBoxInternal/Devices/piix3ide/0/LUN#[x]/Config/FlushInterval" [b]
For SATA disks use the following command:
VBoxManage setextradataVM-name"VBoxInternal/Devices/ahci/0/LUN#[x]/Config/FlushInterval" [b]
[ specifies the
disk. For IDE, x]0 represents device 0 on the
primary channel, 1 represents device 1 on the
primary channel, 2 represents device 0 on the
secondary channel, and 3 represents device 1
on the secondary channel. For SATA, use values between
0 and 29. This
configuration option applies to disks only. Do not use this
option for CD or DVD drives.
The unit of the interval
([) is the
number of bytes written since the last flush. The value for it
must be selected so that the occasional long write delays do not
occur. Since the proper flush interval depends on the
performance of the host and the host filesystem, finding the
optimal value that makes the problem disappear requires some
experimentation. Values between 1000000 and 10000000 (1 to 10
megabytes) are a good starting point. Decreasing the interval
both decreases the probability of the problem and the write
performance of the guest. Setting the value unnecessarily low
will cost performance without providing any benefits. An
interval of 1 will cause a flush for each write operation and
should solve the problem in any case, but has a severe write
performance penalty.
b]
Providing a value of 0 for
[ is treated as
an infinite flush interval, effectively disabling this
workaround. Removing the extra data key by specifying no value
for b][ has the
same effect.
b]
If desired, the virtual disk images can be flushed when the guest issues the IDE FLUSH CACHE command. Normally these requests are ignored for improved performance. The parameters below are only accepted for disk drives. They must not be set for DVD drives.
To enable flushing for IDE disks, issue the following command:
$ VBoxManage setextradataVM-name"VBoxInternal/Devices/piix3ide/0/LUN#[x]/Config/IgnoreFlush" 0
[ specifies the
disk. Enter x]0 for device 0 on the primary
channel, 1 for device 1 on the primary
channel, 2 for device 0 on the secondary
channel, or 3 for device 1 on the secondary
channel.
To enable flushing for SATA disks, issue the following command:
$ VBoxManage setextradata VM-name "VBoxInternal/Devices/ahci/0/LUN#[x]/Config/IgnoreFlush" 0The value [x] that selects the disk can be a value between 0 and 29.
Note that this does not affect the flushes performed according to the configuration described in Section 12.2.1, “Guest Shows IDE/SATA Errors for File-Based Images on Slow Host File System”. Restoring the default of ignoring flush commands is possible by setting the value to 1 or by removing the key.
Many multicore processors support some form of frequency boosting, which means that if only one core is utilized, it can run possibly 50% faster or even more than the rated CPU frequency. This causes measured performance to vary somewhat as a function of the momentary overall system load. The exact behavior depends strongly on the specific processor model.
As a consequence, benchmarking on systems which utilize frequency boosting may produce unstable and non-repeatable results. This is especially true if benchmark runs are short, of the order of seconds. To obtain stable results, benchmarks must be run over longer periods of time and with a constant system load apart from the VM being tested.
On some hardware platforms and operating systems, CPU frequency scaling may cause CPU usage reporting to be highly misleading. This happens in situations when the host CPU load is significant but not heavy, such as between 15% to 30% of the maximum.
Most operating systems determine CPU usage in terms of time spent, measuring for example how many nanoseconds the systems or a process was active within one second. However, in order to save energy, systems can significantly scale down CPU speed when the system is not fully loaded. When the CPU is running at for example one half of its maximum speed, the same number of instructions will take roughly twice as long to execute compared to running at full speed.
Depending on the specific hardware and host OS, this effect can very significantly skew the CPU usage reported by the OS. The reported CPU usage can be several times higher than what it would have been had the CPU been running at full speed. The effect can be observed both on the host OS and in a guest OS.
CPU usage reporting tools which come with Windows, such as Task Manager or Resource Monitor, do not take the time spent processing hardware interrupts into account. If the interrupt load is heavy, with thousands of interrupts per second, CPU usage may be significantly underreported.
This problem affects Windows as both host and guest OS. Sysinternals tools, such as Process Explorer, do not suffer from this problem.
On some hardware platforms and operating systems, virtualization performance is negatively affected by host CPU power management. The symptoms may be choppy audio in the guest or erratic guest clock behavior.
Some of the problems may be caused by firmware and/or host operating system bugs. Therefore, updating the firmware and applying operating systems fixes is recommended.
For optimal virtualization performance, the C1E power state
support in the system's BIOS should be disabled, if such a
setting is available. Not all systems support the C1E power
state. On Intel systems, the Intel C State
setting should be disabled. Disabling other power management
settings may also improve performance. However, a balance
between performance and power consumption must always be
considered.
To use 2D Video Acceleration within Oracle VM VirtualBox, your host's video card should support certain OpenGL extensions. On startup, Oracle VM VirtualBox checks for those extensions, and, if the test fails, this option is silently grayed out.
To find out why it has failed, you can manually execute the following command:
$ VBoxTestOGL --log "log_file_name" --test 2D
It will list the required OpenGL extensions one by one and will show you which one failed the test. This usually means that you are running an outdated or misconfigured OpenGL driver on your host. It can also mean that your video chip is lacking required functionality.
If a Windows 7 or Windows Server 2008 R2 guest is configured for USB 3.0 (xHCI) support, the guest OS will not have any USB support at all. This happens because Windows 7 predates USB 3.0 and therefore does not ship with any xHCI drivers. Microsoft also does not offer any vendor-provided xHCI drivers through Windows Update.
To solve this problem, it is necessary to download and install the Intel xHCI driver in the guest. Intel offers the driver as the USB 3.0 eXtensible Host Controller (xHCI) driver for Intel 7 Series/C216 chipsets.
Note that the driver only supports Windows 7 and Windows Server 2008 R2. The driver package includes support for both 32-bit and 64-bit OS variants.
Changing certain virtual machine settings can cause Windows guests to fail during start up with a bluescreen. This may happen if you change VM settings after installing Windows, or if you copy a disk image with an already installed Windows to a newly created VM which has settings that differ from the original machine.
This applies in particular to the following settings:
The ACPI and I/O APIC settings should never be changed after installing Windows. Depending on the presence of these hardware features, the Windows installation program chooses special kernel and device driver versions and will fail to startup should these hardware features be removed. Enabling them for a Windows VM which was installed without them does not cause any harm. However, Windows will not use these features in this case.
Changing the storage controller hardware will cause bootup failures as well. This might also apply to you if you copy a disk image from an older version of Oracle VM VirtualBox to a new virtual machine. The default subtype of IDE controller hardware used by Oracle VM VirtualBox is PIIX4. Make sure that the storage controller settings are identical.
If a VM is configured to have more than one processor (symmetrical multiprocessing, SMP), some configurations of Windows guests crash with an 0x101 error message, indicating a timeout for interprocessor interrupts (IPIs). These interrupts synchronize memory management between processors.
According to Microsoft, this is due to a race condition in Windows. A hotfix is available from Microsoft.
If this does not help, please reduce the number of virtual processors to 1.
When installing Windows 2000 guests, you might run into one of the following issues:
Installation reboots, usually during component registration.
Installation fills the whole hard disk with empty log files.
Installation complains about a failure installing
msgina.dll.
These problems are all caused by a bug in the hard disk driver of Windows 2000. After issuing a hard disk request, there is a race condition in the Windows driver code which leads to corruption if the operation completes too fast. For example, the hardware interrupt from the IDE controller arrives too soon. With physical hardware, there is a guaranteed delay in most systems so the problem is usually hidden there. However, it should be possible to also reproduce it on physical hardware. In a virtual environment, it is possible for the operation to be done immediately, especially on very fast systems with multiple CPUs, and the interrupt is signaled sooner than on a physical system. The solution is to introduce an artificial delay before delivering such interrupts. This delay can be configured for a VM using the following command:
$ VBoxManage setextradata VM-name "VBoxInternal/Devices/piix3ide/0/Config/IRQDelay" 1This sets the delay to one millisecond. In case this does not help, increase it to a value between 1 and 5 milliseconds. Please note that this slows down disk performance. After installation, you should be able to remove the key, or set it to 0.
When Windows guests run into a kernel crash, they display a bluescreen error. Depending on how Windows is configured, the information will remain on the screen until the machine is restarted or it will reboot automatically. During installation, Windows is usually configured to reboot automatically. With automatic reboots, there is no chance to record the bluescreen information which might be important for problem determination.
Oracle VM VirtualBox provides a method of halting a guest when it wants to perform a reset. In order to enable this feature, use the following command:
$ VBoxManage setextradata VM-name "VBoxInternal/PDM/HaltOnReset" 1With Windows Vista, Microsoft dropped support for the AMD PCNet card that legacy versions of Oracle VM VirtualBox used to provide as the default virtual network card. For Windows Vista guests, Oracle VM VirtualBox now uses an Intel E1000 card by default.
If, for some reason, you still want to use the AMD card, you need to download the PCNet driver from the AMD website. This driver is available for 32-bit Windows only. You can transfer it into the virtual machine using a shared folder. See Section 4.3, “Shared Folders”.
Several background applications of Windows guests, especially virus scanners, are known to increase the CPU load notably even if the guest appears to be idle. We recommend to deactivate virus scanners within virtualized guests if possible.
The performance for accesses to shared folders from a Windows
guest might be decreased due to delays during the resolution of
the Oracle VM VirtualBox shared folders name service. To fix these
delays, add the following entries to the file
\windows\system32\drivers\etc\lmhosts of
the Windows guest:
255.255.255.255        VBOXSVR #PRE
255.255.255.255        VBOXSRV #PRE
After doing this change, a reboot of the guest is required.
If a Windows 98 VM is configured to use the emulated USB tablet (absolute pointing device), the coordinate translation may be incorrect and the pointer is restricted to the upper left quarter of the guest's screen.
The USB HID (Human Interface Device) drivers in Windows 98 are very old and do not handle tablets in the same way as modern operating systems do. To work around the problem, use the following command:
$ VBoxManage setextradata VM-name "VBoxInternal/USB/HidMouse/0/Config/CoordShift" 0To restore the default behavior, remove the key or set its value to 1.
If a Windows guest is a member of an Active Directory domain and the snapshot feature of Oracle VM VirtualBox is used, it could be removed from the Active Direcory domain after you restore an older snapshot.
This is caused by automatic machine password changes performed by Windows at regular intervals for security purposes. You can disable this feature as shown in the following article from Microsoft: http://support.microsoft.com/kb/154501.
Windows 3.x guests are typically limited to 64 MB RAM, even if a VM is assigned much more memory. While Windows 3.1 is theoretically capable of using up to 512 MB RAM, it only uses memory available through the XMS interface. Versions of HIMEM.SYS, the Microsoft XMS manager, shipped with MS-DOS and Microsoft Windows 3.x can only use up to 64 MB on standard PCs.
This is a known HIMEM.SYS limitation. Windows 3.1 memory limits are described in detail in Microsoft Knowledge base article KB 84388.
It is possible for Windows 3.x guests to utilize more than 64 MB RAM if a different XMS provider is used. That could be a newer HIMEM.SYS version, such as that shipped with Windows 98, or a more capable third-party memory manager, such as QEMM.
Some Linux guests may cause a high CPU load even if the guest system appears to be idle. This can be caused by a high timer frequency of the guest kernel. Some Linux distributions, for example Fedora, ship a Linux kernel configured for a timer frequency of 1000Hz. We recommend to recompile the guest kernel and to select a timer frequency of 100Hz.
Linux kernels shipped with Red Hat Enterprise Linux, as well as kernels of related Linux distributions, such as CentOS and Oracle Linux, support a kernel parameter divider=N. Hence, such kernels support a lower timer frequency without recompilation. We suggest you add the kernel parameter divider=10 to select a guest kernel timer frequency of 100Hz.
The following bugs in Linux kernels prevent them from executing correctly in Oracle VM VirtualBox, causing VM boot crashes:
The Linux kernel version 2.6.18, and some 2.6.17 versions, introduced a race condition that can cause boot crashes in Oracle VM VirtualBox. Please use a kernel version 2.6.19 or later.
With hardware virtualization and the I/O APIC enabled, kernels before 2.6.24-rc6 may panic on boot with the following message:
Kernel panic - not syncing: IO-APIC + timer doesn't work!  Boot with
apic=debug and send a report.  Then try booting with the 'noapic' option
If you see this message, either disable hardware virtualization or the I/O APIC as described in Section 3.5, “System Settings”, or upgrade the guest to a newer kernel.
See http://www.mail-archive.com/git-commits-head@vger.kernel.org/msg30813.html for details about the kernel fix.
Guest desktop services in guests running the X11 window system such as Oracle Solaris and Linux, are provided by a guest service called VBoxClient, which runs under the ID of the user who started the desktop session and is automatically started using the following command lines when your X11 user session is started if you are using a common desktop environment such as Gnome or KDE.
$ VBoxClient --clipboard
$ VBoxClient --display
$ VBoxClient --seamless
If a particular desktop service is not working correctly, it is worth checking whether the process which should provide it is running.
The VBoxClient processes create files in the
user's home directory with names of the form
.vboxclient-*.pid when they are running in
order to prevent a given service from being started twice. It
can happen due to misconfiguration that these files are created
owned by root and not deleted when the services are stopped,
which will prevent them from being started in future sessions.
If the services cannot be started, you may wish to check whether
these files still exist.
When using more than one CPU, Oracle Solaris 10 10/08, and Oracle Solaris 10 5/09 may take a long time to boot and may print warnings on the system console regarding failures to read from disk. This is a bug in Oracle Solaris 10 which affects specific physical and virtual configurations. It is caused by trying to read microcode updates from the boot disk when the disk interrupt is reassigned to a not yet fully initialized secondary CPU. Disk reads will time out and fail, triggering delays of about 45 seconds and warnings.
The recommended solution is upgrading to at least Oracle Solaris 10 10/09 which includes a fix for this problem. Alternative solutions include restricting the number of virtual CPUs to one or possibly using a different storage controller.
Solaris releases before Solaris 10 1/06, including Solaris 9, Solaris 10 1/05 (GA), and Solaris 10 3/05 (HW2), are unable to communicate through the Intel E1000 card. The Solaris e1000g driver does not enable PCI bus mastering for the network adapter and is therefore unable to send and receive data. This problem appears to be specific to the e1000g driver and does not reflect general Solaris driver behavior.
The AMD PCnet emulation (using the Solaris pcn driver) can be used instead of Intel E1000. Solaris 10 1/06 (U1) and later releases do not have this problem and work with the emulated E1000 ethernet controller.
Microsoft Windows uses technologies like UAC (User Account Control) and UIPI (User Interface Privilege Isolation) to prevent and/or mitigate security issues. By default, UAC and UIPI are enabled.
When a Oracle VM VirtualBox VM process is running with a higher so-called privilege level than another process that wants to interact with the VM process via drag'n drop (or system clipboard), Windows prevents this by default due to security reasons. This results in Oracle VM VirtualBox not being able to receive any Windows messages for drag'n drop. To make this work, the Oracle VM VirtualBox VM process must be running with the same (or lower) privilege level as the process its interacting with using drag'n drop. Disabling UAC and/or UIPI is not recommended.
Oracle VM VirtualBox makes use of the Microsoft Component Object Model
(COM) for interprocess and intraprocess communication. This
enables Oracle VM VirtualBox to share a common configuration among
different virtual machine processes and provide several user
interface options based on a common architecture. All global
status information and configuration is maintained by the
process VBoxSVC.exe, which is an
out-of-process COM server. Whenever an Oracle VM VirtualBox process is
started, it requests access to the COM server and Windows
automatically starts the process. Note that it should never be
started by the end user.
When the last process disconnects from the COM server, it will terminate itself after some seconds. The Oracle VM VirtualBox configuration XML files are maintained and owned by the COM server and the files are locked whenever the server runs.
In some cases, such as when a virtual machine is terminated
unexpectedly, the COM server will not notice that the client is
disconnected and stay active for a longer period of 10 minutes
or so, keeping the configuration files locked. In other rare
cases the COM server might experience an internal error and
subsequently other processes fail to initialize it. In these
situations, it is recommended to use the Windows task manager to
kill the process VBoxSVC.exe.
In case you have assigned a physical CD or DVD drive to a guest and the guest does not notice when the medium changes, make sure that the Windows media change notification (MCN) feature is not turned off. This is represented by the following key in the Windows registry:
HKEY_LOCAL_MACHINE\System\CurrentControlSet\Services\Cdrom\Autorun
Certain applications may disable this key against Microsoft's advice. If it is set to 0, change it to 1 and reboot your system. Oracle VM VirtualBox relies on Windows notifying it of media changes.
If connecting to a Virtual Machine using the Microsoft RDP client, called a Remote Desktop Connection, there can be large delays between input such as moving the mouse over a menu and output. This is because this RDP client collects input for a certain time before sending it to the RDP server.
The interval can be decreased by setting a Windows registry key to smaller values than the default of 100. The key does not exist initially and must be of type DWORD. The unit for its values is milliseconds. Values around 20 are suitable for low-bandwidth connections between the RDP client and server. Values around 4 can be used for a gigabit Ethernet connection. Generally values below 10 achieve a performance that is very close to that of the local input devices and screen of the host on which the Virtual Machine is running.
Depending whether the setting should be changed for an individual user or for the system, set either of the following.
HKEY_CURRENT_USER\Software\Microsoft\Terminal Server Client\Min Send Interval
HKEY_LOCAL_MACHINE\Software\Microsoft\Terminal Server Client\Min Send Interval
Deadlocks can occur on a Windows host when attempting to access an iSCSI target running in a guest virtual machine with an iSCSI initiator, such as a Microsoft iSCSI Initiator, that is running on the host. This is caused by a flaw in the Windows cache manager component, and causes sluggish host system response for several minutes, followed by a "Delayed Write Failed" error message in the system tray or in a separate message window. The guest is blocked during that period and may show error messages or become unstable.
Setting the VBOX_DISABLE_HOST_DISK_CACHE
environment variable to 1 enables a
workaround for this problem until Microsoft addresses the issue.
For example, open a command prompt window and start
Oracle VM VirtualBox like this:
set VBOX_DISABLE_HOST_DISK_CACHE=1
VirtualBox
While this will decrease guest disk performance, especially writes, it does not affect the performance of other applications running on the host.
If no bridged adapters show up in the Networking section of the VM settings, this typically means that the bridged networking driver was not installed properly on your host. This could be due to the following reasons:
The maximum allowed filter count was reached on the host. In this case, the MSI log would mention the
0x8004a029error code returned on NetFlt network component install, as follows:VBoxNetCfgWinInstallComponent: Install failed, hr (0x8004a029)
You can try to increase the maximum filter count in the Windows registry using the following key:
HKEY_LOCAL_MACHINE\SYSTEM\CurrentControlSet\Control\Network\MaxNumFilters
The maximum number allowed is 14. After a reboot, try to reinstall Oracle VM VirtualBox.
The INF cache is corrupt. In this case, the install log at
%windir%\inf\setupapi.dev.logwould typically mention the failure to find a suitable driver package for either the sun_VBoxNetFlt or sun_VBoxNetFltmp components. The solution then is to uninstall Oracle VM VirtualBox, remove the INF cache (%windir%\inf\INFCACHE.1), reboot and try to reinstall Oracle VM VirtualBox.
If a host-only adapter cannot be created, either with the
VirtualBox Manager or the VBoxManage command, then
the INF cache is probably corrupt. In this case, the install log
at %windir%\inf\setupapi.dev.log would
typically mention the failure to find a suitable driver package
for the sun_VBoxNetAdp component. Again, as
with the bridged networking problem described above, the
solution is to uninstall Oracle VM VirtualBox, remove the INF cache
(%windir%\inf\INFCACHE.1), reboot and try
to reinstall Oracle VM VirtualBox.
If the Oracle VM VirtualBox kernel module, vboxdrv,
refuses to load you may see an Error inserting vboxdrv:
Invalid argument message. As root, check the output of
the dmesg command to find out why the load
failed. Most probably the kernel disagrees with the version of
gcc used to compile the module. Make sure
that you use the same compiler that was used to build the
kernel.
If you have configured a virtual machine to use the host's CD or
DVD drive or floppy disk drive, but this does not appear to
work, make sure that the current user has permission to access
the corresponding Linux device file. For example, for a CD or
DVD drive this may be /dev/hdc,
/dev/scd0, /dev/cdrom
or similar. On most distributions, the user must be added to a
corresponding group, usually called cdrom or
cdrw or floppy.
On supported Linux distributions, Oracle VM VirtualBox uses udev to locate hardware such as CD/DVD drives and floppy disk drives.
If the experimental CD or DVD writer support is enabled with an incorrect host or guest configuration, it is possible that any attempt to access the CD or DVD writer fails and simply results in guest kernel error messages for Linux guests or application error messages for Windows guests. Oracle VM VirtualBox performs the usual consistency checks when a VM is powered up. In particular, it aborts with an error message if the device for the CD or DVD writer is not writable by the user starting the VM. But Oracle VM VirtualBox cannot detect all misconfigurations. The necessary host and guest OS configuration is not specific for Oracle VM VirtualBox, but a few frequent problems are listed here which occurred in connection with Oracle VM VirtualBox.
Special care must be taken to use the correct device. The
configured host CD or DVD device file name, in most cases
/dev/cdrom, must point to the device that
allows writing to the CD or DVD unit. For CD or DVD writer units
connected to a SCSI controller or to a IDE controller that
interfaces to the Linux SCSI subsystem, common for some SATA
controllers, this must refer to the SCSI device node, such as
/dev/scd0. Even for IDE CD or DVD writer
units this must refer to the appropriate SCSI CD-ROM device
node, such as /dev/scd0, if the
ide-scsi kernel module is loaded. This module
is required for CD or DVD writer support with some early 2.6
kernels. Many Linux distributions load this module whenever a CD
or DVD writer is detected in the system, even if the kernel
would support CD or DVD writers without the module.
Oracle VM VirtualBox supports the use of IDE device files, such as
/dev/hdc, provided the kernel supports this
and the ide-scsi module is not loaded.
Similar rules, except that within the guest the CD or DVD writer is always an IDE device, apply to the guest configuration. Since this setup is very common, it is likely that the default configuration of the guest works as expected.
On Linux, Oracle VM VirtualBox makes use of a custom version of
Mozilla XPCOM (cross platform component object model) for
interprocess and intraprocess communication (IPC). The process
VBoxSVC serves as a communication hub between
different Oracle VM VirtualBox processes and maintains the global
configuration, such as the XML database. When starting an
Oracle VM VirtualBox component, the processes
VBoxSVC and VBoxXPCOMIPCD
are started automatically. They are only accessible from the
user account they are running under. VBoxSVC
owns the Oracle VM VirtualBox configuration database which normally
resides in ~/.config/VirtualBox, or the
appropriate configuration directory for your operating system.
While it is running, the configuration files are locked.
Communication between the various Oracle VM VirtualBox components and
VBoxSVC is performed through a local domain
socket residing in
/tmp/.vbox-.
In case there are communication problems, such as an
Oracle VM VirtualBox application cannot communicate with
VBoxSVC, terminate the daemons and remove the
local domain socket directory.
username-ipc
If USB is not working on your Linux host, make sure that the
current user is a member of the vboxusers
group. Please keep in mind that group membership does not take
effect immediately but rather at the next login. If available,
the newgrp command may avoid the need for a
logout and login.
Linux kernels including the grsec patch, see http://www.grsecurity.net/, and derivates have to disable PAX_MPROTECT for the VBox binaries to be able to start a VM. The reason is that Oracle VM VirtualBox has to create executable code on anonymous memory.
When running a large number of VMs with a lot of RAM on a Linux
system, say 20 VMs with 1 GB of RAM each, additional VMs might
fail to start with a kernel error saying that the vmalloc pool
is exhausted and should be extended. The error message also
tells you to specify vmalloc=256MB in your
kernel parameter list. If adding this parameter to your GRUB or
LILO configuration makes the kernel fail to boot, with an error
message such as failed to mount the root
partition, then you have probably run into a memory
conflict of your kernel and initial RAM disk. This can be solved
by adding the following parameter to your GRUB configuration:
uppermem 524288
The ZFS file system is known to use nearly all available RAM as
cache if the default system settings are not changed. This may
lead to a heavy fragmentation of the host memory preventing
Oracle VM VirtualBox VMs from being started. We recommend to limit the
ZFS cache by adding the following line to
/etc/system, where
xxxx bytes is the amount of memory
usable for the ZFS cache.
set zfs:zfs_arc_max = xxxx
Table of Contents
The following principles are fundamental to using any application securely.
Keep software up to date. One of the principles of good security practise is to keep all software versions and patches up to date. Activate the Oracle VM VirtualBox update notification to get notified when a new Oracle VM VirtualBox release is available. When updating Oracle VM VirtualBox, do not forget to update the Guest Additions. Keep the host operating system as well as the guest operating system up to date.
Restrict network access to critical services. Use proper means, for instance a firewall, to protect your computer and your guests from accesses from the outside. Choosing the proper networking mode for VMs helps to separate host networking from the guest and vice versa.
Follow the principle of least privilege. The principle of least privilege states that users should be given the least amount of privilege necessary to perform their jobs. Always execute Oracle VM VirtualBox as a regular user. We strongly discourage anyone from executing Oracle VM VirtualBox with system privileges.
Choose restrictive permissions when creating configuration files, for instance when creating /etc/default/virtualbox, see Section 2.3.3.7, “Automatic Installation Options”. Mode 0600 is preferred.
Monitor system activity. System security builds on three pillars: good security protocols, proper system configuration and system monitoring. Auditing and reviewing audit records address the third requirement. Each component within a system has some degree of monitoring capability. Follow audit advice in this document and regularly monitor audit records.
Keep up to date on latest security information. Oracle continually improves its software and documentation. Check this note yearly for revisions.
The Oracle VM VirtualBox base package should be downloaded only from a trusted source, for instance the official website http://www.virtualbox.org. The integrity of the package should be verified with the provided SHA256 checksum which can be found on the official website.
General Oracle VM VirtualBox installation instructions for the supported hosts can be found in Chapter 2, Installation Details.
On Windows hosts, the installer can be used to disable USB support, support for bridged networking, support for host-only networking and the Python language binding. See Section 2.1, “Installing on Windows Hosts”. All these features are enabled by default but disabling some of them could be appropriate if the corresponding functionality is not required by any virtual machine. The Python language bindings are only required if the Oracle VM VirtualBox API is to be used by external Python applications. In particular USB support and support for the two networking modes require the installation of Windows kernel drivers on the host. Therefore disabling those selected features can not only be used to restrict the user to certain functionality but also to minimize the surface provided to a potential attacker.
The general case is to install the complete Oracle VM VirtualBox package. The installation must be done with system privileges. All Oracle VM VirtualBox binaries should be executed as a regular user and never as a privileged user.
The Oracle VM VirtualBox Extension Pack provides additional features and must be downloaded and installed separately, see Section 1.5, “Installing Oracle VM VirtualBox and Extension Packs”. As for the base package, the SHA256 checksum of the extension pack should be verified. As the installation requires system privileges, Oracle VM VirtualBox will ask for the system password during the installation of the extension pack.
Normally there is no post installation configuration of Oracle VM VirtualBox components required. However, on Oracle Solaris and Linux hosts it is necessary to configure the proper permissions for users executing VMs and who should be able to access certain host resources. For instance, Linux users must be member of the vboxusers group to be able to pass USB devices to a guest. If a serial host interface should be accessed from a VM, the proper permissions must be granted to the user to be able to access that device. The same applies to other resources like raw partitions, DVD/CD drives, and sound devices.
This section outlines the specific security mechanisms offered by Oracle VM VirtualBox.
One property of virtual machine monitors (VMMs) like Oracle VM VirtualBox is to encapsulate a guest by executing it in a protected environment, a virtual machine, running as a user process on the host operating system. The guest cannot communicate directly with the hardware or other computers but only through the VMM. The VMM provides emulated physical resources and devices to the guest which are accessed by the guest operating system to perform the required tasks. The VM settings control the resources provided to the guest, for example the amount of guest memory or the number of guest processors and the enabled features for that guest. For example remote control, certain screen settings and others. See Section 3.4, “General Settings”.
Several aspects of a virtual machine configuration are subject to security considerations.
The default networking mode for VMs is NAT which means that the VM acts like a computer behind a router, see Section 6.3, “Network Address Translation (NAT)”. The guest is part of a private subnet belonging to this VM and the guest IP is not visible from the outside. This networking mode works without any additional setup and is sufficient for many purposes. Keep in mind that NAT allows access to the host operating system's loopback interface.
If bridged networking is used, the VM acts like a computer inside the same network as the host, see Section 6.5, “Bridged Networking”. In this case, the guest has the same network access as the host and a firewall might be necessary to protect other computers on the subnet from a potential malicious guest as well as to protect the guest from a direct access from other computers. In some cases it is worth considering using a forwarding rule for a specific port in NAT mode instead of using bridged networking.
Some setups do not require a VM to be connected to the public network at all. Internal networking, see Section 6.6, “Internal Networking”, or host-only networking, see Section 6.7, “Host-Only Networking”, are often sufficient to connect VMs among each other or to connect VMs only with the host but not with the public network.
When using the Oracle VM VirtualBox Extension Pack provided by Oracle for VRDP remote desktop support, you can optionally use various methods to configure RDP authentication. The "null" method is very insecure and should be avoided in a public network. See Section 7.1.5, “RDP Authentication”.
The shared clipboard enables users to share data between the host and the guest. Enabling the clipboard in Bidirectional mode enables the guest to read and write the host clipboard. The Host to Guest mode and the Guest to Host mode limit the access to one direction. If the guest is able to access the host clipboard it can also potentially access sensitive data from the host which is shared over the clipboard.
If the guest is able to read from and/or write to the host clipboard then a remote user connecting to the guest over the network will also gain this ability, which may not be desirable. As a consequence, the shared clipboard is disabled for new machines.
If any host folder is shared with the guest then a remote user connected to the guest over the network can access these files too as the folder sharing mechanism cannot be selectively disabled for remote users.
Enabling 3D graphics using the Guest Additions exposes the host to additional security risks. See Section 4.5.1, “Hardware 3D Acceleration (OpenGL and Direct3D 8/9)”.
Enabling CD/DVD passthrough enables the guest to perform advanced operations on the CD/DVD drive, see Section 5.9, “CD/DVD Support”. This could induce a security risk as a guest could overwrite data on a CD/DVD medium.
Passing USB devices to the guest provides the guest full access to these devices, see Section 3.11.1, “USB Settings”. For instance, in addition to reading and writing the content of the partitions of an external USB disk the guest will be also able to read and write the partition table and hardware data of that disk.
The following components of Oracle VM VirtualBox can use passwords for authentication:
When using remote iSCSI storage and the storage server requires authentication, an initiator secret can optionally be supplied with the VBoxManage storageattach command. As long as no settings password is provided, by using the command line option
--settingspwfile, then this secret is stored unencrypted in the machine configuration and is therefore potentially readable on the host. See Section 5.10, “iSCSI Servers” and Section 8.26, “VBoxManage storageattach”.When using the Oracle VM VirtualBox web service to control an Oracle VM VirtualBox host remotely, connections to the web service are authenticated in various ways. This is described in detail in the Oracle VM VirtualBox Software Development Kit (SDK) reference. See Chapter 11, Oracle VM VirtualBox Programming Interfaces.
The following features of Oracle VM VirtualBox can present security problems:
Enabling 3D graphics using the Guest Additions exposes the host to additional security risks. See Section 4.5.1, “Hardware 3D Acceleration (OpenGL and Direct3D 8/9)”.
When teleporting a machine, the data stream through which the machine's memory contents are transferred from one host to another is not encrypted. A third party with access to the network through which the data is transferred could therefore intercept that data. An SSH tunnel could be used to secure the connection between the two hosts. But when considering teleporting a VM over an untrusted network the first question to answer is how both VMs can securely access the same virtual disk image with a reasonable performance.
If the network is not sufficiently trusted, the password should be changed for each teleportation as the a 3rd party could snoop up the unecrypted password hash when it is transferred between the target and source host machines.
When Page Fusion, see Section 4.10.2, “Page Fusion”, is enabled, it is possible that a side-channel opens up that enables a malicious guest to determine the address space of another VM running on the same host layout. For example, where DLLs are typically loaded. This information leak in itself is harmless, however the malicious guest may use it to optimize attack against that VM through unrelated attack vectors. It is recommended to only enable Page Fusion if you do not think this is a concern in your setup.
When using the Oracle VM VirtualBox web service to control an Oracle VM VirtualBox host remotely, connections to the web service, over which the API calls are transferred using SOAP XML, are not encrypted. They use plain HTTP by default. This is a potential security risk. For details about the web service, see Chapter 11, Oracle VM VirtualBox Programming Interfaces.
The web services are not started by default. See Section 9.18, “Starting the Oracle VM VirtualBox Web Service Automatically” to find out how to start this service and how to enable SSL/TLS support. It has to be started as a regular user and only the VMs of that user can be controlled. By default, the service binds to localhost preventing any remote connection.
Traffic sent over a UDP Tunnel network attachment is not encrypted. You can either encrypt it on the host network level, with IPsec, or use encrypted protocols in the guest network, such as SSH. The security properties are similar to bridged Ethernet.
Because of shortcomings in older Windows versions, using Oracle VM VirtualBox on Windows versions older than Vista with Service Pack 1 is not recommended.
The following components of Oracle VM VirtualBox use encryption to protect sensitive data:
When using the Oracle VM VirtualBox Extension Pack provided by Oracle for VRDP remote desktop support, RDP data can optionally be encrypted. See Section 7.1.6, “RDP Encryption”. Only the Enhanced RDP Security method (RDP5.2) with TLS protocol provides a secure connection. Standard RDP Security (RDP4 and RDP5.1) is vulnerable to a man-in-the-middle attack.
When using the Oracle VM VirtualBox Extension Pack provided by Oracle for disk encryption, the data stored in disk images can optionally be encrypted. See Section 9.29, “Encryption of Disk Images”. This feature covers disk image content only. All other data for a virtual machine is stored unencrypted, including the VM's memory and device state which is stored as part of a saved state, both when created explicitly or part of a snapshot of a running VM.
This section contains security recommendations for specific issues. By default VirtualBox will configure the VMs to run in a secure manner, however this may not always be possible without additional user actions such as host OS or firmware configuration changes.
This security issue affect a range of Intel CPUs with nested paging. AMD CPUs are expected not to be impacted (pending direct confirmation by AMD). Also the issue does not affect VMs running with hardware virtualization disabled or with nested paging disabled.
For more information about nested paging, see Section 10.6, “Nested Paging and VPIDs”.
The following mitigation options are available.
By disabling nested paging (EPT), the VMM will construct page tables shadowing the ones in the guest. It is no possible for the guest to insert anything fishy into the page tables, since the VMM carefully validates each entry before shadowing it.
As a side effect of disabling nested paging, several CPU features will not be made available to the guest. Among these features are AVX, AVX2, XSAVE, AESNI, and POPCNT. Not all guests may be able to cope with dropping these features after installation. Also, for some guests, especially in SMP configurations, there could be stability issues arising from disabling nested paging. Finally, some workloads may experience a performance degradation.
This aims at removing potentially sensitive data from the level 1 data cache when running guest code. However, it is made difficult by hyper-threading setups sharing the level 1 cache and thereby potentially letting the other thread in a pair refill the cache with data the user does not want the guest to see. In addition, flushing the level 1 data cache is usually not without performance side effects.
Up to date CPU microcode is a prerequisite for the cache flushing mitigations. Some host OSes may install these automatically, though it has traditionally been a task best performed by the system firmware. So, please check with your system / mainboard manufacturer for the latest firmware update.
We recommend disabling hyper threading on the host. This is traditionally done from the firmware setup, but some OSes also offers ways disable HT. In some cases it may be disabled by default, but please verify as the effectiveness of the mitigation depends on it.
The default action taken by VirtualBox is to flush the level 1 data cache when a thread is scheduled to execute guest code, rather than on each VM entry. This reduces the performance impact, while making the assumption that the host OS will not handle security sensitive data from interrupt handlers and similar without taking precautions.
A more aggressive flushing option is provided via the
VBoxManage modifyvm
--l1d-flush-on-vm-entry option. When enabled
the level 1 data cache will be flushed on every VM entry. The
performance impact is greater than with the default option,
though this of course depends on the workload. Workloads
producing a lot of VM exits (like networking, VGA access, and
similiar) will probably be most impacted.
For users not concerned by this security issue, the default mitigation can be disabled using the VBoxManage modifyvm name --l1d-flush-on-sched off command.
These security issues affect a range of Intel CPUs starting with Nehalem. The CVE-2018-12130 also affects some Atom Silvermont, Atom Airmont, and Knights family CPUs, however the scope is so limited that the host OS should deal with it and Oracle VM VirtualBox is therefore not affected. Leaks only happens when entering and leaving C states.
The following mitigation option is available.
First, up to date CPU microcode is a prerequisite for the buffer overwriting (clearing) mitigations. Some host OSes may install these automatically, though it has traditionally been a task best performed by the system firmware. Please check with your system or mainboard manufacturer for the latest firmware update.
This mitigation aims at removing potentially sensitive data from the affected buffers before running guest code. Since this means additional work each time the guest is scheduled, there might be some performance side effects.
We recommend disabling hyper-threading (HT) on hosts affected by CVE-2018-12126 and CVE-2018-12127, because the affected sets of buffers are normally shared between thread pairs and therefore cause leaks between the threads. This is traditionally done from the firmware setup, but some OSes also offers ways disable HT. In some cases it may be disabled by default, but please verify as the effectiveness of the mitigation depends on it.
The default action taken by Oracle VM VirtualBox is to clear the affected buffers when a thread is scheduled to execute guest code, rather than on each VM entry. This reduces the performance impact, while making the assumption that the host OS will not handle security sensitive data from interrupt handlers and similar without taking precautions.
The VBoxManage modifyvm command provides a
more aggressive flushing option is provided by means of the
--mds-clear-on-vm-entry option. When enabled
the affected buffers will be cleared on every VM entry. The
performance impact is greater than with the default option,
though this of course depends on the workload. Workloads
producing a lot of VM exits (like networking, VGA access, and
similiar) will probably be most impacted.
For users not concerned by this security issue, the default mitigation can be disabled using the VBoxManage modifyvm name --mds-clear-on-sched off command.
Table of Contents
Some Oracle VM VirtualBox features are labeled as experimental. Such features are provided on an "as-is" basis and are not formally supported. However, feedback and suggestions about such features are welcome. A comprehensive list of experimental features is as follows:
Hardware 3D acceleration support for Windows, Linux, and Oracle Solaris guests
Hardware 2D video playback acceleration support for Windows guests
Mac OS X guests (macOS hosts only)
ICH9 chipset emulation
EFI firmware
Host CD/DVD drive passthrough
Support of iSCSI using internal networking
Using Oracle VM VirtualBox and Hyper-V on the same host
The following section describes known problems with this release of Oracle VM VirtualBox. Unless marked otherwise, these issues are planned to be fixed in later releases.
The macOS installer packages for Oracle VM VirtualBox 7 currently do not include the Internal Networking feature, which is available on all other platforms. This will be addressed with an update of Oracle VM VirtualBox 7. For setups which depend on this functionality it is best to keep using Oracle VM VirtualBox 6.1.
Poor performance when using Oracle VM VirtualBox and Hyper-V on the same host. To fix this, certain Windows features like "Hyper-V Platform", "Virtual Machine Platform" and "Windows Hypervisor Platform" must be turned off, followed by a host reboot.
Additionally, the Microsoft Device Guard and Credential Guard hardware readiness tool might have to be used in order to turn off more features. For example, by running the following command:
.\DG_Readiness_Tool_vX.X.ps1 -Disable -AutoReboot
Note
Disabling Device Guard and Credential Guard features will have an impact on the overall security of the host. Please contact your Administrator beforehand regarding this.
The following Guest SMP (multiprocessor) limitations exist:
Poor performance with 32-bit guests on AMD CPUs. This affects mainly Windows and Oracle Solaris guests, but possibly also some Linux kernel revisions. Partially solved for 32-bit Windows NT, 2000, XP, and 2003 guests. Requires the Guest Additions to be installed.
Poor performance with 32-bit guests on certain Intel CPU models that do not include virtual APIC hardware optimization support. This affects mainly Windows and Oracle Solaris guests, but possibly also some Linux kernel revisions. Partially solved for 32-bit Windows NT, 2000, XP, and 2003 guests. Requires the Guest Additions to be installed.
NX (no execute, data execution prevention) only works for guests running on 64-bit hosts and requires that hardware virtualization be enabled.
Guest control. On Windows guests, a process started using the guest control execute support will not be able to display a graphical user interface unless the user account under which it is running is currently logged in and has a desktop session.
Also, to use accounts without or with an empty password, the guest's group policy must be changed. To do so, open the group policy editor on the command line by typing gpedit.msc, open the key
Computer
          Configuration\Windows Settings\Security Settings\Local
          Policies\Security Options
and change the value ofAccounts: Limit local account use of blank passwords to console logon onlyto Disabled.Compacting virtual disk images is limited to VDI files. The VBoxManage modifymedium --compact command is currently only implemented for VDI files. At the moment the only way to optimize the size of a virtual disk images in other formats, such as VMDK or VHD, is to clone the image and then use the cloned image in the VM configuration.
OVF import/export:
OVF localization, with multiple languages in a single OVF file, is not yet supported.
Some OVF sections like StartupSection, DeploymentOptionSection, and InstallSection are ignored.
OVF environment documents, including their property sections and appliance configuration with ISO images, are not yet supported.
Remote files using HTTP or other mechanisms are not yet supported.
Neither scale mode nor seamless mode work correctly with guests using OpenGL 3D features, such as with Compiz-enabled window managers.
The RDP server in the Oracle VM VirtualBox extension pack supports only audio streams in format 22.05kHz stereo 16-bit. If the RDP client requests any other audio format there will be no audio.
Preserving the aspect ratio in scale mode works only on Windows hosts and on macOS hosts.
On macOS hosts, the following features are not yet implemented:
Numlock emulation
CPU frequency metric
Memory ballooning
macOS/ARM64 (Apple silicon) host package
Mac OS X guests:
Mac OS X guests can only run on a certain host hardware. For details about license and host hardware limitations. See Section 3.1.1, “Mac OS X Guests” and check the Apple software license conditions.
Oracle VM VirtualBox does not provide Guest Additions for Mac OS X at this time.
The graphics resolution currently defaults to 1024x768 as Mac OS X falls back to the built-in EFI display support. See Section 3.14.1, “Video Modes in EFI” for more information on how to change EFI video modes.
Mac OS X guests only work with one CPU assigned to the VM. Support for SMP will be provided in a future release.
Depending on your system and version of Mac OS X, you might experience guest hangs after some time. This can be fixed by turning off energy saving. Set the timeout to "Never" in the system preferences.
By default, the Oracle VM VirtualBox EFI enables debug output of the Mac OS X kernel to help you diagnose boot problems. Note that there is a lot of output and not all errors are fatal. They would also show when using a physical Apple Macintosh computer. You can turn off these messages by using the following command:
$ VBoxManage setextradata
VM-name"VBoxInternal2/EfiBootArgs" " "To revert to the previous behavior, use the following command:
$ VBoxManage setextradata
VM-name"VBoxInternal2/EfiBootArgs" ""It is currently not possible to start a Mac OS X guest in safe mode by specifying the
-xoption inVBoxInternal2/EfiBootArgsextradata.
Oracle Solaris hosts:
USB support on Oracle Solaris hosts requires Oracle Solaris 11 version snv_124 or later. Webcams and other isochronous devices are known to have poor performance.
Host Webcam passthrough is restricted to 640x480 frames at 20 frames per second due to limitations in the Oracle Solaris V4L2 API. This may be addressed in a future Oracle Solaris release.
No ACPI information, such as battery status or power source, is reported to the guest.
No support for using wireless adapters with bridged networking.
Crossbow-based bridged networking on Oracle Solaris 11 hosts does not work directly with aggregate links. However, you can use dladm to manually create a VNIC over the aggregate link and use that with a VM. This limitation does not exist in Oracle Solaris 11u1 build 17 and later.
Neither virtio nor Intel PRO/1000 drivers for Windows XP guests support segmentation offloading. Therefore Windows XP guests have slower transmission rates comparing to other guest types. Refer to MS Knowledge base article 842264 for additional information.
Guest Additions for OS/2. Seamless windows and automatic guest resizing will probably never be implemented due to inherent limitations of the OS/2 graphics system.
Some guest operating systems predating ATAPI CD-ROMs may exhibit long delays or entirely fail to boot in certain configurations. This is most likely to happen when an IDE/ATAPI CD-ROM exists alone on a primary or secondary IDE channel.
Affected operating systems are MS OS/2 1.21: fails to boot with an error message referencing COUNTRY.SYS and MS OS/2 1.3: long boot delays. To avoid such problems, disable the emulated IDE/ATAPI CD-ROM. The guest OS cannot use this device, anyway.
Table of Contents
- 15.1. Version 7.0.18 (2024-05-07)
- 15.2. Version 7.0.16 (2024-04-16)
- 15.3. Version 7.0.14 (2024-01-16)
- 15.4. Version 7.0.12 (2023-10-17)
- 15.5. Version 7.0.10 (2023-07-18)
- 15.6. Version 7.0.8 (2023-04-18)
- 15.7. Version 7.0.6 (2023-01-17)
- 15.8. Version 7.0.4 (2022-11-18)
- 15.9. Version 7.0.2 (2022-10-20)
- 15.10. Version 7.0.0 (2022-10-10)
- 15.11. Change Logs for Legacy Versions
This section summarizes the changes between Oracle VM VirtualBox versions. Note that this change log is not exhaustive and not all changes are listed.
Oracle VM VirtualBox version numbers consist of three numbers separated by dots where the first and second number represent the major version and the third number the minor version. Minor version numbers of official releases are always even. An odd minor version number represents an internal development or test build. In addition, each build contains a revision number.
This is a maintenance release. The following items were fixed and/or added:
Networking: Fixed an issue which caused host system crash when VM was using bridged or host-only network adapter (bug #22045)
Linux Guest Additions: Added more fixes to prevent UBSAN warnings (bug #21877)
Linux Guest Additions: Fixed issue when time stamps were displayed incorrectly within mounted shared folder (bug #22047)
This is a maintenance release. The following items were fixed and/or added:
VMM: Fixed a guru meditation executing nested-guests using the KVM hypervisor in the guest on Intel hosts (bug #21805)
VMM: Fixed Linux VM crash on some recent AMD models
USB: Fixed issue when EHCI controller was mishandling short packets (bug #20726)
Audio: Introduced general improvements
VBoxManage and vboximg-mount: Updated usage information and documentation (bugs #21895, #21992 and #21993)
Guest Control: Fixed starting Windows guest processes in the correct Windows session (7.0 regression)
Linux Host: Fixed issue when VBox.sh was deleting wrong VBoxSVC IPC socket when VM was started using sudo (bug #20928)
Linux Host: Fixed kernel modules build failure when using GCC 13.2
macOS Host: Fixed issue when App Nap was affecting VM performance (bug #18678)
Linux Host and Guest: Added fixes related to UBSAN warnings discovered on recent Linux distributions (bug #21877)
Linux Host and Guest: Added possibility to prevent kernel module from automatic loading during system boot by adding mod_name.disabled=1 into kernel command line
Linux Host and Guest: Added initial support for kernel 6.9 (bug #22033)
Linux Host and Guest: Fixed mk_pte warning introduced in kernel 6.6 (bug #21898)
Linux Guest Additions: Added initial support for kernel 6.8
Windows Guest Additions: Introduced general improvements in graphics area
This is a maintenance release. The following items were fixed and/or added:
Audio: Added more fixes for switching host audio devices on Windows hosts using the WAS backend
3D: Added general improvements
OCI: Fixed wrong guest RAM unit usage in VirtualSystemDescription, memory is provided in bytes, "Byte" is the base unit
Main: OVF Import/Export: Added support for importing and exporting VMs containing NVMe storage controllers (bug #19320)
Main: OVF Import/Export: Added support for exporting a VM which contains a medium inserted into a virtual CD/DVD drive which is attached to a Virtio-SCSI controller
Devices: Fixed a problem where Windows guests "forget" in-progress touch events when the user holds down a finger without moving it for a period of time
macOS Host USB: Added support for newer storage devices
macOS Host: Fixed memory Leak in the VBoxIntNetSwitch process when VM was configured to use 'Internal Networking' (bug #21752)
Linux Host and Guest: Added initial support for RHEL 9.4 kernel
Linux Guest Additions: Fixed kernel panic on RHEL 8.9 kernel caused by vboxvideo (bugs #10381 and #21911)
Solaris Guest Additions: Added support for the Additions to be installed into an alternate root path ('pkgadd -R')
Solaris Guest Additions: Removed requirement to reboot VM after uninstalling GAs
RDP: Fix possible crash when connecting with the Apple Silicon variant of the Microsoft Remote Desktop application (bug #21820)
BIOS: Fixed handle number used for DMI OEM table (bug #19781)
This is a maintenance release. The following items were fixed and/or added:
VMM: Fixed using a debugger inside the guest under certain circumstances (bugs #21413 and #21546)
VMM: Fixed detection of VT-x being used by other hypervisors (bug #21867)
VMM: Introduced additional improvements in Split Lock Detection feature of recent Intel CPUs on Linux hosts (bug #20180)
GUI: Fixed issue when the nested hardware virtualization setting was not displayed in the VM details panel (bug #21707)
GUI: Introduced NLS update for Croatian, Indonesian, Italian, Japanese, Korean, Dutch and Turkish languages as well as added general look-and-feel improvements
Devices: Fixed black screen in Windows guests with multiple guest screens when 3D is disabled (7.0.10 regression)
Devices: Fixed PCI device identifiers for the VirtIO network interface (bug #21516)
Devices: Fixed VLAN support for the VirtIO network interface (bug #21778)
Devices: Fixed loading saved states when a TPM is configured (7.0.10 regression, bug #21773)
Networking: Fixed memory leaks in the VBoxIntNetSwitch process on macOS (bug #21752)
Networking: Fixed TCP connections with IP addresses ending on .2 when the NAT network attachment is used (bug #21513)
Audio: Fixed switching host audio devices on Windows hosts using the WAS backend (bugs #20431, #21517, #20630 and #20723)
VRDP: Added general improvements
VBoxManage: Added improvements for "list usbfilters" command
Unattended: Added kick start file support for Oracle Linux 8 and Oracle Linux 9
Main: Added more Linux OS subtypes
Host Services: Fixed Guest Properties service crash under rare circumstance
Linux Host and Guest: Fixed few "field-spanning write" kernel warnings (bugs #21410 and #21862)
Linux Guest Additions: Added more fixes for RHEL 8.9 and 9.3 kernel
Linux Guest Additions: Added more fixes for kernel 6.4
Linux Guest Additions: Added initial support for OpenSUSE 15.5 kernel
Linux Guest Additions: Added initial support for kernels 6.5 and 6.6
Linux Guest Additions: Added version reporting for "rcvboxadd status-kernel" and "rcvboxadd status-user" commands
BIOS: Restored support for ISA SCSI HBAs in the BIOS (bug #21736)
This is a maintenance release. The following items were fixed and/or added:
OCI: Introduced general improvements
VMM: Fixed sluggish performance starting with macOS Ventura 13.3 (bug #21563, bug#21596)
VMM: Fixed a bug while walking page tables while executing nested VMs causing flooding of the release log as a consequence (Intel hosts only, bug #21551)
GUI: Added general improvements
TPM: Fixed a crash when a VM has a TPM version 1.2 configured (bug #21622)
3D: Initial support for OpenGL 4.1
3D: Fixed various graphics issues with Windows 11 guests (bugs #21136, #21515)
Guest Control/VBoxManage: Fixed parameter "--ignore-orphaned-processes"
Guest Control/VBoxManage: One can now explicitly specify an executable argument 0 via "--arg0" with the "run" and "start" commands. See VBoxManage help for examples
Audio: Also use the PulseAudio backend when pipewire-pulse is running instead of falling back to ALSA (bug #21575)
NAT: Adjusted UDP proxy timeout from 18-21 to 21-24 range to respect intended 20 second timeout (bug #21560)
Linux Host: Added initial support for Indirect Branch Tracking (bug #21435)
Linux Host: Added initial support for kernel 6.5 (NOTE: Guest Additions do not support kernel 6.5 yet)
Solaris Host: Introduced general improvements in the installer area
Linux Host and Guest: Improved condition check when kernel modules need to be signed
Linux Host and Guest: Added initial support for RHEL 8.8 (bug #21692), 8.9 (bug #21690) and 9.3 (bugs #21598 and #21671) kernels
MacOS Host and Guest: Introduced general improvements in the installer area
Windows Host and Guest: Introduced ECDSA support (bug #21621)
Linux Guest Additions: Fixed issue when kernel modules were rebuilt on each boot when guest system has no X11 installed
Linux Guest Additions: Added initial support for kernel 6.4
Linux Guest Additions: Fixed issue when vboxvideo module reloading caused kernel panic in some guests (bug #21740)
Linux Guest Additions: Introduced general improvements in the installer area
Windows Guest Additions: Introduced general improvements in graphics drivers area
This is a maintenance release. The following items were fixed and/or added:
VMM: Fixed EFLAGS.TF handling for CPUID instructions when Hyper-V is used (bug #17961)
VMM: Fixed MONITOR/MWAIT crash with Solaris guests when Hyper-V is used on Windows 11
VMM: Introduced general improvements in nested visualization area
VMM: Fixed triple fault related guru meditations for UEFI guests starting with macOS Ventura 13.3 (bug #21563)
GUI: Brought back Restore current snapshot checkbox of Close VM dialog (bugs #21189, #21491)
GUI: Fixes and validation for VM settings USB filters editor, filter port value is now properly saved/restored
GUI: Fixes for VM name and OS type embedded editors of Details pane
GUI: Cloud related wizards should now propose enabled profiles before disabled
Oracle VM VirtualBox Extension Pack: Fixed shipping the cryptographic support module for full VM encryption
E1000: Fixed possible guru meditation when changing network attachments (bug #21488)
virtio-net: Follow up fixes for FreeBSD 12.3 and pfSense 2.6.0 (bug #21201)
3D: Fixed various graphics issues with Windows 7 guests (bugs #21129, #21196, #21208, #21521)
Main/UefiVariableStore: Added API to add signatures to the MOK list (Machine Owner Key)
VBoxManage: Introduced modifynvram enrollmok sub-command to enroll Machine Owner Key into NVRAM, so Linux guest kernel can pick it up in order to verify signature of modules signed with this key
Guest Control/Main: Fixed deleting files via built-in toolbox
Linux host: Added possibility to bypass kernel modules signature verification once VBOX_BYPASS_MODULES_SIGNATURE_CHECK="1" is specified in /etc/vbox/vbox.cfg, useful in case if Linux distribution does not provide necessary tools to verify kernel module signature
Linux Guest Additions and host Installer: Improved detection if system is running systemd as the init process
Linux Guest Additions and host drivers: Introduce initial support for kernel 6.3
Linux Guest Additions: Added possibility to bypass kernel modules signature verification once VBOX_BYPASS_MODULES_SIGNATURE_CHECK="1" is specified in /etc/virtualbox-guest-additions.conf, useful in case if Linux distribution does not provide necessary tools to verify kernel module signature
Linux Guest Additions: Added experimental support for kernel modules and user services reloading in the end of installation process, thus guest system reboot after Guest Additions (7.0.8 and newer) upgrade is no longer required in general case
Linux Guest Additions: Fixed vboxvideo build issue with RHEL 8.7, 9.1 and 9.2 kernels (bugs #21446 and #21450)
This is a maintenance release. The following items were fixed and/or added:
VMM: Fixed guru running the FreeBSD loader on older Intel CPUs without unrestricted guest support (bug #21332)
GUI: Fixed virtual machines grouping when VM was created or modified in command line (bugs #11500, #20933)
GUI: Introduced generic changes in settings dialogs
VirtioNet: Fixed broken network after loading saved state (bug #21172)
Storage: Added support for increasing the size of the following VMDK image variants: monolithicFlat, monolithicSparse, twoGbMaxExtentSparse, twoGbMaxExtentFlat
VBoxManage: Added missing --directory switch for guestcontrol mktemp command
Mouse Integration: Guest was provided with extended host mouse state (bug #21139)
DnD: Introduced generic improvements
Guest Control: Fixed handling creation mode for temporary directories (bug #21394)
Linux Host and Guest: Added initial support for building UEK7 kernel on Oracle Linux 8
Linux Host and Guest: Added initial support for RHEL 9.1 kernel
Windows Host: Fixed support for VM autostart (bug#21349)
Linux Guest Additions: Added initial support for kernel 6.2 for vboxvideo
Audio: The "--audio" option in VBoxManage is now marked as deprecated; please use "--audio-driver" and "--audio-enabled" instead. This will allow more flexibility when changing the driver and/or controlling the audio functionality
This is a maintenance release. The following items were fixed and/or added:
VMM: Added nested paging support for nested virtualization (Intel hosts only)
VMM: Fixed rare guru meditations with certain guests on macOS 10.15 (Catalina) (bug #21237)
VMM: Fixed possible VM process crash on Windows hosts when Hyper-V is used with certain guests (bug #21174)
VMM: Fixed Windows XP guest hang or BSOD on AMD CPUs under certain circumstances (bug #21256)
GUI: Various bugfixes for the Guest Control file manager
GUI: Added more informative file operations in the Guest Control file manager
GUI: Added an option to the global settings (the display page) to resize user interface font
GUI: Fixed a regression in new vm wizard. Selected virtual disks are no longer deleted when the wizard is cancelled (bug #21244)
GUI: Added a new menu item to the devices menu to optionally upgrade the guest additions
VirtioSCSI: Fixed recognition of the virtio SCSI controller by the EFI firmware (bug #21200)
VirtioSCSI: Fixed hang when shutting down the VM if the virtio SCSI controller is used (bug #21144)
virtio-net: Workaround a bug in the virtio-net driver included in FreeBSD version up to 12.3 which renders the device non functional (bug #21201)
Storage: Fixed I/O errors with the VirtioSCSI controller when the host I/O cache is enabled (bug #19717)
VBoxManage: Fixed regression when 'createmedium disk --variant RawDisk' command resulted in invalid .vmdk file (bug #21125)
Main: Restored input pointing device behavior in multi-monitor VM configuration (bug #21137)
Main: Fixed progress indication during automatic Linux Guest Additions installation
Guest Control: Fixed path handling issues (bug #21095)
3D: Fixed VM process crash on macOS with 3D enabled (bug #21232)
Linux Host and Guest: General improvements in startup scripts
Linux Guest Additions: Introduced initial support for RHEL 8.7 and 9.2 kernels (bug #21272, #21258)
Linux Guest Additions: Introduced initial support for SLES 15.4 kernels
Linux Guest Additions: Fixed kernel modules rebuild behavior on system shutdown
This is a maintenance release. The following items were fixed and/or added:
Known issue: VMs having more than one vCPU configured will not work properly on macOS Catalina due to an unknown memory corruption issue. Either lower the number of vCPUs to 1 or upgrade to BigSur or later where the issue does not occur
Main: Fixed issue when VBoxSVC could become unresponsive if Extension Pack was not installed (bug #21167)
macOS hosts: Added workaround for a bug in the Hypervisor framework on Catalina causing VERR_NEM_MAP_PAGES_FAILED errors when starting a VM. (bug #21128)
macOS hosts: Re-introduced support for internal networking, this is considered a bit experimental still
macOS hosts: Fixed VM crash when the guest tries to access a microphone or webcam
Windows host: Shared Clipboard: Fixed issue when only 4Kb of host clipboard buffer was accessible to guest (bug #21149)
Linux Guest Additions: Introduced initial support for kernel 6.1
Linux Guest Additions: Fixed issue when VBoxClient seamless service caused a crash of some X11 applications (bug #21132)
Windows hosts: GUI: Fixed missing Qt libraries for vista style and sql driver (bug #21155)
GUI: Fixed a glitch in the log viewer which was causing wrong log file to be saved (bug #21156)
This is a major update. The following major new features were added:
Virtual machines can be fully encrypted now, including the VM config logs and saved states (CLI only for now)
OCI: Cloud virtual machines can be added to Virtual Machine Manager and controlled as local VMs
OCI: Cloud networks can now be configured via Network Manager tool same way as it is done for Host-only and NAT networks
GUI: Added a new utility similar to "top" or "resource monitor" which lists peformance statistics (CPU usage, RAM usage, disk I/O rate, etc.) of running guests
GUI: Reworked the new vm wizard to integrate the unattended guest OS installation and to have a more streamlined work flow
GUI: Added a new help viewer widget which enables the user manual to be navigated and searched
GUI: Adding new notification center unifying most of running progresses and error reporting around the GUI
GUI: Improved theme support on all platforms. Linux and macOS use native engine while for Windows host it is separately implemented
GUI: Large icon update
Audio recording: Now using Vorbis as the default audio format for WebM containers. Opus is no longer being used
Audio: Added "default" host driver type to make it possible to move VMs (appliances) between different platforms without the need of changing the audio driver explicitly. When the "default" driver is selected, the best audio backend option for a platform will be used. This is the default for newly created VMs
Guest Control: Implemented initial support for automatic updating of Guest Additions for Linux guests
Guest Control: Implemented ability to wait for and/or reboot the guest when updating Guest Additions via VBoxManage
VBoxManage: Added Guest Control "waitrunlevel" sub-command to make it possible to wait for a guest to reach a certain run level
Windows hosts: Added experimental support of running autostarted VMs in session 0, to allow running VMS even when a usser is not being logged in (disabled by default, please consult the manual)
macOS host: Dropped all kernel extensions. VirtualBox relies fully on the hypervisor and vmnet frameworks provided by Apple now. At the moment the implementation lacks "Internal Networking" functionality. This will be provided at a later date
macOS host: Providing a Developer Preview package for systems with an Apple silicon CPU. This is unsupported work in progress, and is known to have very modest performance
Linux Guest Additions: Reworked guest screen re-size functionality, added basic integration with some of guest Desktop Environments
Devices: Implemented new 3D support based on DirectX 11 (and DXVK on non Windows hosts)
Devices: Added virtual IOMMU devices (Intel and AMD variant)
Devices: Added virtual TPM 1.2 and 2.0 devices
Devices: The EHCI and XHCI USB controller devices are now part of the open source base package
EFI: Added support for Secure Boot
Debugging: Added experimental support for guest debugging through GDB and highly experimental support for guest debugging through KD/WinDbg
In addition, the following items were fixed and/or added:
OCI: Cloud networking functionality is enhanced for local VMs, now local VMs could be connected to cloud networking
GUI: Improved behavior of the virtual machine list and various VM related tools in case multiple items are selected
GUI: On available platforms, added a new option to disable the host's screensaver
GUI: Reworked global preferences, machine settings and the wizards to improve stability and usability
GUI: Improving mouse handling in multi-monitor case on X11 platform
GUI: Medium enumeration engine was reworked to improve permormance
GUI: NAT Network stuff was moved from global preferences to global Network Manager tool
GUI: Extension Pack Manager was moved from global preferences to global tools
GUI: Improved overall accessibility
GUI: Migrating to recent Qt versions
To view the change log for a legacy version of VirtualBox see the documentation for the relevant Oracle VM VirtualBox release.
Change logs are also available at:
Table of Contents
- A.1. Third-Party Materials
- A.2. Third-Party Licenses
- A.2.1. GNU General Public License (GPL)
- A.2.2. GNU Lesser General Public License (LGPL)
- A.2.3. Mozilla Public License (MPL)
- A.2.4. MIT License
- A.2.5. X Consortium License (X11) (variant 1)
- A.2.6. X Consortium License (X11) (variant 2)
- A.2.7. zlib License
- A.2.8. Apache License v2
- A.2.9. OpenSSL License
- A.2.10. Slirp License
- A.2.11. liblzf License
- A.2.12. libpng License
- A.2.13. lwIP License
- A.2.14. libxml License
- A.2.15. gSOAP Public License Version 1.3a
- A.2.16. curl License
- A.2.17. libgd License
- A.2.18. BSD License from Intel
- A.2.19. IJG (Independent JPEG Group) License
- A.2.20. libjpeg-turbo Modified (3-clause) BSD License
- A.2.21. FreeBSD License
- A.2.22. NetBSD License
- A.2.23. VPX License
- A.2.24. Vorbis License
- A.2.25. curl License
- A.2.26. DocBook XML DTD License
- A.2.27. DocBook XSL Stylesheets License
- A.2.28. Intel ACPI Component Architecture (ACPICA) License
- A.2.29. Khronos License
- A.2.30. SGI Free Software License B
- A.2.31. Boost Software License
- A.2.32. Default Mesa 3D Graphics Library License
- A.2.33. Microsoft Software License
- A.2.34. Python License
- A.2.35. License for Berkeley SoftFloat Release 3e
- A.2.36. BSD 3-Clause License for Glslang
- A.2.37. BSD 2-Clause License for Glslang
- A.2.38. GNU General Public License (GPL) License with Bison Exception for Glslang
- A.2.39. WiX Toolset License
- A.2.40. XFree86 License (variant 1)
- A.2.41. XFree86 License (variant 2)
- A.2.42. Cereal License
- A.2.43. Keith Packard License
- A.2.44. X Direct Rendering Infrastructure (DRI) 2 Extension License
- A.2.45. Network Computing Devices and DEC License
- A.2.46. MIT Open Group Variant License
- A.2.47. Digital Equipment Corporation License (variant 1)
- A.2.48. Digital Equipment Corporation License (variant 2)
- A.2.49. Digital Equipment Corporation License (variant 3)
- A.2.50. Digital Equipment Corporation and QuarterDeck Office Systems License
- A.2.51. Hewlett-Packard License (variant 1)
- A.2.52. Hewlett-Packard License (variant 2)
- A.2.53. Hewlett-Packard License (variant 3)
- A.2.54. Hewlett-Packard License (variant 4)
- A.2.55. Silicon Graphics License
- A.2.56. X Resize and Rotate Extension (RandR) License
- A.2.57. SuSE License
- A.2.58. Network Computing Devices (NCD) License (variant 1)
- A.2.59. Network Computing Devices (NCD) License (variant 2)
- A.2.60. Network Computing Devices (NCD) License (variant 3)
- A.2.61. Digital Equipment Corporation and Olivetti Research Limited License
- A.2.62. X Consortium, DEC, Intergraph, Silicon Graphics, and Hewlett-Packard License
- A.2.63. Sun Microsystems License
- A.2.64. X libpciaccess Library License
- A.2.65. X libxshmfence License
- A.2.66. X xf86-input-mouse driver License
- A.2.67. Kazutaka YOKOTA License
- A.2.68. Conectiva License
- A.2.69. Red Hat and SuSE License
- A.2.70. Red Hat License
- A.2.71. X Consortium and Red Hat License
- A.2.72. Precision Insight License
- A.2.73. VA Linux and IBM License
- A.2.74. IBM License
- A.2.75. Metro Link License (variant 1)
- A.2.76. Metro Link License (variant 2)
- A.2.77. Metro Link License (variant 3)
- A.2.78. NVIDIA License
- A.2.79. Vrije Universiteit License
- A.2.80. Concurrent Computer Corporation License
- A.2.81. Nokia License
- A.2.82. Adobe License
- A.2.83. University of California License (variant 1)
- A.2.84. University of California License (variant 2)
- A.2.85. OMRON Corporation and Data General Corporation License
- A.2.86. X11 Legacy License (variant 1)
- A.2.87. X11 Legacy License (variant 2)
- A.2.88. X11 Legacy License (variant 3)
- A.2.89. X11 Legacy License (variant 4)
- A.2.90. X11 Legacy License (variant 5)
- A.2.91. X11 Legacy License (variant 6)
- A.2.92. X11 Legacy License (variant 7)
- A.2.93. X11 Legacy License (variant 8)
- A.2.94. X11 Legacy License (variant 9)
- A.2.95. X11 Legacy License (variant 10)
- A.2.96. X11 Legacy License (variant 11)
- A.2.97. X11 Legacy License (variant 12)
- A.2.98. X11 Legacy License (variant 13)
- A.2.99. X11 Legacy License (variant 14)
- A.2.100. Davor Matic License
- A.2.101. Harold L Hunt II License
- A.2.102. Thomas Roell License
- A.2.103. Thomas Roell and David Wexelblat License
- A.2.104. Thomas Roell and SGCS (Snitily Graphics Consulting Services) License
- A.2.105. Alan Hourihane License
- A.2.106. Kaleb S. Keithley License
- A.2.107. Matthieu Herrb License
- A.2.108. Egbert Eich License
- A.2.109. David Wexelblat License
- A.2.110. Orest Zborowski and David Wexelblat License
- A.2.111. Orest Zborowski and David Dawes License
- A.2.112. Frederic Lepied License
- A.2.113. Rich Murphey and David Wexelblat License
- A.2.114. Rich Murphey and David Dawes License
- A.2.115. Anders Carlsson License
- A.2.116. Eric Anholt License
- A.2.117. Todd C. Miller License
- A.2.118. Philip Blundell License
- A.2.119. Marc Aurele La France License
- A.2.120. J. Kean Johnston License
- A.2.121. Jakub Jelinek License
- A.2.122. UCHIYAMA Yasushi License
- A.2.123. OpenedHand Ltd License
- A.2.124. Oracle License
- A.2.125. NVIDIA License for Glslang
- A.2.126. The Khronos Group Inc. License for Glslang
- A.2.127. The Khronos Group Inc. License for the EGL Registry Repository
- A.2.128. The IBM Corporation License for the libtpms library
Oracle VM VirtualBox incorporates materials from several Open Source software projects. Therefore the use of these materials by Oracle VM VirtualBox is governed by different Open Source licenses. This document reproduces these licenses and provides a list of the materials used and their respective licensing conditions. Section 1 contains a list of the materials used. Section 2 reproduces the applicable Open Source licenses. For each material, a reference to its license is provided.
The source code for the materials listed below as well as the rest of the Oracle VM VirtualBox code which is released as open source are available at http://www.virtualbox.org, both as tarballs for particular releases and as a live SVN repository.
Oracle VM VirtualBox contains portions of QEMU which is governed by the licenses in A.2.5 and A.2.2 and
Copyright (C) 1998, 2003-2005 Fabrice Bellard; Copyright (C) 2004 Magnus Damm; Copyright (C) 2003-2005 Vassili Karpov (malc); Copyright (C) 2004 Antony T Curtis; Copyright (C) 2003 Jocelyn Mayer
Oracle VM VirtualBox contains code from the X Window System which is governed by the license in A.2.5 and
Copyright 2004 by the Massachusetts Institute of Technology.
Oracle VM VirtualBox contains code from the BOCHS VGA BIOS which is governed by the license in A.2.2 and
Copyright (C) 2001,2002 the LGPL VGABios developers Team.
Oracle VM VirtualBox contains code from the BOCHS ROM BIOS which is governed by the license in A.2.2 and
Copyright (C) 2002 MandrakeSoft S.A.
Oracle VM VirtualBox contains the zlib library which is governed by the license in A.2.7 and
Copyright (C) 1995-2022 Jean-loup Gailly and Mark Adler.
Oracle VM VirtualBox contains OpenSSL 3.0 or later which is governed by the license in A.2.8 and
Copyright 2019-2021 The OpenSSL Project Authors. All Rights Reserved.
Oracle VM VirtualBox contains OpenSSL before 3.0 which is governed by the license in A.2.9 and
Copyright (C) 1998-2019 The OpenSSL Project. All rights reserved.; Copyright (C) 1995-1998 Eric Young (eay@cryptsoft.com). This product includes software written by Tim Hudson (tjh@cryptsoft.com).
Oracle VM VirtualBox may contain NSPR and XPCOM which is governed by the license in A.2.3 and
Copyright (C) 2002-2003 Netscape Communications Corporation. All Rights Reserved.
Oracle VM VirtualBox contains Slirp which is governed by the license in A.2.10 and was written by Danny Gasparovski.
Copyright (c) 1995,1996 Danny Gasparovski. All rights reserved.
Oracle VM VirtualBox contains liblzf which is governed by the license in A.2.11 and
Copyright (C) 2000-2009 Marc Alexander Lehmann <schmorp@schmorp.de>
Oracle VM VirtualBox may contain iPXE which is governed by the license in A.2.1 and
Copyright (C) 2015 Michael Brown <mbrown@fensystems.co.uk> and others.
Oracle VM VirtualBox contains code from Wine which is governed by the license in A.2.2 and
Copyright (c) 1993-2015 the Wine project authors
Oracle VM VirtualBox contains code from lwIP which is governed by the license in A.2.13 and
Copyright (C) 2001, 2004 Swedish Institute of Computer Science. All rights reserved.
Oracle VM VirtualBox contains libxml2 which is governed by the license in A.2.14 and
Copyright (C) 1998-2012 Daniel Veillard. All Rights Reserved.
Oracle VM VirtualBox contains code from the gSOAP XML web services tools, which are licensed under the license in A.2.15 and
Copyright (C) 2000-2022, Robert van Engelen, Genivia Inc., and others.
Oracle VM VirtualBox contains libcurl which is governed by the license in A.2.16 and
Copyright (C) 1996-2022, Daniel Stenberg.
Oracle VM VirtualBox contains dnsproxy which is governed by the license in A.2.4 and
Copyright (c) 2003, 2004, 2005 Armin Wolfermann
Oracle VM VirtualBox contains some code from libgd which is governed by the license in A.2.17 and
Portions Copyright 2000, 2001, 2002, 2003, 2004, 2005, 2006, 2007, 2008 Pierre-Alain Joye (pierre@libgd.org). For complete copyright information, see the license.
Oracle VM VirtualBox contains code from the EFI Development Kit II (EDK II) which is governed by the licenses in A.2.18 and A.2.4 and
Copyright (c) 2019, TianoCore and contributors.; Copyright (c) 2004-2019, Intel Corporation.; Copyright (c) 2011, Andrei Warkentin <andreiw@motorola.com>; Copyright (c) 2011, Bei Guan <gbtju85@gmail.com>; Copyright (c) 2012-2018, Red Hat, Inc.; Copyright (c) 2014, Pluribus Networks, Inc.; Copyright (c) 2015 Nahanni Systems Copyright (c) 2016 Hewlett Packard Enterprise Development LP; Copyright (c) 2017, Advanced Micro Devices. All rights reserved.; Copyright (c) 2020, Rebecca Cran <rebecca@bsdio.com> Portions copyright (c) 2010, 2011, Apple Inc. All rights reserved.
Oracle VM VirtualBox contains libjpeg-turbo which is governed by the licenses in A.2.19 and A.2.20 and
Copyright (C) 1991-2020, Thomas G. Lane, Guido Vollbeding. Copyright (C)2009-2022 D. R. Commander. All Rights Reserved. Copyright (C)2015 Viktor Szathmáry. All Rights Reserved.
Oracle VM VirtualBox may contain the libjpeg-turbo x86 SIMD extensions which is governed by the license in A.2.7 and
Copyright (C) 1995-2022 Jean-loup Gailly and Mark Adler.
Oracle VM VirtualBox may ship a copy of Qt which is governed by the license in A.2.2 and
Copyright (C) 2015 The Qt Company Ltd.
Oracle VM VirtualBox contains parts of the FreeBSD kernel which is governed by the license in A.2.21 and
Copyright 1992-2022 The FreeBSD Project.
Oracle VM VirtualBox contains parts of the NetBSD kernel which is governed by the license in A.2.22 and
Copyright (c) 2008 The NetBSD Foundation, Inc.
Oracle VM VirtualBox may contain code from the WebM VP8 Codec SDK which is governed by the license in A.2.23 and
Copyright (c) 2010, 2013, 2016, 2019 The WebM Project authors. All rights reserved.; Copyright (C) 2002-2010 The Xiph.Org Foundation and contributors.; Copyright (C) 2005-2016 x264 project; Copyright (c) 2010, Google Inc. All rights reserved.
Oracle VM VirtualBox may contain code from libvorbis ("Vorbis") which is governed by the license in A.2.24 and
Monty <monty@xiph.org> and the rest of the Xiph.org Foundation.
Oracle VM VirtualBox contains code from cURL which is governed by the license in A.2.25 and
Copyright (c) 1996 - 2022, Daniel Stenberg, <daniel@haxx.se>, and others.
Oracle VM VirtualBox contains documentation generated using the DocBook XML DTD which is governed by the license in A.2.26 and
Copyright 1992-2004 HaL Computer Systems, Inc., O'Reilly & Associates, Inc., ArborText, Inc., Fujitsu Software Associates, Inc., ArborText, Inc., Fujitsu Software Corporation, Norman Walsh, Sun Microsystems, Inc., and the Organization for the Advancement of Structured Information Standards (OASIS).
Oracle VM VirtualBox contains documentation generated using DocBook XSL Stylesheets which is governed by the license in A.2.27 and
Copyright (C) 1999, 2000, 2001, 2002 Norman Walsh
Oracle VM VirtualBox contains code from the ACPI Component Architecture (ACPICA) project which is governed by the license in A.2.28 and
Copyright (c) 1999 - 2010, Intel Corp. All rights reserved.
Oracle VM VirtualBox contains code from the Independent JPEG (IJG) Group which is governed by the license in A.2.19 and
Copyright (C) 1991-2021, Thomas G. Lane, Guido Vollbeding.
Oracle VM VirtualBox contains code from the Linux kernel which is governed by the license in A.2.1
Oracle VM VirtualBox contains makeself which is governed by the license in A.2.1
Oracle VM VirtualBox contains code from the Mesa 3D graphics library which is governed by the default Mesa license in A.2.32 and
Copyright (C) 1999-2007 Brian Paul All Rights Reserved. For complete copyright information, see the license.
Oracle VM VirtualBox contains code from the Microsoft Windows Driver Kit (WDK) which is governed by the license in A.2.33 and
Copyright (C) 1999-2007 Brian Paul All Rights Reserved. For complete copyright information, see the license.
Oracle VM VirtualBox contains code from MoltenVK which is governed by the license in A.2.8 and
Copyright (c) 2015-2022 The Brenwill Workshop Ltd. (http://www.brenwill.com)
Oracle VM VirtualBox contains code from the NSIS AccessControl plugin which is governed by the license in A.2.7 and
Copyright (C) 1999-2009 Nullsoft and Contributors; Copyright (C) 2003 Mathias Hasselmann <mathias@taschenorakel.de>
Oracle VM VirtualBox contains code from the NSIS NsProcess plugin which is governed by the license in A.2.7 and
Copyright (C) 1999-2008 Nullsoft and Contributors
Oracle VM VirtualBox contains code from the Khronos OpenGL Registry which is governed by the license in A.2.29 and
Copyright (c) 2008-2018 The Khronos Group Inc.
Oracle VM VirtualBox contains code from Python which is governed by the license in A.2.34 and
Copyright (c) 2001-2022 Python Software Foundation. All rights reserved.; Copyright (c) 2000 BeOpen.com. All rights reserved.; Copyright (c) 1995-2001 Corporation for National Research Initiatives. All rights reserved.; Copyright (c) 1991-1995 Stichting Mathematisch Centrum. All rights reserved.
Oracle VM VirtualBox contains code from the SPIR-V Registry which is governed by the license in A.2.29 and
Copyright (c) 2008-2018 The Khronos Group Inc.
Oracle VM VirtualBox contains code from SPIRV-Cross which is governed by the license in A.2.8 and
Copyright (c) 2014-2021 The Khronos Group, Inc.
Oracle VM VirtualBox contains code from the SPIR-V Tools project which is governed by the license in A.2.8 and
Copyright (c) 2015-2020 The Khronos Group Inc.;Modifications Copyright (C) 2020 Advanced Micro Devices, Inc. All rights reserved.
Oracle VM VirtualBox contains code from Berkeley SoftFloat which is governed by the license in A.2.35 and
Copyright 2011, 2012, 2013, 2014, 2015, 2016, 2017, 2018 The Regents of the University of California. All rights reserved.
Oracle VM VirtualBox contains code from the Vulkan Header files and API registry which is governed by the license in A.2.8 and
Copyright (c) 2015-2016 The Khronos Group Inc.; Copyright (c) 2015-2016 Valve Corporation; Copyright (c) 2015-2016 LunarG, Inc.
Oracle VM VirtualBox contains code from the Vulkan tools which is governed by the license in A.2.8 and
Copyright (c) 2015-2021 The Khronos Group Inc.; Copyright (c) 2015-2021 Valve Corporation; Copyright (c) 2015-2021 LunarG, Inc.
Oracle VM VirtualBox contains code from Glslang which is governed by the licenses in A.2.36 and A.2.37 and A.2.4 and A.2.8 and A.2.38 and A.2.125 and A.2.126 and
Copyright (C) 1984, 1989-1990, 2000-2015, 2018-2020 Free Software Foundation, Inc.; Copyright (C) 2002-2005 3Dlabs Inc. Ltd.; Copyright (c) 2002-2010 The ANGLE Project Authors.; Copyright (c) 2002, NVIDIA Corporation.; Copyright (C) 2012-2021 LunarG, Inc.; Copyright (c) 2013-2021 The Khronos Group Inc.; Copyright (c) 2015-2021 Google Inc.; Copyright (c) 2015-2021 Valve Corporation; Copyright (C) 2017, 2019 ARM Limited.; Copyright (c) 2019, Viktor Latypov; Copyright (C) 2020-2021 Advanced Micro Devices, Inc. All rights; Copyright (c) 2020, Travis Fort; Copyright 2017 The Glslang Authors. All rights reserved.
Oracle VM VirtualBox contains code from the EGL-Registry repository which is governed by the licenses in A.2.8 and A.2.127 and
Copyright (c) 2008-2020 The Khronos Group Inc.
Oracle VM VirtualBox contains code from the Wayland project which is governed by the license in A.2.4 and
Copyright (c) 2008-2012 Kristian Høgsberg; Copyright (c) 2010-2012 Intel Corporation; Copyright (c) 2011 Benjamin Franzke; Copyright (c) 2012 Collabora, Ltd.
Oracle VM VirtualBox contains code from the WiX toolset which is governed by the license in A.2.39 and
Copyright (c) 2008-2012 Kristian Høgsberg; Copyright (c) 2010-2012 Intel Corporation; Copyright (c) 2011 Benjamin Franzke; Copyright (c) 2012 Collabora, Ltd.
Oracle VM VirtualBox contains code from the XFree86-VidModeExtension which is governed by the license in A.2.40 and
Copyright (C) 1994-2003 The XFree86 Project, Inc. All Rights Reserved.
Oracle VM VirtualBox contains code from the Advanced Linux Sound Architecture (ALSA) project which is governed by the license in A.2.2 and
Copyright (c) 1994-2007, 2010 by Jaroslav Kysela <perex@perex.cz>; Copyright (c) 1998-1999 by Frank van de Pol <fvdpol@coil.demon.nl>; Copyright (c) 1999 by Uros Bizjak <uros@kss-loka.si>; Copyright (c) 1994-2003 by Abramo Bagnara <abramo@alsa-project.org>; Copyright (c) 2016 by Thomas Klausner <wiz@NetBSD.org>; Copyright (c) 2006-2007 Diego Pettenò <flameeyes@gmail.com>; Copyright (c) 2014-2015 Intel Corporation; Copyright (C) 2010 Red Hat Inc.; Copyright (C) 2000-2002 Richard W.E. Furse, Paul Barton-Davis, Stefan Westerfeld; Copyright (C) 2008-2010 SlimLogic Ltd; Copyright (C) 1998,99,2000, 2003-2007, 2015 Takashi Iwai <tiwai@suse.de>; Copyright (c) 2015-2016 Takashi Sakamoto; Copyright (C) 2010, 2012 Texas Instruments Inc.; Copyright (C) 2003 Thomas Charbonnel (thomas@undata.org); Copyright (C) 2003 Winfried Ritsch (IEM); Copyright (C) 2010 Wolfson Microelectronics PLC; Copyright (C) 1994 X Consortium; Copyright (c) 2006-2007 xine project
Oracle VM VirtualBox contains code from the cereal C++11 serialization library which is governed by the license in A.2.42 and
Copyright (c) 2013-2022, Randolph Voorhies, Shane Grant All rights reserved.; (C) Copyright 2002 Robert Ramey - http://www.rrsd.com; (C) Copyright 2006 David Abrahams - http://www.boost.org.; Copyright (C) 2004-2008 René Nyffenegger; Copyright (c) 2014, 2017, Juan Pedro; Copyright (c) 2015, Kyle Fleming, Juan Pedro Bolivar Puente; Copyright (c) 2017, Juan Pedro Bolivar Puente; Copyright (c) 2006-2013 Alexander Chemeris; Copyright (C) 2006, 2007, 2009 Marcin Kalicinski; Copyright (c) 2016-2021 Viktor Kirilov; Copyright (C) 2015 THL A29 Limited, a Tencent company, and Milo Yip. All rights reserved.
Oracle VM VirtualBox contains code from the X Composite Extension which is governed by the licenses in A.2.5 and A.2.43 and
Copyright (c) 2006, Oracle and/or its affiliates. All rights reserved.; Copyright (c) 2003 Keith Packard, Noah Levitt
Oracle VM VirtualBox contains code from the X Damage Extension which is governed by the license in A.2.43 and
Copyright (c) 2001,2003 Keith Packard; Copyright (c) 2007 Eric Anholt
Oracle VM VirtualBox contains code from the X Direct Rendering Infrastructure (DRI) 2 Extension which is governed by the license in A.2.44 and
Copyright (c) 2007 Red Hat, Inc.
Oracle VM VirtualBox contains code from the X Fixes Extension which is governed by the licenses in A.2.5 and A.2.43 and
Copyright (c) 2006, Oracle and/or its affiliates. All rights reserved.; Copyright 2010 Red Hat, Inc.; Copyright (c) 2001,2003 Keith Packard
Oracle VM VirtualBox contains code from the X Fonts Extension which is governed by the licenses in A.2.45 and A.2.46 and A.2.47 and A.2.40 and
Copyright 1990, 1991 Network Computing Devices; Portions Copyright 1987 by Digital Equipment Corporation; Copyright 1990, 1991, 1998 The Open Group; Copyright 1987 by Digital Equipment Corporation, Maynard, Massachusetts.; Copyright (c) 1999 The XFree86 Project Inc.
Oracle VM VirtualBox contains code from the X OpenGL Extension (GLX) which is governed by the license in A.2.30 and
Copyright (C) 1991-2000 Silicon Graphics, Inc. All Rights Reserved.
Oracle VM VirtualBox contains code from the X Input Extension which is governed by the licenses in A.2.46 and A.2.51 and
Copyright 1989, 1998 The Open Group; Copyright 1989 by Hewlett-Packard Company, Palo Alto, California.
Oracle VM VirtualBox contains code from the X Keyboard Extension which is governed by the license in A.2.55 and
Copyright (c) 1993 by Silicon Graphics Computer Systems, Inc.
Oracle VM VirtualBox contains code from the X Resize and Rotate Extension (RandR) Extension which is governed by the license in A.2.56 and
Copyright (c) 2000 Compaq Computer Corporation; Copyright (c) 2002 Hewlett-Packard Company; Copyright (c) 2006 Intel Corporation; Copyright (c) 2008 Red Hat, Inc.
Oracle VM VirtualBox contains code from the X Rendering Extension which is governed by the license in A.2.57 and
Copyright (c) 2000 SuSE, Inc.
Oracle VM VirtualBox contains code from the X XExt Extension which is governed by the licenses in A.2.46 and A.2.55 and A.2.58 and A.2.52 and A.2.48 and A.2.59 and A.2.61 and A.2.53 and A.2.4 and A.2.5 and
Copyright 1989, 1998 The Open Group; Copyright (c) 1997 by Silicon Graphics Computer Systems, Inc.; Copyright 1992 Network Computing Devices; Copyright (c) 1994, 1995 Hewlett-Packard Company; Copyright (c) 1996 Digital Equipment Corporation, Maynard, Massachusetts.; Copyright 1988, 1989, 1990, 1994 Network Computing Devices, Inc.; Copyright 1991,1993 by Digital Equipment Corporation, Maynard, Massachusetts, and Olivetti Research Limited, Cambridge, England.; Copyright 1986, 1987, 1988 by Hewlett-Packard Corporation
Oracle VM VirtualBox contains code from the XFree86 Direct Rendering Infrastructure (DRI) Extension which is governed by the license in A.2.4 and
Copyright 1998-1999 Precision Insight, Inc., Cedar Park, Texas.; Copyright 2000 VA Linux Systems, Inc.; All Rights Reserved.
Oracle VM VirtualBox contains code from the libXcomposite library which is governed by the licenses in A.2.43 and A.2.4 and
Copyright (c) 2001,2003 Keith Packard; Copyright (c) 2006, 2007, Oracle and/or its affiliates. All rights reserved.
Oracle VM VirtualBox contains code from the libXdamage library which is governed by the licenses in A.2.43 and
Copyright (c) 2001,2003 Keith Packard; Copyright (c) 2007 Eric Anholt
Oracle VM VirtualBox contains code from the libXext library which is governed by the licenses in A.2.46 and A.2.55 and A.2.58 and A.2.52 and A.2.48 and A.2.61 and A.2.53 and A.2.4 and A.2.62 and
Copyright 1986, 1987, 1988, 1989, 1994, 1998 The Open Group; Copyright (c) 1996 Digital Equipment Corporation, Maynard, Massachusetts.; Copyright (c) 1997 by Silicon Graphics Computer Systems, Inc.; Copyright 1992 Network Computing Devices; Copyright 1991,1993 by Digital Equipment Corporation, Maynard, Massachusetts, and Olivetti Research Limited, Cambridge, England.; Copyright 1986, 1987, 1988 by Hewlett-Packard Corporation; Copyright (c) 1994, 1995 Hewlett-Packard Company; Copyright Digital Equipment Corporation, 1996; Copyright (c) 1999, 2005, 2006, 2013, Oracle and/or its affiliates.; Copyright (c) 1989 X Consortium, Inc. and Digital Equipment Corporation.; Copyright (c) 1992 X Consortium, Inc. and Intergraph Corporation.; Copyright (c) 1993 X Consortium, Inc. and Silicon Graphics, Inc.; Copyright (c) 1994, 1995 X Consortium, Inc. and Hewlett-Packard Company.
Oracle VM VirtualBox contains code from the libXfixes library which is governed by the license in A.2.43 and
Copyright (c) 2001,2003 Keith Packard
Oracle VM VirtualBox contains code from the X libpciaccess library which is governed by the licenses in A.2.4 and A.2.63 and A.2.64 and A.2.40 and
Copyright (C) 2007 Free Software Foundation, Inc.; (C) Copyright Eric Anholt 2006; (C) Copyright IBM Corporation 2006; Copyright (C) 2008 Free Software Foundation, Inc.; Copyright 2005 Red Hat, Inc; Copyright (c) 2008 Juan Romero Pardines; Copyright (c) 2008 Mark Kettenis; Copyright (c) 2007 Paulo R. Zanoni, Tiago Vignatti; Copyright 2005-2009 Sun Microsystems, Inc. All rights reserved.; Copyright (C) 2000 The XFree86 Project, Inc. All Rights Reserved.; Copyright (c) 2009 Tiago Vignatti
Oracle VM VirtualBox contains code from the libxshmfence library which is governed by the license in A.2.65 and
Copyright (c) 2013 Keith Packard; Copyright (c) 2013 Jung-uk Kim <jkim@FreeBSD.org>
Oracle VM VirtualBox contains code from the pixman library which is governed by the license in A.2.4 and
Copyright 1987, 1988, 1989, 1998 The Open Group; Copyright 1987, 1988, 1989 Digital Equipment Corporation; Copyright 1999, 2004, 2008 Keith Packard; Copyright 2000 SuSE, Inc.; Copyright 2000 Keith Packard, member of The XFree86 Project, Inc.; Copyright 2004, 2005, 2007, 2008, 2009, 2010 Red Hat, Inc.; Copyright 2004 Nicholas Miell; Copyright 2005 Lars Knoll & Zack Rusin, Trolltech; Copyright 2005 Trolltech AS; Copyright 2007 Luca Barbato; Copyright 2008 Aaron Plattner, NVIDIA Corporation; Copyright 2008 Rodrigo Kumpera; Copyright 2008 André Tupinambá; Copyright 2008 Mozilla Corporation; Copyright 2008 Frederic Plourde; Copyright 2009, Oracle and/or its affiliates. All rights reserved.; Copyright 2009, 2010 Nokia Corporation
Oracle VM VirtualBox contains code from the xf86-input-mouse driver which is governed by the licenses in A.2.66 and A.2.67 and
Copyright (c) 1997-1999 by The XFree86 Project, Inc.; Copyright 1990,91 by Thomas Roell, Dinkelscherben, Germany.; Copyright 1993 by David Dawes <dawes@xfree86.org>; Copyright 1994-2002 by The XFree86 Project, Inc.; Copyright 1998 by Kazutaka YOKOTA <yokota@zodiac.mech.utsunomiya-u.ac.jp>; Copyright 2002 by Paul Elliott; Copyright 2002 by SuSE Linux AG, Author: Egbert Eich; Copyright 2005 Red Hat, Inc; Copyright 2005 Sun Microsystems, Inc. All rights reserved.; Copyright 2005 Adam Jackson
Oracle VM VirtualBox contains code from the xf86-video-vesa driver which is governed by the license in A.2.68 and
Copyright (c) 2000 by Conectiva S.A. (http://www.conectiva.com); Authors: Paulo César Pereira de Andrade <pcpa@conectiva.com.br> David Dawes <dawes@xfree86.org>
Oracle VM VirtualBox contains code from the Xorg X server which is governed by the licenses in A.2.4 and A.2.40 and A.2.41 and A.2.46 and A.2.57 and A.2.47 and A.2.50 and A.2.49 and A.2.48 and A.2.30 and A.2.52 and A.2.51 and A.2.69 and A.2.70 and A.2.71 and A.2.72 and A.2.73 and A.2.74 and A.2.75 and A.2.76 and A.2.77 and A.2.68 and A.2.78 and A.2.79 and A.2.80 and A.2.81 and A.2.82 and A.2.60 and A.2.83 and A.2.85 and A.2.43 and A.2.86 and A.2.100 and A.2.101 and A.2.102 and A.2.103 and A.2.104 and A.2.105 and A.2.106 and A.2.107 and A.2.108 and A.2.109 and A.2.110 and A.2.111 and A.2.112 and A.2.113 and A.2.114 and A.2.115 and A.2.116 and A.2.117 and A.2.118 and A.2.40 and A.2.87 and A.2.88 and A.2.89 and A.2.90 and A.2.91 and A.2.92 and A.2.93 and A.2.94 and A.2.96 and A.2.119 and A.2.97 and A.2.120 and A.2.121 and A.2.122 and A.2.98 and A.2.99 and A.2.123 and A.2.84 and
Copyright (c) 2000-2001 Juliusz Chroboczek; Copyright (c) 1998 Egbert Eich; Copyright (c) 2006-2007 Intel Corporation; Copyright (c) 2006 Nokia Corporation; Copyright (c) 2006-2008 Peter Hutterer; Copyright (c) 2006 Adam Jackson; Copyright (c) 2009 NVIDIA Corporation; Copyright (c) 1999 Keith Packard; Copyright (c) 2007-2009 Red Hat, Inc.; Copyright (c) 2005-2008 Daniel Stone; Copyright (c) 2006-2009 Simon Thum; Copyright (c) 1987, 2003-2006, 2008-2009 Sun Microsystems, Inc.; Copyright (c) 2006 Luc Verhaegen. For complete copyright information, see the individual licenses.
Oracle VM VirtualBox contains code from the X Window System Core Protocol which is governed by the licenses in A.2.124 and A.2.46 and A.2.47 and A.2.54 and A.2.40 and
Copyright (c) 1991, 2005, 2006, Oracle and/or its affiliates. All rights reserved.; Copyright 1997 Metro Link Incorporated; Copyright (c) 2005 Daniel Stone; Copyright (c) 1999 The XFree86 Project Inc.; Copyright 1985-1991, 1993-1998 The Open Group; Copyright 1987 by Apollo Computer Inc., Chelmsford, Massachusetts.; Copyright 1987, 1988 by Digital Equipment Corporation, Maynard, Massachusetts.; Copyright 1989 by Hewlett-Packard Company.; Copyright 2005 Red Hat, Inc
Oracle VM VirtualBox contains code from the xset utility which is governed by the license in A.2.46 and
Copyright 1985, 1988, 1998 The Open Group
Oracle VM VirtualBox contains code from the libdrm library which is governed by the license in A.2.4 and
Copyright 1999, 2000 Precision Insight, Inc., Cedar Park, Texas.; Copyright 2000 VA Linux Systems, Inc., Sunnyvale, California. All Rights Reserved.
Oracle VM VirtualBox contains code from the libdevmapper library which is governed by the license in A.2.1 and
Copyright (C) 2001-2004 Sistina Software, Inc. All rights reserved.; Copyright (C) 2004-2017 Red Hat, Inc. All rights reserved.; Copyright (C) 2006 Rackable Systems All rights reserved.
Oracle VM VirtualBox contains code from DXVK Native which is governed by the license in A.2.7 and
Copyright (c) 2017-2021 Philip Rebohle; Copyright (c) 2019-2021 Joshua Ashton
Oracle VM VirtualBox contains code from PulseAudio which is governed by the license in A.2.2 and
Copyright (c) 2017-2021 Philip Rebohle; Copyright (c) 2019-2021 Joshua Ashton
Oracle VM VirtualBox contains code from libtpms which is governed by the license in A.2.128 and
(c) Copyright IBM Corporation 2006 - 2011; (c) Copyright IBM Corp. and others, 2012-2016
Oracle VM VirtualBox contains code from libssh which is governed by the license in A.2.2 and
Copyright (c) 2004-2013 by Aris Adamantiadis; Copyright (c) 2009-2013 by Andreas Schneider <asn@cryptomilk.org>
GNU GENERAL PUBLIC LICENSE Version 2, June 1991
Copyright (C) 1989, 1991 Free Software Foundation, Inc.
51 Franklin St, Fifth Floor, Boston, MA 02110-1301 USA
Everyone is permitted to copy and distribute verbatim copies of this license document, but changing it is not allowed.
Preamble
The licenses for most software are designed to take away your freedom to share and change it. By contrast, the GNU General Public License is intended to guarantee your freedom to share and change free software--to make sure the software is free for all its users. This General Public License applies to most of the Free Software Foundation's software and to any other program whose authors commit to using it. (Some other Free Software Foundation software is covered by the GNU Library General Public License instead.) You can apply it to your programs, too.
When we speak of free software, we are referring to freedom, not price. Our General Public Licenses are designed to make sure that you have the freedom to distribute copies of free software (and charge for this service if you wish), that you receive source code or can get it if you want it, that you can change the software or use pieces of it in new free programs; and that you know you can do these things.
To protect your rights, we need to make restrictions that forbid anyone to deny you these rights or to ask you to surrender the rights. These restrictions translate to certain responsibilities for you if you distribute copies of the software, or if you modify it.
For example, if you distribute copies of such a program, whether gratis or for a fee, you must give the recipients all the rights that you have. You must make sure that they, too, receive or can get the source code. And you must show them these terms so they know their rights.
We protect your rights with two steps: (1) copyright the software, and (2) offer you this license which gives you legal permission to copy, distribute and/or modify the software.
Also, for each author's protection and ours, we want to make certain that everyone understands that there is no warranty for this free software. If the software is modified by someone else and passed on, we want its recipients to know that what they have is not the original, so that any problems introduced by others will not reflect on the original authors' reputations.
Finally, any free program is threatened constantly by software patents. We wish to avoid the danger that redistributors of a free program will individually obtain patent licenses, in effect making the program proprietary. To prevent this, we have made it clear that any patent must be licensed for everyone's free use or not licensed at all.
The precise terms and conditions for copying, distribution and modification follow.
GNU GENERAL PUBLIC LICENSE TERMS AND CONDITIONS FOR COPYING, DISTRIBUTION AND MODIFICATION
0. This License applies to any program or other work which contains a notice placed by the copyright holder saying it may be distributed under the terms of this General Public License. The "Program", below, refers to any such program or work, and a "work based on the Program" means either the Program or any derivative work under copyright law: that is to say, a work containing the Program or a portion of it, either verbatim or with modifications and/or translated into another language. (Hereinafter, translation is included without limitation in the term "modification".) Each licensee is addressed as "you".
Activities other than copying, distribution and modification are not covered by this License; they are outside its scope. The act of running the Program is not restricted, and the output from the Program is covered only if its contents constitute a work based on the Program (independent of having been made by running the Program). Whether that is true depends on what the Program does.
1. You may copy and distribute verbatim copies of the Program's source code as you receive it, in any medium, provided that you conspicuously and appropriately publish on each copy an appropriate copyright notice and disclaimer of warranty; keep intact all the notices that refer to this License and to the absence of any warranty; and give any other recipients of the Program a copy of this License along with the Program.
You may charge a fee for the physical act of transferring a copy, and you may at your option offer warranty protection in exchange for a fee.
2. You may modify your copy or copies of the Program or any portion of it, thus forming a work based on the Program, and copy and distribute such modifications or work under the terms of Section 1 above, provided that you also meet all of these conditions:
a) You must cause the modified files to carry prominent notices stating that you changed the files and the date of any change.
b) You must cause any work that you distribute or publish, that in whole or in part contains or is derived from the Program or any part thereof, to be licensed as a whole at no charge to all third parties under the terms of this License.
c) If the modified program normally reads commands interactively when run, you must cause it, when started running for such interactive use in the most ordinary way, to print or display an announcement including an appropriate copyright notice and a notice that there is no warranty (or else, saying that you provide a warranty) and that users may redistribute the program under these conditions, and telling the user how to view a copy of this License. (Exception: if the Program itself is interactive but does not normally print such an announcement, your work based on the Program is not required to print an announcement.)
These requirements apply to the modified work as a whole. If identifiable sections of that work are not derived from the Program, and can be reasonably considered independent and separate works in themselves, then this License, and its terms, do not apply to those sections when you distribute them as separate works. But when you distribute the same sections as part of a whole which is a work based on the Program, the distribution of the whole must be on the terms of this License, whose permissions for other licensees extend to the entire whole, and thus to each and every part regardless of who wrote it.
Thus, it is not the intent of this section to claim rights or contest your rights to work written entirely by you; rather, the intent is to exercise the right to control the distribution of derivative or collective works based on the Program.
In addition, mere aggregation of another work not based on the Program with the Program (or with a work based on the Program) on a volume of a storage or distribution medium does not bring the other work under the scope of this License.
3. You may copy and distribute the Program (or a work based on it, under Section 2) in object code or executable form under the terms of Sections 1 and 2 above provided that you also do one of the following:
a) Accompany it with the complete corresponding machine-readable source code, which must be distributed under the terms of Sections 1 and 2 above on a medium customarily used for software interchange; or,
b) Accompany it with a written offer, valid for at least three years, to give any third party, for a charge no more than your cost of physically performing source distribution, a complete machine-readable copy of the corresponding source code, to be distributed under the terms of Sections 1 and 2 above on a medium customarily used for software interchange; or,
c) Accompany it with the information you received as to the offer to distribute corresponding source code. (This alternative is allowed only for noncommercial distribution and only if you received the program in object code or executable form with such an offer, in accord with Subsection b above.)
The source code for a work means the preferred form of the work for making modifications to it. For an executable work, complete source code means all the source code for all modules it contains, plus any associated interface definition files, plus the scripts used to control compilation and installation of the executable. However, as a special exception, the source code distributed need not include anything that is normally distributed (in either source or binary form) with the major components (compiler, kernel, and so on) of the operating system on which the executable runs, unless that component itself accompanies the executable.
If distribution of executable or object code is made by offering access to copy from a designated place, then offering equivalent access to copy the source code from the same place counts as distribution of the source code, even though third parties are not compelled to copy the source along with the object code.
4. You may not copy, modify, sublicense, or distribute the Program except as expressly provided under this License. Any attempt otherwise to copy, modify, sublicense or distribute the Program is void, and will automatically terminate your rights under this License. However, parties who have received copies, or rights, from you under this License will not have their licenses terminated so long as such parties remain in full compliance.
5. You are not required to accept this License, since you have not signed it. However, nothing else grants you permission to modify or distribute the Program or its derivative works. These actions are prohibited by law if you do not accept this License. Therefore, by modifying or distributing the Program (or any work based on the Program), you indicate your acceptance of this License to do so, and all its terms and conditions for copying, distributing or modifying the Program or works based on it.
6. Each time you redistribute the Program (or any work based on the Program), the recipient automatically receives a license from the original licensor to copy, distribute or modify the Program subject to these terms and conditions. You may not impose any further restrictions on the recipients' exercise of the rights granted herein. You are not responsible for enforcing compliance by third parties to this License.
7. If, as a consequence of a court judgment or allegation of patent infringement or for any other reason (not limited to patent issues), conditions are imposed on you (whether by court order, agreement or otherwise) that contradict the conditions of this License, they do not excuse you from the conditions of this License. If you cannot distribute so as to satisfy simultaneously your obligations under this License and any other pertinent obligations, then as a consequence you may not distribute the Program at all. For example, if a patent license would not permit royalty-free redistribution of the Program by all those who receive copies directly or indirectly through you, then the only way you could satisfy both it and this License would be to refrain entirely from distribution of the Program.
If any portion of this section is held invalid or unenforceable under any particular circumstance, the balance of the section is intended to apply and the section as a whole is intended to apply in other circumstances.
It is not the purpose of this section to induce you to infringe any patents or other property right claims or to contest validity of any such claims; this section has the sole purpose of protecting the integrity of the free software distribution system, which is implemented by public license practices. Many people have made generous contributions to the wide range of software distributed through that system in reliance on consistent application of that system; it is up to the author/donor to decide if he or she is willing to distribute software through any other system and a licensee cannot impose that choice.
This section is intended to make thoroughly clear what is believed to be a consequence of the rest of this License.
8. If the distribution and/or use of the Program is restricted in certain countries either by patents or by copyrighted interfaces, the original copyright holder who places the Program under this License may add an explicit geographical distribution limitation excluding those countries, so that distribution is permitted only in or among countries not thus excluded. In such case, this License incorporates the limitation as if written in the body of this License.
9. The Free Software Foundation may publish revised and/or new versions of the General Public License from time to time. Such new versions will be similar in spirit to the present version, but may differ in detail to address new problems or concerns.
Each version is given a distinguishing version number. If the Program specifies a version number of this License which applies to it and "any later version", you have the option of following the terms and conditions either of that version or of any later version published by the Free Software Foundation. If the Program does not specify a version number of this License, you may choose any version ever published by the Free Software Foundation.
10. If you wish to incorporate parts of the Program into other free programs whose distribution conditions are different, write to the author to ask for permission. For software which is copyrighted by the Free Software Foundation, write to the Free Software Foundation; we sometimes make exceptions for this. Our decision will be guided by the two goals of preserving the free status of all derivatives of our free software and of promoting the sharing and reuse of software generally.
NO WARRANTY
11. BECAUSE THE PROGRAM IS LICENSED FREE OF CHARGE, THERE IS NO WARRANTY FOR THE PROGRAM, TO THE EXTENT PERMITTED BY APPLICABLE LAW. EXCEPT WHEN OTHERWISE STATED IN WRITING THE COPYRIGHT HOLDERS AND/OR OTHER PARTIES PROVIDE THE PROGRAM "AS IS" WITHOUT WARRANTY OF ANY KIND, EITHER EXPRESSED OR IMPLIED, INCLUDING, BUT NOT LIMITED TO, THE IMPLIED WARRANTIES OF MERCHANTABILITY AND FITNESS FOR A PARTICULAR PURPOSE. THE ENTIRE RISK AS TO THE QUALITY AND PERFORMANCE OF THE PROGRAM IS WITH YOU. SHOULD THE PROGRAM PROVE DEFECTIVE, YOU ASSUME THE COST OF ALL NECESSARY SERVICING, REPAIR OR CORRECTION.
12. IN NO EVENT UNLESS REQUIRED BY APPLICABLE LAW OR AGREED TO IN WRITING WILL ANY COPYRIGHT HOLDER, OR ANY OTHER PARTY WHO MAY MODIFY AND/OR REDISTRIBUTE THE PROGRAM AS PERMITTED ABOVE, BE LIABLE TO YOU FOR DAMAGES, INCLUDING ANY GENERAL, SPECIAL, INCIDENTAL OR CONSEQUENTIAL DAMAGES ARISING OUT OF THE USE OR INABILITY TO USE THE PROGRAM (INCLUDING BUT NOT LIMITED TO LOSS OF DATA OR DATA BEING RENDERED INACCURATE OR LOSSES SUSTAINED BY YOU OR THIRD PARTIES OR A FAILURE OF THE PROGRAM TO OPERATE WITH ANY OTHER PROGRAMS), EVEN IF SUCH HOLDER OR OTHER PARTY HAS BEEN ADVISED OF THE POSSIBILITY OF SUCH DAMAGES.
END OF TERMS AND CONDITIONS
GNU LESSER GENERAL PUBLIC LICENSE Version 2.1, February 1999
Copyright (C) 1991, 1999 Free Software Foundation, Inc. 59 Temple Place, Suite 330, Boston, MA 02111-1307 USA Everyone is permitted to copy and distribute verbatim copies of this license document, but changing it is not allowed.
[This is the first released version of the Lesser GPL. It also counts as the successor of the GNU Library Public License, version 2, hence the version number 2.1.]
Preamble
The licenses for most software are designed to take away your freedom to share and change it. By contrast, the GNU General Public Licenses are intended to guarantee your freedom to share and change free software--to make sure the software is free for all its users.
This license, the Lesser General Public License, applies to some specially designated software packages--typically libraries--of the Free Software Foundation and other authors who decide to use it. You can use it too, but we suggest you first think carefully about whether this license or the ordinary General Public License is the better strategy to use in any particular case, based on the explanations below.
When we speak of free software, we are referring to freedom of use, not price. Our General Public Licenses are designed to make sure that you have the freedom to distribute copies of free software (and charge for this service if you wish); that you receive source code or can get it if you want it; that you can change the software and use pieces of it in new free programs; and that you are informed that you can do these things.
To protect your rights, we need to make restrictions that forbid distributors to deny you these rights or to ask you to surrender these rights. These restrictions translate to certain responsibilities for you if you distribute copies of the library or if you modify it.
For example, if you distribute copies of the library, whether gratis or for a fee, you must give the recipients all the rights that we gave you. You must make sure that they, too, receive or can get the source code. If you link other code with the library, you must provide complete object files to the recipients, so that they can relink them with the library after making changes to the library and recompiling it. And you must show them these terms so they know their rights.
We protect your rights with a two-step method: (1) we copyright the library, and (2) we offer you this license, which gives you legal permission to copy, distribute and/or modify the library.
To protect each distributor, we want to make it very clear that there is no warranty for the free library. Also, if the library is modified by someone else and passed on, the recipients should know that what they have is not the original version, so that the original author's reputation will not be affected by problems that might be introduced by others.
Finally, software patents pose a constant threat to the existence of any free program. We wish to make sure that a company cannot effectively restrict the users of a free program by obtaining a restrictive license from a patent holder. Therefore, we insist that any patent license obtained for a version of the library must be consistent with the full freedom of use specified in this license.
Most GNU software, including some libraries, is covered by the ordinary GNU General Public License. This license, the GNU Lesser General Public License, applies to certain designated libraries, and is quite different from the ordinary General Public License. We use this license for certain libraries in order to permit linking those libraries into non-free programs.
When a program is linked with a library, whether statically or using a shared library, the combination of the two is legally speaking a combined work, a derivative of the original library. The ordinary General Public License therefore permits such linking only if the entire combination fits its criteria of freedom. The Lesser General Public License permits more lax criteria for linking other code with the library.
We call this license the "Lesser" General Public License because it does Less to protect the user's freedom than the ordinary General Public License. It also provides other free software developers Less of an advantage over competing non-free programs. These disadvantages are the reason we use the ordinary General Public License for many libraries. However, the Lesser license provides advantages in certain special circumstances.
For example, on rare occasions, there may be a special need to encourage the widest possible use of a certain library, so that it becomes a de-facto standard. To achieve this, non-free programs must be allowed to use the library. A more frequent case is that a free library does the same job as widely used non-free libraries. In this case, there is little to gain by limiting the free library to free software only, so we use the Lesser General Public License.
In other cases, permission to use a particular library in non-free programs enables a greater number of people to use a large body of free software. For example, permission to use the GNU C Library in non-free programs enables many more people to use the whole GNU operating system, as well as its variant, the GNU/Linux operating system.
Although the Lesser General Public License is Less protective of the users' freedom, it does ensure that the user of a program that is linked with the Library has the freedom and the wherewithal to run that program using a modified version of the Library.
The precise terms and conditions for copying, distribution and modification follow. Pay close attention to the difference between a "work based on the library" and a "work that uses the library". The former contains code derived from the library, whereas the latter must be combined with the library in order to run.
GNU LESSER GENERAL PUBLIC LICENSE TERMS AND CONDITIONS FOR COPYING, DISTRIBUTION AND MODIFICATION
0. This License Agreement applies to any software library or other program which contains a notice placed by the copyright holder or other authorized party saying it may be distributed under the terms of this Lesser General Public License (also called "this License"). Each licensee is addressed as "you".
A "library" means a collection of software functions and/or data prepared so as to be conveniently linked with application programs (which use some of those functions and data) to form executables.
The "Library", below, refers to any such software library or work which has been distributed under these terms. A "work based on the Library" means either the Library or any derivative work under copyright law: that is to say, a work containing the Library or a portion of it, either verbatim or with modifications and/or translated straightforwardly into another language. (Hereinafter, translation is included without limitation in the term "modification".)
"Source code" for a work means the preferred form of the work for making modifications to it. For a library, complete source code means all the source code for all modules it contains, plus any associated interface definition files, plus the scripts used to control compilation and installation of the library.
Activities other than copying, distribution and modification are not covered by this License; they are outside its scope. The act of running a program using the Library is not restricted, and output from such a program is covered only if its contents constitute a work based on the Library (independent of the use of the Library in a tool for writing it). Whether that is true depends on what the Library does and what the program that uses the Library does.
1. You may copy and distribute verbatim copies of the Library's complete source code as you receive it, in any medium, provided that you conspicuously and appropriately publish on each copy an appropriate copyright notice and disclaimer of warranty; keep intact all the notices that refer to this License and to the absence of any warranty; and distribute a copy of this License along with the Library.
You may charge a fee for the physical act of transferring a copy, and you may at your option offer warranty protection in exchange for a fee.
2. You may modify your copy or copies of the Library or any portion of it, thus forming a work based on the Library, and copy and distribute such modifications or work under the terms of Section 1 above, provided that you also meet all of these conditions:
a) The modified work must itself be a software library.
b) You must cause the files modified to carry prominent notices stating that you changed the files and the date of any change.
c) You must cause the whole of the work to be licensed at no charge to all third parties under the terms of this License.
d) If a facility in the modified Library refers to a function or a table of data to be supplied by an application program that uses the facility, other than as an argument passed when the facility is invoked, then you must make a good faith effort to ensure that, in the event an application does not supply such function or table, the facility still operates, and performs whatever part of its purpose remains meaningful.
(For example, a function in a library to compute square roots has a purpose that is entirely well-defined independent of the application. Therefore, Subsection 2d requires that any application-supplied function or table used by this function must be optional: if the application does not supply it, the square root function must still compute square roots.)
These requirements apply to the modified work as a whole. If identifiable sections of that work are not derived from the Library, and can be reasonably considered independent and separate works in themselves, then this License, and its terms, do not apply to those sections when you distribute them as separate works. But when you distribute the same sections as part of a whole which is a work based on the Library, the distribution of the whole must be on the terms of this License, whose permissions for other licensees extend to the entire whole, and thus to each and every part regardless of who wrote it.
Thus, it is not the intent of this section to claim rights or contest your rights to work written entirely by you; rather, the intent is to exercise the right to control the distribution of derivative or collective works based on the Library.
In addition, mere aggregation of another work not based on the Library with the Library (or with a work based on the Library) on a volume of a storage or distribution medium does not bring the other work under the scope of this License.
3. You may opt to apply the terms of the ordinary GNU General Public License instead of this License to a given copy of the Library. To do this, you must alter all the notices that refer to this License, so that they refer to the ordinary GNU General Public License, version 2, instead of to this License. (If a newer version than version 2 of the ordinary GNU General Public License has appeared, then you can specify that version instead if you wish.) Do not make any other change in these notices.
Once this change is made in a given copy, it is irreversible for that copy, so the ordinary GNU General Public License applies to all subsequent copies and derivative works made from that copy.
This option is useful when you wish to copy part of the code of the Library into a program that is not a library.
4. You may copy and distribute the Library (or a portion or derivative of it, under Section 2) in object code or executable form under the terms of Sections 1 and 2 above provided that you accompany it with the complete corresponding machine-readable source code, which must be distributed under the terms of Sections 1 and 2 above on a medium customarily used for software interchange.
If distribution of object code is made by offering access to copy from a designated place, then offering equivalent access to copy the source code from the same place satisfies the requirement to distribute the source code, even though third parties are not compelled to copy the source along with the object code.
5. A program that contains no derivative of any portion of the Library, but is designed to work with the Library by being compiled or linked with it, is called a "work that uses the Library". Such a work, in isolation, is not a derivative work of the Library, and therefore falls outside the scope of this License.
However, linking a "work that uses the Library" with the Library creates an executable that is a derivative of the Library (because it contains portions of the Library), rather than a "work that uses the library". The executable is therefore covered by this License. Section 6 states terms for distribution of such executables.
When a "work that uses the Library" uses material from a header file that is part of the Library, the object code for the work may be a derivative work of the Library even though the source code is not. Whether this is true is especially significant if the work can be linked without the Library, or if the work is itself a library. The threshold for this to be true is not precisely defined by law.
If such an object file uses only numerical parameters, data structure layouts and accessors, and small macros and small inline functions (ten lines or less in length), then the use of the object file is unrestricted, regardless of whether it is legally a derivative work. (Executables containing this object code plus portions of the Library will still fall under Section 6.) Otherwise, if the work is a derivative of the Library, you may distribute the object code for the work under the terms of Section 6. Any executables containing that work also fall under Section 6, whether or not they are linked directly with the Library itself.
6. As an exception to the Sections above, you may also combine or link a "work that uses the Library" with the Library to produce a work containing portions of the Library, and distribute that work under terms of your choice, provided that the terms permit modification of the work for the customer's own use and reverse engineering for debugging such modifications.
You must give prominent notice with each copy of the work that the Library is used in it and that the Library and its use are covered by this License. You must supply a copy of this License. If the work during execution displays copyright notices, you must include the copyright notice for the Library among them, as well as a reference directing the user to the copy of this License. Also, you must do one of these things:
a) Accompany the work with the complete corresponding machine-readable source code for the Library including whatever changes were used in the work (which must be distributed under Sections 1 and 2 above); and, if the work is an executable linked with the Library, with the complete machine-readable "work that uses the Library", as object code and/or source code, so that the user can modify the Library and then relink to produce a modified executable containing the modified Library. (It is understood that the user who changes the contents of definitions files in the Library will not necessarily be able to recompile the application to use the modified definitions.)
b) Use a suitable shared library mechanism for linking with the Library. A suitable mechanism is one that (1) uses at run time a copy of the library already present on the user's computer system, rather than copying library functions into the executable, and (2) will operate properly with a modified version of the library, if the user installs one, as long as the modified version is interface-compatible with the version that the work was made with.
c) Accompany the work with a written offer, valid for at least three years, to give the same user the materials specified in Subsection 6a, above, for a charge no more than the cost of performing this distribution.
d) If distribution of the work is made by offering access to copy from a designated place, offer equivalent access to copy the above specified materials from the same place.
e) Verify that the user has already received a copy of these materials or that you have already sent this user a copy.
For an executable, the required form of the "work that uses the Library" must include any data and utility programs needed for reproducing the executable from it. However, as a special exception, the materials to be distributed need not include anything that is normally distributed (in either source or binary form) with the major components (compiler, kernel, and so on) of the operating system on which the executable runs, unless that component itself accompanies the executable.
It may happen that this requirement contradicts the license restrictions of other proprietary libraries that do not normally accompany the operating system. Such a contradiction means you cannot use both them and the Library together in an executable that you distribute.
7. You may place library facilities that are a work based on the Library side-by-side in a single library together with other library facilities not covered by this License, and distribute such a combined library, provided that the separate distribution of the work based on the Library and of the other library facilities is otherwise permitted, and provided that you do these two things:
a) Accompany the combined library with a copy of the same work based on the Library, uncombined with any other library facilities. This must be distributed under the terms of the Sections above.
b) Give prominent notice with the combined library of the fact that part of it is a work based on the Library, and explaining where to find the accompanying uncombined form of the same work.
8. You may not copy, modify, sublicense, link with, or distribute the Library except as expressly provided under this License. Any attempt otherwise to copy, modify, sublicense, link with, or distribute the Library is void, and will automatically terminate your rights under this License. However, parties who have received copies, or rights, from you under this License will not have their licenses terminated so long as such parties remain in full compliance.
9. You are not required to accept this License, since you have not signed it. However, nothing else grants you permission to modify or distribute the Library or its derivative works. These actions are prohibited by law if you do not accept this License. Therefore, by modifying or distributing the Library (or any work based on the Library), you indicate your acceptance of this License to do so, and all its terms and conditions for copying, distributing or modifying the Library or works based on it.
10. Each time you redistribute the Library (or any work based on the Library), the recipient automatically receives a license from the original licensor to copy, distribute, link with or modify the Library subject to these terms and conditions. You may not impose any further restrictions on the recipients' exercise of the rights granted herein. You are not responsible for enforcing compliance by third parties with this License.
11. If, as a consequence of a court judgment or allegation of patent infringement or for any other reason (not limited to patent issues), conditions are imposed on you (whether by court order, agreement or otherwise) that contradict the conditions of this License, they do not excuse you from the conditions of this License. If you cannot distribute so as to satisfy simultaneously your obligations under this License and any other pertinent obligations, then as a consequence you may not distribute the Library at all. For example, if a patent license would not permit royalty-free redistribution of the Library by all those who receive copies directly or indirectly through you, then the only way you could satisfy both it and this License would be to refrain entirely from distribution of the Library.
If any portion of this section is held invalid or unenforceable under any particular circumstance, the balance of the section is intended to apply, and the section as a whole is intended to apply in other circumstances.
It is not the purpose of this section to induce you to infringe any patents or other property right claims or to contest validity of any such claims; this section has the sole purpose of protecting the integrity of the free software distribution system which is implemented by public license practices. Many people have made generous contributions to the wide range of software distributed through that system in reliance on consistent application of that system; it is up to the author/donor to decide if he or she is willing to distribute software through any other system and a licensee cannot impose that choice.
This section is intended to make thoroughly clear what is believed to be a consequence of the rest of this License.
12. If the distribution and/or use of the Library is restricted in certain countries either by patents or by copyrighted interfaces, the original copyright holder who places the Library under this License may add an explicit geographical distribution limitation excluding those countries, so that distribution is permitted only in or among countries not thus excluded. In such case, this License incorporates the limitation as if written in the body of this License.
13. The Free Software Foundation may publish revised and/or new versions of the Lesser General Public License from time to time. Such new versions will be similar in spirit to the present version, but may differ in detail to address new problems or concerns.
Each version is given a distinguishing version number. If the Library specifies a version number of this License which applies to it and "any later version", you have the option of following the terms and conditions either of that version or of any later version published by the Free Software Foundation. If the Library does not specify a license version number, you may choose any version ever published by the Free Software Foundation.
14. If you wish to incorporate parts of the Library into other free programs whose distribution conditions are incompatible with these, write to the author to ask for permission. For software which is copyrighted by the Free Software Foundation, write to the Free Software Foundation; we sometimes make exceptions for this. Our decision will be guided by the two goals of preserving the free status of all derivatives of our free software and of promoting the sharing and reuse of software generally.
NO WARRANTY
15. BECAUSE THE LIBRARY IS LICENSED FREE OF CHARGE, THERE IS NO WARRANTY FOR THE LIBRARY, TO THE EXTENT PERMITTED BY APPLICABLE LAW. EXCEPT WHEN OTHERWISE STATED IN WRITING THE COPYRIGHT HOLDERS AND/OR OTHER PARTIES PROVIDE THE LIBRARY "AS IS" WITHOUT WARRANTY OF ANY KIND, EITHER EXPRESSED OR IMPLIED, INCLUDING, BUT NOT LIMITED TO, THE IMPLIED WARRANTIES OF MERCHANTABILITY AND FITNESS FOR A PARTICULAR PURPOSE. THE ENTIRE RISK AS TO THE QUALITY AND PERFORMANCE OF THE LIBRARY IS WITH YOU. SHOULD THE LIBRARY PROVE DEFECTIVE, YOU ASSUME THE COST OF ALL NECESSARY SERVICING, REPAIR OR CORRECTION.
16. IN NO EVENT UNLESS REQUIRED BY APPLICABLE LAW OR AGREED TO IN WRITING WILL ANY COPYRIGHT HOLDER, OR ANY OTHER PARTY WHO MAY MODIFY AND/OR REDISTRIBUTE THE LIBRARY AS PERMITTED ABOVE, BE LIABLE TO YOU FOR DAMAGES, INCLUDING ANY GENERAL, SPECIAL, INCIDENTAL OR CONSEQUENTIAL DAMAGES ARISING OUT OF THE USE OR INABILITY TO USE THE LIBRARY (INCLUDING BUT NOT LIMITED TO LOSS OF DATA OR DATA BEING RENDERED INACCURATE OR LOSSES SUSTAINED BY YOU OR THIRD PARTIES OR A FAILURE OF THE LIBRARY TO OPERATE WITH ANY OTHER SOFTWARE), EVEN IF SUCH HOLDER OR OTHER PARTY HAS BEEN ADVISED OF THE POSSIBILITY OF SUCH DAMAGES.
END OF TERMS AND CONDITIONS
MOZILLA PUBLIC LICENSE Version 1.1
1. Definitions.
1.0.1. "Commercial Use" means distribution or otherwise making the Covered Code available to a third party.
1.1. "Contributor" means each entity that creates or contributes to the creation of Modifications.
1.2. "Contributor Version" means the combination of the Original Code, prior Modifications used by a Contributor, and the Modifications made by that particular Contributor.
1.3. "Covered Code" means the Original Code or Modifications or the combination of the Original Code and Modifications, in each case including portions thereof.
1.4. "Electronic Distribution Mechanism" means a mechanism generally accepted in the software development community for the electronic transfer of data.
1.5. "Executable" means Covered Code in any form other than Source Code.
1.6. "Initial Developer" means the individual or entity identified as the Initial Developer in the Source Code notice required by Exhibit A.
1.7. "Larger Work" means a work which combines Covered Code or portions thereof with code not governed by the terms of this License.
1.8. "License" means this document.
1.8.1. "Licensable" means having the right to grant, to the maximum extent possible, whether at the time of the initial grant or subsequently acquired, any and all of the rights conveyed herein.
1.9. "Modifications" means any addition to or deletion from the substance or structure of either the Original Code or any previous Modifications. When Covered Code is released as a series of files, a Modification is:
A. Any addition to or deletion from the contents of a file containing Original Code or previous Modifications.
B. Any new file that contains any part of the Original Code or previous Modifications.
1.10. "Original Code" means Source Code of computer software code which is described in the Source Code notice required by Exhibit A as Original Code, and which, at the time of its release under this License is not already Covered Code governed by this License.
1.10.1. "Patent Claims" means any patent claim(s), now owned or hereafter acquired, including without limitation, method, process, and apparatus claims, in any patent Licensable by grantor.
1.11. "Source Code" means the preferred form of the Covered Code for making modifications to it, including all modules it contains, plus any associated interface definition files, scripts used to control compilation and installation of an Executable, or source code differential comparisons against either the Original Code or another well known, available Covered Code of the Contributor's choice. The Source Code can be in a compressed or archival form, provided the appropriate decompression or de-archiving software is widely available for no charge.
1.12. "You" (or "Your") means an individual or a legal entity exercising rights under, and complying with all of the terms of, this License or a future version of this License issued under Section 6.1. For legal entities, "You" includes any entity which controls, is controlled by, or is under common control with You. For purposes of this definition, "control" means (a) the power, direct or indirect, to cause the direction or management of such entity, whether by contract or otherwise, or (b) ownership of more than fifty percent (50%) of the outstanding shares or beneficial ownership of such entity.
2. Source Code License.
2.1. The Initial Developer Grant. The Initial Developer hereby grants You a world-wide, royalty-free, non-exclusive license, subject to third party intellectual property claims:
(a) under intellectual property rights (other than patent or trademark) Licensable by Initial Developer to use, reproduce, modify, display, perform, sublicense and distribute the Original Code (or portions thereof) with or without Modifications, and/or as part of a Larger Work; and
(b) under Patents Claims infringed by the making, using or selling of Original Code, to make, have made, use, practice, sell, and offer for sale, and/or otherwise dispose of the Original Code (or portions thereof).
(c) the licenses granted in this Section 2.1(a) and (b) are effective on the date Initial Developer first distributes Original Code under the terms of this License.
(d) Notwithstanding Section 2.1(b) above, no patent license is granted: 1) for code that You delete from the Original Code; 2) separate from the Original Code; or 3) for infringements caused by: i) the modification of the Original Code or ii) the combination of the Original Code with other software or devices.
2.2. Contributor Grant. Subject to third party intellectual property claims, each Contributor hereby grants You a world-wide, royalty-free, non-exclusive license
(a) under intellectual property rights (other than patent or trademark) Licensable by Contributor, to use, reproduce, modify, display, perform, sublicense and distribute the Modifications created by such Contributor (or portions thereof) either on an unmodified basis, with other Modifications, as Covered Code and/or as part of a Larger Work; and
(b) under Patent Claims infringed by the making, using, or selling of Modifications made by that Contributor either alone and/or in combination with its Contributor Version (or portions of such combination), to make, use, sell, offer for sale, have made, and/or otherwise dispose of: 1) Modifications made by that Contributor (or portions thereof); and 2) the combination of Modifications made by that Contributor with its Contributor Version (or portions of such combination).
(c) the licenses granted in Sections 2.2(a) and 2.2(b) are effective on the date Contributor first makes Commercial Use of the Covered Code.
(d) Notwithstanding Section 2.2(b) above, no patent license is granted: 1) for any code that Contributor has deleted from the Contributor Version; 2) separate from the Contributor Version; 3) for infringements caused by: i) third party modifications of Contributor Version or ii) the combination of Modifications made by that Contributor with other software (except as part of the Contributor Version) or other devices; or 4) under Patent Claims infringed by Covered Code in the absence of Modifications made by that Contributor.
3. Distribution Obligations.
3.1. Application of License. The Modifications which You create or to which You contribute are governed by the terms of this License, including without limitation Section 2.2. The Source Code version of Covered Code may be distributed only under the terms of this License or a future version of this License released under Section 6.1, and You must include a copy of this License with every copy of the Source Code You distribute. You may not offer or impose any terms on any Source Code version that alters or restricts the applicable version of this License or the recipients' rights hereunder. However, You may include an additional document offering the additional rights described in Section 3.5.
3.2. Availability of Source Code. Any Modification which You create or to which You contribute must be made available in Source Code form under the terms of this License either on the same media as an Executable version or via an accepted Electronic Distribution Mechanism to anyone to whom you made an Executable version available; and if made available via Electronic Distribution Mechanism, must remain available for at least twelve (12) months after the date it initially became available, or at least six (6) months after a subsequent version of that particular Modification has been made available to such recipients. You are responsible for ensuring that the Source Code version remains available even if the Electronic Distribution Mechanism is maintained by a third party.
3.3. Description of Modifications. You must cause all Covered Code to which You contribute to contain a file documenting the changes You made to create that Covered Code and the date of any change. You must include a prominent statement that the Modification is derived, directly or indirectly, from Original Code provided by the Initial Developer and including the name of the Initial Developer in (a) the Source Code, and (b) in any notice in an Executable version or related documentation in which You describe the origin or ownership of the Covered Code.
3.4. Intellectual Property Matters
(a) Third Party Claims. If Contributor has knowledge that a license under a third party's intellectual property rights is required to exercise the rights granted by such Contributor under Sections 2.1 or 2.2, Contributor must include a text file with the Source Code distribution titled "LEGAL" which describes the claim and the party making the claim in sufficient detail that a recipient will know whom to contact. If Contributor obtains such knowledge after the Modification is made available as described in Section 3.2, Contributor shall promptly modify the LEGAL file in all copies Contributor makes available thereafter and shall take other steps (such as notifying appropriate mailing lists or newsgroups) reasonably calculated to inform those who received the Covered Code that new knowledge has been obtained.
(b) Contributor APIs. If Contributor's Modifications include an application programming interface and Contributor has knowledge of patent licenses which are reasonably necessary to implement that API, Contributor must also include this information in the LEGAL file.
3.5. Required Notices. You must duplicate the notice in Exhibit A in each file of the Source Code. If it is not possible to put such notice in a particular Source Code file due to its structure, then You must include such notice in a location (such as a relevant directory) where a user would be likely to look for such a notice. If You created one or more Modification(s) You may add your name as a Contributor to the notice described in Exhibit A. You must also duplicate this License in any documentation for the Source Code where You describe recipients' rights or ownership rights relating to Covered Code. You may choose to offer, and to charge a fee for, warranty, support, indemnity or liability obligations to one or more recipients of Covered Code. However, You may do so only on Your own behalf, and not on behalf of the Initial Developer or any Contributor. You must make it absolutely clear than any such warranty, support, indemnity or liability obligation is offered by You alone, and You hereby agree to indemnify the Initial Developer and every Contributor for any liability incurred by the Initial Developer or such Contributor as a result of warranty, support, indemnity or liability terms You offer.
3.6. Distribution of Executable Versions. You may distribute Covered Code in Executable form only if the requirements of Section 3.1-3.5 have been met for that Covered Code, and if You include a notice stating that the Source Code version of the Covered Code is available under the terms of this License, including a description of how and where You have fulfilled the obligations of Section 3.2. The notice must be conspicuously included in any notice in an Executable version, related documentation or collateral in which You describe recipients' rights relating to the Covered Code. You may distribute the Executable version of Covered Code or ownership rights under a license of Your choice, which may contain terms different from this License, provided that You are in compliance with the terms of this License and that the license for the Executable version does not attempt to limit or alter the recipient's rights in the Source Code version from the rights set forth in this License. If You distribute the Executable version under a different license You must make it absolutely clear that any terms which differ from this License are offered by You alone, not by the Initial Developer or any Contributor. You hereby agree to indemnify the Initial Developer and every Contributor for any liability incurred by the Initial Developer or such Contributor as a result of any such terms You offer.
3.7. Larger Works. You may create a Larger Work by combining Covered Code with other code not governed by the terms of this License and distribute the Larger Work as a single product. In such a case, You must make sure the requirements of this License are fulfilled for the Covered Code.
4. Inability to Comply Due to Statute or Regulation.If it is impossible for You to comply with any of the terms of this License with respect to some or all of the Covered Code due to statute, judicial order, or regulation then You must: (a) comply with the terms of this License to the maximum extent possible; and (b) describe the limitations and the code they affect. Such description must be included in the LEGAL file described in Section 3.4 and must be included with all distributions of the Source Code. Except to the extent prohibited by statute or regulation, such description must be sufficiently detailed for a recipient of ordinary skill to be able to understand it.
5. Application of this License. This License applies to code to which the Initial Developer has attached the notice in Exhibit A and to related Covered Code.
6. Versions of the License.
6.1. New Versions. Netscape Communications Corporation ("Netscape") may publish revised and/or new versions of the License from time to time. Each version will be given a distinguishing version number.
6.2. Effect of New Versions. Once Covered Code has been published under a particular version of the License, You may always continue to use it under the terms of that version. You may also choose to use such Covered Code under the terms of any subsequent version of the License published by Netscape. No one other than Netscape has the right to modify the terms applicable to Covered Code created under this License.
6.3. Derivative Works. If You create or use a modified version of this License (which you may only do in order to apply it to code which is not already Covered Code governed by this License), You must (a) rename Your license so that the phrases "Mozilla", "MOZILLAPL", "MOZPL", "Netscape", "MPL", "NPL" or any confusingly similar phrase do not appear in your license (except to note that your license differs from this License) and (b) otherwise make it clear that Your version of the license contains terms which differ from the Mozilla Public License and Netscape Public License. (Filling in the name of the Initial Developer, Original Code or Contributor in the notice described in Exhibit A shall not of themselves be deemed to be modifications of this License.)
7. DISCLAIMER OF WARRANTY.
COVERED CODE IS PROVIDED UNDER THIS LICENSE ON AN "AS IS" BASIS, WITHOUT WARRANTY OF ANY KIND, EITHER EXPRESSED OR IMPLIED, INCLUDING, WITHOUT LIMITATION, WARRANTIES THAT THE COVERED CODE IS FREE OF DEFECTS, MERCHANTABLE, FIT FOR A PARTICULAR PURPOSE OR NON-INFRINGING. THE ENTIRE RISK AS TO THE QUALITY AND PERFORMANCE OF THE COVERED CODE IS WITH YOU. SHOULD ANY COVERED CODE PROVE DEFECTIVE IN ANY RESPECT, YOU (NOT THE INITIAL DEVELOPER OR ANY OTHER CONTRIBUTOR) ASSUME THE COST OF ANY NECESSARY SERVICING, REPAIR OR CORRECTION. THIS DISCLAIMER OF WARRANTY CONSTITUTES AN ESSENTIAL PART OF THIS LICENSE. NO USE OF ANY COVERED CODE IS AUTHORIZED HEREUNDER EXCEPT UNDER THIS DISCLAIMER.
8. TERMINATION.
8.1. This License and the rights granted hereunder will terminate automatically if You fail to comply with terms herein and fail to cure such breach within 30 days of becoming aware of the breach. All sublicenses to the Covered Code which are properly granted shall survive any termination of this License. Provisions which, by their nature, must remain in effect beyond the termination of this License shall survive.
8.2. If You initiate litigation by asserting a patent infringement claim (excluding declaratory judgment actions) against Initial Developer or a Contributor (the Initial Developer or Contributor against whom You file such action is referred to as "Participant") alleging that:
(a) such Participant's Contributor Version directly or indirectly infringes any patent, then any and all rights granted by such Participant to You under Sections 2.1 and/or 2.2 of this License shall, upon 60 days notice from Participant terminate prospectively, unless if within 60 days after receipt of notice You either: (i) agree in writing to pay Participant a mutually agreeable reasonable royalty for Your past and future use of Modifications made by such Participant, or (ii) withdraw Your litigation claim with respect to the Contributor Version against such Participant. If within 60 days of notice, a reasonable royalty and payment arrangement are not mutually agreed upon in writing by the parties or the litigation claim is not withdrawn, the rights granted by Participant to You under Sections 2.1 and/or 2.2 automatically terminate at the expiration of the 60 day notice period specified above.
(b) any software, hardware, or device, other than such Participant's Contributor Version, directly or indirectly infringes any patent, then any rights granted to You by such Participant under Sections 2.1(b) and 2.2(b) are revoked effective as of the date You first made, used, sold, distributed, or had made, Modifications made by that Participant.
8.3. If You assert a patent infringement claim against Participant alleging that such Participant's Contributor Version directly or indirectly infringes any patent where such claim is resolved (such as by license or settlement) prior to the initiation of patent infringement litigation, then the reasonable value of the licenses granted by such Participant under Sections 2.1 or 2.2 shall be taken into account in determining the amount or value of any payment or license.
8.4. In the event of termination under Sections 8.1 or 8.2 above, all end user license agreements (excluding distributors and resellers) which have been validly granted by You or any distributor hereunder prior to termination shall survive termination.
9. LIMITATION OF LIABILITY. UNDER NO CIRCUMSTANCES AND UNDER NO LEGAL THEORY, WHETHER TORT (INCLUDING NEGLIGENCE), CONTRACT, OR OTHERWISE, SHALL YOU, THE INITIAL DEVELOPER, ANY OTHER CONTRIBUTOR, OR ANY DISTRIBUTOR OF COVERED CODE, OR ANY SUPPLIER OF ANY OF SUCH PARTIES, BE LIABLE TO ANY PERSON FOR ANY INDIRECT, SPECIAL, INCIDENTAL, OR CONSEQUENTIAL DAMAGES OF ANY CHARACTER INCLUDING, WITHOUT LIMITATION, DAMAGES FOR LOSS OF GOODWILL, WORK STOPPAGE, COMPUTER FAILURE OR MALFUNCTION, OR ANY AND ALL OTHER COMMERCIAL DAMAGES OR LOSSES, EVEN IF SUCH PARTY SHALL HAVE BEEN INFORMED OF THE POSSIBILITY OF SUCH DAMAGES. THIS LIMITATION OF LIABILITY SHALL NOT APPLY TO LIABILITY FOR DEATH OR PERSONAL INJURY RESULTING FROM SUCH PARTY'S NEGLIGENCE TO THE EXTENT APPLICABLE LAW PROHIBITS SUCH LIMITATION. SOME JURISDICTIONS DO NOT ALLOW THE EXCLUSION OR LIMITATION OF INCIDENTAL OR CONSEQUENTIAL DAMAGES, SO THIS EXCLUSION AND LIMITATION MAY NOT APPLY TO YOU.
10. U.S. GOVERNMENT END USERS. The Covered Code is a "commercial item," as that term is defined in 48 C.F.R. 2.101 (Oct. 1995), consisting of "commercial computer software" and "commercial computer software documentation," as such terms are used in 48 C.F.R. 12.212 (Sept. 1995). Consistent with 48 C.F.R. 12.212 and 48 C.F.R. 227.7202-1 through 227.7202-4 (June 1995), all U.S. Government End Users acquire Covered Code with only those rights set forth herein.
11. MISCELLANEOUS. This License represents the complete agreement concerning subject matter hereof. If any provision of this License is held to be unenforceable, such provision shall be reformed only to the extent necessary to make it enforceable. This License shall be governed by California law provisions (except to the extent applicable law, if any, provides otherwise), excluding its conflict-of-law provisions. With respect to disputes in which at least one party is a citizen of, or an entity chartered or registered to do business in the United States of America, any litigation relating to this License shall be subject to the jurisdiction of the Federal Courts of the Northern District of California, with venue lying in Santa Clara County, California, with the losing party responsible for costs, including without limitation, court costs and reasonable attorneys' fees and expenses. The application of the United Nations Convention on Contracts for the International Sale of Goods is expressly excluded. Any law or regulation which provides that the language of a contract shall be construed against the drafter shall not apply to this License.
12. RESPONSIBILITY FOR CLAIMS. As between Initial Developer and the Contributors, each party is responsible for claims and damages arising, directly or indirectly, out of its utilization of rights under this License and You agree to work with Initial Developer and Contributors to distribute such responsibility on an equitable basis. Nothing herein is intended or shall be deemed to constitute any admission of liability.
13. MULTIPLE-LICENSED CODE. Initial Developer may designate portions of the Covered Code as "Multiple-Licensed". "Multiple-Licensed" means that the Initial Developer permits you to utilize portions of the Covered Code under Your choice of the NPL or the alternative licenses, if any, specified by the Initial Developer in the file described in Exhibit A.
EXHIBIT A -Mozilla Public License.
``The contents of this file are subject to the Mozilla Public License Version 1.1 (the "License"); you may not use this file except in compliance with the License. You may obtain a copy of the License at http://www.mozilla.org/MPL/
Software distributed under the License is distributed on an "AS IS" basis, WITHOUT WARRANTY OF ANY KIND, either express or implied. See the License for the specific language governing rights and limitations under the License.
The Original Code is ______________________________________.
The Initial Developer of the Original Code is ________________________. Portions created by ______________________ are Copyright (C) ______ _______________________. All Rights Reserved.
Contributor(s): ______________________________________.
Alternatively, the contents of this file may be used under the terms of the _____ license (the "[___] License"), in which case the provisions of [______] License are applicable instead of those above. If you wish to allow use of your version of this file only under the terms of the [____] License and not to allow others to use your version of this file under the MPL, indicate your decision by deleting the provisions above and replace them with the notice and other provisions required by the [___] License. If you do not delete the provisions above, a recipient may use your version of this file under either the MPL or the [___] License."
[NOTE: The text of this Exhibit A may differ slightly from the text of the notices in the Source Code files of the Original Code. You should use the text of this Exhibit A rather than the text found in the Original Code Source Code for Your Modifications.]
Permission is hereby granted, free of charge, to any person obtaining a copy of this software and associated documentation files (the "Software"), to deal in the Software without restriction, including without limitation the rights to use, copy, modify, merge, publish, distribute, sublicense, and/or sell copies of the Software, and to permit persons to whom the Software is furnished to do so, subject to the following conditions:
The above copyright notice and this permission notice shall be included in all copies or substantial portions of the Software.
THE SOFTWARE IS PROVIDED "AS IS", WITHOUT WARRANTY OF ANY KIND, EXPRESS OR IMPLIED, INCLUDING BUT NOT LIMITED TO THE WARRANTIES OF MERCHANTABILITY, FITNESS FOR A PARTICULAR PURPOSE AND NONINFRINGEMENT. IN NO EVENT SHALL THE AUTHORS OR COPYRIGHT HOLDERS BE LIABLE FOR ANY CLAIM, DAMAGES OR OTHER LIABILITY, WHETHER IN AN ACTION OF CONTRACT, TORT OR OTHERWISE, ARISING FROM, OUT OF OR IN CONNECTION WITH THE SOFTWARE OR THE USE OR OTHER DEALINGS IN THE SOFTWARE.
Copyright (c) 1987, 1989-1990, 1992-1995 X Consortium
Permission is hereby granted, free of charge, to any person obtaining a copy of this software and associated documentation files (the "Software"), to deal in the Software without restriction, including without limitation the rights to use, copy, modify, merge, publish, distribute, sublicense, and/or sell copies of the Software, and to permit persons to whom the Software is furnished to do so, subject to the following conditions:
The above copyright notice and this permission notice shall be included in all copies or substantial portions of the Software.
THE SOFTWARE IS PROVIDED "AS IS", WITHOUT WARRANTY OF ANY KIND, EXPRESS OR IMPLIED, INCLUDING BUT NOT LIMITED TO THE WARRANTIES OF MERCHANTABILITY, FITNESS FOR A PARTICULAR PURPOSE AND NONINFRINGEMENT. IN NO EVENT SHALL THE X CONSORTIUM BE LIABLE FOR ANY CLAIM, DAMAGES OR OTHER LIABILITY, WHETHER IN AN ACTION OF CONTRACT, TORT OR OTHERWISE, ARISING FROM, OUT OF OR IN CONNECTION WITH THE SOFTWARE OR THE USE OR OTHER DEALINGS IN THE SOFTWARE.
Except as contained in this notice, the name of the X Consortium shall not be used in advertising or otherwise to promote the sale, use or other dealings in this Software without prior written authorization from the X Consortium.
This software is provided 'as-is', without any express or implied warranty. In no event will the authors be held liable for any damages arising from the use of this software.
Permission is granted to anyone to use this software for any purpose, including commercial applications, and to alter it and redistribute it freely, subject to the following restrictions:
1. The origin of this software must not be misrepresented; you must not claim that you wrote the original software. If you use this software in a product, an acknowledgment in the product documentation would be appreciated but is not required.
2. Altered source versions must be plainly marked as such, and must not be misrepresented as being the original software.
3. This notice may not be removed or altered from any source distribution.
Jean-loup Gailly        Mark Adler
jloup@gzip.org          madler@alumni.caltech.edu
TERMS AND CONDITIONS FOR USE, REPRODUCTION, AND DISTRIBUTION
1. Definitions.
"License" shall mean the terms and conditions for use, reproduction, and distribution as defined by Sections 1 through 9 of this document.
"Licensor" shall mean the copyright owner or entity authorized by the copyright owner that is granting the License.
"Legal Entity" shall mean the union of the acting entity and all other entities that control, are controlled by, or are under common control with that entity. For the purposes of this definition, "control" means (i) the power, direct or indirect, to cause the direction or management of such entity, whether by contract or otherwise, or (ii) ownership of fifty percent (50%) or more of the outstanding shares, or (iii) beneficial ownership of such entity.
"You" (or "Your") shall mean an individual or Legal Entity exercising permissions granted by this License.
"Source" form shall mean the preferred form for making modifications, including but not limited to software source code, documentation source, and configuration files.
"Object" form shall mean any form resulting from mechanical transformation or translation of a Source form, including but not limited to compiled object code, generated documentation, and conversions to other media types.
"Work" shall mean the work of authorship, whether in Source or Object form, made available under the License, as indicated by a copyright notice that is included in or attached to the work (an example is provided in the Appendix below).
"Derivative Works" shall mean any work, whether in Source or Object form, that is based on (or derived from) the Work and for which the editorial revisions, annotations, elaborations, or other modifications represent, as a whole, an original work of authorship. For the purposes of this License, Derivative Works shall not include works that remain separable from, or merely link (or bind by name) to the interfaces of, the Work and Derivative Works thereof.
"Contribution" shall mean any work of authorship, including the original version of the Work and any modifications or additions to that Work or Derivative Works thereof, that is intentionally submitted to Licensor for inclusion in the Work by the copyright owner or by an individual or Legal Entity authorized to submit on behalf of the copyright owner. For the purposes of this definition, "submitted" means any form of electronic, verbal, or written communication sent to the Licensor or its representatives, including but not limited to communication on electronic mailing lists, source code control systems, and issue tracking systems that are managed by, or on behalf of, the Licensor for the purpose of discussing and improving the Work, but excluding communication that is conspicuously marked or otherwise designated in writing by the copyright owner as "Not a Contribution."
"Contributor" shall mean Licensor and any individual or Legal Entity on behalf of whom a Contribution has been received by Licensor and subsequently incorporated within the Work.
2. Grant of Copyright License. Subject to the terms and conditions of this License, each Contributor hereby grants to You a perpetual, worldwide, non-exclusive, no-charge, royalty-free, irrevocable copyright license to reproduce, prepare Derivative Works of, publicly display, publicly perform, sublicense, and distribute the Work and such Derivative Works in Source or Object form.
3. Grant of Patent License. Subject to the terms and conditions of this License, each Contributor hereby grants to You a perpetual, worldwide, non-exclusive, no-charge, royalty-free, irrevocable (except as stated in this section) patent license to make, have made, use, offer to sell, sell, import, and otherwise transfer the Work, where such license applies only to those patent claims licensable by such Contributor that are necessarily infringed by their Contribution(s) alone or by combination of their Contribution(s) with the Work to which such Contribution(s) was submitted. If You institute patent litigation against any entity (including a cross-claim or counterclaim in a lawsuit) alleging that the Work or a Contribution incorporated within the Work constitutes direct or contributory patent infringement, then any patent licenses granted to You under this License for that Work shall terminate as of the date such litigation is filed.
4. Redistribution. You may reproduce and distribute copies of the Work or Derivative Works thereof in any medium, with or without modifications, and in Source or Object form, provided that You meet the following conditions:
(a) You must give any other recipients of the Work or Derivative Works a copy of this License; and
(b) You must cause any modified files to carry prominent notices stating that You changed the files; and
(c) You must retain, in the Source form of any Derivative Works that You distribute, all copyright, patent, trademark, and attribution notices from the Source form of the Work, excluding those notices that do not pertain to any part of the Derivative Works; and
(d) If the Work includes a "NOTICE" text file as part of its distribution, then any Derivative Works that You distribute must include a readable copy of the attribution notices contained within such NOTICE file, excluding those notices that do not pertain to any part of the Derivative Works, in at least one of the following places: within a NOTICE text file distributed as part of the Derivative Works; within the Source form or documentation, if provided along with the Derivative Works; or, within a display generated by the Derivative Works, if and wherever such third-party notices normally appear. The contents of the NOTICE file are for informational purposes only and do not modify the License. You may add Your own attribution notices within Derivative Works that You distribute, alongside or as an addendum to the NOTICE text from the Work, provided that such additional attribution notices cannot be construed as modifying the License.
You may add Your own copyright statement to Your modifications and may provide additional or different license terms and conditions for use, reproduction, or distribution of Your modifications, or for any such Derivative Works as a whole, provided Your use, reproduction, and distribution of the Work otherwise complies with the conditions stated in this License.
5. Submission of Contributions. Unless You explicitly state otherwise, any Contribution intentionally submitted for inclusion in the Work by You to the Licensor shall be under the terms and conditions of this License, without any additional terms or conditions. Notwithstanding the above, nothing herein shall supersede or modify the terms of any separate license agreement you may have executed with Licensor regarding such Contributions.
6. Trademarks. This License does not grant permission to use the trade names, trademarks, service marks, or product names of the Licensor, except as required for reasonable and customary use in describing the origin of the Work and reproducing the content of the NOTICE file.
7. Disclaimer of Warranty. Unless required by applicable law or agreed to in writing, Licensor provides the Work (and each Contributor provides its Contributions) on an "AS IS" BASIS, WITHOUT WARRANTIES OR CONDITIONS OF ANY KIND, either express or implied, including, without limitation, any warranties or conditions of TITLE, NON-INFRINGEMENT, MERCHANTABILITY, or FITNESS FOR A PARTICULAR PURPOSE. You are solely responsible for determining the appropriateness of using or redistributing the Work and assume any risks associated with Your exercise of permissions under this License.
8. Limitation of Liability. In no event and under no legal theory, whether in tort (including negligence), contract, or otherwise, unless required by applicable law (such as deliberate and grossly negligent acts) or agreed to in writing, shall any Contributor be liable to You for damages, including any direct, indirect, special, incidental, or consequential damages of any character arising as a result of this License or out of the use or inability to use the Work (including but not limited to damages for loss of goodwill, work stoppage, computer failure or malfunction, or any and all other commercial damages or losses), even if such Contributor has been advised of the possibility of such damages.
9. Accepting Warranty or Additional Liability. While redistributing the Work or Derivative Works thereof, You may choose to offer, and charge a fee for, acceptance of support, warranty, indemnity, or other liability obligations and/or rights consistent with this License. However, in accepting such obligations, You may act only on Your own behalf and on Your sole responsibility, not on behalf of any other Contributor, and only if You agree to indemnify, defend, and hold each Contributor harmless for any liability incurred by, or claims asserted against, such Contributor by reason of your accepting any such warranty or additional liability.
END OF TERMS AND CONDITIONS
This package is an SSL implementation written by Eric Young (eay@cryptsoft.com). The implementation was written so as to conform with Netscape's SSL.
This library is free for commercial and non-commercial use as long as the following conditions are adhered to. The following conditions apply to all code found in this distribution, be it the RC4, RSA, lhash, DES, etc., code; not just the SSL code. The SSL documentation included with this distribution is covered by the same copyright terms except that the holder is Tim Hudson (tjh@cryptsoft.com).
Copyright remains Eric Young's, and as such any Copyright notices in the code are not to be removed. If this package is used in a product, Eric Young should be given attribution as the author of the parts of the library used. This can be in the form of a textual message at program startup or in documentation (online or textual) provided with the package.
Redistribution and use in source and binary forms, with or without modification, are permitted provided that the following conditions are met:
1. Redistributions of source code must retain the copyright notice, this list of conditions and the following disclaimer.
2. Redistributions in binary form must reproduce the above copyright notice, this list of conditions and the following disclaimer in the documentation and/or other materials provided with the distribution.
3. All advertising materials mentioning features or use of this software must display the following acknowledgement: "This product includes cryptographic software written by Eric Young (eay@cryptsoft.com)" The word 'cryptographic' can be left out if the routines from the library being used are not cryptographic related :-).
4. If you include any Windows specific code (or a derivative thereof) from the apps directory (application code) you must include an acknowledgement: "This product includes software written by Tim Hudson (tjh@cryptsoft.com)"
THIS SOFTWARE IS PROVIDED BY ERIC YOUNG ``AS IS'' AND ANY EXPRESS OR IMPLIED WARRANTIES, INCLUDING, BUT NOT LIMITED TO, THE IMPLIED WARRANTIES OF MERCHANTABILITY AND FITNESS FOR A PARTICULAR PURPOSE ARE DISCLAIMED. IN NO EVENT SHALL THE AUTHOR OR CONTRIBUTORS BE LIABLE FOR ANY DIRECT, INDIRECT, INCIDENTAL, SPECIAL, EXEMPLARY, OR CONSEQUENTIAL DAMAGES (INCLUDING, BUT NOT LIMITED TO, PROCUREMENT OF SUBSTITUTE GOODS OR SERVICES; LOSS OF USE, DATA, OR PROFITS; OR BUSINESS INTERRUPTION) HOWEVER CAUSED AND ON ANY THEORY OF LIABILITY, WHETHER IN CONTRACT, STRICT LIABILITY, OR TORT (INCLUDING NEGLIGENCE OR OTHERWISE) ARISING IN ANY WAY OUT OF THE USE OF THIS SOFTWARE, EVEN IF ADVISED OF THE POSSIBILITY OF SUCH DAMAGE.
The licence and distribution terms for any publicly available version or derivative of this code cannot be changed. i.e. this code cannot simply be copied and put under another distribution licence [including the GNU Public Licence.]
Copyright (c) 1995,1996 Danny Gasparovski. All rights reserved.
Redistribution and use in source and binary forms, with or without modification, are permitted provided that the following conditions are met:
1. Redistributions of source code must retain the above copyright notice, this list of conditions and the following disclaimer.
2. Redistributions in binary form must reproduce the above copyright notice, this list of conditions and the following disclaimer in the documentation and/or other materials provided with the distribution.
3. Neither the name of the copyright holder nor the names of its contributors may be used to endorse or promote products derived from this software without specific prior written permission.
THIS SOFTWARE IS PROVIDED ``AS IS'' AND ANY EXPRESS OR IMPLIED WARRANTIES, INCLUDING, BUT NOT LIMITED TO, THE IMPLIED WARRANTIES OF MERCHANTABILITY AND FITNESS FOR A PARTICULAR PURPOSE ARE DISCLAIMED. IN NO EVENT SHALL DANNY GASPAROVSKI OR CONTRIBUTORS BE LIABLE FOR ANY DIRECT, INDIRECT, INCIDENTAL, SPECIAL, EXEMPLARY, OR CONSEQUENTIAL DAMAGES (INCLUDING, BUT NOT LIMITED TO, PROCUREMENT OF SUBSTITUTE GOODS OR SERVICES; LOSS OF USE, DATA, OR PROFITS; OR BUSINESS INTERRUPTION) HOWEVER CAUSED AND ON ANY THEORY OF LIABILITY, WHETHER IN CONTRACT, STRICT LIABILITY, OR TORT (INCLUDING NEGLIGENCE OR OTHERWISE) ARISING IN ANY WAY OUT OF THE USE OF THIS SOFTWARE, EVEN IF ADVISED OF THE POSSIBILITY OF SUCH DAMAGE.
Redistribution and use in source and binary forms, with or without modification, are permitted provided that the following conditions are met:
1. Redistributions of source code must retain the above copyright notice, this list of conditions and the following disclaimer.
2. Redistributions in binary form must reproduce the above copyright notice, this list of conditions and the following disclaimer in the documentation and/or other materials provided with the distribution.
3. The name of the author may not be used to endorse or promote products derived from this software without specific prior written permission.
THIS SOFTWARE IS PROVIDED BY THE AUTHOR ``AS IS'' AND ANY EXPRESS OR IMPLIED WARRANTIES, INCLUDING, BUT NOT LIMITED TO, THE IMPLIED WARRANTIES OF MERCHANTABILITY AND FITNESS FOR A PARTICULAR PURPOSE ARE DISCLAIMED. IN NO EVENT SHALL THE AUTHOR BE LIABLE FOR ANY DIRECT, INDIRECT, INCIDENTAL, SPECIAL, EXEMPLARY, OR CONSEQUENTIAL DAMAGES (INCLUDING, BUT NOT LIMITED TO, PROCUREMENT OF SUBSTITUTE GOODS OR SERVICES; LOSS OF USE, DATA, OR PROFITS; OR BUSINESS INTERRUPTION) HOWEVER CAUSED AND ON ANY THEORY OF LIABILITY, WHETHER IN CONTRACT, STRICT LIABILITY, OR TORT (INCLUDING NEGLIGENCE OR OTHERWISE) ARISING IN ANY WAY OUT OF THE USE OF THIS SOFTWARE, EVEN IF ADVISED OF THE POSSIBILITY OF SUCH DAMAGE.
The PNG Reference Library is supplied "AS IS". The Contributing Authors and Group 42, Inc. disclaim all warranties, expressed or implied, including, without limitation, the warranties of merchantability and of fitness for any purpose. The Contributing Authors and Group 42, Inc. assume no liability for direct, indirect, incidental, special, exemplary, or consequential damages, which may result from the use of the PNG Reference Library, even if advised of the possibility of such damage.
Permission is hereby granted to use, copy, modify, and distribute this source code, or portions hereof, for any purpose, without fee, subject to the following restrictions:
1. The origin of this source code must not be misrepresented.
2. Altered versions must be plainly marked as such and must not be misrepresented as being the original source.
3. This Copyright notice may not be removed or altered from any source or altered source distribution.
The Contributing Authors and Group 42, Inc. specifically permit, without fee, and encourage the use of this source code as a component to supporting the PNG file format in commercial products. If you use this source code in a product, acknowledgment is not required but would be appreciated.
Redistribution and use in source and binary forms, with or without modification, are permitted provided that the following conditions are met:
1. Redistributions of source code must retain the above copyright notice, this list of conditions and the following disclaimer.
2. Redistributions in binary form must reproduce the above copyright notice, this list of conditions and the following disclaimer in the documentation and/or other materials provided with the distribution.
3. The name of the author may not be used to endorse or promote products derived from this software without specific prior written permission.
THIS SOFTWARE IS PROVIDED BY THE AUTHOR ``AS IS'' AND ANY EXPRESS OR IMPLIED WARRANTIES, INCLUDING, BUT NOT LIMITED TO, THE IMPLIED WARRANTIES OF MERCHANTABILITY AND FITNESS FOR A PARTICULAR PURPOSE ARE DISCLAIMED. IN NO EVENT SHALL THE AUTHOR BE LIABLE FOR ANY DIRECT, INDIRECT, INCIDENTAL, SPECIAL, EXEMPLARY, OR CONSEQUENTIAL DAMAGES (INCLUDING, BUT NOT LIMITED TO, PROCUREMENT OF SUBSTITUTE GOODS OR SERVICES; LOSS OF USE, DATA, OR PROFITS; OR BUSINESS INTERRUPTION) HOWEVER CAUSED AND ON ANY THEORY OF LIABILITY, WHETHER IN CONTRACT, STRICT LIABILITY, OR TORT (INCLUDING NEGLIGENCE OR OTHERWISE) ARISING IN ANY WAY OUT OF THE USE OF THIS SOFTWARE, EVEN IF ADVISED OF THE POSSIBILITY OF SUCH DAMAGE.
Except where otherwise noted in the source code (e.g. the files hash.c, list.c and the trio files, which are covered by a similar licence but with different Copyright notices) all the files are:
Copyright (C) 1998-2012 Daniel Veillard. All Rights Reserved.
Permission is hereby granted, free of charge, to any person obtaining a copy of this software and associated documentation files (the "Software"), to deal in the Software without restriction, including without limitation the rights to use, copy, modify, merge, publish, distribute, sublicense, and/or sell copies of the Software, and to permit persons to whom the Software is furnished to do so, subject to the following conditions:
The above copyright notice and this permission notice shall be included in all copies or substantial portions of the Software.
THE SOFTWARE IS PROVIDED "AS IS", WITHOUT WARRANTY OF ANY KIND, EXPRESS OR IMPLIED, INCLUDING BUT NOT LIMITED TO THE WARRANTIES OF MERCHANTABILITY, FITNESS FOR A PARTICULAR PURPOSE AND NONINFRINGEMENT. IN NO EVENT SHALL THE DANIEL VEILLARD BE LIABLE FOR ANY CLAIM, DAMAGES OR OTHER LIABILITY, WHETHER IN AN ACTION OF CONTRACT, TORT OR OTHERWISE, ARISING FROM, OUT OF OR IN CONNECTION WITH THE SOFTWARE OR THE USE OR OTHER DEALINGS IN THE SOFTWARE.
Except as contained in this notice, the name of Daniel Veillard shall not be used in advertising or otherwise to promote the sale, use or other dealings in this Software without prior written authorization from him.
The file hash.c is:
Copyright (C) 2000,2012 Bjorn Reese and Daniel Veillard.
The file list.c is:
Copyright (C) 2000 Gary Pennington and Daniel Veillard
The trio files are:
Copyright (C) 1998 Bjorn Reese and Daniel Stenberg.
The license for hash.c, list.c, and the trio files is:
Permission to use, copy, modify, and distribute this software for any purpose with or without fee is hereby granted, provided that the above copyright notice and this permission notice appear in all copies.
THIS SOFTWARE IS PROVIDED ``AS IS'' AND WITHOUT ANY EXPRESS OR IMPLIED WARRANTIES, INCLUDING, WITHOUT LIMITATION, THE IMPLIED WARRANTIES OF MERCHANTABILITY AND FITNESS FOR A PARTICULAR PURPOSE. THE AUTHORS AND CONTRIBUTORS ACCEPT NO RESPONSIBILITY IN ANY CONCEIVABLE MANNER.
The gSOAP public license is derived from the Mozilla Public License (MPL1.1). The sections that were deleted from the original MPL1.1 text are 1.0.1, 2.1.(c),(d), 2.2.(c),(d), 8.2.(b), 10, and 11. Section 3.8 was added. The modified sections are 2.1.(b), 2.2.(b), 3.2 (simplified), 3.5 (deleted the last sentence), and 3.6 (simplified).
1 DEFINITIONS
1.1. "Contributor" means each entity that creates or contributes to the creation of Modifications.
1.2. "Contributor Version" means the combination of the Original Code, prior Modifications used by a Contributor, and the Modifications made by that particular Contributor.
1.3. "Covered Code" means the Original Code, or Modifications or the combination of the Original Code, and Modifications, in each case including portions thereof.
1.4. "Electronic Distribution Mechanism" means a mechanism generally accepted in the software development community for the electronic transfer of data.
1.5. "Executable" means Covered Code in any form other than Source Code.
1.6. "Initial Developer" means the individual or entity identified as the Initial Developer in the Source Code notice required by Exhibit A.
1.7. "Larger Work" means a work which combines Covered Code or portions thereof with code not governed by the terms of this License.
1.8. "License" means this document.
1.8.1. "Licensable" means having the right to grant, to the maximum extent possible, whether at the time of the initial grant or subsequently acquired, any and all of the rights conveyed herein.
1.9. "Modifications" means any addition to or deletion from the substance or structure of either the Original Code or any previous Modifications. When Covered Code is released as a series of files, a Modification is:
A. Any addition to or deletion from the contents of a file containing Original Code or previous Modifications.
B. Any new file that contains any part of the Original Code, or previous Modifications.
1.10. "Original Code" means Source Code of computer software code which is described in the Source Code notice required by Exhibit A as Original Code, and which, at the time of its release under this License is not already Covered Code governed by this License.
1.10.1. "Patent Claims" means any patent claim(s), now owned or hereafter acquired, including without limitation, method, process, and apparatus claims, in any patent Licensable by grantor.
1.11. "Source Code" means the preferred form of the Covered Code for making modifications to it, including all modules it contains, plus any associated interface definition files, scripts used to control compilation and installation of an Executable, or source code differential comparisons against either the Original Code or another well known, available Covered Code of the Contributor's choice. The Source Code can be in a compressed or archival form, provided the appropriate decompression or de-archiving software is widely available for no charge.
1.12. "You" (or "Your") means an individual or a legal entity exercising rights under, and complying with all of the terms of, this License or a future version of this License issued under Section 6.1. For legal entities, "You" includes any entity which controls, is controlled by, or is under common control with You. For purposes of this definition, "control" means (a) the power, direct or indirect, to cause the direction or management of such entity, whether by contract or otherwise, or (b) ownership of more than fifty percent (50%) of the outstanding shares or beneficial ownership of such entity.
2 SOURCE CODE LICENSE.
2.1. The Initial Developer Grant.
The Initial Developer hereby grants You a world-wide, royalty-free, non-exclusive license, subject to third party intellectual property claims:
(a) under intellectual property rights (other than patent or trademark) Licensable by Initial Developer to use, reproduce, modify, display, perform, sublicense and distribute the Original Code (or portions thereof) with or without Modifications, and/or as part of a Larger Work; and
(b) under patents now or hereafter owned or controlled by Initial Developer, to make, have made, use and sell ("offer to sell and import") the Original Code, Modifications, or portions thereof, but solely to the extent that any such patent is reasonably necessary to enable You to utilize, alone or in combination with other software, the Original Code, Modifications, or any combination or portions thereof.
(c)
(d)
2.2. Contributor Grant.
Subject to third party intellectual property claims, each Contributor hereby grants You a world-wide, royalty-free, non-exclusive license
(a) under intellectual property rights (other than patent or trademark) Licensable by Contributor, to use, reproduce, modify, display, perform, sublicense and distribute the Modifications created by such Contributor (or portions thereof) either on an unmodified basis, with other Modifications, as Covered Code and/or as part of a Larger Work; and
(b) under patents now or hereafter owned or controlled by Contributor, to make, have made, use and sell ("offer to sell and import") the Contributor Version (or portions thereof), but solely to the extent that any such patent is reasonably necessary to enable You to utilize, alone or in combination with other software, the Contributor Version (or portions thereof).
(c)
(d)
3 DISTRIBUTION OBLIGATIONS.
3.1. Application of License.
The Modifications which You create or to which You contribute are governed by the terms of this License, including without limitation Section 2.2. The Source Code version of Covered Code may be distributed only under the terms of this License or a future version of this License released under Section 6.1, and You must include a copy of this License with every copy of the Source Code You distribute. You may not offer or impose any terms on any Source Code version that alters or restricts the applicable version of this License or the recipients' rights hereunder. However, You may include an additional document offering the additional rights described in Section 3.5.
3.2. Availability of Source Code.
Any Modification created by You will be provided to the Initial Developer in Source Code form and are subject to the terms of the License. 3.3. Description of Modifications.
You must cause all Covered Code to which You contribute to contain a file documenting the changes You made to create that Covered Code and the date of any change. You must include a prominent statement that the Modification is derived, directly or indirectly, from Original Code provided by the Initial Developer and including the name of the Initial Developer in (a) the Source Code, and (b) in any notice in an Executable version or related documentation in which You describe the origin or ownership of the Covered Code.
3.4. Intellectual Property Matters.
(a) Third Party Claims. If Contributor has knowledge that a license under a third party's intellectual property rights is required to exercise the rights granted by such Contributor under Sections 2.1 or 2.2, Contributor must include a text file with the Source Code distribution titled "LEGAL" which describes the claim and the party making the claim in sufficient detail that a recipient will know whom to contact. If Contributor obtains such knowledge after the Modification is made available as described in Section 3.2, Contributor shall promptly modify the LEGAL file in all copies Contributor makes available thereafter and shall take other steps (such as notifying appropriate mailing lists or newsgroups) reasonably calculated to inform those who received the Covered Code that new knowledge has been obtained.
(b) Contributor APIs. If Contributor's Modifications include an application programming interface and Contributor has knowledge of patent licenses which are reasonably necessary to implement that API, Contributor must also include this information in the LEGAL file.
(c) Representations. Contributor represents that, except as disclosed pursuant to Section 3.4(a) above, Contributor believes that Contributor's Modifications are Contributor's original creation(s) and/or Contributor has sufficient rights to grant the rights conveyed by this License.
3.5. Required Notices. You must duplicate the notice in Exhibit A in each file of the Source Code. If it is not possible to put such notice in a particular Source Code file due to its structure, then You must include such notice in a location (such as a relevant directory) where a user would be likely to look for such a notice. If You created one or more Modification(s) You may add your name as a Contributor to the notice described in Exhibit A. You must also duplicate this License in any documentation for the Source Code where You describe recipients' rights or ownership rights relating to Covered Code. You may choose to offer, and to charge a fee for, warranty, support, indemnity or liability obligations to one or more recipients of Covered Code. However, You may do so only on Your own behalf, and not on behalf of the Initial Developer or any Contributor.
3.6. Distribution of Executable Versions. You may distribute Covered Code in Executable form only if the requirements of Section 3.1-3.5 have been met for that Covered Code. You may distribute the Executable version of Covered Code or ownership rights under a license of Your choice, which may contain terms different from this License, provided that You are in compliance with the terms of this License and that the license for the Executable version does not attempt to limit or alter the recipient's rights in the Source Code version from the rights set forth in this License. If You distribute the Executable version under a different license You must make it absolutely clear that any terms which differ from this License are offered by You alone, not by the Initial Developer or any Contributor. If you distribute executable versions containing Covered Code as part of a product, you must reproduce the notice in Exhibit B in the documentation and/or other materials provided with the product.
3.7. Larger Works. You may create a Larger Work by combining Covered Code with other code not governed by the terms of this License and distribute the Larger Work as a single product. In such a case, You must make sure the requirements of this License are fulfilled for the Covered Code.
3.8. Restrictions. You may not remove any product identification, copyright, proprietary notices or labels from gSOAP.
4 INABILITY TO COMPLY DUE TO STATUTE OR REGULATION.
If it is impossible for You to comply with any of the terms of this License with respect to some or all of the Covered Code due to statute, judicial order, or regulation then You must: (a) comply with the terms of this License to the maximum extent possible; and (b) describe the limitations and the code they affect. Such description must be included in the LEGAL file described in Section 3.4 and must be included with all distributions of the Source Code. Except to the extent prohibited by statute or regulation, such description must be sufficiently detailed for a recipient of ordinary skill to be able to understand it.
5 APPLICATION OF THIS LICENSE.
This License applies to code to which the Initial Developer has attached the notice in Exhibit A and to related Covered Code.
6 VERSIONS OF THE LICENSE.
6.1. New Versions.
Grantor may publish revised and/or new versions of the License from time to time. Each version will be given a distinguishing version number.
6.2. Effect of New Versions.
Once Covered Code has been published under a particular version of the License, You may always continue to use it under the terms of that version. You may also choose to use such Covered Code under the terms of any subsequent version of the License.
6.3. Derivative Works.
If You create or use a modified version of this License (which you may only do in order to apply it to code which is not already Covered Code governed by this License), You must (a) rename Your license so that the phrase "gSOAP" or any confusingly similar phrase do not appear in your license (except to note that your license differs from this License) and (b) otherwise make it clear that Your version of the license contains terms which differ from the gSOAP Public License. (Filling in the name of the Initial Developer, Original Code or Contributor in the notice described in Exhibit A shall not of themselves be deemed to be modifications of this License.)
7 DISCLAIMER OF WARRANTY.
COVERED CODE IS PROVIDED UNDER THIS LICENSE ON AN "AS IS" BASIS, WITHOUT WARRANTY OF ANY KIND, WHETHER EXPRESS, IMPLIED OR STATUTORY, INCLUDING, WITHOUT LIMITATION, THE IMPLIED WARRANTIES OF MERCHANTABILITY, OF FITNESS FOR A PARTICULAR PURPOSE, NONINFRINGEMENT OF THIRD PARTY INTELLECTUAL PROPERTY RIGHTS, AND ANY WARRANTY THAT MAY ARISE BY REASON OF TRADE USAGE, CUSTOM, OR COURSE OF DEALING. WITHOUT LIMITING THE FOREGOING, YOU ACKNOWLEDGE THAT THE SOFTWARE IS PROVIDED "AS IS" AND THAT THE AUTHORS DO NOT WARRANT THE SOFTWARE WILL RUN UNINTERRUPTED OR ERROR FREE. LIMITED LIABILITY THE ENTIRE RISK AS TO RESULTS AND PERFORMANCE OF THE SOFTWARE IS ASSUMED BY YOU. UNDER NO CIRCUMSTANCES WILL THE AUTHORS BE LIABLE FOR ANY SPECIAL, INDIRECT, INCIDENTAL, EXEMPLARY OR CONSEQUENTIAL DAMAGES OF ANY KIND OR NATURE WHATSOEVER, WHETHER BASED ON CONTRACT, WARRANTY, TORT (INCLUDING NEGLIGENCE), STRICT LIABILITY OR OTHERWISE, ARISING OUT OF OR IN ANY WAY RELATED TO THE SOFTWARE, EVEN IF THE AUTHORS HAVE BEEN ADVISED ON THE POSSIBILITY OF SUCH DAMAGE OR IF SUCH DAMAGE COULD HAVE BEEN REASONABLY FORESEEN, AND NOTWITHSTANDING ANY FAILURE OF ESSENTIAL PURPOSE OF ANY EXCLUSIVE REMEDY PROVIDED. SUCH LIMITATION ON DAMAGES INCLUDES, BUT IS NOT LIMITED TO, DAMAGES FOR LOSS OF GOODWILL, LOST PROFITS, LOSS OF DATA OR SOFTWARE, WORK STOPPAGE, COMPUTER FAILURE OR MALFUNCTION OR IMPAIRMENT OF OTHER GOODS. IN NO EVENT WILL THE AUTHORS BE LIABLE FOR THE COSTS OF PROCUREMENT OF SUBSTITUTE SOFTWARE OR SERVICES. YOU ACKNOWLEDGE THAT THIS SOFTWARE IS NOT DESIGNED FOR USE IN ON-LINE EQUIPMENT IN HAZARDOUS ENVIRONMENTS SUCH AS OPERATION OF NUCLEAR FACILITIES, AIRCRAFT NAVIGATION OR CONTROL, OR LIFE-CRITICAL APPLICATIONS. THE AUTHORS EXPRESSLY DISCLAIM ANY LIABILITY RESULTING FROM USE OF THE SOFTWARE IN ANY SUCH ON-LINE EQUIPMENT IN HAZARDOUS ENVIRONMENTS AND ACCEPTS NO LIABILITY IN RESPECT OF ANY ACTIONS OR CLAIMS BASED ON THE USE OF THE SOFTWARE IN ANY SUCH ON-LINE EQUIPMENT IN HAZARDOUS ENVIRONMENTS BY YOU. FOR PURPOSES OF THIS PARAGRAPH, THE TERM "LIFE-CRITICAL APPLICATION" MEANS AN APPLICATION IN WHICH THE FUNCTIONING OR MALFUNCTIONING OF THE SOFTWARE MAY RESULT DIRECTLY OR INDIRECTLY IN PHYSICAL INJURY OR LOSS OF HUMAN LIFE. THIS DISCLAIMER OF WARRANTY CONSTITUTES AN ESSENTIAL PART OF THIS LICENSE. NO USE OF ANY COVERED CODE IS AUTHORIZED HEREUNDER EXCEPT UNDER THIS DISCLAIMER.
8 TERMINATION.
8.1.
This License and the rights granted hereunder will terminate automatically if You fail to comply with terms herein and fail to cure such breach within 30 days of becoming aware of the breach. All sublicenses to the Covered Code which are properly granted shall survive any termination of this License. Provisions which, by their nature, must remain in effect beyond the termination of this License shall survive.
8.2.
8.3.
If You assert a patent infringement claim against Participant alleging that such Participant's Contributor Version directly or indirectly infringes any patent where such claim is resolved (such as by license or settlement) prior to the initiation of patent infringement litigation, then the reasonable value of the licenses granted by such Participant under Sections 2.1 or 2.2 shall be taken into account in determining the amount or value of any payment or license.
8.4. In the event of termination under Sections 8.1 or 8.2 above, all end user license agreements (excluding distributors and resellers) which have been validly granted by You or any distributor hereunder prior to termination shall survive termination.
9 LIMITATION OF LIABILITY.
UNDER NO CIRCUMSTANCES AND UNDER NO LEGAL THEORY, WHETHER TORT (INCLUDING NEGLIGENCE), CONTRACT, OR OTHERWISE, SHALL YOU, THE INITIAL DEVELOPER, ANY OTHER CONTRIBUTOR, OR ANY DISTRIBUTOR OF COVERED CODE, OR ANY SUPPLIER OF ANY OF SUCH PARTIES, BE LIABLE TO ANY PERSON FOR ANY INDIRECT, SPECIAL, INCIDENTAL, OR CONSEQUENTIAL DAMAGES OF ANY CHARACTER INCLUDING, WITHOUT LIMITATION, DAMAGES FOR LOSS OF GOODWILL, WORK STOPPAGE, COMPUTER FAILURE OR MALFUNCTION, OR ANY AND ALL OTHER COMMERCIAL DAMAGES OR LOSSES, EVEN IF SUCH PARTY SHALL HAVE BEEN INFORMED OF THE POSSIBILITY OF SUCH DAMAGES. THIS LIMITATION OF LIABILITY SHALL NOT APPLY TO LIABILITY FOR DEATH OR PERSONAL INJURY RESULTING FROM SUCH PARTY'S NEGLIGENCE TO THE EXTENT APPLICABLE LAW PROHIBITS SUCH LIMITATION. SOME JURISDICTIONS DO NOT ALLOW THE EXCLUSION OR LIMITATION OF INCIDENTAL OR CONSEQUENTIAL DAMAGES, SO THIS EXCLUSION AND LIMITATION MAY NOT APPLY TO YOU.
10 U.S. GOVERNMENT END USERS.
11 MISCELLANEOUS.
12 RESPONSIBILITY FOR CLAIMS.
As between Initial Developer and the Contributors, each party is responsible for claims and damages arising, directly or indirectly, out of its utilization of rights under this License and You agree to work with Initial Developer and Contributors to distribute such responsibility on an equitable basis. Nothing herein is intended or shall be deemed to constitute any admission of liability.
EXHIBIT A.
"The contents of this file are subject to the gSOAP Public License Version 1.3 (the "License"); you may not use this file except in compliance with the License. You may obtain a copy of the License at http://www.cs.fsu.edu/~engelen/soaplicense.html. Software distributed under the License is distributed on an "AS IS" basis, WITHOUT WARRANTY OF ANY KIND, either express or implied. See the License for the specific language governing rights and limitations under the License.
The Original Code of the gSOAP Software is: stdsoap.h, stdsoap2.h, stdsoap.c, stdsoap2.c, stdsoap.cpp, stdsoap2.cpp, soapcpp2.h, soapcpp2.c, soapcpp2_lex.l, soapcpp2_yacc.y, error2.h, error2.c, symbol2.c, init2.c, soapdoc2.html, and soapdoc2.pdf, httpget.h, httpget.c, stl.h, stldeque.h, stllist.h, stlvector.h, stlset.h.
The Initial Developer of the Original Code is Robert A. van Engelen. Portions created by Robert A. van Engelen are Copyright (C) 2001-2004 Robert A. van Engelen, Genivia inc. All Rights Reserved.
Contributor(s): "________________________." [Note: The text of this Exhibit A may differ slightly form the text of the notices in the Source Code files of the Original code. You should use the text of this Exhibit A rather than the text found in the Original Code Source Code for Your Modifications.]
EXHIBIT B.
"Part of the software embedded in this product is gSOAP software. Portions created by gSOAP are Copyright (C) 2001-2004 Robert A. van Engelen, Genivia inc. All Rights Reserved. THE SOFTWARE IN THIS PRODUCT WAS IN PART PROVIDED BY GENIVIA INC AND ANY EXPRESS OR IMPLIED WARRANTIES, INCLUDING, BUT NOT LIMITED TO, THE IMPLIED WARRANTIES OF MERCHANTABILITY AND FITNESS FOR A PARTICULAR PURPOSE ARE DISCLAIMED. IN NO EVENT SHALL THE AUTHOR BE LIABLE FOR ANY DIRECT, INDIRECT, INCIDENTAL, SPECIAL, EXEMPLARY, OR CONSEQUENTIAL DAMAGES (INCLUDING, BUT NOT LIMITED TO, PROCUREMENT OF SUBSTITUTE GOODS OR SERVICES; LOSS OF USE, DATA, OR PROFITS; OR BUSINESS INTERRUPTION) HOWEVER CAUSED AND ON ANY THEORY OF LIABILITY, WHETHER IN CONTRACT, STRICT LIABILITY, OR TORT (INCLUDING NEGLIGENCE OR OTHERWISE) ARISING IN ANY WAY OUT OF THE USE OF THIS SOFTWARE, EVEN IF ADVISED OF THE POSSIBILITY OF SUCH DAMAGE."
COPYRIGHT AND PERMISSION NOTICE
Copyright (c) 1996 - 2009, Daniel Stenberg, daniel@haxx.se.
All rights reserved.
Permission to use, copy, modify, and distribute this software for any purpose with or without fee is hereby granted, provided that the above copyright notice and this permission notice appear in all copies.
THE SOFTWARE IS PROVIDED "AS IS", WITHOUT WARRANTY OF ANY KIND, EXPRESS OR IMPLIED, INCLUDING BUT NOT LIMITED TO THE WARRANTIES OF MERCHANTABILITY, FITNESS FOR A PARTICULAR PURPOSE AND NONINFRINGEMENT OF THIRD PARTY RIGHTS. IN NO EVENT SHALL THE AUTHORS OR COPYRIGHT HOLDERS BE LIABLE FOR ANY CLAIM, DAMAGES OR OTHER LIABILITY, WHETHER IN AN ACTION OF CONTRACT, TORT OR OTHERWISE, ARISING FROM, OUT OF OR IN CONNECTION WITH THE SOFTWARE OR THE USE OR OTHER DEALINGS IN THE SOFTWARE.
Except as contained in this notice, the name of a copyright holder shall not be used in advertising or otherwise to promote the sale, use or other dealings in this Software without prior written authorization of the copyright holder.
Credits and license terms:
In order to resolve any possible confusion regarding the authorship of gd, the following copyright statement covers all of the authors who have required such a statement. If you are aware of any oversights in this copyright notice, please contact Pierre-A. Joye who will be pleased to correct them.
Portions copyright 1994, 1995, 1996, 1997, 1998, 1999, 2000, 2001, 2002, 2003, 2004 by Cold Spring Harbor Laboratory. Funded under Grant P41-RR02188 by the National Institutes of Health.
Portions copyright 1996, 1997, 1998, 1999, 2000, 2001, 2002, 2003, 2004 by Boutell.Com, Inc.
Portions relating to GD2 format copyright 1999, 2000, 2001, 2002, 2003, 2004 Philip Warner.
Portions relating to PNG copyright 1999, 2000, 2001, 2002, 2003, 2004 Greg Roelofs.
Portions relating to gdttf.c copyright 1999, 2000, 2001, 2002, 2003, 2004 John Ellson (ellson@graphviz.org).
Portions relating to gdft.c copyright 2001, 2002, 2003, 2004 John Ellson (ellson@graphviz.org).
Portions copyright 2000, 2001, 2002, 2003, 2004, 2005, 2006, 2007, 2008 Pierre-Alain Joye (pierre@libgd.org).
Portions relating to JPEG and to color quantization copyright 2000, 2001, 2002, 2003, 2004, Doug Becker and copyright (C) 1994, 1995, 1996, 1997, 1998, 1999, 2000, 2001, 2002, 2003, 2004 Thomas G. Lane. This software is based in part on the work of the Independent JPEG Group. See the file README-JPEG.TXT for more information.
Portions relating to GIF compression copyright 1989 by Jef Poskanzer and David Rowley, with modifications for thread safety by Thomas Boutell.
Portions relating to GIF decompression copyright 1990, 1991, 1993 by David Koblas, with modifications for thread safety by Thomas Boutell.
Portions relating to WBMP copyright 2000, 2001, 2002, 2003, 2004 Maurice Szmurlo and Johan Van den Brande.
Portions relating to GIF animations copyright 2004 Jaakko Hyvätti (jaakko.hyvatti@iki.fi)
Permission has been granted to copy, distribute and modify gd in any context without fee, including a commercial application, provided that this notice is present in user-accessible supporting documentation.
This does not affect your ownership of the derived work itself, and the intent is to assure proper credit for the authors of gd, not to interfere with your productive use of gd. If you have questions, ask. "Derived works" includes all programs that utilize the library. Credit must be given in user-accessible documentation.
This software is provided "AS IS." The copyright holders disclaim all warranties, either express or implied, including but not limited to implied warranties of merchantability and fitness for a particular purpose, with respect to this code and accompanying documentation.
Although their code does not appear in gd, the authors wish to thank David Koblas, David Rowley, and Hutchison Avenue Software Corporation for their prior contributions.
All rights reserved.
Redistribution and use in source and binary forms, with or without modification, are permitted provided that the following conditions are met:
Redistributions of source code must retain the above copyright notice, this list of conditions and the following disclaimer.
Redistributions in binary form must reproduce the above copyright notice, this list of conditions and the following disclaimer in the documentation and/or other materials provided with the distribution.
Neither the name of the Intel Corporation nor the names of its contributors may be used to endorse or promote products derived from this software without specific prior written permission.
THIS SOFTWARE IS PROVIDED BY THE COPYRIGHT HOLDERS AND CONTRIBUTORS "AS IS" AND ANY EXPRESS OR IMPLIED WARRANTIES, INCLUDING, BUT NOT LIMITED TO, THE IMPLIED WARRANTIES OF MERCHANTABILITY AND FITNESS FOR A PARTICULAR PURPOSE ARE DISCLAIMED. IN NO EVENT SHALL THE COPYRIGHT OWNER OR CONTRIBUTORS BE LIABLE FOR ANY DIRECT, INDIRECT, INCIDENTAL, SPECIAL, EXEMPLARY, OR CONSEQUENTIAL DAMAGES (INCLUDING, BUT NOT LIMITED TO, PROCUREMENT OF SUBSTITUTE GOODS OR SERVICES; LOSS OF USE, DATA, OR PROFITS; OR BUSINESS INTERRUPTION) HOWEVER CAUSED AND ON ANY THEORY OF LIABILITY, WHETHER IN CONTRACT, STRICT LIABILITY, OR TORT (INCLUDING NEGLIGENCE OR OTHERWISE) ARISING IN ANY WAY OUT OF THE USE OF THIS SOFTWARE, EVEN IF ADVISED OF THE POSSIBILITY OF SUCH DAMAGE.
The authors make NO WARRANTY or representation, either express or implied, with respect to this software, its quality, accuracy, merchantability, or fitness for a particular purpose. This software is provided "AS IS", and you, its user, assume the entire risk as to its quality and accuracy.
This software is copyright (C) 1991-2021, Thomas G. Lane, Guido Vollbeding. All Rights Reserved except as specified below.
Permission is hereby granted to use, copy, modify, and distribute this software (or portions thereof) for any purpose, without fee, subject to these conditions:
(1) If any part of the source code for this software is distributed, then this README file must be included, with this copyright and no-warranty notice unaltered; and any additions, deletions, or changes to the original files must be clearly indicated in accompanying documentation.
(2) If only executable code is distributed, then the accompanying documentation must state that "this software is based in part on the work of the Independent JPEG Group".
(3) Permission for use of this software is granted only if the user accepts full responsibility for any undesirable consequences; the authors accept NO LIABILITY for damages of any kind.
These conditions apply to any software derived from or based on the IJG code, not just to the unmodified library. If you use our work, you ought to acknowledge us.
Permission is NOT granted for the use of any IJG author's name or company name in advertising or publicity relating to this software or products derived from it. This software may be referred to only as "the Independent JPEG Group's software".
We specifically permit and encourage the use of this software as the basis of commercial products, provided that all warranty or liability claims are assumed by the product vendor.
Copyright (C)2009-2022 D. R. Commander. All Rights Reserved. Copyright (C)2015 Viktor Szathmáry. All Rights Reserved.
Redistribution and use in source and binary forms, with or without modification, are permitted provided that the following conditions are met:
Redistributions of source code must retain the above copyright notice, this list of conditions and the following disclaimer.
Redistributions in binary form must reproduce the above copyright notice, this list of conditions and the following disclaimer in the documentation and/or other materials provided with the distribution.
Neither the name of the libjpeg-turbo Project nor the names of its contributors may be used to endorse or promote products derived from this software without specific prior written permission.
THIS SOFTWARE IS PROVIDED BY THE COPYRIGHT HOLDERS AND CONTRIBUTORS "AS IS", AND ANY EXPRESS OR IMPLIED WARRANTIES, INCLUDING, BUT NOT LIMITED TO, THE IMPLIED WARRANTIES OF MERCHANTABILITY AND FITNESS FOR A PARTICULAR PURPOSE ARE DISCLAIMED. IN NO EVENT SHALL THE COPYRIGHT HOLDERS OR CONTRIBUTORS BE LIABLE FOR ANY DIRECT, INDIRECT, INCIDENTAL, SPECIAL, EXEMPLARY, OR CONSEQUENTIAL DAMAGES (INCLUDING, BUT NOT LIMITED TO, PROCUREMENT OF SUBSTITUTE GOODS OR SERVICES; LOSS OF USE, DATA, OR PROFITS; OR BUSINESS INTERRUPTION) HOWEVER CAUSED AND ON ANY THEORY OF LIABILITY, WHETHER IN CONTRACT, STRICT LIABILITY, OR TORT (INCLUDING NEGLIGENCE OR OTHERWISE) ARISING IN ANY WAY OUT OF THE USE OF THIS SOFTWARE, EVEN IF ADVISED OF THE POSSIBILITY OF SUCH DAMAGE.
The compilation of software known as FreeBSD is distributed under the following terms:
Copyright 1992-2022 The FreeBSD Project.
Redistribution and use in source and binary forms, with or without modification, are permitted provided that the following conditions are met:
Redistributions of source code must retain the above copyright notice, this list of conditions and the following disclaimer.
Redistributions in binary form must reproduce the above copyright notice, this list of conditions and the following disclaimer in the documentation and/or other materials provided with the distribution.
THIS SOFTWARE IS PROVIDED BY THE AUTHOR AND CONTRIBUTORS ``AS IS'' AND ANY EXPRESS OR IMPLIED WARRANTIES, INCLUDING, BUT NOT LIMITED TO, THE IMPLIED WARRANTIES OF MERCHANTABILITY AND FITNESS FOR A PARTICULAR PURPOSE ARE DISCLAIMED. IN NO EVENT SHALL THE AUTHOR OR CONTRIBUTORS BE LIABLE FOR ANY DIRECT, INDIRECT, INCIDENTAL, SPECIAL, EXEMPLARY, OR CONSEQUENTIAL DAMAGES (INCLUDING, BUT NOT LIMITED TO, PROCUREMENT OF SUBSTITUTE GOODS OR SERVICES; LOSS OF USE, DATA, OR PROFITS; OR BUSINESS INTERRUPTION) HOWEVER CAUSED AND ON ANY THEORY OF LIABILITY, WHETHER IN CONTRACT, STRICT LIABILITY, OR TORT (INCLUDING NEGLIGENCE OR OTHERWISE) ARISING IN ANY WAY OUT OF THE USE OF THIS SOFTWARE, EVEN IF ADVISED OF THE POSSIBILITY OF SUCH DAMAGE.
The views and conclusions contained in the software and documentation are those of the authors and should not be interpreted as representing official policies, either expressed or implied, of the FreeBSD Project.
Copyright (c) 2008 The NetBSD Foundation, Inc.
This code is derived from software contributed to The NetBSD Foundation by
Redistribution and use in source and binary forms, with or without modification, are permitted provided that the following conditions are met:
Redistributions of source code must retain the above copyright notice, this list of conditions and the following disclaimer.
Redistributions in binary form must reproduce the above copyright notice, this list of conditions and the following disclaimer in the documentation and/or other materials provided with the distribution.
THIS SOFTWARE IS PROVIDED BY THE NETBSD FOUNDATION, INC. AND CONTRIBUTORS ``AS IS'' AND ANY EXPRESS OR IMPLIED WARRANTIES, INCLUDING, BUT NOT LIMITED TO, THE IMPLIED WARRANTIES OF MERCHANTABILITY AND FITNESS FOR A PARTICULAR PURPOSE ARE DISCLAIMED. IN NO EVENT SHALL THE FOUNDATION OR CONTRIBUTORS BE LIABLE FOR ANY DIRECT, INDIRECT, INCIDENTAL, SPECIAL, EXEMPLARY, OR CONSEQUENTIAL DAMAGES (INCLUDING, BUT NOT LIMITED TO, PROCUREMENT OF SUBSTITUTE GOODS OR SERVICES; LOSS OF USE, DATA, OR PROFITS; OR BUSINESS INTERRUPTION) HOWEVER CAUSED AND ON ANY THEORY OF LIABILITY, WHETHER IN CONTRACT, STRICT LIABILITY, OR TORT (INCLUDING NEGLIGENCE OR OTHERWISE) ARISING IN ANY WAY OUT OF THE USE OF THIS SOFTWARE, EVEN IF ADVISED OF THE POSSIBILITY OF SUCH DAMAGE.
Copyright (c) 2010, The WebM Project authors. All rights reserved.
Redistribution and use in source and binary forms, with or without modification, are permitted provided that the following conditions are met:
Redistributions of source code must retain the above copyright notice, this list of conditions and the following disclaimer.
Redistributions in binary form must reproduce the above copyright notice, this list of conditions and the following disclaimer in the documentation and/or other materials provided with the distribution.
Neither the name of Google, nor the WebM Project, nor the names of its contributors may be used to endorse or promote products derived from this software without specific prior written permission.
THIS SOFTWARE IS PROVIDED BY THE COPYRIGHT HOLDERS AND CONTRIBUTORS "AS IS" AND ANY EXPRESS OR IMPLIED WARRANTIES, INCLUDING, BUT NOT LIMITED TO, THE IMPLIED WARRANTIES OF MERCHANTABILITY AND FITNESS FOR A PARTICULAR PURPOSE ARE DISCLAIMED. IN NO EVENT SHALL THE COPYRIGHT HOLDER OR CONTRIBUTORS BE LIABLE FOR ANY DIRECT, INDIRECT, INCIDENTAL, SPECIAL, EXEMPLARY, OR CONSEQUENTIAL DAMAGES (INCLUDING, BUT NOT LIMITED TO, PROCUREMENT OF SUBSTITUTE GOODS OR SERVICES; LOSS OF USE, DATA, OR PROFITS; OR BUSINESS INTERRUPTION) HOWEVER CAUSED AND ON ANY THEORY OF LIABILITY, WHETHER IN CONTRACT, STRICT LIABILITY, OR TORT (INCLUDING NEGLIGENCE OR OTHERWISE) ARISING IN ANY WAY OUT OF THE USE OF THIS SOFTWARE, EVEN IF ADVISED OF THE POSSIBILITY OF SUCH DAMAGE.
Copyright (c) 2002-2020 Xiph.org Foundation
Redistribution and use in source and binary forms, with or without modification, are permitted provided that the following conditions are met:
Redistributions of source code must retain the above copyright notice, this list of conditions and the following disclaimer.
Redistributions in binary form must reproduce the above copyright notice, this list of conditions and the following disclaimer in the documentation and/or other materials provided with the distribution.
Neither the name of the Xiph.org Foundation nor the names of its contributors may be used to endorse or promote products derived from this software without specific prior written permission.
THIS SOFTWARE IS PROVIDED BY THE COPYRIGHT HOLDERS AND CONTRIBUTORS ``AS IS'' AND ANY EXPRESS OR IMPLIED WARRANTIES, INCLUDING, BUT NOT LIMITED TO, THE IMPLIED WARRANTIES OF MERCHANTABILITY AND FITNESS FOR A PARTICULAR PURPOSE ARE DISCLAIMED. IN NO EVENT SHALL THE FOUNDATION OR CONTRIBUTORS BE LIABLE FOR ANY DIRECT, INDIRECT, INCIDENTAL, SPECIAL, EXEMPLARY, OR CONSEQUENTIAL DAMAGES (INCLUDING, BUT NOT LIMITED TO, PROCUREMENT OF SUBSTITUTE GOODS OR SERVICES; LOSS OF USE, DATA, OR PROFITS; OR BUSINESS INTERRUPTION) HOWEVER CAUSED AND ON ANY THEORY OF LIABILITY, WHETHER IN CONTRACT, STRICT LIABILITY, OR TORT (INCLUDING NEGLIGENCE OR OTHERWISE) ARISING IN ANY WAY OUT OF THE USE OF THIS SOFTWARE, EVEN IF ADVISED OF THE POSSIBILITY OF SUCH DAMAGE.
Copyright (c) 1996 - 2022, Daniel Stenberg, <daniel@haxx.se>, and many contributors, see the THANKS file.
All rights reserved.
Permission to use, copy, modify, and distribute this software for any purpose with or without fee is hereby granted, provided that the above copyright notice and this permission notice appear in all copies.
THE SOFTWARE IS PROVIDED "AS IS", WITHOUT WARRANTY OF ANY KIND, EXPRESS OR IMPLIED, INCLUDING BUT NOT LIMITED TO THE WARRANTIES OF MERCHANTABILITY, FITNESS FOR A PARTICULAR PURPOSE AND NONINFRINGEMENT OF THIRD PARTY RIGHTS. IN NO EVENT SHALL THE AUTHORS OR COPYRIGHT HOLDERS BE LIABLE FOR ANY CLAIM, DAMAGES OR OTHER LIABILITY, WHETHER IN AN ACTION OF CONTRACT, TORT OR OTHERWISE, ARISING FROM, OUT OF OR IN CONNECTION WITH THE SOFTWARE OR THE USE OR OTHER DEALINGS IN THE SOFTWARE.
Except as contained in this notice, the name of a copyright holder shall not be used in advertising or otherwise to promote the sale, use or other dealings in this Software without prior written authorization of the copyright holder.
Copyright 1992-2004 HaL Computer Systems, Inc., O'Reilly & Associates, Inc., ArborText, Inc., Fujitsu Software Corporation, Norman Walsh, Sun Microsystems, Inc., and the Organization for the Advancement of Structured Information Standards (OASIS).
See also http://docbook.org/specs/
$Id: user_ThirdParty.xml 155244 2023-01-17 14:15:46Z bird $
Permission to use, copy, modify and distribute the DocBook XML DTD and its accompanying documentation for any purpose and without fee is hereby granted in perpetuity, provided that the above copyright notice and this paragraph appear in all copies. The copyright holders make no representation about the suitability of the DTD for any purpose. It is provided "as is" without expressed or implied warranty.
If you modify the DocBook DTD in any way, except for declaring and referencing additional sets of general entities and declaring additional notations, label your DTD as a variant of DocBook. See the maintenance documentation for more information.
Please direct all questions, bug reports, or suggestions for changes to the docbook@lists.oasis-open.org mailing list. For more information, see http://www.oasis-open.org/docbook/.
Copyright (C) 1999, 2000, 2001, 2002 Norman Walsh
Permission is hereby granted, free of charge, to any person obtaining a copy of this software and associated documentation files (the ``Software''), to deal in the Software without restriction, including without limitation the rights to use, copy, modify, merge, publish, distribute, sublicense, and/or sell copies of the Software, and to permit persons to whom the Software is furnished to do so, subject to the following conditions:
The above copyright notice and this permission notice shall be included in all copies or substantial portions of the Software.
Except as contained in this notice, the names of individuals credited with contribution to this software shall not be used in advertising or otherwise to promote the sale, use or other dealings in this Software without prior written authorization from the individuals in question.
Any stylesheet derived from this Software that is publically distributed will be identified with a different name and the version strings in any derived Software will be changed so that no possibility of confusion between the derived package and this Software will exist.
THE SOFTWARE IS PROVIDED "AS IS", WITHOUT WARRANTY OF ANY KIND, EXPRESS OR IMPLIED, INCLUDING BUT NOT LIMITED TO THE WARRANTIES OF MERCHANTABILITY, FITNESS FOR A PARTICULAR PURPOSE AND NONINFRINGEMENT. IN NO EVENT SHALL NORMAN WALSH OR ANY OTHER CONTRIBUTOR BE LIABLE FOR ANY CLAIM, DAMAGES OR OTHER LIABILITY, WHETHER IN AN ACTION OF CONTRACT, TORT OR OTHERWISE, ARISING FROM, OUT OF OR IN CONNECTION WITH THE SOFTWARE OR THE USE OR OTHER DEALINGS IN THE SOFTWARE.
These stylesheets are maintained by Norman Walsh, <ndw@nwalsh.com>.
1. Copyright Notice
Some or all of this work - Copyright (c) 1999 - 2017, Intel Corp. All rights reserved.
2. License
2.1. This is your license from Intel Corp. under its intellectual property rights. You may have additional license terms from the party that provided you this software, covering your right to use that party's intellectual property rights.
2.2. Intel grants, free of charge, to any person ("Licensee") obtaining a copy of the source code appearing in this file ("Covered Code") an irrevocable, perpetual, worldwide license under Intel's copyrights in the base code distributed originally by Intel ("Original Intel Code") to copy, make derivatives, distribute, use and display any portion of the Covered Code in any form, with the right to sublicense such rights; and
2.3. Intel grants Licensee a non-exclusive and non-transferable patent license (with the right to sublicense), under only those claims of Intel patents that are infringed by the Original Intel Code, to make, use, sell, offer to sell, and import the Covered Code and derivative works thereof solely to the minimum extent necessary to exercise the above copyright license, and in no event shall the patent license extend to any additions to or modifications of the Original Intel Code. No other license or right is granted directly or by implication, estoppel or otherwise;
3. Conditions
3.1. Redistribution of Source with Rights to Further Distribute Source. Redistribution of source code of any substantial portion of the Covered Code or modification with rights to further distribute source must include the above Copyright Notice, the above License, this list of Conditions, and the following Disclaimer and Export Compliance provision. In addition, Licensee must cause all Covered Code to which Licensee contributes to contain a file documenting the changes Licensee made to create that Covered Code and the date of any change. Licensee must include in that file the documentation of any changes made by any predecessor Licensee. Licensee must include a prominent statement that the modification is derived, directly or indirectly, from Original Intel Code.
3.2. Redistribution of Source with no Rights to Further Distribute Source. Redistribution of source code of any substantial portion of the Covered Code or modification without rights to further distribute source must include the following Disclaimer and Export Compliance provision in the documentation and/or other materials provided with distribution. In addition, Licensee may not authorize further sublicense of source of any portion of the Covered Code, and must include terms to the effect that the license from Licensee to its licensee is limited to the intellectual property embodied in the software Licensee provides to its licensee, and not to intellectual property embodied in modifications its licensee may make.
3.3. Redistribution of Executable. Redistribution in executable form of any substantial portion of the Covered Code or modification must reproduce the above Copyright Notice, and the following Disclaimer and Export Compliance provision in the documentation and/or other materials provided with the distribution.
3.4. Intel retains all right, title, and interest in and to the Original Intel Code.
3.5. Neither the name Intel nor any other trademark owned or controlled by Intel shall be used in advertising or otherwise to promote the sale, use or other dealings in products derived from or relating to the Covered Code without prior written authorization from Intel.
4. Disclaimer and Export Compliance
4.1. INTEL MAKES NO WARRANTY OF ANY KIND REGARDING ANY SOFTWARE PROVIDED HERE. ANY SOFTWARE ORIGINATING FROM INTEL OR DERIVED FROM INTEL SOFTWARE IS PROVIDED "AS IS," AND INTEL WILL NOT PROVIDE ANY SUPPORT, ASSISTANCE, INSTALLATION, TRAINING OR OTHER SERVICES. INTEL WILL NOT PROVIDE ANY UPDATES, ENHANCEMENTS OR EXTENSIONS. INTEL SPECIFICALLY DISCLAIMS ANY IMPLIED WARRANTIES OF MERCHANTABILITY, NONINFRINGEMENT AND FITNESS FOR A PARTICULAR PURPOSE.
4.2. IN NO EVENT SHALL INTEL HAVE ANY LIABILITY TO LICENSEE, ITS LICENSEES OR ANY OTHER THIRD PARTY, FOR ANY LOST PROFITS, LOST DATA, LOSS OF USE OR COSTS OF PROCUREMENT OF SUBSTITUTE GOODS OR SERVICES, OR FOR ANY INDIRECT, SPECIAL OR CONSEQUENTIAL DAMAGES ARISING OUT OF THIS AGREEMENT, UNDER ANY CAUSE OF ACTION OR THEORY OF LIABILITY, AND IRRESPECTIVE OF WHETHER INTEL HAS ADVANCE NOTICE OF THE POSSIBILITY OF SUCH DAMAGES. THESE LIMITATIONS SHALL APPLY NOTWITHSTANDING THE FAILURE OF THE ESSENTIAL PURPOSE OF ANY LIMITED REMEDY.
4.3. Licensee shall not export, either directly or indirectly, any of this software or system incorporating such software without first obtaining any required license or other approval from the U. S. Department of Commerce or any other agency or department of the United States Government. In the event Licensee exports any such software from the United States or re-exports any such software from a foreign destination, Licensee shall ensure that the distribution and export/re-export of the software is in compliance with all laws, regulations, orders, or other restrictions of the U.S. Export Administration Regulations. Licensee agrees that neither it nor any of its subsidiaries will export/re-export any technical data, process, software, or service, directly or indirectly, to any country for which the United States government or any agency thereof requires an export license, other governmental approval, or letter of assurance, without first obtaining such license, approval or letter.
Copyright (c) 2008-2018 The Khronos Group Inc.
Permission is hereby granted, free of charge, to any person obtaining a copy of this software and/or associated documentation files (the "Materials"), to deal in the Materials without restriction, including without limitation the rights to use, copy, modify, merge, publish, distribute, sublicense, and/or sell copies of the Materials, and to permit persons to whom the Materials are furnished to do so, subject to the following conditions:
The above copyright notice and this permission notice shall be included in all copies or substantial portions of the Materials.
THE MATERIALS ARE PROVIDED "AS IS", WITHOUT WARRANTY OF ANY KIND, EXPRESS OR IMPLIED, INCLUDING BUT NOT LIMITED TO THE WARRANTIES OF MERCHANTABILITY, FITNESS FOR A PARTICULAR PURPOSE AND NONINFRINGEMENT. IN NO EVENT SHALL THE AUTHORS OR COPYRIGHT HOLDERS BE LIABLE FOR ANY CLAIM, DAMAGES OR OTHER LIABILITY, WHETHER IN AN ACTION OF CONTRACT, TORT OR OTHERWISE, ARISING FROM, OUT OF OR IN CONNECTION WITH THE MATERIALS OR THE USE OR OTHER DEALINGS IN THE MATERIALS.
Copyright (C) 1991-2000 Silicon Graphics, Inc. All Rights Reserved.
Permission is hereby granted, free of charge, to any person obtaining a copy of this software and associated documentation files (the "Software"), to deal in the Software without restriction, including without limitation the rights to use, copy, modify, merge, publish, distribute, sublicense, and/or sell copies of the Software, and to permit persons to whom the Software is furnished to do so, subject to the following conditions:
The above copyright notice including the dates of first publication and either this permission notice or a reference to http://oss.sgi.com/projects/FreeB/ shall be included in all copies or substantial portions of the Software.
THE SOFTWARE IS PROVIDED "AS IS", WITHOUT WARRANTY OF ANY KIND, EXPRESS OR IMPLIED, INCLUDING BUT NOT LIMITED TO THE WARRANTIES OF MERCHANTABILITY, FITNESS FOR A PARTICULAR PURPOSE AND NONINFRINGEMENT. IN NO EVENT SHALL SILICON GRAPHICS, INC. BE LIABLE FOR ANY CLAIM, DAMAGES OR OTHER LIABILITY, WHETHER IN AN ACTION OF CONTRACT, TORT OR OTHERWISE, ARISING FROM, OUT OF OR IN CONNECTION WITH THE SOFTWARE OR THE USE OR OTHER DEALINGS IN THE SOFTWARE.
Except as contained in this notice, the name of Silicon Graphics, Inc. shall not be used in advertising or otherwise to promote the sale, use or other dealings in this Software without prior written authorization from Silicon Graphics, Inc.
Boost Software License - Version 1.0 - August 17th, 2003
Permission is hereby granted, free of charge, to any person or organization obtaining a copy of the software and accompanying documentation covered by this license (the "Software") to use, reproduce, display, distribute, execute, and transmit the Software, and to prepare derivative works of the Software, and to permit third-parties to whom the Software is furnished to do so, all subject to the following:
The copyright notices in the Software and this entire statement, including the above license grant, this restriction and the following disclaimer, must be included in all copies of the Software, in whole or in part, and all derivative works of the Software, unless such copies or derivative works are solely in the form of machine-executable object code generated by a source language processor.
THE SOFTWARE IS PROVIDED "AS IS", WITHOUT WARRANTY OF ANY KIND, EXPRESS OR IMPLIED, INCLUDING BUT NOT LIMITED TO THE WARRANTIES OF MERCHANTABILITY, FITNESS FOR A PARTICULAR PURPOSE, TITLE AND NON-INFRINGEMENT. IN NO EVENT SHALL THE COPYRIGHT HOLDERS OR ANYONE DISTRIBUTING THE SOFTWARE BE LIABLE FOR ANY DAMAGES OR OTHER LIABILITY, WHETHER IN CONTRACT, TORT OR OTHERWISE, ARISING FROM, OUT OF OR IN CONNECTION WITH THE SOFTWARE OR THE USE OR OTHER DEALINGS IN THE SOFTWARE.
License / Copyright Information
The Mesa distribution consists of several components. Different copyrights and licenses apply to different components. For example, the GLX client code uses the SGI Free Software License B, and some of the Mesa device drivers are copyrighted by their authors. See below for a list of Mesa's main components and the license for each.
The core Mesa library is licensed according to the terms of the MIT license. This allows integration with the XFree86, Xorg and DRI projects.
The default Mesa license is as follows:
Copyright (C) 1999-2007 Brian Paul All Rights Reserved.
Permission is hereby granted, free of charge, to any person obtaining a copy of this software and associated documentation files (the "Software"), to deal in the Software without restriction, including without limitation the rights to use, copy, modify, merge, publish, distribute, sublicense, and/or sell copies of the Software, and to permit persons to whom the Software is furnished to do so, subject to the following conditions:
The above copyright notice and this permission notice shall be included in all copies or substantial portions of the Software.
THE SOFTWARE IS PROVIDED "AS IS", WITHOUT WARRANTY OF ANY KIND, EXPRESS OR IMPLIED, INCLUDING BUT NOT LIMITED TO THE WARRANTIES OF MERCHANTABILITY, FITNESS FOR A PARTICULAR PURPOSE AND NONINFRINGEMENT. IN NO EVENT SHALL THE AUTHORS OR COPYRIGHT HOLDERS BE LIABLE FOR ANY CLAIM, DAMAGES OR OTHER LIABILITY, WHETHER IN AN ACTION OF CONTRACT, TORT OR OTHERWISE, ARISING FROM, OUT OF OR IN CONNECTION WITH THE SOFTWARE OR THE USE OR OTHER DEALINGS IN THE SOFTWARE.
Attention, Contributors
When contributing to the Mesa project you must agree to the licensing terms of the component to which you're contributing. The following section lists the primary components of the Mesa distribution and their respective licenses.
Mesa Component Licenses
Table A.1. Mesa Component Licenses
Component | Location | License |
|---|---|---|
Main Mesa code |
| |
Device drivers |
| Section A.2.4, “MIT License”, generally |
Gallium code |
| |
Ext headers |
| |
GLX client code |
| |
C11 thread emulation |
| Section A.2.31, “Boost Software License” (permissive) |
Additional copyrights:
Copyright (c) 2001, 2002, 2003, 2004 The SCons Foundation; Copyright IBM Corporation 2003, 2004, 2005, 2006; Copyright Zack Rusin 2005. All Rights Reserved.; Copyright John Maddock 2006.; Copyright (c) 2002, 2007-2011 Apple Inc.; Copyright (c) 2006 - 2015, 2017 Intel Corporation; Copyright (C) 2005 Aapo Tahkola.; Copyright (C) 2014 Adrián Arroyo Calle <adrian.arroyocalle@gmail.com>; Copyright (c) 2014 Alex Henrie <alexhenrie24@gmail.com>; Copyright 2006-2012, Haiku. All rights reserved.; Copyright (C) 2015 Android-x86 Open Source Project; Copyright 2010 Thomas Balling Sørensen & Orasanu Lucian.; Copyright (C) 2010 Belen Masia (bmasia@unizar.es); Copyright (c) 2011 Benjamin Franzke; Copyright (c) 2015 Boyan Ding; Copyright (c) 2014 Broadcom; Copyright (c) 2011 Bryan Cain; Copyright (c) 2007 Carl Worth; Copyright (C) 2015 Chih-Wei Huang <cwhuang@linux.org.tw>; Copyright (C) 2010, 2013 Christoph Bumiller; Copyright 2011 The Chromium OS authors.; Copyright (c) 2012 Collabora, Ltd.; Copyright (c) 2014 Connor Abbott; Copyright (c) 2007-2010 Dan Nicholson; Copyright (c) 2011 Daniel Richard G. <skunk@iSKUNK.ORG>; Copyright (c) 2007 Dave Airlie <airlied@linux.ie>; Copyright (C) 1999-2004 David Airlie All Rights Reserved.; Copyright 2015 Axel Davy <axel.davy@ens.fr>; Copyright 2016 Nayan Deshmukh.; Copyright (c) 2010 Diego Elio Petteno` <flameeyes@gmail.com>; Copyright (c) 2017 Dylan Baker; Copyright (c) 2011-2014 Emil Velikov <emil.l.velikov@gmail.com>; Copyright (c) 2012-2013 Etnaviv Project; Copyright (C) 2003 Felix Kuehling; Copyright (C) 2010 Fernando Navarro (fernandn@microsoft.com); Copyright 2008-2009 Jose Fonseca; Copyright (c) 2009 Francesco Salvestrini <salvestrini@users.sourceforge.net>; Copyright (c) 2013 Gabriele Svelto <gabriele.svelto@gmail.com>; Copyright (c) 2017 Gert Wollny; Copyright 2015 Zoltan Gilian; Copyright 2012 Vadim Girlin <vadimgirlin@gmail.com>; Copyright (c) 2017, Google Inc.; Copyright 2013 Grigori Goronzy <greg@chown.ath.cx>; Copyright (c) 2017 Gražvydas Ignotas; Copyright (c) 2002 Greg Parker. All Rights Reserved.; Copyright (c) 2013 Gregory Hainaut <gregory.hainaut@gmail.com>; Copyright (c) 2008 Guido U. Draheim <guidod@gmx.de>; Copyright (c) 2007-2008, 2014-2016 Red Hat, Inc.; Copyright 2006-2008, Philippe Houdoin. All rights reserved.; Copyright (C) 1998-2013 VMware, Inc. All rights reserved.; Copyright 1998-1999 Precision Insight, Inc., Cedar Park, Texas.; Copyright (c) 2007, 2010 Jakob Bornecrantz <wallbraker@gmail.com>; Copyright (c) 2009 Jeremy Huddleston, Julien Cristau, and Matthieu Herrb; Copyright (C) 2009, 2012 Francisco Jerez.; Copyright (c) 2008, 2010 Jérôme Glisse <glisse@freedesktop.org>; Copyright (c) 2008 John Darrington <j.darrington@elvis.murdoch.edu.au>; Copyright (c) 2009-2014 Jon TURNEY; Copyright (C) 2010 Jorge Jimenez (jorge@iryoku.com); Copyright (C) 2010 Jose I. Echevarria (joseignacioechevarria@gmail.com); Copyright (c) 2010-2014 Christian König; Copyright (c) 2008-2011 Kristian Høgsberg; Copyright 2011-2013 Maarten Lankhorst, Ilia Mirkin; Copyright (c) 2012 Laurent Carlier <lordheavym@gmail.com>; Copyright (C) 2011 Lauri Kasanen (cand@gmx.com); Copyright (C) 2016 Linaro, Ltd, Rob Herring <robh@kernel.org>; Copyright 2000, 2001 VA Linux Systems Inc., Fremont, California.; Copyright (c) 2010 Luca Barbieri; Copyright (C) 2010, 2011 LunarG Inc.; Copyright (c) 2011 Maarten Bosmans <mkbosmans@gmail.com>; Copyright (c) 2008, 2009 Maciej Cencora <m.cencora@gmail.com>; Copyright 2010 Younes Manton & Thomas Balling Sørensen.; Copyright 2009 Younes Manton.; Copyright 2014-2015 Serge Martin; Copyright (c) 2012 Matt Turner <mattst88@gmail.com>; Copyright (c) 2016 Mauro Rossi <issor.oruam@gmail.com>; Copyright (C) 2010, 2011 Advanced Micro Devices, Inc.; Copyright (c) 2009-2010 Mikhail Gusarov; Copyright (C) 2016 Miklós Máté; Copyright (C) 2013, 2014, 2016 Ilia Mirkin. All Rights Reserved.; Copyright (C) 2011 Morgan Armand <morgan.devel@gmail.com>; Copyright (C) 2004, 2009 Nicolai Hähnle <nhaehnle@gmail.com>; Copyright (c) 2016 Bas Nieuwenhuizen; Copyright (c) 2014, 2015, NVIDIA Corporation; Copyright (c) 2009, 2010 Marek Olšák <maraeo@gmail.com>; Copyright (c) 2009 Pauli Nieminen; Copyright (c) 1999-2000 Pawel W. Olszta. All Rights Reserved.; Copyright 2007 Nouveau Project; Copyright 2011 Adam Rak <adam.rak@streamnovation.com>; Copyright (c) 2012 Rob Clark <robclark@freedesktop.org>; Copyright (C) 2004 Roland Scheidegger All Rights Reserved.; Copyright 2015 Patrick Rudolph <siro@das-labor.org>; Copyright (C) 2015 Samuel Pitoiset; Copyright 2008, 2010 George Sapountzis <gsapountzis@gmail.com>; Copyright (c) 2014 Scott Mansell; Copyright (C) 1991-2000 Silicon Graphics, Inc. All Rights Reserved.; Copyright (c) 2008, 2009 Corbin Simpson <MostAwesomeDude@gmail.com>; Copyright (c) 2009 Joakim Sindholt <opensource@zhasha.com>; Copyright (C) 2005, 2008 Ben Skeggs.; Copyright 2008 Dennis Smit; Copyright (c) 2003-2005, Stefan Gustavson; Copyright (C) 2005 Stephane Marchesin; Copyright (c) 2008 Steven G. Johnson <stevenj@alum.mit.edu>; Copyright 2000, 2001 ATI Technologies Inc., Ontario, Canada, and$ VA Linux Systems Inc., Fremont, California.; Copyright 2000-2002 ATI Technologies Inc., Ontario, Canada, and VMware, Inc.; Copyright (c) 2000 The NetBSD Foundation, Inc.; Copyright (c) 2015 Thomas Helland; Copyright (C) 1995 Thorsten.Ohl @ Physik.TH-Darmstadt.de; Copyright (C) 2013, 2017 Timothy Arceri All Rights Reserved.; Copyright (c) 2002 Todd C. Miller <Todd.Miller@courtesan.com>; Copyright (c) 2010, 2012-2014 Tom Stellard <tstellar@gmail.com>; Copyright (C) 2014 Tomasz Figa <tomasz.figa@gmail.com>; Copyright (c) 2004 Torrey T. Lyons. All Rights Reserved.; Copyright (c) 2003, 2007-2008 Tungsten Graphics, Inc., Cedar Park, TX., USA; Copyright 1992 Vrije Universiteit, The Netherlands; Copyright (c) 2015-2016 Valve Corporation; Copyright 2014-2016 Jan Vesely; Copyright (c) 2012 Vincent Lejeune; Copyright 2013 Alexander von Gluck IV <kallisti5@unixzen.com>; Copyright (c) 2013 W.J. van der Laan; Copyright (C) The Weather Channel, Inc. 2002. All Rights Reserved.; Copyright (C) 1999 Wittawat Yamwong; Copyright 2009-2010 Chia-I Wu <olvaffe@gmail.com>; Copyright (C) 2009 Chia-I Wu <olv@0xlab.org>; Copyright 2009 Artur Wyszynski <harakash@gmail.com>; Copyright (c) 2012 Yaakov Selkowitz and Keith Packard; Copyright (c) 1988-2004 Keith Packard and Bart Massey.; Copyright (C) 2016 Zodiac Inflight Innovations; Copyright (C) 2006-2010 by the following authors: Artur Huillet <arthur.huillet@free.fr> (ahuillet), Ben Skeggs (darktama, darktama_), B. R. <koala_br@users.sourceforge.net> (koala_br), Carlos Martin <carlosmn@users.sf.net> (carlosmn), Christoph Bumiller <e0425955@student.tuwien.ac.at> (calim, chrisbmr), Dawid Gajownik <gajownik@users.sf.net> (gajownik), Dmitry Baryshkov, Dmitry Eremin,Solenikov <lumag@users.sf.net> (lumag), EdB <edb_@users.sf.net> (edb_), Erik Waling <erikwailing@users.sf.net> (erikwaling), Francisco Jerez <currojerez@riseup.net> (curro), imirkin <imirkin@users.sf.net> (imirkin), jb17bsome <jb17bsome@bellsouth.net> (jb17bsome), Jeremy Kolb <kjeremy@users.sf.net> (kjeremy), Laurent Carlier <lordheavym@gmail.com> (lordheavy), Luca Barbieri <luca@luca,barbieri.com> (lb, lb1), Maarten Maathuis <madman2003@gmail.com> (stillunknown), Marcin Kościelnicki <koriakin@0x04.net> (mwk, koriakin), Mark Carey <mark.carey@gmail.com> (careym), Matthieu Castet <matthieu.castet@parrot.com> (mat,c), nvidiaman <nvidiaman@users.sf.net> (nvidiaman), Patrice Mandin <patmandin@gmail.com> (pmandin, pmdata), Pekka Paalanen <pq@iki.fi> (pq, ppaalanen), Peter Popov <ironpeter@users.sf.net> (ironpeter), Richard Hughes <hughsient@users.sf.net> (hughsient), Rudi Cilibrasi <cilibrar@users.sf.net> (cilibrar), Serge Martin, Simon Raffeiner, Stephane Loeuillet <leroutier@users.sf.net> (leroutier), Stephane Marchesin <stephane.marchesin@gmail.com> (marcheu), sturmflut <sturmflut@users.sf.net> (sturmflut), Sylvain Munaut <tnt@246tNt.com>, Victor Stinner <victor.stinner@haypocalc.com> (haypo), Wladmir van der Laan <laanwj@gmail.com> (miathan6), Younes Manton <younes.m@gmail.com> (ymanton)
MICROSOFT SOFTWARE LICENSE TERMS
MICROSOFT WINDOWS DRIVER KIT
These license terms are an agreement between Microsoft Corporation (or based on where you live, one of its affiliates) and you. Please read them. They apply to the software named above, which includes the media on which you received it, if any. The terms also apply to any Microsoft
updates,
supplements,
Internet-based services, and
support services
for this software, unless other terms accompany those items. If so, those terms apply. By using the software, you accept these terms. If you do not accept them, do not use the software.
If you comply with these license terms, you have the rights below.
INSTALLATION AND USE RIGHTS.
Installation and Use. One user may install and use any number of copies of the software on your devices to design, develop and test your programs.
Included Microsoft Programs. The software contains other Microsoft programs. In some cases, those programs and the license terms that apply to your use of them are addressed specifically in these license terms. For all other included Microsoft programs, these license terms govern your use.
Device Simulation Framework. One user may install and use any number of copies of the Device Simulation Framework on your devices for the sole purpose of testing the interoperability of your devices, drivers and firmware with Windows. For the avoidance of doubt, the Device Simulation Framework shall not be used for testing software you have designed and developed using a software development kit other than the Windows Driver Kit.
Third Party Programs. The software contains third party programs. These license terms as well as any license terms accompanying the third party program files apply to your use of them.
ADDITIONAL LICENSING REQUIREMENTS AND/OR USE RIGHTS.
Distributable Code. The software contains code that you are permitted to distribute in programs you develop if you comply with the terms below.
Right to Use and Distribute. The code and text files listed below are “Distributable Code.”
REDIST.TXT Files. You may copy and distribute the object code form of code listed in REDIST.TXT files.
Sample Code. You may modify, copy and distribute only in object code form the sample code found in the SRC directory of the Windows Driver Kit, except that you may also modify, copy, and distribute in source code form the sample code listed in the SAMPLES.TXT file.
Third Party Distribution. You may permit distributors of your programs to copy and distribute the Distributable Code as part of those programs.
Distribution Requirements. For any Distributable Code you distribute, you must
add significant primary functionality to it in your programs;
require distributors and external end users to agree to terms that protect it at least as much as this agreement;
display your valid copyright notice on your programs; and
indemnify, defend, and hold harmless Microsoft from any claims, including attorneys’ fees, related to the distribution or use of your programs.
Distribution Restrictions. You may not
alter any copyright, trademark or patent notice in the Distributable Code;
use Microsoft’s trademarks in your programs’ names or in a way that suggests your programs come from or are endorsed by Microsoft;
distribute Distributable Code to run on a platform other than the Windows platform;
include Distributable Code in malicious, deceptive or unlawful programs; or
modify or distribute the source code of any Distributable Code so that any part of it becomes subject to an Excluded License. An Excluded License is one that requires, as a condition of use, modification or distribution, that
the code be disclosed or distributed in source code form; or
others have the right to modify it.
Scope of License. The software is licensed, not sold. This agreement only gives you some rights to use the software. Microsoft reserves all other rights. Unless applicable law gives you more rights despite this limitation, you may use the software only as expressly permitted in this agreement. In doing so, you must comply with any technical limitations in the software that only allow you to use it in certain ways. You may not
work around any technical limitations in the software;
reverse engineer, decompile or disassemble the software, except and only to the extent that applicable law expressly permits, despite this limitation;
make more copies of the software than specified in this agreement or allowed by applicable law, despite this limitation;
publish the software for others to copy;
rent, lease or lend the software;
transfer the software or this agreement to any third party; or
use the software for commercial software hosting services.
BACKUP COPY. You may make one backup copy of the software. You may use it only to reinstall the software.
DOCUMENTATION. Any person that has valid access to your computer or internal network may copy and use the documentation for your internal, reference purposes.
Export Restrictions. The software is subject to United States export laws and regulations. You must comply with all domestic and international export laws and regulations that apply to the software. These laws include restrictions on destinations, end users and end use. For additional information, see www.microsoft.com/exporting.
SUPPORT SERVICES. Because this software is “as is,” we may not provide support services for it.
Entire Agreement. This agreement, and the terms for supplements, updates, Internet-based services and support services that you use, are the entire agreement for the software and support services
Applicable Law.
United States. If you acquired the software in the United States, Washington state law governs the interpretation of this agreement and applies to claims for breach of it, regardless of conflict of laws principles. The laws of the state where you live govern all other claims, including claims under state consumer protection laws, unfair competition laws, and in tort.
Outside the United States. If you acquired the software in any other country, the laws of that country apply.
Legal Effect. This agreement describes certain legal rights. You may have other rights under the laws of your country. You may also have rights with respect to the party from whom you acquired the software. This agreement does not change your rights under the laws of your country if the laws of your country do not permit it to do so.
Disclaimer of Warranty. The software is licensed “as-is.” You bear the risk of using it. Microsoft gives no express warranties, guarantees or conditions. You may have additional consumer rights under your local laws which this agreement cannot change. To the extent permitted under your local laws, Microsoft excludes the implied warranties of merchantability, fitness for a particular purpose and non-infringement.
Limitation on and Exclusion of Remedies and Damages. You can recover from Microsoft and its suppliers only direct damages up to U.S. $5.00. You cannot recover any other damages, including consequential, lost profits, special, indirect or incidental damages. This limitation applies to
anything related to the software, services, content (including code) on third party Internet sites, or third party programs; and
claims for breach of contract, breach of warranty, guarantee or condition, strict liability, negligence, or other tort to the extent permitted by applicable law.
It also applies even if Microsoft knew or should have known about the possibility of the damages. The above limitation or exclusion may not apply to you because your country may not allow the exclusion or limitation of incidental, consequential or other damages.
Please note: As this software is distributed in Quebec, Canada, some of the clauses in this agreement are provided below in French.
Remarque : Ce logiciel étant distribué au Québec, Canada, certaines des clauses dans ce contrat sont fournies ci-dessous en français.
EXONÉRATION DE GARANTIE. Le logiciel visé par une licence est offert « tel quel ». Toute utilisation de ce logiciel est à votre seule risque et péril. Microsoft n’accorde aucune autre garantie expresse. Vous pouvez bénéficier de droits additionnels en vertu du droit local sur la protection des consommateurs, que ce contrat ne peut modifier. La ou elles sont permises par le droit locale, les garanties implicites de qualité marchande, d’adéquation à un usage particulier et d’absence de contrefaçon sont exclues.
LIMITATION DES DOMMAGES-INTÉRÊTS ET EXCLUSION DE RESPONSABILITÉ POUR LES DOMMAGES. Vous pouvez obtenir de Microsoft et de ses fournisseurs une indemnisation en cas de dommages directs uniquement à hauteur de 5,00 $ US. Vous ne pouvez prétendre à aucune indemnisation pour les autres dommages, y compris les dommages spéciaux, indirects ou accessoires et pertes de bénéfices.
Cette limitation concerne :
tout ce qui est relié au logiciel, aux services ou au contenu (y compris le code) figurant sur des sites Internet tiers ou dans des programmes tiers ; et
les réclamations au titre de violation de contrat ou de garantie, ou au titre de responsabilité stricte, de négligence ou d’une autre faute dans la limite autorisée par la loi en vigueur.
Elle s’applique également, même si Microsoft connaissait ou devrait connaître l’éventualité d’un tel dommage. Si votre pays n’autorise pas l’exclusion ou la limitation de responsabilité pour les dommages indirects, accessoires ou de quelque nature que ce soit, il se peut que la limitation ou l’exclusion ci-dessus ne s’appliquera pas à votre égard.
EFFET JURIDIQUE. Le présent contrat décrit certains droits juridiques. Vous pourriez avoir d’autres droits prévus par les lois de votre pays. Le présent contrat ne modifie pas les droits que vous confèrent les lois de votre pays si celles-ci ne le permettent pas.
A. HISTORY OF THE SOFTWARE ==========================
Python was created in the early 1990s by Guido van Rossum at Stichting Mathematisch Centrum (CWI, see http://www.cwi.nl) in the Netherlands as a successor of a language called ABC. Guido remains Python's principal author, although it includes many contributions from others.
In 1995, Guido continued his work on Python at the Corporation for National Research Initiatives (CNRI, see http://www.cnri.reston.va.us) in Reston, Virginia where he released several versions of the software.
In May 2000, Guido and the Python core development team moved to BeOpen.com to form the BeOpen PythonLabs team. In October of the same year, the PythonLabs team moved to Digital Creations, which became Zope Corporation. In 2001, the Python Software Foundation (PSF, see https://www.python.org/psf/) was formed, a non-profit organization created specifically to own Python-related Intellectual Property. Zope Corporation was a sponsoring member of the PSF.
All Python releases are Open Source (see http://www.opensource.org for the Open Source Definition). Historically, most, but not all, Python releases have also been GPL-compatible; the table below summarizes the various releases.
Table A.2. Python releases
Release | Derived from | Year | Owner | GPL-compatible? (1) |
|---|---|---|---|---|
0.9.0 thru 1.2 |
| 1991-1995 | CWI | yes |
0.9.0 thru 1.2 |
| 1991-1995 | CWI | yes |
1.3 thru 1.5.2 | 1.2 | 1995-1999 | CNRI | yes |
1.6 | 1.5.2 | 2000 | CNRI | no |
2.0 | 1.6 | 2000 | BeOpen.com | no |
1.6.1 | 1.6 | 2001 | CNRI | yes (2) |
2.1 | 2.0+1.6.1 | 2001 | PSF | yes |
2.0.1 | 2.0+1.6.1 | 2001 | PSF | yes |
2.1.1 | 2.1+2.0.1 | 2001 | PSF | yes |
2.1.2 | 2.1.1 | 2002 | PSF | yes |
2.1.3 | 2.1.2 | 2002 | PSF | yes |
2.2 and above | 2.1.1 | 2001-now | PSF | yes |
Footnotes:
(1) GPL-compatible doesn't mean that we're distributing Python under the GPL. All Python licenses, unlike the GPL, let you distribute a modified version without making your changes open source. The GPL-compatible licenses make it possible to combine Python with other software that is released under the GPL; the others don't.
(2) According to Richard Stallman, 1.6.1 is not GPL-compatible, because its license has a choice of law clause. According to CNRI, however, Stallman's lawyer has told CNRI's lawyer that 1.6.1 is "not incompatible" with the GPL.
Thanks to the many outside volunteers who have worked under Guido's direction to make these releases possible.
B. TERMS AND CONDITIONS FOR ACCESSING OR OTHERWISE USING PYTHON ===============================================================
Python software and documentation are licensed under the Python Software Foundation License Version 2.
Starting with Python 3.8.6, examples, recipes, and other code in the documentation are dual licensed under the PSF License Version 2 and the Zero-Clause BSD license.
Some software incorporated into Python is under different licenses. The licenses are listed with code falling under that license.
PYTHON SOFTWARE FOUNDATION LICENSE VERSION 2 --------------------------------------------
1. This LICENSE AGREEMENT is between the Python Software Foundation ("PSF"), and the Individual or Organization ("Licensee") accessing and otherwise using this software ("Python") in source or binary form and its associated documentation.
2. Subject to the terms and conditions of this License Agreement, PSF hereby grants Licensee a nonexclusive, royalty-free, world-wide license to reproduce, analyze, test, perform and/or display publicly, prepare derivative works, distribute, and otherwise use Python alone or in any derivative version, provided, however, that PSF's License Agreement and PSF's notice of copyright, i.e., "Copyright (c) 2001, 2002, 2003, 2004, 2005, 2006, 2007, 2008, 2009, 2010, 2011, 2012, 2013, 2014, 2015, 2016, 2017, 2018, 2019, 2020, 2021, 2022 Python Software Foundation; All Rights Reserved" are retained in Python alone or in any derivative version prepared by Licensee.
3. In the event Licensee prepares a derivative work that is based on or incorporates Python or any part thereof, and wants to make the derivative work available to others as provided herein, then Licensee hereby agrees to include in any such work a brief summary of the changes made to Python.
4. PSF is making Python available to Licensee on an "AS IS" basis. PSF MAKES NO REPRESENTATIONS OR WARRANTIES, EXPRESS OR IMPLIED. BY WAY OF EXAMPLE, BUT NOT LIMITATION, PSF MAKES NO AND DISCLAIMS ANY REPRESENTATION OR WARRANTY OF MERCHANTABILITY OR FITNESS FOR ANY PARTICULAR PURPOSE OR THAT THE USE OF PYTHON WILL NOT INFRINGE ANY THIRD PARTY RIGHTS.
5. PSF SHALL NOT BE LIABLE TO LICENSEE OR ANY OTHER USERS OF PYTHON FOR ANY INCIDENTAL, SPECIAL, OR CONSEQUENTIAL DAMAGES OR LOSS AS A RESULT OF MODIFYING, DISTRIBUTING, OR OTHERWISE USING PYTHON, OR ANY DERIVATIVE THEREOF, EVEN IF ADVISED OF THE POSSIBILITY THEREOF.
6. This License Agreement will automatically terminate upon a material breach of its terms and conditions.
7. Nothing in this License Agreement shall be deemed to create any relationship of agency, partnership, or joint venture between PSF and Licensee. This License Agreement does not grant permission to use PSF trademarks or trade name in a trademark sense to endorse or promote products or services of Licensee, or any third party.
8. By copying, installing or otherwise using Python, Licensee agrees to be bound by the terms and conditions of this License Agreement.
BEOPEN.COM LICENSE AGREEMENT FOR PYTHON 2.0 -------------------------------------------
BEOPEN PYTHON OPEN SOURCE LICENSE AGREEMENT VERSION 1
1. This LICENSE AGREEMENT is between BeOpen.com ("BeOpen"), having an office at 160 Saratoga Avenue, Santa Clara, CA 95051, and the Individual or Organization ("Licensee") accessing and otherwise using this software in source or binary form and its associated documentation ("the Software").
2. Subject to the terms and conditions of this BeOpen Python License Agreement, BeOpen hereby grants Licensee a non-exclusive, royalty-free, world-wide license to reproduce, analyze, test, perform and/or display publicly, prepare derivative works, distribute, and otherwise use the Software alone or in any derivative version, provided, however, that the BeOpen Python License is retained in the Software, alone or in any derivative version prepared by Licensee.
3. BeOpen is making the Software available to Licensee on an "AS IS" basis. BEOPEN MAKES NO REPRESENTATIONS OR WARRANTIES, EXPRESS OR IMPLIED. BY WAY OF EXAMPLE, BUT NOT LIMITATION, BEOPEN MAKES NO AND DISCLAIMS ANY REPRESENTATION OR WARRANTY OF MERCHANTABILITY OR FITNESS FOR ANY PARTICULAR PURPOSE OR THAT THE USE OF THE SOFTWARE WILL NOT INFRINGE ANY THIRD PARTY RIGHTS.
4. BEOPEN SHALL NOT BE LIABLE TO LICENSEE OR ANY OTHER USERS OF THE SOFTWARE FOR ANY INCIDENTAL, SPECIAL, OR CONSEQUENTIAL DAMAGES OR LOSS AS A RESULT OF USING, MODIFYING OR DISTRIBUTING THE SOFTWARE, OR ANY DERIVATIVE THEREOF, EVEN IF ADVISED OF THE POSSIBILITY THEREOF.
5. This License Agreement will automatically terminate upon a material breach of its terms and conditions.
6. This License Agreement shall be governed by and interpreted in all respects by the law of the State of California, excluding conflict of law provisions. Nothing in this License Agreement shall be deemed to create any relationship of agency, partnership, or joint venture between BeOpen and Licensee. This License Agreement does not grant permission to use BeOpen trademarks or trade names in a trademark sense to endorse or promote products or services of Licensee, or any third party. As an exception, the "BeOpen Python" logos available at http://www.pythonlabs.com/logos.html may be used according to the permissions granted on that web page.
7. By copying, installing or otherwise using the software, Licensee agrees to be bound by the terms and conditions of this License Agreement.
CNRI LICENSE AGREEMENT FOR PYTHON 1.6.1 ---------------------------------------
1. This LICENSE AGREEMENT is between the Corporation for National Research Initiatives, having an office at 1895 Preston White Drive, Reston, VA 20191 ("CNRI"), and the Individual or Organization ("Licensee") accessing and otherwise using Python 1.6.1 software in source or binary form and its associated documentation.
2. Subject to the terms and conditions of this License Agreement, CNRI hereby grants Licensee a nonexclusive, royalty-free, world-wide license to reproduce, analyze, test, perform and/or display publicly, prepare derivative works, distribute, and otherwise use Python 1.6.1 alone or in any derivative version, provided, however, that CNRI's License Agreement and CNRI's notice of copyright, i.e., "Copyright (c) 1995-2001 Corporation for National Research Initiatives; All Rights Reserved" are retained in Python 1.6.1 alone or in any derivative version prepared by Licensee. Alternately, in lieu of CNRI's License Agreement, Licensee may substitute the following text (omitting the quotes): "Python 1.6.1 is made available subject to the terms and conditions in CNRI's License Agreement. This Agreement together with Python 1.6.1 may be located on the Internet using the following unique, persistent identifier (known as a handle): 1895.22/1013. This Agreement may also be obtained from a proxy server on the Internet using the following URL: http://hdl.handle.net/1895.22/1013".
3. In the event Licensee prepares a derivative work that is based on or incorporates Python 1.6.1 or any part thereof, and wants to make the derivative work available to others as provided herein, then Licensee hereby agrees to include in any such work a brief summary of the changes made to Python 1.6.1.
4. CNRI is making Python 1.6.1 available to Licensee on an "AS IS" basis. CNRI MAKES NO REPRESENTATIONS OR WARRANTIES, EXPRESS OR IMPLIED. BY WAY OF EXAMPLE, BUT NOT LIMITATION, CNRI MAKES NO AND DISCLAIMS ANY REPRESENTATION OR WARRANTY OF MERCHANTABILITY OR FITNESS FOR ANY PARTICULAR PURPOSE OR THAT THE USE OF PYTHON 1.6.1 WILL NOT INFRINGE ANY THIRD PARTY RIGHTS.
5. CNRI SHALL NOT BE LIABLE TO LICENSEE OR ANY OTHER USERS OF PYTHON 1.6.1 FOR ANY INCIDENTAL, SPECIAL, OR CONSEQUENTIAL DAMAGES OR LOSS AS A RESULT OF MODIFYING, DISTRIBUTING, OR OTHERWISE USING PYTHON 1.6.1, OR ANY DERIVATIVE THEREOF, EVEN IF ADVISED OF THE POSSIBILITY THEREOF.
6. This License Agreement will automatically terminate upon a material breach of its terms and conditions.
7. This License Agreement shall be governed by the federal intellectual property law of the United States, including without limitation the federal copyright law, and, to the extent such U.S. federal law does not apply, by the law of the Commonwealth of Virginia, excluding Virginia's conflict of law provisions. Notwithstanding the foregoing, with regard to derivative works based on Python 1.6.1 that incorporate non-separable material that was previously distributed under the GNU General Public License (GPL), the law of the Commonwealth of Virginia shall govern this License Agreement only as to issues arising under or with respect to Paragraphs 4, 5, and 7 of this License Agreement. Nothing in this License Agreement shall be deemed to create any relationship of agency, partnership, or joint venture between CNRI and Licensee. This License Agreement does not grant permission to use CNRI trademarks or trade name in a trademark sense to endorse or promote products or services of Licensee, or any third party.
8. By clicking on the "ACCEPT" button where indicated, or by copying, installing or otherwise using Python 1.6.1, Licensee agrees to be bound by the terms and conditions of this License Agreement.
ACCEPT
CWI LICENSE AGREEMENT FOR PYTHON 0.9.0 THROUGH 1.2 --------------------------------------------------
Copyright (c) 1991 - 1995, Stichting Mathematisch Centrum Amsterdam, The Netherlands. All rights reserved.
Permission to use, copy, modify, and distribute this software and its documentation for any purpose and without fee is hereby granted, provided that the above copyright notice appear in all copies and that both that copyright notice and this permission notice appear in supporting documentation, and that the name of Stichting Mathematisch Centrum or CWI not be used in advertising or publicity pertaining to distribution of the software without specific, written prior permission.
STICHTING MATHEMATISCH CENTRUM DISCLAIMS ALL WARRANTIES WITH REGARD TO THIS SOFTWARE, INCLUDING ALL IMPLIED WARRANTIES OF MERCHANTABILITY AND FITNESS, IN NO EVENT SHALL STICHTING MATHEMATISCH CENTRUM BE LIABLE FOR ANY SPECIAL, INDIRECT OR CONSEQUENTIAL DAMAGES OR ANY DAMAGES WHATSOEVER RESULTING FROM LOSS OF USE, DATA OR PROFITS, WHETHER IN AN ACTION OF CONTRACT, NEGLIGENCE OR OTHER TORTIOUS ACTION, ARISING OUT OF OR IN CONNECTION WITH THE USE OR PERFORMANCE OF THIS SOFTWARE.
ZERO-CLAUSE BSD LICENSE FOR CODE IN THE PYTHON DOCUMENTATION ----------------------------------------------------------------------
Permission to use, copy, modify, and/or distribute this software for any purpose with or without fee is hereby granted.
THE SOFTWARE IS PROVIDED "AS IS" AND THE AUTHOR DISCLAIMS ALL WARRANTIES WITH REGARD TO THIS SOFTWARE INCLUDING ALL IMPLIED WARRANTIES OF MERCHANTABILITY AND FITNESS. IN NO EVENT SHALL THE AUTHOR BE LIABLE FOR ANY SPECIAL, DIRECT, INDIRECT, OR CONSEQUENTIAL DAMAGES OR ANY DAMAGES WHATSOEVER RESULTING FROM LOSS OF USE, DATA OR PROFITS, WHETHER IN AN ACTION OF CONTRACT, NEGLIGENCE OR OTHER TORTIOUS ACTION, ARISING OUT OF OR IN CONNECTION WITH THE USE OR PERFORMANCE OF THIS SOFTWARE.
John R. Hauser 2018 January 20
The following applies to the whole of SoftFloat Release 3e as well as to each source file individually.
Copyright 2011, 2012, 2013, 2014, 2015, 2016, 2017, 2018 The Regents of the University of California. All rights reserved.
Redistribution and use in source and binary forms, with or without modification, are permitted provided that the following conditions are met:
Redistributions of source code must retain the above copyright notice, this list of conditions, and the following disclaimer.
Redistributions in binary form must reproduce the above copyright notice, this list of conditions, and the following disclaimer in the documentation and/or other materials provided with the distribution.
Neither the name of the University nor the names of its contributors may be used to endorse or promote products derived from this software without specific prior written permission.
THIS SOFTWARE IS PROVIDED BY THE REGENTS AND CONTRIBUTORS "AS IS", AND ANY EXPRESS OR IMPLIED WARRANTIES, INCLUDING, BUT NOT LIMITED TO, THE IMPLIED WARRANTIES OF MERCHANTABILITY AND FITNESS FOR A PARTICULAR PURPOSE, ARE DISCLAIMED. IN NO EVENT SHALL THE REGENTS OR CONTRIBUTORS BE LIABLE FOR ANY DIRECT, INDIRECT, INCIDENTAL, SPECIAL, EXEMPLARY, OR CONSEQUENTIAL DAMAGES (INCLUDING, BUT NOT LIMITED TO, PROCUREMENT OF SUBSTITUTE GOODS OR SERVICES; LOSS OF USE, DATA, OR PROFITS; OR BUSINESS INTERRUPTION) HOWEVER CAUSED AND ON ANY THEORY OF LIABILITY, WHETHER IN CONTRACT, STRICT LIABILITY, OR TORT (INCLUDING NEGLIGENCE OR OTHERWISE) ARISING IN ANY WAY OUT OF THE USE OF THIS SOFTWARE, EVEN IF ADVISED OF THE POSSIBILITY OF SUCH DAMAGE.
Copyright (C) 2015-2018 Google, Inc.; Copyright (C) <various other dates and companies>
All rights reserved.
Redistribution and use in source and binary forms, with or without modification, are permitted provided that the following conditions are met:
Redistributions of source code must retain the above copyright notice, this list of conditions, and the following disclaimer.
Redistributions in binary form must reproduce the above copyright notice, this list of conditions, and the following disclaimer in the documentation and/or other materials provided with the distribution.
Neither the name of 3Dlabs Inc. Ltd. nor the names of its contributors may be used to endorse or promote products derived from this software without specific prior written permission.
THIS SOFTWARE IS PROVIDED BY THE COPYRIGHT HOLDERS AND CONTRIBUTORS "AS IS" AND ANY EXPRESS OR IMPLIED WARRANTIES, INCLUDING, BUT NOT LIMITED TO, THE IMPLIED WARRANTIES OF MERCHANTABILITY AND FITNESS FOR A PARTICULAR PURPOSE ARE DISCLAIMED. IN NO EVENT SHALL THE COPYRIGHT HOLDERS OR CONTRIBUTORS BE LIABLE FOR ANY DIRECT, INDIRECT, INCIDENTAL, SPECIAL, EXEMPLARY, OR CONSEQUENTIAL DAMAGES (INCLUDING, BUT NOT LIMITED TO, PROCUREMENT OF SUBSTITUTE GOODS OR SERVICES; LOSS OF USE, DATA, OR PROFITS; OR BUSINESS INTERRUPTION) HOWEVER CAUSED AND ON ANY THEORY OF LIABILITY, WHETHER IN CONTRACT, STRICT LIABILITY, OR TORT (INCLUDING NEGLIGENCE OR OTHERWISE) ARISING IN ANY WAY OUT OF THE USE OF THIS SOFTWARE, EVEN IF ADVISED OF THE POSSIBILITY OF SUCH DAMAGE.
Redistribution and use in source and binary forms, with or without modification, are permitted provided that the following conditions are met:
Redistributions of source code must retain the above copyright notice, this list of conditions and the following disclaimer.
Redistributions in binary form must reproduce the above copyright notice, this list of conditions and the following disclaimer in the documentation and/or other materials provided with the distribution.
THIS SOFTWARE IS PROVIDED BY THE COPYRIGHT HOLDERS AND CONTRIBUTORS "AS IS" AND ANY EXPRESS OR IMPLIED WARRANTIES, INCLUDING, BUT NOT LIMITED TO, THE IMPLIED WARRANTIES OF MERCHANTABILITY AND FITNESS FOR A PARTICULAR PURPOSE ARE DISCLAIMED. IN NO EVENT SHALL THE COPYRIGHT HOLDER OR CONTRIBUTORS BE LIABLE FOR ANY DIRECT, INDIRECT, INCIDENTAL, SPECIAL, EXEMPLARY, OR CONSEQUENTIAL DAMAGES (INCLUDING, BUT NOT LIMITED TO, PROCUREMENT OF SUBSTITUTE GOODS OR SERVICES; LOSS OF USE, DATA, OR PROFITS; OR BUSINESS INTERRUPTION) HOWEVER CAUSED AND ON ANY THEORY OF LIABILITY, WHETHER IN CONTRACT, STRICT LIABILITY, OR TORT (INCLUDING NEGLIGENCE OR OTHERWISE) ARISING IN ANY WAY OUT OF THE USE OF THIS SOFTWARE, EVEN IF ADVISED OF THE POSSIBILITY OF SUCH DAMAGE.
GNU GENERAL PUBLIC LICENSE Version 3, 29 June 2007
Copyright (C) 2007 Free Software Foundation, Inc. <http://fsf.org/> Everyone is permitted to copy and distribute verbatim copies of this license document, but changing it is not allowed.
Preamble
The GNU General Public License is a free, copyleft license for software and other kinds of works.
The licenses for most software and other practical works are designed to take away your freedom to share and change the works. By contrast, the GNU General Public License is intended to guarantee your freedom to share and change all versions of a program--to make sure it remains free software for all its users. We, the Free Software Foundation, use the GNU General Public License for most of our software; it applies also to any other work released this way by its authors. You can apply it to your programs, too.
When we speak of free software, we are referring to freedom, not price. Our General Public Licenses are designed to make sure that you have the freedom to distribute copies of free software (and charge for them if you wish), that you receive source code or can get it if you want it, that you can change the software or use pieces of it in new free programs, and that you know you can do these things.
To protect your rights, we need to prevent others from denying you these rights or asking you to surrender the rights. Therefore, you have certain responsibilities if you distribute copies of the software, or if you modify it: responsibilities to respect the freedom of others.
For example, if you distribute copies of such a program, whether gratis or for a fee, you must pass on to the recipients the same freedoms that you received. You must make sure that they, too, receive or can get the source code. And you must show them these terms so they know their rights.
Developers that use the GNU GPL protect your rights with two steps: (1) assert copyright on the software, and (2) offer you this License giving you legal permission to copy, distribute and/or modify it.
For the developers' and authors' protection, the GPL clearly explains that there is no warranty for this free software. For both users' and authors' sake, the GPL requires that modified versions be marked as changed, so that their problems will not be attributed erroneously to authors of previous versions.
Some devices are designed to deny users access to install or run modified versions of the software inside them, although the manufacturer can do so. This is fundamentally incompatible with the aim of protecting users' freedom to change the software. The systematic pattern of such abuse occurs in the area of products for individuals to use, which is precisely where it is most unacceptable. Therefore, we have designed this version of the GPL to prohibit the practice for those products. If such problems arise substantially in other domains, we stand ready to extend this provision to those domains in future versions of the GPL, as needed to protect the freedom of users.
Finally, every program is threatened constantly by software patents. States should not allow patents to restrict development and use of software on general-purpose computers, but in those that do, we wish to avoid the special danger that patents applied to a free program could make it effectively proprietary. To prevent this, the GPL assures that patents cannot be used to render the program non-free.
The precise terms and conditions for copying, distribution and modification follow.
TERMS AND CONDITIONS
0. Definitions.
"This License" refers to version 3 of the GNU General Public License.
"Copyright" also means copyright-like laws that apply to other kinds of works, such as semiconductor masks.
"The Program" refers to any copyrightable work licensed under this License. Each licensee is addressed as "you". "Licensees" and "recipients" may be individuals or organizations.
To "modify" a work means to copy from or adapt all or part of the work in a fashion requiring copyright permission, other than the making of an exact copy. The resulting work is called a "modified version" of the earlier work or a work "based on" the earlier work.
A "covered work" means either the unmodified Program or a work based on the Program.
To "propagate" a work means to do anything with it that, without permission, would make you directly or secondarily liable for infringement under applicable copyright law, except executing it on a computer or modifying a private copy. Propagation includes copying, distribution (with or without modification), making available to the public, and in some countries other activities as well.
To "convey" a work means any kind of propagation that enables other parties to make or receive copies. Mere interaction with a user through a computer network, with no transfer of a copy, is not conveying.
An interactive user interface displays "Appropriate Legal Notices" to the extent that it includes a convenient and prominently visible feature that (1) displays an appropriate copyright notice, and (2) tells the user that there is no warranty for the work (except to the extent that warranties are provided), that licensees may convey the work under this License, and how to view a copy of this License. If the interface presents a list of user commands or options, such as a menu, a prominent item in the list meets this criterion.
1. Source Code.
The "source code" for a work means the preferred form of the work for making modifications to it. "Object code" means any non-source form of a work.
A "Standard Interface" means an interface that either is an official standard defined by a recognized standards body, or, in the case of interfaces specified for a particular programming language, one that is widely used among developers working in that language.
The "System Libraries" of an executable work include anything, other than the work as a whole, that (a) is included in the normal form of packaging a Major Component, but which is not part of that Major Component, and (b) serves only to enable use of the work with that Major Component, or to implement a Standard Interface for which an implementation is available to the public in source code form. A "Major Component", in this context, means a major essential component (kernel, window system, and so on) of the specific operating system (if any) on which the executable work runs, or a compiler used to produce the work, or an object code interpreter used to run it.
The "Corresponding Source" for a work in object code form means all the source code needed to generate, install, and (for an executable work) run the object code and to modify the work, including scripts to control those activities. However, it does not include the work's System Libraries, or general-purpose tools or generally available free programs which are used unmodified in performing those activities but which are not part of the work. For example, Corresponding Source includes interface definition files associated with source files for the work, and the source code for shared libraries and dynamically linked subprograms that the work is specifically designed to require, such as by intimate data communication or control flow between those subprograms and other parts of the work.
The Corresponding Source need not include anything that users can regenerate automatically from other parts of the Corresponding Source.
The Corresponding Source for a work in source code form is that same work.
2. Basic Permissions.
All rights granted under this License are granted for the term of copyright on the Program, and are irrevocable provided the stated conditions are met. This License explicitly affirms your unlimited permission to run the unmodified Program. The output from running a covered work is covered by this License only if the output, given its content, constitutes a covered work. This License acknowledges your rights of fair use or other equivalent, as provided by copyright law.
You may make, run and propagate covered works that you do not convey, without conditions so long as your license otherwise remains in force. You may convey covered works to others for the sole purpose of having them make modifications exclusively for you, or provide you with facilities for running those works, provided that you comply with the terms of this License in conveying all material for which you do not control copyright. Those thus making or running the covered works for you must do so exclusively on your behalf, under your direction and control, on terms that prohibit them from making any copies of your copyrighted material outside their relationship with you.
Conveying under any other circumstances is permitted solely under the conditions stated below. Sublicensing is not allowed; section 10 makes it unnecessary.
3. Protecting Users' Legal Rights From Anti-Circumvention Law.
No covered work shall be deemed part of an effective technological measure under any applicable law fulfilling obligations under article 11 of the WIPO copyright treaty adopted on 20 December 1996, or similar laws prohibiting or restricting circumvention of such measures.
When you convey a covered work, you waive any legal power to forbid circumvention of technological measures to the extent such circumvention is effected by exercising rights under this License with respect to the covered work, and you disclaim any intention to limit operation or modification of the work as a means of enforcing, against the work's users, your or third parties' legal rights to forbid circumvention of technological measures.
4. Conveying Verbatim Copies.
You may convey verbatim copies of the Program's source code as you receive it, in any medium, provided that you conspicuously and appropriately publish on each copy an appropriate copyright notice; keep intact all notices stating that this License and any non-permissive terms added in accord with section 7 apply to the code; keep intact all notices of the absence of any warranty; and give all recipients a copy of this License along with the Program.
You may charge any price or no price for each copy that you convey, and you may offer support or warranty protection for a fee.
5. Conveying Modified Source Versions.
You may convey a work based on the Program, or the modifications to produce it from the Program, in the form of source code under the terms of section 4, provided that you also meet all of these conditions:
a) The work must carry prominent notices stating that you modified it, and giving a relevant date.
b) The work must carry prominent notices stating that it is released under this License and any conditions added under section 7. This requirement modifies the requirement in section 4 to "keep intact all notices".
c) You must license the entire work, as a whole, under this License to anyone who comes into possession of a copy. This License will therefore apply, along with any applicable section 7 additional terms, to the whole of the work, and all its parts, regardless of how they are packaged. This License gives no permission to license the work in any other way, but it does not invalidate such permission if you have separately received it.
d) If the work has interactive user interfaces, each must display Appropriate Legal Notices; however, if the Program has interactive interfaces that do not display Appropriate Legal Notices, your work need not make them do so.
A compilation of a covered work with other separate and independent works, which are not by their nature extensions of the covered work, and which are not combined with it such as to form a larger program, in or on a volume of a storage or distribution medium, is called an "aggregate" if the compilation and its resulting copyright are not used to limit the access or legal rights of the compilation's users beyond what the individual works permit. Inclusion of a covered work in an aggregate does not cause this License to apply to the other parts of the aggregate.
6. Conveying Non-Source Forms.
You may convey a covered work in object code form under the terms of sections 4 and 5, provided that you also convey the machine-readable Corresponding Source under the terms of this License, in one of these ways:
a) Convey the object code in, or embodied in, a physical product (including a physical distribution medium), accompanied by the Corresponding Source fixed on a durable physical medium customarily used for software interchange.
b) Convey the object code in, or embodied in, a physical product (including a physical distribution medium), accompanied by a written offer, valid for at least three years and valid for as long as you offer spare parts or customer support for that product model, to give anyone who possesses the object code either (1) a copy of the Corresponding Source for all the software in the product that is covered by this License, on a durable physical medium customarily used for software interchange, for a price no more than your reasonable cost of physically performing this conveying of source, or (2) access to copy the Corresponding Source from a network server at no charge.
c) Convey individual copies of the object code with a copy of the written offer to provide the Corresponding Source. This alternative is allowed only occasionally and noncommercially, and only if you received the object code with such an offer, in accord with subsection 6b.
d) Convey the object code by offering access from a designated place (gratis or for a charge), and offer equivalent access to the Corresponding Source in the same way through the same place at no further charge. You need not require recipients to copy the Corresponding Source along with the object code. If the place to copy the object code is a network server, the Corresponding Source may be on a different server (operated by you or a third party) that supports equivalent copying facilities, provided you maintain clear directions next to the object code saying where to find the Corresponding Source. Regardless of what server hosts the Corresponding Source, you remain obligated to ensure that it is available for as long as needed to satisfy these requirements.
e) Convey the object code using peer-to-peer transmission, provided you inform other peers where the object code and Corresponding Source of the work are being offered to the general public at no charge under subsection 6d.
A separable portion of the object code, whose source code is excluded from the Corresponding Source as a System Library, need not be included in conveying the object code work.
A "User Product" is either (1) a "consumer product", which means any tangible personal property which is normally used for personal, family, or household purposes, or (2) anything designed or sold for incorporation into a dwelling. In determining whether a product is a consumer product, doubtful cases shall be resolved in favor of coverage. For a particular product received by a particular user, "normally used" refers to a typical or common use of that class of product, regardless of the status of the particular user or of the way in which the particular user actually uses, or expects or is expected to use, the product. A product is a consumer product regardless of whether the product has substantial commercial, industrial or non-consumer uses, unless such uses represent the only significant mode of use of the product.
"Installation Information" for a User Product means any methods, procedures, authorization keys, or other information required to install and execute modified versions of a covered work in that User Product from a modified version of its Corresponding Source. The information must suffice to ensure that the continued functioning of the modified object code is in no case prevented or interfered with solely because modification has been made.
If you convey an object code work under this section in, or with, or specifically for use in, a User Product, and the conveying occurs as part of a transaction in which the right of possession and use of the User Product is transferred to the recipient in perpetuity or for a fixed term (regardless of how the transaction is characterized), the Corresponding Source conveyed under this section must be accompanied by the Installation Information. But this requirement does not apply if neither you nor any third party retains the ability to install modified object code on the User Product (for example, the work has been installed in ROM).
The requirement to provide Installation Information does not include a requirement to continue to provide support service, warranty, or updates for a work that has been modified or installed by the recipient, or for the User Product in which it has been modified or installed. Access to a network may be denied when the modification itself materially and adversely affects the operation of the network or violates the rules and protocols for communication across the network.
Corresponding Source conveyed, and Installation Information provided, in accord with this section must be in a format that is publicly documented (and with an implementation available to the public in source code form), and must require no special password or key for unpacking, reading or copying.
7. Additional Terms.
"Additional permissions" are terms that supplement the terms of this License by making exceptions from one or more of its conditions. Additional permissions that are applicable to the entire Program shall be treated as though they were included in this License, to the extent that they are valid under applicable law. If additional permissions apply only to part of the Program, that part may be used separately under those permissions, but the entire Program remains governed by this License without regard to the additional permissions.
When you convey a copy of a covered work, you may at your option remove any additional permissions from that copy, or from any part of it. (Additional permissions may be written to require their own removal in certain cases when you modify the work.) You may place additional permissions on material, added by you to a covered work, for which you have or can give appropriate copyright permission.
Notwithstanding any other provision of this License, for material you add to a covered work, you may (if authorized by the copyright holders of that material) supplement the terms of this License with terms:
a) Disclaiming warranty or limiting liability differently from the terms of sections 15 and 16 of this License; or
b) Requiring preservation of specified reasonable legal notices or author attributions in that material or in the Appropriate Legal Notices displayed by works containing it; or
c) Prohibiting misrepresentation of the origin of that material, or requiring that modified versions of such material be marked in reasonable ways as different from the original version; or
d) Limiting the use for publicity purposes of names of licensors or authors of the material; or
e) Declining to grant rights under trademark law for use of some trade names, trademarks, or service marks; or
f) Requiring indemnification of licensors and authors of that material by anyone who conveys the material (or modified versions of it) with contractual assumptions of liability to the recipient, for any liability that these contractual assumptions directly impose on those licensors and authors.
All other non-permissive additional terms are considered "further restrictions" within the meaning of section 10. If the Program as you received it, or any part of it, contains a notice stating that it is governed by this License along with a term that is a further restriction, you may remove that term. If a license document contains a further restriction but permits relicensing or conveying under this License, you may add to a covered work material governed by the terms of that license document, provided that the further restriction does not survive such relicensing or conveying.
If you add terms to a covered work in accord with this section, you must place, in the relevant source files, a statement of the additional terms that apply to those files, or a notice indicating where to find the applicable terms.
Additional terms, permissive or non-permissive, may be stated in the form of a separately written license, or stated as exceptions; the above requirements apply either way.
8. Termination.
You may not propagate or modify a covered work except as expressly provided under this License. Any attempt otherwise to propagate or modify it is void, and will automatically terminate your rights under this License (including any patent licenses granted under the third paragraph of section 11).
However, if you cease all violation of this License, then your license from a particular copyright holder is reinstated (a) provisionally, unless and until the copyright holder explicitly and finally terminates your license, and (b) permanently, if the copyright holder fails to notify you of the violation by some reasonable means prior to 60 days after the cessation.
Moreover, your license from a particular copyright holder is reinstated permanently if the copyright holder notifies you of the violation by some reasonable means, this is the first time you have received notice of violation of this License (for any work) from that copyright holder, and you cure the violation prior to 30 days after your receipt of the notice.
Termination of your rights under this section does not terminate the licenses of parties who have received copies or rights from you under this License. If your rights have been terminated and not permanently reinstated, you do not qualify to receive new licenses for the same material under section 10.
9. Acceptance Not Required for Having Copies.
You are not required to accept this License in order to receive or run a copy of the Program. Ancillary propagation of a covered work occurring solely as a consequence of using peer-to-peer transmission to receive a copy likewise does not require acceptance. However, nothing other than this License grants you permission to propagate or modify any covered work. These actions infringe copyright if you do not accept this License. Therefore, by modifying or propagating a covered work, you indicate your acceptance of this License to do so.
10. Automatic Licensing of Downstream Recipients.
Each time you convey a covered work, the recipient automatically receives a license from the original licensors, to run, modify and propagate that work, subject to this License. You are not responsible for enforcing compliance by third parties with this License.
An "entity transaction" is a transaction transferring control of an organization, or substantially all assets of one, or subdividing an organization, or merging organizations. If propagation of a covered work results from an entity transaction, each party to that transaction who receives a copy of the work also receives whatever licenses to the work the party's predecessor in interest had or could give under the previous paragraph, plus a right to possession of the Corresponding Source of the work from the predecessor in interest, if the predecessor has it or can get it with reasonable efforts.
You may not impose any further restrictions on the exercise of the rights granted or affirmed under this License. For example, you may not impose a license fee, royalty, or other charge for exercise of rights granted under this License, and you may not initiate litigation (including a cross-claim or counterclaim in a lawsuit) alleging that any patent claim is infringed by making, using, selling, offering for sale, or importing the Program or any portion of it.
11. Patents.
A "contributor" is a copyright holder who authorizes use under this License of the Program or a work on which the Program is based. The work thus licensed is called the contributor's "contributor version".
A contributor's "essential patent claims" are all patent claims owned or controlled by the contributor, whether already acquired or hereafter acquired, that would be infringed by some manner, permitted by this License, of making, using, or selling its contributor version, but do not include claims that would be infringed only as a consequence of further modification of the contributor version. For purposes of this definition, "control" includes the right to grant patent sublicenses in a manner consistent with the requirements of this License.
Each contributor grants you a non-exclusive, worldwide, royalty-free patent license under the contributor's essential patent claims, to make, use, sell, offer for sale, import and otherwise run, modify and propagate the contents of its contributor version.
In the following three paragraphs, a "patent license" is any express agreement or commitment, however denominated, not to enforce a patent (such as an express permission to practice a patent or covenant not to sue for patent infringement). To "grant" such a patent license to a party means to make such an agreement or commitment not to enforce a patent against the party.
If you convey a covered work, knowingly relying on a patent license, and the Corresponding Source of the work is not available for anyone to copy, free of charge and under the terms of this License, through a publicly available network server or other readily accessible means, then you must either (1) cause the Corresponding Source to be so available, or (2) arrange to deprive yourself of the benefit of the patent license for this particular work, or (3) arrange, in a manner consistent with the requirements of this License, to extend the patent license to downstream recipients. "Knowingly relying" means you have actual knowledge that, but for the patent license, your conveying the covered work in a country, or your recipient's use of the covered work in a country, would infringe one or more identifiable patents in that country that you have reason to believe are valid.
If, pursuant to or in connection with a single transaction or arrangement, you convey, or propagate by procuring conveyance of, a covered work, and grant a patent license to some of the parties receiving the covered work authorizing them to use, propagate, modify or convey a specific copy of the covered work, then the patent license you grant is automatically extended to all recipients of the covered work and works based on it.
A patent license is "discriminatory" if it does not include within the scope of its coverage, prohibits the exercise of, or is conditioned on the non-exercise of one or more of the rights that are specifically granted under this License. You may not convey a covered work if you are a party to an arrangement with a third party that is in the business of distributing software, under which you make payment to the third party based on the extent of your activity of conveying the work, and under which the third party grants, to any of the parties who would receive the covered work from you, a discriminatory patent license (a) in connection with copies of the covered work conveyed by you (or copies made from those copies), or (b) primarily for and in connection with specific products or compilations that contain the covered work, unless you entered into that arrangement, or that patent license was granted, prior to 28 March 2007.
Nothing in this License shall be construed as excluding or limiting any implied license or other defenses to infringement that may otherwise be available to you under applicable patent law.
12. No Surrender of Others' Freedom.
If conditions are imposed on you (whether by court order, agreement or otherwise) that contradict the conditions of this License, they do not excuse you from the conditions of this License. If you cannot convey a covered work so as to satisfy simultaneously your obligations under this License and any other pertinent obligations, then as a consequence you may not convey it at all. For example, if you agree to terms that obligate you to collect a royalty for further conveying from those to whom you convey the Program, the only way you could satisfy both those terms and this License would be to refrain entirely from conveying the Program.
13. Use with the GNU Affero General Public License.
Notwithstanding any other provision of this License, you have permission to link or combine any covered work with a work licensed under version 3 of the GNU Affero General Public License into a single combined work, and to convey the resulting work. The terms of this License will continue to apply to the part which is the covered work, but the special requirements of the GNU Affero General Public License, section 13, concerning interaction through a network will apply to the combination as such.
14. Revised Versions of this License.
The Free Software Foundation may publish revised and/or new versions of the GNU General Public License from time to time. Such new versions will be similar in spirit to the present version, but may differ in detail to address new problems or concerns.
Each version is given a distinguishing version number. If the Program specifies that a certain numbered version of the GNU General Public License "or any later version" applies to it, you have the option of following the terms and conditions either of that numbered version or of any later version published by the Free Software Foundation. If the Program does not specify a version number of the GNU General Public License, you may choose any version ever published by the Free Software Foundation.
If the Program specifies that a proxy can decide which future versions of the GNU General Public License can be used, that proxy's public statement of acceptance of a version permanently authorizes you to choose that version for the Program.
Later license versions may give you additional or different permissions. However, no additional obligations are imposed on any author or copyright holder as a result of your choosing to follow a later version.
15. Disclaimer of Warranty.
THERE IS NO WARRANTY FOR THE PROGRAM, TO THE EXTENT PERMITTED BY APPLICABLE LAW. EXCEPT WHEN OTHERWISE STATED IN WRITING THE COPYRIGHT HOLDERS AND/OR OTHER PARTIES PROVIDE THE PROGRAM "AS IS" WITHOUT WARRANTY OF ANY KIND, EITHER EXPRESSED OR IMPLIED, INCLUDING, BUT NOT LIMITED TO, THE IMPLIED WARRANTIES OF MERCHANTABILITY AND FITNESS FOR A PARTICULAR PURPOSE. THE ENTIRE RISK AS TO THE QUALITY AND PERFORMANCE OF THE PROGRAM IS WITH YOU. SHOULD THE PROGRAM PROVE DEFECTIVE, YOU ASSUME THE COST OF ALL NECESSARY SERVICING, REPAIR OR CORRECTION.
16. Limitation of Liability.
IN NO EVENT UNLESS REQUIRED BY APPLICABLE LAW OR AGREED TO IN WRITING WILL ANY COPYRIGHT HOLDER, OR ANY OTHER PARTY WHO MODIFIES AND/OR CONVEYS THE PROGRAM AS PERMITTED ABOVE, BE LIABLE TO YOU FOR DAMAGES, INCLUDING ANY GENERAL, SPECIAL, INCIDENTAL OR CONSEQUENTIAL DAMAGES ARISING OUT OF THE USE OR INABILITY TO USE THE PROGRAM (INCLUDING BUT NOT LIMITED TO LOSS OF DATA OR DATA BEING RENDERED INACCURATE OR LOSSES SUSTAINED BY YOU OR THIRD PARTIES OR A FAILURE OF THE PROGRAM TO OPERATE WITH ANY OTHER PROGRAMS), EVEN IF SUCH HOLDER OR OTHER PARTY HAS BEEN ADVISED OF THE POSSIBILITY OF SUCH DAMAGES.
17. Interpretation of Sections 15 and 16.
If the disclaimer of warranty and limitation of liability provided above cannot be given local legal effect according to their terms, reviewing courts shall apply local law that most closely approximates an absolute waiver of all civil liability in connection with the Program, unless a warranty or assumption of liability accompanies a copy of the Program in return for a fee.
Bison Exception
As a special exception, you may create a larger work that contains part or all of the Bison parser skeleton and distribute that work under terms of your choice, so long as that work isn't itself a parser generator using the skeleton or a modified version thereof as a parser skeleton. Alternatively, if you modify or redistribute the parser skeleton itself, you may (at your option) remove this special exception, which will cause the skeleton and the resulting Bison output files to be licensed under the GNU General Public License without this special exception.
This special exception was added by the Free Software Foundation in version 2.2 of Bison.
END OF TERMS AND CONDITIONS
The WiX toolset is released under the Microsoft Reciprocal License (MS-RL). A reciprocal license is used to ensure that others who build on the effort of the WiX community give back to the WiX community. Specifically the license requires that fixes and improvements to the WiX toolset must be published using the same license.
Sometimes the reciprocal license is incorrectly interpreted to also apply to bundles, packages, and custom actions built using the WiX toolset. The Outercurve Foundation has previously provided this statement below to clarify which now the .NET Foundation reaffirms:
The WiX toolset (WiX) is licensed under the Microsoft Reciprocal License (MS-RL). The MS-RL governs the distribution of the software licensed under it, as well as derivative works, and incorporates the definition of a derivative work provided in U.S. copyright law. OuterCurve Foundation (and the .NET Foundation) does not view the installer packages generated by WiX as falling within the definition of a derivative work, merely because they are produced using WiX. Thus, the installer packages generated by WiX will normally fall outside the scope of the MS-RL, and any of your source code, binaries, libraries, routines or other software components that are incorporated in installer packages generated by WiX can be governed by other licensing terms.
The full text of the MS-RL license is reproduced below. It can also be found in the LICENSE.TXT file included with the source code.
Microsoft Reciprocal License (MS-RL)
This license governs use of the accompanying software. If you use the software, you accept this license. If you do not accept the license, do not use the software.
Definitions.
The terms "reproduce," "reproduction," "derivative works," and "distribution" have the same meaning here as under U.S. copyright law. A "contribution" is the original software, or any additions or changes to the software. A "contributor" is any person that distributes its contribution under this license. "Licensed patents" are a contributor's patent claims that read directly on its contribution. disclaimer.
Grant of Rights
Copyright Grant- Subject to the terms of this license, including the license conditions and limitations in section 3, each contributor grants you a non-exclusive, worldwide, royalty-free copyright license to reproduce its contribution, prepare derivative works of its contribution, and distribute its contribution or any derivative works that you create.
Patent Grant- Subject to the terms of this license, including the license conditions and limitations in section 3, each contributor grants you a non-exclusive, worldwide, royalty-free license under its licensed patents to make, have made, use, sell, offer for sale, import, and/or otherwise dispose of its contribution in the software or derivative works of the contribution in the software.
Conditions and Limitations
Reciprocal Grants- For any file you distribute that contains code from the software (in source code or binary format), you must provide recipients the source code to that file along with a copy of this license, which license will govern that file. You may license other files that are entirely your own work and do not contain code from the software under any terms you choose.
No Trademark License- This license does not grant you rights to use any contributors' name, logo, or trademarks.
If you bring a patent claim against any contributor over patents that you claim are infringed by the software, your patent license from such contributor to the software ends automatically.
If you distribute any portion of the software, you must retain all copyright, patent, trademark, and attribution notices that are present in the software.
If you distribute any portion of the software in source code form, you may do so only under this license by including a complete copy of this license with your distribution. If you distribute any portion of the software in compiled or object code form, you may only do so under a license that complies with this license.
The software is licensed "as-is." You bear the risk of using it. The contributors give no express warranties, guarantees or conditions. You may have additional consumer rights under your local laws which this license cannot change. To the extent permitted under your local laws, the contributors exclude the implied warranties of merchantability, fitness for a particular purpose and non-infringement.
Copyright (C) 1994-2003 The XFree86 Project, Inc. All Rights Reserved.
Permission is hereby granted, free of charge, to any person obtaining a copy of this software and associated documentation files (the "Software"), to deal in the Software without restriction, including without limitation the rights to use, copy, modify, merge, publish, distribute, sublicense, and/or sell copies of the Software, and to permit persons to whom the Software is furnished to do so, subject to the following conditions:
The above copyright notice and this permission notice shall be included in all copies or substantial portions of the Software.
THE SOFTWARE IS PROVIDED "AS IS", WITHOUT WARRANTY OF ANY KIND, EXPRESS OR IMPLIED, INCLUDING BUT NOT LIMITED TO THE WARRANTIES OF MERCHANTABILITY, FITNESS FOR A PARTICULAR PURPOSE AND NONINFRINGEMENT. IN NO EVENT SHALL THE XFREE86 PROJECT BE LIABLE FOR ANY CLAIM, DAMAGES OR OTHER LIABILITY, WHETHER IN AN ACTION OF CONTRACT, TORT OR OTHERWISE, ARISING FROM, OUT OF OR IN CONNECTION WITH THE SOFTWARE OR THE USE OR OTHER DEALINGS IN THE SOFTWARE.
Except as contained in this notice, the name of the XFree86 Project shall not be used in advertising or otherwise to promote the sale, use or other dealings in this Software without prior written authorization from the XFree86 Project.
Copyright 1997 by The XFree86 Project, Inc.
Permission to use, copy, modify, distribute, and sell this software and its documentation for any purpose is hereby granted without fee, provided that the above copyright notice appear in all copies and that both that copyright notice and this permission notice appear in supporting documentation, and that the name of the XFree86 Project, Inc. not be used in advertising or publicity pertaining to distribution of the software without specific, written prior permission. The Xfree86 Project, Inc. makes no representations about the suitability of this software for any purpose. It is provided "as is" without express or implied warranty.
THE XFREE86 PROJECT, INC. DISCLAIMS ALL WARRANTIES WITH REGARD TO THIS SOFTWARE, INCLUDING ALL IMPLIED WARRANTIES OF MERCHANTABILITY AND FITNESS, IN NO EVENT SHALL OREST ZBOROWSKI OR DAVID WEXELBLAT BE LIABLE FOR ANY SPECIAL, INDIRECT OR CONSEQUENTIAL DAMAGES OR ANY DAMAGES WHATSOEVER RESULTING FROM LOSS OF USE, DATA OR PROFITS, WHETHER IN AN ACTION OF CONTRACT, NEGLIGENCE OR OTHER TORTIOUS ACTION, ARISING OUT OF OR IN CONNECTION WITH THE USE OR PERFORMANCE OF THIS SOFTWARE.
Copyright (c) 2013-2022, Randolph Voorhies, Shane Grant All rights reserved.
Redistribution and use in source and binary forms, with or without modification, are permitted provided that the following conditions are met:
Redistributions of source code must retain the above copyright notice, this list of conditions and the following disclaimer.
Redistributions in binary form must reproduce the above copyright notice, this list of conditions and the following disclaimer in the documentation and/or other materials provided with the distribution.
Neither the name of the copyright holder nor the names of its contributors may be used to endorse or promote products derived from this software without specific prior written permission.
THIS SOFTWARE IS PROVIDED BY THE COPYRIGHT HOLDERS AND CONTRIBUTORS "AS IS" AND ANY EXPRESS OR IMPLIED WARRANTIES, INCLUDING, BUT NOT LIMITED TO, THE IMPLIED WARRANTIES OF MERCHANTABILITY AND FITNESS FOR A PARTICULAR PURPOSE ARE DISCLAIMED. IN NO EVENT SHALL THE COPYRIGHT HOLDER OR CONTRIBUTORS BE LIABLE FOR ANY DIRECT, INDIRECT, INCIDENTAL, SPECIAL, EXEMPLARY, OR CONSEQUENTIAL DAMAGES (INCLUDING, BUT NOT LIMITED TO, PROCUREMENT OF SUBSTITUTE GOODS OR SERVICES; LOSS OF USE, DATA, OR PROFITS; OR BUSINESS INTERRUPTION) HOWEVER CAUSED AND ON ANY THEORY OF LIABILITY, WHETHER IN CONTRACT, STRICT LIABILITY, OR TORT (INCLUDING NEGLIGENCE OR OTHERWISE) ARISING IN ANY WAY OUT OF THE USE OF THIS SOFTWARE, EVEN IF ADVISED OF THE POSSIBILITY OF SUCH DAMAGE.
Copyright (c) 2001, 2003 Keith Packard
Permission to use, copy, modify, distribute, and sell this software and its documentation for any purpose is hereby granted without fee, provided that the above copyright notice appear in all copies and that both that copyright notice and this permission notice appear in supporting documentation, and that the name of Keith Packard not be used in advertising or publicity pertaining to distribution of the software without specific, written prior permission. Keith Packard makes no representations about the suitability of this software for any purpose. It is provided "as is" without express or implied warranty.
KEITH PACKARD DISCLAIMS ALL WARRANTIES WITH REGARD TO THIS SOFTWARE, INCLUDING ALL IMPLIED WARRANTIES OF MERCHANTABILITY AND FITNESS, IN NO EVENT SHALL KEITH PACKARD BE LIABLE FOR ANY SPECIAL, INDIRECT OR CONSEQUENTIAL DAMAGES OR ANY DAMAGES WHATSOEVER RESULTING FROM LOSS OF USE, DATA OR PROFITS, WHETHER IN AN ACTION OF CONTRACT, NEGLIGENCE OR OTHER TORTIOUS ACTION, ARISING OUT OF OR IN CONNECTION WITH THE USE OR PERFORMANCE OF THIS SOFTWARE.
Copyright (c) 2007 Red Hat, Inc.
Permission is hereby granted, free of charge, to any person obtaining a copy of this software and associated documentation files (the "Software"), to deal in the Software without restriction, including without limitation the rights to use, copy, modify, merge, publish, distribute, and/or sell copies of the Software, and to permit persons to whom the Software is furnished to do so, provided that the above copyright notice(s) and this permission notice appear in all copies of the Soft- ware and that both the above copyright notice(s) and this permission notice appear in supporting documentation.
THE SOFTWARE IS PROVIDED "AS IS", WITHOUT WARRANTY OF ANY KIND, EXPRESS OR IMPLIED, INCLUDING BUT NOT LIMITED TO THE WARRANTIES OF MERCHANTABILITY, FITNESS FOR A PARTICULAR PURPOSE AND NONINFRINGEMENT OF THIRD PARTY RIGHTS. IN NO EVENT SHALL THE COPYRIGHT HOLDER OR HOLDERS INCLUDED IN THIS NOTICE BE LIABLE FOR ANY CLAIM, OR ANY SPECIAL INDIRECT OR CONSEQUENTIAL DAMAGES, OR ANY DAMAGES WHATSOEVER RESULTING FROM LOSS OF USE, DATA OR PROFITS, WHETHER IN AN ACTION OF CONTRACT, NEGLIGENCE OR OTHER TORTIOUS ACTION, ARISING OUT OF OR IN CONNECTION WITH THE USE OR PERFORMANCE OF THIS SOFTWARE.
Except as contained in this notice, the name of a copyright holder shall not be used in advertising or otherwise to promote the sale, use or other dealings in this Software without prior written authorization of the copyright holder.
Authors: Kristian Høgsberg (krh@redhat.com)
Copyright 1990, 1991 Network Computing Devices; Portions Copyright 1987 by Digital Equipment Corporation
Permission to use, copy, modify, distribute, and sell this software and its documentation for any purpose is hereby granted without fee, provided that the above copyright notice appear in all copies and that both that copyright notice and this permission notice appear in supporting documentation, and that the names of Network Computing Devices or Digital not be used in advertising or publicity pertaining to distribution of the software without specific, written prior permission. Network Computing Devices and Digital make no representations about the suitability of this software for any purpose. It is provided "as is" without express or implied warranty.
NETWORK COMPUTING DEVICES AND DIGITAL DISCLAIM ALL WARRANTIES WITH REGARD TO THIS SOFTWARE, INCLUDING ALL IMPLIED WARRANTIES OF MERCHANTABILITY AND FITNESS, IN NO EVENT SHALL NETWORK COMPUTING DEVICES OR DIGITAL BE LIABLE FOR ANY SPECIAL, INDIRECT OR CONSEQUENTIAL DAMAGES OR ANY DAMAGES WHATSOEVER RESULTING FROM LOSS OF USE, DATA OR PROFITS, WHETHER IN AN ACTION OF CONTRACT, NEGLIGENCE OR OTHER TORTIOUS ACTION, ARISING OUT OF OR IN CONNECTION WITH THE USE OR PERFORMANCE OF THIS SOFTWARE.
Copyright 1989, 1990, 1991, 1998 The Open Group
Permission to use, copy, modify, distribute, and sell this software and its documentation for any purpose is hereby granted without fee, provided that the above copyright notice appear in all copies and that both that copyright notice and this permission notice appear in supporting documentation.
The above copyright notice and this permission notice shall be included in all copies or substantial portions of the Software.
THE SOFTWARE IS PROVIDED "AS IS", WITHOUT WARRANTY OF ANY KIND, EXPRESS OR IMPLIED, INCLUDING BUT NOT LIMITED TO THE WARRANTIES OF MERCHANTABILITY, FITNESS FOR A PARTICULAR PURPOSE AND NONINFRINGEMENT. IN NO EVENT SHALL THE OPEN GROUP BE LIABLE FOR ANY CLAIM, DAMAGES OR OTHER LIABILITY, WHETHER IN AN ACTION OF CONTRACT, TORT OR OTHERWISE, ARISING FROM, OUT OF OR IN CONNECTION WITH THE SOFTWARE OR THE USE OR OTHER DEALINGS IN THE SOFTWARE.
Except as contained in this notice, the name of The Open Group shall not be used in advertising or otherwise to promote the sale, use or other dealings in this Software without prior written authorization from The Open Group.
Copyright 1987 by Digital Equipment Corporation, Maynard, Massachusetts. All Rights Reserved
Permission to use, copy, modify, and distribute this software and its documentation for any purpose and without fee is hereby granted, provided that the above copyright notice appear in all copies and that both that copyright notice and this permission notice appear in supporting documentation, and that the name of Digital not be used in advertising or publicity pertaining to distribution of the software without specific, written prior permission.
DIGITAL DISCLAIMS ALL WARRANTIES WITH REGARD TO THIS SOFTWARE, INCLUDING ALL IMPLIED WARRANTIES OF MERCHANTABILITY AND FITNESS, IN NO EVENT SHALL DIGITAL BE LIABLE FOR ANY SPECIAL, INDIRECT OR CONSEQUENTIAL DAMAGES OR ANY DAMAGES WHATSOEVER RESULTING FROM LOSS OF USE, DATA OR PROFITS, WHETHER IN AN ACTION OF CONTRACT, NEGLIGENCE OR OTHER TORTIOUS ACTION, ARISING OUT OF OR IN CONNECTION WITH THE USE OR PERFORMANCE OF THIS SOFTWARE.
Copyright (c) 1996 Digital Equipment Corporation, Maynard, Massachusetts.
Permission is hereby granted, free of charge, to any person obtaining a copy of this software and associated documentation files (the "Software"), to deal in the Software without restriction, including without limitation the rights to use, copy, modify, merge, publish, distribute, sublicense, and/or sell copies of the Software.
The above copyright notice and this permission notice shall be included in all copies or substantial portions of the Software.
THE SOFTWARE IS PROVIDED "AS IS", WITHOUT WARRANTY OF ANY KIND, EXPRESS OR IMPLIED, INCLUDING BUT NOT LIMITED TO THE WARRANTIES OF MERCHANTABILITY, FITNESS FOR A PARTICULAR PURPOSE AND NONINFRINGEMENT. IN NO EVENT SHALL DIGITAL EQUIPMENT CORPORATION BE LIABLE FOR ANY CLAIM, DAMAGES, INCLUDING, BUT NOT LIMITED TO CONSEQUENTIAL OR INCIDENTAL DAMAGES, OR OTHER LIABILITY, WHETHER IN AN ACTION OF CONTRACT, TORT OR OTHERWISE, ARISING FROM, OUT OF OR IN CONNECTION WITH THE SOFTWARE OR THE USE OR OTHER DEALINGS IN THE SOFTWARE.
Except as contained in this notice, the name of Digital Equipment Corporation shall not be used in advertising or otherwise to promote the sale, use or other dealings in this Software without prior written authorization from Digital Equipment Corporation.
Copyright 1997 Digital Equipment Corporation. All rights reserved.
This software is furnished under license and may be used and copied only in accordance with the following terms and conditions. Subject to these conditions, you may download, copy, install, use, modify and distribute this software in source and/or binary form. No title or ownership is transferred hereby.
1) Any source code used, modified or distributed must reproduce and retain this copyright notice and list of conditions as they appear in the source file.
2) No right is granted to use any trade name, trademark, or logo of Digital Equipment Corporation. Neither the "Digital Equipment Corporation" name nor any trademark or logo of Digital Equipment Corporation may be used to endorse or promote products derived from this software without the prior written permission of Digital Equipment Corporation.
3) This software is provided "AS-IS" and any express or implied warranties, including but not limited to, any implied warranties of merchantability, fitness for a particular purpose, or non-infringement are disclaimed. In no event shall DIGITAL be liable for any damages whatsoever, and in particular, DIGITAL shall not be liable for special, indirect, consequential, or incidental damages or damages for lost profits, loss of revenue or loss of use, whether such damages arise in contract, negligence, tort, under statute, in equity, at law or otherwise, even if advised of the possibility of such damage.
Copyright 1987 by Digital Equipment Corporation, Maynard, Massachusetts, Copyright 1994 Quarterdeck Office Systems. All Rights Reserved
Permission to use, copy, modify, and distribute this software and its documentation for any purpose and without fee is hereby granted, provided that the above copyright notice appear in all copies and that both that copyright notice and this permission notice appear in supporting documentation, and that the names of Digital and Quarterdeck not be used in advertising or publicity pertaining to distribution of the software without specific, written prior permission.
DIGITAL AND QUARTERDECK DISCLAIM ALL WARRANTIES WITH REGARD TO THIS SOFTWARE, INCLUDING ALL IMPLIED WARRANTIES OF MERCHANTABILITY AND FITNESS, IN NO EVENT SHALL DIGITAL BE LIABLE FOR ANY SPECIAL, INDIRECT OR CONSEQUENTIAL DAMAGES OR ANY DAMAGES WHATSOEVER RESULTING FROM LOSS OF USE, DATA OR PROFITS, WHETHER IN AN ACTION OF CONTRACT, NEGLIGENCE OR OTHER TORTIOUS ACTION, ARISING OUT OF OR IN CONNECTION WITH THE USE OR PERFORMANCE OF THIS SOFTWARE.
Copyright 1989 by Hewlett-Packard Company, Palo Alto, California.
Permission to use, copy, modify, and distribute this software and its documentation for any purpose and without fee is hereby granted, provided that the above copyright notice appear in all copies and that both that copyright notice and this permission notice appear in supporting documentation, and that the name of Hewlett-Packard not be used in advertising or publicity pertaining to distribution of the software without specific, written prior permission.
HEWLETT-PACKARD DISCLAIMS ALL WARRANTIES WITH REGARD TO THIS SOFTWARE, INCLUDING ALL IMPLIED WARRANTIES OF MERCHANTABILITY AND FITNESS, IN NO EVENT SHALL HEWLETT-PACKARD BE LIABLE FOR ANY SPECIAL, INDIRECT OR CONSEQUENTIAL DAMAGES OR ANY DAMAGES WHATSOEVER RESULTING FROM LOSS OF USE, DATA OR PROFITS, WHETHER IN AN ACTION OF CONTRACT, NEGLIGENCE OR OTHER TORTIOUS ACTION, ARISING OUT OF OR IN CONNECTION WITH THE USE OR PERFORMANCE OF THIS SOFTWARE.
Copyright (c) 1994, 1995 Hewlett-Packard Company
Permission is hereby granted, free of charge, to any person obtaining a copy of this software and associated documentation files (the "Software"), to deal in the Software without restriction, including without limitation the rights to use, copy, modify, merge, publish, distribute, sublicense, and/or sell copies of the Software, and to permit persons to whom the Software is furnished to do so, subject to the following conditions:
The above copyright notice and this permission notice shall be included in all copies or substantial portions of the Software.
THE SOFTWARE IS PROVIDED "AS IS", WITHOUT WARRANTY OF ANY KIND, EXPRESS OR IMPLIED, INCLUDING BUT NOT LIMITED TO THE WARRANTIES OF MERCHANTABILITY, FITNESS FOR A PARTICULAR PURPOSE AND NONINFRINGEMENT. IN NO EVENT SHALL HEWLETT-PACKARD COMPANY BE LIABLE FOR ANY CLAIM, DAMAGES OR OTHER LIABILITY, WHETHER IN AN ACTION OF CONTRACT, TORT OR OTHERWISE, ARISING FROM, OUT OF OR IN CONNECTION WITH THE SOFTWARE OR THE USE OR OTHER DEALINGS IN THE SOFTWARE.
Except as contained in this notice, the name of the Hewlett-Packard Company shall not be used in advertising or otherwise to promote the sale, use or other dealings in this Software without prior written authorization from the Hewlett-Packard Company.
Copyright 1986, 1987, 1988 by Hewlett-Packard Corporation
Permission to use, copy, modify, and distribute this software and its documentation for any purpose and without fee is hereby granted, provided that the above copyright notice appear in all copies and that both that copyright notice and this permission notice appear in supporting documentation, and that the name of Hewlett-Packard not be used in advertising or publicity pertaining to distribution of the software without specific, written prior permission.
Hewlett-Packard makes no representations about the suitability of this software for any purpose. It is provided "as is" without express or implied warranty.
This software is not subject to any license of the American Telephone and Telegraph Company or of the Regents of the University of California.
Copyright 1987 by Apollo Computer Inc., Chelmsford, Massachusetts.; Copyright 1989 by Hewlett-Packard Company. All Rights Reserved
Permission to use, duplicate, change, and distribute this software and its documentation for any purpose and without fee is granted, provided that the above copyright notice appear in such copy and that this copyright notice appear in all supporting documentation, and that the names of Apollo Computer Inc., the Hewlett-Packard Company, or the X Consortium not be used in advertising or publicity pertaining to distribution of the software without written prior permission.
HEWLETT-PACKARD MAKES NO WARRANTY OF ANY KIND WITH REGARD TO THIS SOFWARE, INCLUDING, BUT NOT LIMITED TO, THE IMPLIED WARRANTIES OF MERCHANTABILITY AND FITNESS FOR A PARTICULAR PURPOSE. Hewlett-Packard shall not be liable for errors contained herein or direct, indirect, special, incidental or consequential damages in connection with the furnishing, performance, or use of this material.
Copyright (c) 1993, 1997 by Silicon Graphics Computer Systems, Inc.
Permission to use, copy, modify, and distribute this software and its documentation for any purpose and without fee is hereby granted, provided that the above copyright notice appear in all copies and that both that copyright notice and this permission notice appear in supporting documentation, and that the name of Silicon Graphics not be used in advertising or publicity pertaining to distribution of the software without specific prior written permission. Silicon Graphics makes no representation about the suitability of this software for any purpose. It is provided "as is" without any express or implied warranty.
SILICON GRAPHICS DISCLAIMS ALL WARRANTIES WITH REGARD TO THIS SOFTWARE, INCLUDING ALL IMPLIED WARRANTIES OF MERCHANTABILITY AND FITNESS FOR A PARTICULAR PURPOSE. IN NO EVENT SHALL SILICON GRAPHICS BE LIABLE FOR ANY SPECIAL, INDIRECT OR CONSEQUENTIAL DAMAGES OR ANY DAMAGES WHATSOEVER RESULTING FROM LOSS OF USE, DATA OR PROFITS, WHETHER IN AN ACTION OF CONTRACT, NEGLIGENCE OR OTHER TORTIOUS ACTION, ARISING OUT OF OR IN CONNECTION WITH THE USE OR PERFORMANCE OF THIS SOFTWARE.
Copyright (c) 2000 Compaq Computer Corporation; Copyright (c) 2002 Hewlett-Packard Company; Copyright (c) 2006 Intel Corporation; Copyright (c) 2008 Red Hat, Inc.
Permission to use, copy, modify, distribute, and sell this software and its documentation for any purpose is hereby granted without fee, provided that the above copyright notice appear in all copies and that both that copyright notice and this permission notice appear in supporting documentation, and that the name of the copyright holders not be used in advertising or publicity pertaining to distribution of the software without specific, written prior permission. The copyright holders make no representations about the suitability of this software for any purpose. It is provided "as is" without express or implied warranty.
THE COPYRIGHT HOLDERS DISCLAIM ALL WARRANTIES WITH REGARD TO THIS SOFTWARE, INCLUDING ALL IMPLIED WARRANTIES OF MERCHANTABILITY AND FITNESS, IN NO EVENT SHALL THE COPYRIGHT HOLDERS BE LIABLE FOR ANY SPECIAL, INDIRECT OR CONSEQUENTIAL DAMAGES OR ANY DAMAGES WHATSOEVER RESULTING FROM LOSS OF USE, DATA OR PROFITS, WHETHER IN AN ACTION OF CONTRACT, NEGLIGENCE OR OTHER TORTIOUS ACTION, ARISING OUT OF OR IN CONNECTION WITH THE USE OR PERFORMANCE OF THIS SOFTWARE.
Copyright (c) 2000 SuSE, Inc.
Permission to use, copy, modify, distribute, and sell this software and its documentation for any purpose is hereby granted without fee, provided that the above copyright notice appear in all copies and that both that copyright notice and this permission notice appear in supporting documentation, and that the name of SuSE not be used in advertising or publicity pertaining to distribution of the software without specific, written prior permission. SuSE makes no representations about the suitability of this software for any purpose. It is provided "as is" without express or implied warranty.
SuSE DISCLAIMS ALL WARRANTIES WITH REGARD TO THIS SOFTWARE, INCLUDING ALL IMPLIED WARRANTIES OF MERCHANTABILITY AND FITNESS, IN NO EVENT SHALL SuSE BE LIABLE FOR ANY SPECIAL, INDIRECT OR CONSEQUENTIAL DAMAGES OR ANY DAMAGES WHATSOEVER RESULTING FROM LOSS OF USE, DATA OR PROFITS, WHETHER IN AN ACTION OF CONTRACT, NEGLIGENCE OR OTHER TORTIOUS ACTION, ARISING OUT OF OR IN CONNECTION WITH THE USE OR PERFORMANCE OF THIS SOFTWARE.
Copyright 1992 Network Computing Devices; Portions
Permission to use, copy, modify, distribute, and sell this software and its documentation for any purpose is hereby granted without fee, provided that the above copyright notice appear in all copies and that both that copyright notice and this permission notice appear in supporting documentation, and that the name of NCD. not be used in advertising or publicity pertaining to distribution of the software without specific, written prior permission. NCD. makes no representations about the suitability of this software for any purpose. It is provided "as is" without express or implied warranty.
NCD. DISCLAIMS ALL WARRANTIES WITH REGARD TO THIS SOFTWARE, INCLUDING ALL IMPLIED WARRANTIES OF MERCHANTABILITY AND FITNESS, IN NO EVENT SHALL NCD. BE LIABLE FOR ANY SPECIAL, INDIRECT OR CONSEQUENTIAL DAMAGES OR ANY DAMAGES WHATSOEVER RESULTING FROM LOSS OF USE, DATA OR PROFITS, WHETHER IN AN ACTION OF CONTRACT, NEGLIGENCE OR OTHER TORTIOUS ACTION, ARISING OUT OF OR IN CONNECTION WITH THE USE OR PERFORMANCE OF THIS SOFTWARE.
Copyright 1988, 1989, 1990, 1994 Network Computing Devices, Inc.
Permission to use, copy, modify, distribute, and sell this software and its documentation for any purpose is hereby granted without fee, provided that the above copyright notice appear in all copies and that both that copyright notice and this permission notice appear in supporting documentation, and that the name Network Computing Devices, Inc. not be used in advertising or publicity pertaining to distribution of this software without specific, written prior permission.
THIS SOFTWARE IS PROVIDED `AS-IS'. NETWORK COMPUTING DEVICES, INC., DISCLAIMS ALL WARRANTIES WITH REGARD TO THIS SOFTWARE, INCLUDING WITHOUT LIMITATION ALL IMPLIED WARRANTIES OF MERCHANTABILITY, FITNESS FOR A PARTICULAR PURPOSE, OR NONINFRINGEMENT. IN NO EVENT SHALL NETWORK COMPUTING DEVICES, INC., BE LIABLE FOR ANY DAMAGES WHATSOEVER, INCLUDING SPECIAL, INCIDENTAL OR CONSEQUENTIAL DAMAGES, INCLUDING LOSS OF USE, DATA, OR PROFITS, EVEN IF ADVISED OF THE POSSIBILITY THEREOF, AND REGARDLESS OF WHETHER IN AN ACTION IN CONTRACT, TORT OR NEGLIGENCE, ARISING OUT OF OR IN CONNECTION WITH THE USE OR PERFORMANCE OF THIS SOFTWARE.
Copyright 1989 Network Computing Devices, Inc., Mountain View, California.
Permission to use, copy, modify, and distribute this software and its documentation for any purpose and without fee is hereby granted, provided that the above copyright notice appear in all copies and that both that copyright notice and this permission notice appear in supporting documentation, and that the name of N.C.D. not be used in advertising or publicity pertaining to distribution of the software without specific, written prior permission. N.C.D. makes no representations about the suitability of this software for any purpose. It is provided "as is" without express or implied warranty.
Copyright 1991,1993 by Digital Equipment Corporation, Maynard, Massachusetts, and Olivetti Research Limited, Cambridge, England. All Rights Reserved
Permission to use, copy, modify, and distribute this software and its documentation for any purpose and without fee is hereby granted, provided that the above copyright notice appear in all copies and that both that copyright notice and this permission notice appear in supporting documentation, and that the names of Digital or Olivetti not be used in advertising or publicity pertaining to distribution of the software without specific, written prior permission.
DIGITAL AND OLIVETTI DISCLAIM ALL WARRANTIES WITH REGARD TO THIS SOFTWARE, INCLUDING ALL IMPLIED WARRANTIES OF MERCHANTABILITY AND FITNESS, IN NO EVENT SHALL THEY BE LIABLE FOR ANY SPECIAL, INDIRECT OR CONSEQUENTIAL DAMAGES OR ANY DAMAGES WHATSOEVER RESULTING FROM LOSS OF USE, DATA OR PROFITS, WHETHER IN AN ACTION OF CONTRACT, NEGLIGENCE OR OTHER TORTIOUS ACTION, ARISING OUT OF OR IN CONNECTION WITH THE USE OR PERFORMANCE OF THIS SOFTWARE.
Copyright (c) 1989 X Consortium, Inc. and Digital Equipment Corporation.; Copyright (c) 1992 X Consortium, Inc. and Intergraph Corporation.; Copyright (c) 1993 X Consortium, Inc. and Silicon Graphics, Inc.; Copyright (c) 1994, 1995 X Consortium, Inc. and Hewlett-Packard Company.
Permission to use, copy, modify, and distribute this documentation for any purpose and without fee is hereby granted, provided that the above copyright notice and this permission notice appear in all copies. Digital Equipment Corporation, Intergraph Corporation, Silicon Graphics, Hewlett-Packard, and the X Consortium make no representations about the suitability for any purpose of the information in this document. This documentation is provided ``as is'' without express or implied warranty.
Copyright 2007, 2008, 2009 Sun Microsystems, Inc. All rights reserved.
Permission is hereby granted, free of charge, to any person obtaining a copy of this software and associated documentation files (the "Software"), to deal in the Software without restriction, including without limitation the rights to use, copy, modify, merge, publish, distribute, and/or sell copies of the Software, and to permit persons to whom the Software is furnished to do so, provided that the above copyright notice(s) and this permission notice appear in all copies of the Software and that both the above copyright notice(s) and this permission notice appear in supporting documentation.
THE SOFTWARE IS PROVIDED "AS IS", WITHOUT WARRANTY OF ANY KIND, EXPRESS OR IMPLIED, INCLUDING BUT NOT LIMITED TO THE WARRANTIES OF MERCHANTABILITY, FITNESS FOR A PARTICULAR PURPOSE AND NONINFRINGEMENT OF THIRD PARTY RIGHTS. IN NO EVENT SHALL THE COPYRIGHT HOLDER OR HOLDERS INCLUDED IN THIS NOTICE BE LIABLE FOR ANY CLAIM, OR ANY SPECIAL INDIRECT OR CONSEQUENTIAL DAMAGES, OR ANY DAMAGES WHATSOEVER RESULTING FROM LOSS OF USE, DATA OR PROFITS, WHETHER IN AN ACTION OF CONTRACT, NEGLIGENCE OR OTHER TORTIOUS ACTION, ARISING OUT OF OR IN CONNECTION WITH THE USE OR PERFORMANCE OF THIS SOFTWARE.
Except as contained in this notice, the name of a copyright holder shall not be used in advertising or otherwise to promote the sale, use or other dealings in this Software without prior written authorization of the copyright holder.
Copyright (c) 2008 Juan Romero Pardines; Copyright (c) 2008 Mark Kettenis
Permission to use, copy, modify, and distribute this software for any purpose with or without fee is hereby granted, provided that the above copyright notice and this permission notice appear in all copies.
THE SOFTWARE IS PROVIDED "AS IS" AND THE AUTHOR DISCLAIMS ALL WARRANTIES WITH REGARD TO THIS SOFTWARE INCLUDING ALL IMPLIED WARRANTIES OF MERCHANTABILITY AND FITNESS. IN NO EVENT SHALL THE AUTHOR BE LIABLE FOR ANY SPECIAL, DIRECT, INDIRECT, OR CONSEQUENTIAL DAMAGES OR ANY DAMAGES WHATSOEVER RESULTING FROM LOSS OF USE, DATA OR PROFITS, WHETHER IN AN ACTION OF CONTRACT, NEGLIGENCE OR OTHER TORTIOUS ACTION, ARISING OUT OF OR IN CONNECTION WITH THE USE OR PERFORMANCE OF THIS SOFTWARE.
Copyright (c) 2013 Keith Packard
Permission to use, copy, modify, distribute, and sell this software and its documentation for any purpose is hereby granted without fee, provided that the above copyright notice appear in all copies and that both that copyright notice and this permission notice appear in supporting documentation, and that the name of the copyright holders not be used in advertising or publicity pertaining to distribution of the software without specific, written prior permission. The copyright holders make no representations about the suitability of this software for any purpose. It is provided "as is" without express or implied warranty.
THE COPYRIGHT HOLDERS DISCLAIM ALL WARRANTIES WITH REGARD TO THIS SOFTWARE, INCLUDING ALL IMPLIED WARRANTIES OF MERCHANTABILITY AND FITNESS, IN NO EVENT SHALL THE COPYRIGHT HOLDERS BE LIABLE FOR ANY SPECIAL, INDIRECT OR CONSEQUENTIAL DAMAGES OR ANY DAMAGES WHATSOEVER RESULTING FROM LOSS OF USE, DATA OR PROFITS, WHETHER IN AN ACTION OF CONTRACT, NEGLIGENCE OR OTHER TORTIOUS ACTION, ARISING OUT OF OR IN CONNECTION WITH THE USE OR PERFORMANCE OF THIS SOFTWARE.
Copyright 1990,91 by Thomas Roell, Dinkelscherben, Germany.; Copyright 1993 by David Dawes <dawes@xfree86.org>; Copyright 2002 by SuSE Linux AG, Author: Egbert Eich; Copyright 1994-2002 by The XFree86 Project, Inc.; Copyright 2002 by Paul Elliott
Permission to use, copy, modify, distribute, and sell this software and its documentation for any purpose is hereby granted without fee, provided that the above copyright notice appear in all copies and that both that copyright notice and this permission notice appear in supporting documentation, and that the names of copyright holders not be used in advertising or publicity pertaining to distribution of the software without specific, written prior permission. The copyright holders make no representations about the suitability of this software for any purpose. It is provided "as is" without express or implied warranty.
THE COPYRIGHT HOLDERS DISCLAIM ALL WARRANTIES WITH REGARD TO THIS SOFTWARE, INCLUDING ALL IMPLIED WARRANTIES OF MERCHANTABILITY AND FITNESS, IN NO EVENT SHALL THE COPYRIGHT HOLDERS BE LIABLE FOR ANY SPECIAL, INDIRECT OR CONSEQUENTIAL DAMAGES OR ANY DAMAGES WHATSOEVER RESULTING FROM LOSS OF USE, DATA OR PROFITS, WHETHER IN AN ACTION OF CONTRACT, NEGLIGENCE OR OTHER TORTIOUS ACTION, ARISING OUT OF OR IN CONNECTION WITH THE USE OR PERFORMANCE OF THIS SOFTWARE.
Copyright 1998 by Kazutaka YOKOTA <yokota@zodiac.mech.utsunomiya-u.ac.jp>
Permission to use, copy, modify, distribute, and sell this software and its documentation for any purpose is hereby granted without fee, provided that the above copyright notice appear in all copies and that both that copyright notice and this permission notice appear in supporting documentation, and that the name of Kazutaka YOKOTA not be used in advertising or publicity pertaining to distribution of the software without specific, written prior permission. Kazutaka YOKOTA makes no representations about the suitability of this software for any purpose. It is provided "as is" without express or implied warranty.
KAZUTAKA YOKOTA DISCLAIMS ALL WARRANTIES WITH REGARD TO THIS SOFTWARE, INCLUDING ALL IMPLIED WARRANTIES OF MERCHANTABILITY AND FITNESS, IN NO EVENT SHALL KAZUTAKA YOKOTA BE LIABLE FOR ANY SPECIAL, INDIRECT OR CONSEQUENTIAL DAMAGES OR ANY DAMAGES WHATSOEVER RESULTING FROM LOSS OF USE, DATA OR PROFITS, WHETHER IN AN ACTION OF CONTRACT, NEGLIGENCE OR OTHER TORTIOUS ACTION, ARISING OUT OF OR IN CONNECTION WITH THE USE OR PERFORMANCE OF THIS SOFTWARE.
Copyright (c) 2000 by Conectiva S.A. (http://www.conectiva.com)
Permission is hereby granted, free of charge, to any person obtaining a copy of this software and associated documentation files (the "Software"), to deal in the Software without restriction, including without limitation the rights to use, copy, modify, merge, publish, distribute, sublicense, and/or sell copies of the Software, and to permit persons to whom the Software is furnished to do so, subject to the following conditions:
The above copyright notice and this permission notice shall be included in all copies or substantial portions of the Software.
THE SOFTWARE IS PROVIDED "AS IS", WITHOUT WARRANTY OF ANY KIND, EXPRESS OR IMPLIED, INCLUDING BUT NOT LIMITED TO THE WARRANTIES OF MERCHANTABILITY, FITNESS FOR A PARTICULAR PURPOSE AND NONINFRINGEMENT. IN NO EVENT SHALL CONECTIVA LINUX BE LIABLE FOR ANY CLAIM, DAMAGES OR OTHER LIABILITY, WHETHER IN AN ACTION OF CONTRACT, TORT OR OTHERWISE, ARISING FROM, OUT OF OR IN CONNECTION WITH THE SOFTWARE OR THE USE OR OTHER DEALINGS IN THE SOFTWARE.
Except as contained in this notice, the name of Conectiva Linux shall not be used in advertising or otherwise to promote the sale, use or other dealings in this Software without prior written authorization from Conectiva Linux.
Copyright © 2008 Red Hat, Inc. Partly based on code Copyright © 2000 SuSE, Inc.
Permission to use, copy, modify, distribute, and sell this software and its documentation for any purpose is hereby granted without fee, provided that the above copyright notice appear in all copies and that both that copyright notice and this permission notice appear in supporting documentation, and that the name of Red Hat not be used in advertising or publicity pertaining to distribution of the software without specific, written prior permission. Red Hat makes no representations about the suitability of this software for any purpose. It is provided "as is" without express or implied warranty.
Red Hat DISCLAIMS ALL WARRANTIES WITH REGARD TO THIS SOFTWARE, INCLUDING ALL IMPLIED WARRANTIES OF MERCHANTABILITY AND FITNESS, IN NO EVENT SHALL Red Hat BE LIABLE FOR ANY SPECIAL, INDIRECT OR CONSEQUENTIAL DAMAGES OR ANY DAMAGES WHATSOEVER RESULTING FROM LOSS OF USE, DATA OR PROFITS, WHETHER IN AN ACTION OF CONTRACT, NEGLIGENCE OR OTHER TORTIOUS ACTION, ARISING OUT OF OR IN CONNECTION WITH THE USE OR PERFORMANCE OF THIS SOFTWARE.
Permission to use, copy, modify, distribute, and sell this software and its documentation for any purpose is hereby granted without fee, provided that the above copyright notice appear in all copies and that both that copyright notice and this permission notice appear in supporting documentation, and that the name of SuSE not be used in advertising or publicity pertaining to distribution of the software without specific, written prior permission. SuSE makes no representations about the suitability of this software for any purpose. It is provided "as is" without express or implied warranty.
SuSE DISCLAIMS ALL WARRANTIES WITH REGARD TO THIS SOFTWARE, INCLUDING ALL IMPLIED WARRANTIES OF MERCHANTABILITY AND FITNESS, IN NO EVENT SHALL SuSE BE LIABLE FOR ANY SPECIAL, INDIRECT OR CONSEQUENTIAL DAMAGES OR ANY DAMAGES WHATSOEVER RESULTING FROM LOSS OF USE, DATA OR PROFITS, WHETHER IN AN ACTION OF CONTRACT, NEGLIGENCE OR OTHER TORTIOUS ACTION, ARISING OUT OF OR IN CONNECTION WITH THE USE OR PERFORMANCE OF THIS SOFTWARE.
Copyright (c) 2006 Red Hat, Inc. (C) Copyright 1998-1999 Precision Insight, Inc., Cedar Park, Texas. All Rights Reserved.
Permission is hereby granted, free of charge, to any person obtaining a copy of this software and associated documentation files (the "Software"), to deal in the Software without restriction, including without limitation the rights to use, copy, modify, merge, publish, distribute, sub license, and/or sell copies of the Software, and to permit persons to whom the Software is furnished to do so, subject to the following conditions:
The above copyright notice and this permission notice (including the next paragraph) shall be included in all copies or substantial portions of the Software.
THE SOFTWARE IS PROVIDED "AS IS", WITHOUT WARRANTY OF ANY KIND, EXPRESS OR IMPLIED, INCLUDING BUT NOT LIMITED TO THE WARRANTIES OF MERCHANTABILITY, FITNESS FOR A PARTICULAR PURPOSE AND NON-INFRINGEMENT. IN NO EVENT SHALL RED HAT, INC, OR PRECISION INSIGHT AND/OR THEIR SUPPLIERS BE LIABLE FOR ANY CLAIM, DAMAGES OR OTHER LIABILITY, WHETHER IN AN ACTION OF CONTRACT, TORT OR OTHERWISE, ARISING FROM, OUT OF OR IN CONNECTION WITH THE SOFTWARE OR THE USE OR OTHER DEALINGS IN THE SOFTWARE.
Copyright (c) 1995 X Consortium Copyright 2004 Red Hat Inc., Durham, North Carolina. All Rights Reserved.
Permission is hereby granted, free of charge, to any person obtaining a copy of this software and associated documentation files (the "Software"), to deal in the Software without restriction, including without limitation on the rights to use, copy, modify, merge, publish, distribute, sublicense, and/or sell copies of the Software, and to permit persons to whom the Software is furnished to do so, subject to the following conditions:
The above copyright notice and this permission notice shall be included in all copies or substantial portions of the Software.
THE SOFTWARE IS PROVIDED "AS IS", WITHOUT WARRANTY OF ANY KIND, EXPRESS OR IMPLIED, INCLUDING BUT NOT LIMITED TO THE WARRANTIES OF MERCHANTABILITY, FITNESS FOR A PARTICULAR PURPOSE AND NON-INFRINGEMENT. IN NO EVENT SHALL RED HAT, THE X CONSORTIUM, AND/OR THEIR SUPPLIERS BE LIABLE FOR ANY CLAIM, DAMAGES OR OTHER LIABILITY, WHETHER IN AN ACTION OF CONTRACT, TORT OR OTHERWISE, ARISING FROM, OUT OF OR IN CONNECTION WITH THE SOFTWARE OR THE USE OR OTHER DEALINGS IN THE SOFTWARE.
Except as contained in this notice, the name of the X Consortium shall not be used in advertising or otherwise to promote the sale, use or other dealings in this Software without prior written authorization from the X Consortium.
Copyright 1998-2000 Precision Insight, Inc., Cedar Park, Texas.; Copyright 2000 VA Linux Systems, Inc.; Copyright (c) 2002, 2008, 2009 Apple Computer, Inc.; Copyright (c) 2003-2004 Torrey T. Lyons.; All Rights Reserved.
Permission is hereby granted, free of charge, to any person obtaining a copy of this software and associated documentation files (the "Software"), to deal in the Software without restriction, including without limitation the rights to use, copy, modify, merge, publish, distribute, sub license, and/or sell copies of the Software, and to permit persons to whom the Software is furnished to do so, subject to the following conditions:
The above copyright notice and this permission notice (including the next paragraph) shall be included in all copies or substantial portions of the Software.
THE SOFTWARE IS PROVIDED "AS IS", WITHOUT WARRANTY OF ANY KIND, EXPRESS OR IMPLIED, INCLUDING BUT NOT LIMITED TO THE WARRANTIES OF MERCHANTABILITY, FITNESS FOR A PARTICULAR PURPOSE AND NON-INFRINGEMENT. IN NO EVENT SHALL PRECISION INSIGHT AND/OR ITS SUPPLIERS BE LIABLE FOR ANY CLAIM, DAMAGES OR OTHER LIABILITY, WHETHER IN AN ACTION OF CONTRACT, TORT OR OTHERWISE, ARISING FROM, OUT OF OR IN CONNECTION WITH THE SOFTWARE OR THE USE OR OTHER DEALINGS IN THE SOFTWARE.
(C) Copyright IBM Corporation 2003 All Rights Reserved.
Permission is hereby granted, free of charge, to any person obtaining a copy of this software and associated documentation files (the "Software"), to deal in the Software without restriction, including without limitation on the rights to use, copy, modify, merge, publish, distribute, sub license, and/or sell copies of the Software, and to permit persons to whom the Software is furnished to do so, subject to the following conditions:
The above copyright notice and this permission notice (including the next paragraph) shall be included in all copies or substantial portions of the Software.
THE SOFTWARE IS PROVIDED "AS IS", WITHOUT WARRANTY OF ANY KIND, EXPRESS OR IMPLIED, INCLUDING BUT NOT LIMITED TO THE WARRANTIES OF MERCHANTABILITY, FITNESS FOR A PARTICULAR PURPOSE AND NON-INFRINGEMENT. IN NO EVENT SHALL VA LINUX SYSTEM, IBM AND/OR THEIR SUPPLIERS BE LIABLE FOR ANY CLAIM, DAMAGES OR OTHER LIABILITY, WHETHER IN AN ACTION OF CONTRACT, TORT OR OTHERWISE, ARISING FROM, OUT OF OR IN CONNECTION WITH THE SOFTWARE OR THE USE OR OTHER DEALINGS IN THE SOFTWARE.
(C) Copyright IBM Corporation 2004-2005 All Rights Reserved.
Permission is hereby granted, free of charge, to any person obtaining a copy of this software and associated documentation files (the "Software"), to deal in the Software without restriction, including without limitation the rights to use, copy, modify, merge, publish, distribute, sub license, and/or sell copies of the Software, and to permit persons to whom the Software is furnished to do so, subject to the following conditions:
The above copyright notice and this permission notice (including the next paragraph) shall be included in all copies or substantial portions of the Software.
THE SOFTWARE IS PROVIDED "AS IS", WITHOUT WARRANTY OF ANY KIND, EXPRESS OR IMPLIED, INCLUDING BUT NOT LIMITED TO THE WARRANTIES OF MERCHANTABILITY, FITNESS FOR A PARTICULAR PURPOSE AND NON-INFRINGEMENT. IN NO EVENT SHALL IBM, AND/OR THEIR SUPPLIERS BE LIABLE FOR ANY CLAIM, DAMAGES OR OTHER LIABILITY, WHETHER IN AN ACTION OF CONTRACT, TORT OR OTHERWISE, ARISING FROM, OUT OF OR IN CONNECTION WITH THE SOFTWARE OR THE USE OR OTHER DEALINGS IN THE SOFTWARE.
Copyright (c) 1997 Metro Link Incorporated
Permission is hereby granted, free of charge, to any person obtaining a copy of this software and associated documentation files (the "Software"), to deal in the Software without restriction, including without limitation the rights to use, copy, modify, merge, publish, distribute, sub license, and/or sell copies of the Software, and to permit persons to whom the Software is furnished to do so, subject to the following conditions:
The above copyright notice and this permission notice shall be included in all copies or substantial portions of the Software.
THE SOFTWARE IS PROVIDED "AS IS", WITHOUT WARRANTY OF ANY KIND, EXPRESS OR IMPLIED, INCLUDING BUT NOT LIMITED TO THE WARRANTIES OF MERCHANTABILITY, FITNESS FOR A PARTICULAR PURPOSE AND NONINFRINGEMENT. IN NO EVENT SHALL THE X CONSORTIUM BE LIABLE FOR ANY CLAIM, DAMAGES OR OTHER LIABILITY, WHETHER IN AN ACTION OF CONTRACT, TORT OR OTHERWISE, ARISING FROM, OUT OF OR IN CONNECTION WITH THE SOFTWARE OR THE USE OR OTHER DEALINGS IN THE SOFTWARE.
Except as contained in this notice, the name of the Metro Link shall not be used in advertising or otherwise to promote the sale, use or other dealings in this Software without prior written authorization from Metro Link.
Copyright 1995-1998 by Metro Link, Inc.; Copyright (c) 1997 Matthieu Herrb
Permission to use, copy, modify, distribute, and sell this software and its documentation for any purpose is hereby granted without fee, provided that the above copyright notice appear in all copies and that both that copyright notice and this permission notice appear in supporting documentation, and that the name of Metro Link, Inc. not be used in advertising or publicity pertaining to distribution of the software without specific, written prior permission. Metro Link, Inc. makes no representations about the suitability of this software for any purpose. It is provided "as is" without express or implied warranty.
METRO LINK, INC. DISCLAIMS ALL WARRANTIES WITH REGARD TO THIS SOFTWARE, INCLUDING ALL IMPLIED WARRANTIES OF MERCHANTABILITY AND FITNESS, IN NO EVENT SHALL METRO LINK, INC. BE LIABLE FOR ANY SPECIAL, INDIRECT OR CONSEQUENTIAL DAMAGES OR ANY DAMAGES WHATSOEVER RESULTING FROM LOSS OF USE, DATA OR PROFITS, WHETHER IN AN ACTION OF CONTRACT, NEGLIGENCE OR OTHER TORTIOUS ACTION, ARISING OUT OF OR IN CONNECTION WITH THE USE OR PERFORMANCE OF THIS SOFTWARE.
Copyright 1998 by Metro Link Incorporated
Permission to use, copy, modify, distribute, and sell this software and its documentation for any purpose is hereby granted without fee, provided that the above copyright notice appear in all copies and that both that copyright notice and this permission notice appear in supporting documentation, and that the name of Metro Link Incorporated not be used in advertising or publicity pertaining to distribution of the software without specific, written prior permission. Metro Link Incorporated makes no representations about the suitability of this software for any purpose. It is provided "as is" without express or implied warranty.
METRO LINK INCORPORATED DISCLAIMS ALL WARRANTIES WITH REGARD TO THIS SOFTWARE, INCLUDING ALL IMPLIED WARRANTIES OF MERCHANTABILITY AND FITNESS, IN NO EVENT SHALL METRO LINK INCORPORATED BE LIABLE FOR ANY SPECIAL, INDIRECT OR CONSEQUENTIAL DAMAGES OR ANY DAMAGES WHATSOEVER RESULTING FROM LOSS OF USE, DATA OR PROFITS, WHETHER IN AN ACTION OF CONTRACT, NEGLIGENCE OR OTHER TORTIOUS ACTION, ARISING OUT OF OR IN CONNECTION WITH THE USE OR PERFORMANCE OF THIS SOFTWARE.
Copyright (c) 2001, Andy Ritger aritger@nvidia.com All rights reserved.
Redistribution and use in source and binary forms, with or without modification, are permitted provided that the following conditions are met:
o Redistributions of source code must retain the above copyright notice, this list of conditions and the following disclaimer.
o Redistributions in binary form must reproduce the above copyright notice, this list of conditions and the following disclaimer in the documentation and/or other materials provided with the distribution.
o Neither the name of NVIDIA nor the names of its contributors may be used to endorse or promote products derived from this software without specific prior written permission.
THIS SOFTWARE IS PROVIDED BY THE COPYRIGHT HOLDERS AND CONTRIBUTORS "AS IS" AND ANY EXPRESS OR IMPLIED WARRANTIES, INCLUDING, BUT NOT LIMITED TO, THE IMPLIED WARRANTIES OF MERCHANTABILITY AND FITNESS FOR A PARTICULAR PURPOSE ARE DISCLAIMED. IN NO EVENT SHALL THE REGENTS OR CONTRIBUTORS BE LIABLE FOR ANY DIRECT, INDIRECT, INCIDENTAL, SPECIAL, EXEMPLARY, OR CONSEQUENTIAL DAMAGES (INCLUDING, BUT NOT LIMITED TO, PROCUREMENT OF SUBSTITUTE GOODS OR SERVICES; LOSS OF USE, DATA, OR PROFITS; OR BUSINESS INTERRUPTION) HOWEVER CAUSED AND ON ANY THEORY OF LIABILITY, WHETHER IN CONTRACT, STRICT LIABILITY, OR TORT (INCLUDING NEGLIGENCE OR OTHERWISE) ARISING IN ANY WAY OUT OF THE USE OF THIS SOFTWARE, EVEN IF ADVISED OF THE POSSIBILITY OF SUCH DAMAGE.
Copyright 1992 Vrije Universiteit, The Netherlands
Permission to use, copy, modify, and distribute this software and its documentation for any purpose and without fee is hereby granted, provided that the above copyright notice appear in all copies and that both that copyright notice and this permission notice appear in supporting documentation, and that the name of the Vrije Universiteit not be used in advertising or publicity pertaining to distribution of the software without specific, written prior permission. The Vrije Universiteit makes no representations about the suitability of this software for any purpose. It is provided "as is" without express or implied warranty.
The Vrije Universiteit DISCLAIMS ALL WARRANTIES WITH REGARD TO THIS SOFTWARE, INCLUDING ALL IMPLIED WARRANTIES OF MERCHANTABILITY AND FITNESS, IN NO EVENT SHALL The Vrije Universiteit BE LIABLE FOR ANY SPECIAL, INDIRECT OR CONSEQUENTIAL DAMAGES OR ANY DAMAGES WHATSOEVER RESULTING FROM LOSS OF USE, DATA OR PROFITS, WHETHER IN AN ACTION OF CONTRACT, NEGLIGENCE OR OTHER TORTIOUS ACTION, ARISING OUT OF OR IN CONNECTION WITH THE USE OR PERFORMANCE OF THIS SOFTWARE.
Copyright 1998 by Concurrent Computer Corporation
Permission to use, copy, modify, distribute, and sell this software and its documentation for any purpose is hereby granted without fee, provided that the above copyright notice appear in all copies and that both that copyright notice and this permission notice appear in supporting documentation, and that the name of Concurrent Computer Corporation not be used in advertising or publicity pertaining to distribution of the software without specific, written prior permission. Concurrent Computer Corporation makes no representations about the suitability of this software for any purpose. It is provided "as is" without express or implied warranty.
CONCURRENT COMPUTER CORPORATION DISCLAIMS ALL WARRANTIES WITH REGARD TO THIS SOFTWARE, INCLUDING ALL IMPLIED WARRANTIES OF MERCHANTABILITY AND FITNESS, IN NO EVENT SHALL CONCURRENT COMPUTER CORPORATION BE LIABLE FOR ANY SPECIAL, INDIRECT OR CONSEQUENTIAL DAMAGES OR ANY DAMAGES WHATSOEVER RESULTING FROM LOSS OF USE, DATA OR PROFITS, WHETHER IN AN ACTION OF CONTRACT, NEGLIGENCE OR OTHER TORTIOUS ACTION, ARISING OUT OF OR IN CONNECTION WITH THE USE OR PERFORMANCE OF THIS SOFTWARE.
Copyright (c) 2004 Nokia
Permission to use, copy, modify, distribute, and sell this software and its documentation for any purpose is hereby granted without fee, provided that the above copyright notice appear in all copies and that both that copyright notice and this permission notice appear in supporting documentation, and that the name of Nokia not be used in advertising or publicity pertaining to distribution of the software without specific, written prior permission. Nokia makes no representations about the suitability of this software for any purpose. It is provided "as is" without express or implied warranty.
NOKIA DISCLAIMS ALL WARRANTIES WITH REGARD TO THIS SOFTWARE, INCLUDING ALL IMPLIED WARRANTIES OF MERCHANTABILITY AND FITNESS, IN NO EVENT SHALL NOKIA BE LIABLE FOR ANY SPECIAL, INDIRECT OR CONSEQUENTIAL DAMAGES OR ANY DAMAGES WHATSOEVER RESULTING FROM LOSS OF USE, DATA OR PROFITS, WHETHER IN AN ACTION OF CONTRACT, NEGLIGENCE OR OTHER TORTIOUS ACTION, ARISING OUT OF OR IN CONNECTION WITH THE USE OR PERFORMANCE OF THIS SOFTWARE.
(c)Copyright 1988,1991 Adobe Systems Incorporated. All rights reserved.
Permission to use, copy, modify, distribute, and sublicense this software and its documentation for any purpose and without fee is hereby granted, provided that the above copyright notices appear in all copies and that both those copyright notices and this permission notice appear in supporting documentation and that the name of Adobe Systems Incorporated not be used in advertising or publicity pertaining to distribution of the software without specific, written prior permission. No trademark license to use the Adobe trademarks is hereby granted. If the Adobe trademark "Display PostScript"(tm) is used to describe this software, its functionality or for any other purpose, such use shall be limited to a statement that this software works in conjunction with the Display PostScript system. Proper trademark attribution to reflect Adobe's ownership of the trademark shall be given whenever any such reference to the Display PostScript system is made.
ADOBE MAKES NO REPRESENTATIONS ABOUT THE SUITABILITY OF THE SOFTWARE FOR ANY PURPOSE. IT IS PROVIDED "AS IS" WITHOUT EXPRESS OR IMPLIED WARRANTY. ADOBE DISCLAIMS ALL WARRANTIES WITH REGARD TO THIS SOFTWARE, INCLUDING ALL IMPLIED WARRANTIES OF MERCHANTABILITY, FITNESS FOR A PARTICULAR PURPOSE AND NON- INFRINGEMENT OF THIRD PARTY RIGHTS. IN NO EVENT SHALL ADOBE BE LIABLE TO YOU OR ANY OTHER PARTY FOR ANY SPECIAL, INDIRECT, OR CONSEQUENTIAL DAMAGES OR ANY DAMAGES WHATSOEVER WHETHER IN AN ACTION OF CONTRACT,NEGLIGENCE, STRICT LIABILITY OR ANY OTHER ACTION ARISING OUT OF OR IN CONNECTION WITH THE USE OR PERFORMANCE OF THIS SOFTWARE. ADOBE WILL NOT PROVIDE ANY TRAINING OR OTHER SUPPORT FOR THE SOFTWARE.
Adobe, PostScript, and Display PostScript are trademarks of Adobe Systems Incorporated which may be registered in certain jurisdictions.
Copyright (c) 1987 by the Regents of the University of California
Permission to use, copy, modify, and distribute this software and its documentation for any purpose and without fee is hereby granted, provided that the above copyright notice appear in all copies. The University of California makes no representations about the suitability of this software for any purpose. It is provided "as is" without express or implied warranty.
Copyright (c) 1989, 1990, 1993, 1994 The Regents of the University of California. All rights reserved.
This code is derived from software contributed to Berkeley by Chris Torek.
This code is derived from software contributed to Berkeley by Michael Rendell of Memorial University of Newfoundland.
Redistribution and use in source and binary forms, with or without modification, are permitted provided that the following conditions are met:
1. Redistributions of source code must retain the above copyright notice, this list of conditions and the following disclaimer.
2. Redistributions in binary form must reproduce the above copyright notice, this list of conditions and the following disclaimer in the documentation and/or other materials provided with the distribution.
4. Neither the name of the University nor the names of its contributors may be used to endorse or promote products derived from this software without specific prior written permission.
THIS SOFTWARE IS PROVIDED BY THE REGENTS AND CONTRIBUTORS ``AS IS'' AND ANY EXPRESS OR IMPLIED WARRANTIES, INCLUDING, BUT NOT LIMITED TO, THE IMPLIED WARRANTIES OF MERCHANTABILITY AND FITNESS FOR A PARTICULAR PURPOSE ARE DISCLAIMED. IN NO EVENT SHALL THE REGENTS OR CONTRIBUTORS BE LIABLE FOR ANY DIRECT, INDIRECT, INCIDENTAL, SPECIAL, EXEMPLARY, OR CONSEQUENTIAL DAMAGES (INCLUDING, BUT NOT LIMITED TO, PROCUREMENT OF SUBSTITUTE GOODS OR SERVICES; LOSS OF USE, DATA, OR PROFITS; OR BUSINESS INTERRUPTION) HOWEVER CAUSED AND ON ANY THEORY OF LIABILITY, WHETHER IN CONTRACT, STRICT LIABILITY, OR TORT (INCLUDING NEGLIGENCE OR OTHERWISE) ARISING IN ANY WAY OUT OF THE USE OF THIS SOFTWARE, EVEN IF ADVISED OF THE POSSIBILITY OF SUCH DAMAGE.
Copyright 1992, 1993 Data General Corporation; Copyright 1992, 1993 OMRON Corporation
Permission to use, copy, modify, distribute, and sell this software and its documentation for any purpose is hereby granted without fee, provided that the above copyright notice appear in all copies and that both that copyright notice and this permission notice appear in supporting documentation, and that neither the name OMRON or DATA GENERAL be used in advertising or publicity pertaining to distribution of the software without specific, written prior permission of the party whose name is to be used. Neither OMRON or DATA GENERAL make any representation about the suitability of this software for any purpose. It is provided "as is" without express or implied warranty.
OMRON AND DATA GENERAL EACH DISCLAIM ALL WARRANTIES WITH REGARD TO THIS SOFTWARE, INCLUDING ALL IMPLIED WARRANTIES OF MERCHANTABILITY AND FITNESS, IN NO EVENT SHALL OMRON OR DATA GENERAL BE LIABLE FOR ANY SPECIAL, INDIRECT OR CONSEQUENTIAL DAMAGES OR ANY DAMAGES WHATSOEVER RESULTING FROM LOSS OF USE, DATA OR PROFITS, WHETHER IN AN ACTION OF CONTRACT, NEGLIGENCE OR OTHER TORTIOUS ACTION, ARISING OUT OF OR IN CONNECTION WITH THE USE OR PERFORMANCE OF THIS SOFTWARE.
Copyright (c) 1999 Keith Packard; Copyright (c) 2000 Compaq Computer Corporation; Copyright (c) 2002 MontaVista Software Inc.; Copyright (c) 2005 OpenedHand Ltd.; Copyright (c) 2006 Nokia Corporation
Permission to use, copy, modify, distribute, and sell this software and its documentation for any purpose is hereby granted without fee, provided that the above copyright notice appear in all copies and that both that copyright notice and this permission notice appear in supporting documentation, and that the name of the authors and/or copyright holders not be used in advertising or publicity pertaining to distribution of the software without specific, written prior permission. The authors and/or copyright holders make no representations about the suitability of this software for any purpose. It is provided "as is" without express or implied warranty.
THE AUTHORS AND/OR COPYRIGHT HOLDERS DISCLAIM ALL WARRANTIES WITH REGARD TO THIS SOFTWARE, INCLUDING ALL IMPLIED WARRANTIES OF MERCHANTABILITY AND FITNESS, IN NO EVENT SHALL THE AUTHORS AND/OR COPYRIGHT HOLDERS BE LIABLE FOR ANY SPECIAL, INDIRECT OR CONSEQUENTIAL DAMAGES OR ANY DAMAGES WHATSOEVER RESULTING FROM LOSS OF USE, DATA OR PROFITS, WHETHER IN AN ACTION OF CONTRACT, NEGLIGENCE OR OTHER TORTIOUS ACTION, ARISING OUT OF OR IN CONNECTION WITH THE USE OR PERFORMANCE OF THIS SOFTWARE.
Copyright 1990,91 by Thomas Roell, Dinkelscherben, Germany; Copyright 1993 by David Wexelblat <dwex@goblin.org>; Copyright 1999 by David Holland <davidh@iquest.net>; Copyright (c) 2000 Compaq Computer Corporation; Copyright (c) 2002 Hewlett-Packard Company; Copyright (c) 2004, 2005 Red Hat, Inc.; Copyright (c) 2004 Nicholas Miell; Copyright (c) 2005 Trolltech AS; Copyright (c) 2006 Intel Corporation; Copyright (c) 2006-2007 Keith Packard; Copyright (c) 2008 Red Hat, Inc; Copyright (c) 2008 George Sapountzis <gsap7@yahoo.gr>; Copyright (c) 2000 Keith Packard, member of The XFree86 Project, Inc.; 2005 Lars Knoll & Zack Rusin, Trolltech
Permission to use, copy, modify, distribute, and sell this software and its documentation for any purpose is hereby granted without fee, provided that the above copyright notice appear in all copies and that both that copyright notice and this permission notice appear in supporting documentation, and that the name of the copyright holders not be used in advertising or publicity pertaining to distribution of the software without specific, written prior permission. The copyright holders make no representations about the suitability of this software for any purpose. It is provided "as is" without express or implied warranty.
THE COPYRIGHT HOLDERS DISCLAIM ALL WARRANTIES WITH REGARD TO THIS SOFTWARE, INCLUDING ALL IMPLIED WARRANTIES OF MERCHANTABILITY AND FITNESS, IN NO EVENT SHALL THE COPYRIGHT HOLDERS BE LIABLE FOR ANY SPECIAL, INDIRECT OR CONSEQUENTIAL DAMAGES OR ANY DAMAGES WHATSOEVER RESULTING FROM LOSS OF USE, DATA OR PROFITS, WHETHER IN AN ACTION OF CONTRACT, NEGLIGENCE OR OTHER TORTIOUS ACTION, ARISING OUT OF OR IN CONNECTION WITH THE USE OR PERFORMANCE OF THIS SOFTWARE.
Copyright 1987, 1998 The Open Group; Copyright (c) 1998-1999, 2001 The XFree86 Project, Inc.; Copyright (c) 2000 VA Linux Systems, Inc.; Copyright (c) 2000, 2001 Nokia Home Communications; Copyright (c) 2007, 2008 Red Hat, Inc.; All rights reserved.
Permission is hereby granted, free of charge, to any person obtaining a copy of this software and associated documentation files (the "Software"), to deal in the Software without restriction, including without limitation the rights to use, copy, modify, merge, publish, distribute, and/or sell copies of the Software, and to permit persons to whom the Software is furnished to do so, provided that the above copyright notice(s) and this permission notice appear in all copies of the Software and that both the above copyright notice(s) and this permission notice appear in supporting documentation.
THE SOFTWARE IS PROVIDED "AS IS", WITHOUT WARRANTY OF ANY KIND, EXPRESS OR IMPLIED, INCLUDING BUT NOT LIMITED TO THE WARRANTIES OF MERCHANTABILITY, FITNESS FOR A PARTICULAR PURPOSE AND NONINFRINGEMENT OF THIRD PARTY RIGHTS. IN NO EVENT SHALL THE COPYRIGHT HOLDER OR HOLDERS INCLUDED IN THIS NOTICE BE LIABLE FOR ANY CLAIM, OR ANY SPECIAL INDIRECT OR CONSEQUENTIAL DAMAGES, OR ANY DAMAGES WHATSOEVER RESULTING FROM LOSS OF USE, DATA OR PROFITS, WHETHER IN AN ACTION OF CONTRACT, NEGLIGENCE OR OTHER TORTIOUS ACTION, ARISING OUT OF OR IN CONNECTION WITH THE USE OR PERFORMANCE OF THIS SOFTWARE.
Except as contained in this notice, the name of a copyright holder shall not be used in advertising or otherwise to promote the sale, use or other dealings in this Software without prior written authorization of the copyright holder.
Copyright 1996 by Thomas E. Dickey <dickey@clark.net> All Rights Reserved
Permission to use, copy, modify, and distribute this software and its documentation for any purpose and without fee is hereby granted, provided that the above copyright notice appear in all copies and that both that copyright notice and this permission notice appear in supporting documentation, and that the name of the above listed copyright holder(s) not be used in advertising or publicity pertaining to distribution of the software without specific, written prior
THE ABOVE LISTED COPYRIGHT HOLDER(S) DISCLAIM ALL WARRANTIES WITH REGARD TO THIS SOFTWARE, INCLUDING ALL IMPLIED WARRANTIES OF MERCHANTABILITY AND FITNESS, IN NO EVENT SHALL THE ABOVE LISTED COPYRIGHT HOLDER(S) BE LIABLE FOR ANY SPECIAL, INDIRECT OR CONSEQUENTIAL DAMAGES OR ANY DAMAGES WHATSOEVER RESULTING FROM LOSS OF USE, DATA OR PROFITS, WHETHER IN AN ACTION OF CONTRACT, NEGLIGENCE OR OTHER TORTIOUS ACTION, ARISING OUT OF OR IN CONNECTION WITH THE USE OR PERFORMANCE OF THIS SOFTWARE.
Copyright 1998-1999 Precision Insight, Inc., Cedar Park, Texas.; Copyright (c) 2001 Andreas Monitzer.; Copyright (c) 2001-2004 Greg Parker.; Copyright (c) 2001-2004 Torrey T. Lyons; Copyright (c) 2002-2003 Apple Computer, Inc.; Copyright (c) 2004-2005 Alexander Gottwald; Copyright (c) 2002-2009 Apple Inc.; Copyright (c) 2007 Jeremy Huddleston; All Rights Reserved.
Permission is hereby granted, free of charge, to any person obtaining a copy of this software and associated documentation files (the "Software"), to deal in the Software without restriction, including without limitation the rights to use, copy, modify, merge, publish, distribute, sublicense, and/or sell copies of the Software, and to permit persons to whom the Software is furnished to do so, subject to the following conditions:
The above copyright notice and this permission notice shall be included in all copies or substantial portions of the Software.
THE SOFTWARE IS PROVIDED "AS IS", WITHOUT WARRANTY OF ANY KIND, EXPRESS OR IMPLIED, INCLUDING BUT NOT LIMITED TO THE WARRANTIES OF MERCHANTABILITY, FITNESS FOR A PARTICULAR PURPOSE AND NONINFRINGEMENT. IN NO EVENT SHALL THE ABOVE LISTED COPYRIGHT HOLDER(S) BE LIABLE FOR ANY CLAIM, DAMAGES OR OTHER LIABILITY, WHETHER IN AN ACTION OF CONTRACT, TORT OR OTHERWISE, ARISING FROM, OUT OF OR IN CONNECTION WITH THE SOFTWARE OR THE USE OR OTHER DEALINGS IN THE SOFTWARE.
Except as contained in this notice, the name(s) of the above copyright holders shall not be used in advertising or otherwise to promote the sale, use or other dealings in this Software without prior written authorization.
Copyright (C) 1999,2000 by Eric Sunshine <sunshine@sunshineco.com>; Copyright (C) 2001-2005 by Thomas Winischhofer, Vienna, Austria.; All rights reserved.
Redistribution and use in source and binary forms, with or without modification, are permitted provided that the following conditions are met:
1. Redistributions of source code must retain the above copyright notice, this list of conditions and the following disclaimer.
2. Redistributions in binary form must reproduce the above copyright notice, this list of conditions and the following disclaimer in the documentation and/or other materials provided with the distribution.
3. The name of the author may not be used to endorse or promote products derived from this software without specific prior written permission.
THIS SOFTWARE IS PROVIDED BY THE AUTHOR ``AS IS'' AND ANY EXPRESS OR IMPLIED WARRANTIES, INCLUDING, BUT NOT LIMITED TO, THE IMPLIED WARRANTIES OF MERCHANTABILITY AND FITNESS FOR A PARTICULAR PURPOSE ARE DISCLAIMED. IN NO EVENT SHALL THE AUTHOR BE LIABLE FOR ANY DIRECT, INDIRECT, INCIDENTAL, SPECIAL, EXEMPLARY, OR CONSEQUENTIAL DAMAGES (INCLUDING, BUT NOT LIMITED TO, PROCUREMENT OF SUBSTITUTE GOODS OR SERVICES; LOSS OF USE, DATA, OR PROFITS; OR BUSINESS INTERRUPTION) HOWEVER CAUSED AND ON ANY THEORY OF LIABILITY, WHETHER IN CONTRACT, STRICT LIABILITY, OR TORT (INCLUDING NEGLIGENCE OR OTHERWISE) ARISING IN ANY WAY OUT OF THE USE OF THIS SOFTWARE, EVEN IF ADVISED OF THE POSSIBILITY OF SUCH DAMAGE.
Copyright (C) 2005 Bogdan D. bogdand@users.sourceforge.net
Permission is hereby granted, free of charge, to any person obtaining a copy of this software and associated documentation files (the "Software"), to deal in the Software without restriction, including without limitation the rights to use, copy, modify, merge, publish, distribute, sublicense, and/or sell copies of the Software, and to permit persons to whom the Software is furnished to do so, subject to the following conditions:
The above copyright notice and this permission notice shall be included in all copies or substantial portions of the Software.
THE SOFTWARE IS PROVIDED "AS IS", WITHOUT WARRANTY OF ANY KIND, EXPRESS OR IMPLIED, INCLUDING BUT NOT LIMITED TO THE WARRANTIES OF MERCHANTABILITY, FITNESS FOR A PARTICULAR PURPOSE AND NONINFRINGEMENT. IN NO EVENT SHALL THE AUTHOR BE LIABLE FOR ANY CLAIM, DAMAGES OR OTHER LIABILITY, WHETHER IN AN ACTION OF CONTRACT, TORT OR OTHERWISE, ARISING FROM, OUT OF OR IN CONNECTION WITH THE SOFTWARE OR THE USE OR OTHER DEALINGS IN THE SOFTWARE.
Except as contained in this notice, the name of the author shall not be used in advertising or otherwise to promote the sale, use or other dealings in this Software without prior written authorization from the author.
Copyright (c) 2002 David Dawes
Permission is hereby granted, free of charge, to any person obtaining a copy of this software and associated documentation files (the "Software"), to deal in the Software without restriction, including without limitation the rights to use, copy, modify, merge, publish, distribute, sublicense, and/or sell copies of the Software, and to permit persons to whom the Software is furnished to do so, subject to the following conditions:
The above copyright notice and this permission notice shall be included in all copies or substantial portions of the Software.
THE SOFTWARE IS PROVIDED "AS IS", WITHOUT WARRANTY OF ANY KIND, EXPRESS OR IMPLIED, INCLUDING BUT NOT LIMITED TO THE WARRANTIES OF MERCHANTABILITY, FITNESS FOR A PARTICULAR PURPOSE AND NONINFRINGEMENT. IN NO EVENT SHALL THE AUTHOR(S) BE LIABLE FOR ANY CLAIM, DAMAGES OR OTHER LIABILITY, WHETHER IN AN ACTION OF CONTRACT, TORT OR OTHERWISE, ARISING FROM, OUT OF OR IN CONNECTION WITH THE SOFTWARE OR THE USE OR OTHER DEALINGS IN THE SOFTWARE.
Except as contained in this notice, the name of the author(s) shall not be used in advertising or otherwise to promote the sale, use or other dealings in this Software without prior written authorization from the author(s).
Copyright (C) 1996-1999 SciTech Software, Inc.; Copyright (C) David Mosberger-Tang; Copyright (C) 1999 Egbert Eich; Copyright (C) 2008 Bart Trojanowski, Symbio Technologies, LLC
Permission to use, copy, modify, distribute, and sell this software and its documentation for any purpose is hereby granted without fee, provided that the above copyright notice appear in all copies and that both that copyright notice and this permission notice appear in supporting documentation, and that the name of the authors not be used in advertising or publicity pertaining to distribution of the software without specific, written prior permission. The authors makes no representations about the suitability of this software for any purpose. It is provided "as is" without express or implied warranty.
THE AUTHORS DISCLAIMS ALL WARRANTIES WITH REGARD TO THIS SOFTWARE, INCLUDING ALL IMPLIED WARRANTIES OF MERCHANTABILITY AND FITNESS, IN NO EVENT SHALL THE AUTHORS BE LIABLE FOR ANY SPECIAL, INDIRECT OR CONSEQUENTIAL DAMAGES OR ANY DAMAGES WHATSOEVER RESULTING FROM LOSS OF USE, DATA OR PROFITS, WHETHER IN AN ACTION OF CONTRACT, NEGLIGENCE OR OTHER TORTIOUS ACTION, ARISING OUT OF OR IN CONNECTION WITH THE USE OR PERFORMANCE OF THIS SOFTWARE.
Copyright 2005-2006 Luc Verhaegen.
Permission is hereby granted, free of charge, to any person obtaining a copy of this software and associated documentation files (the "Software"), to deal in the Software without restriction, including without limitation the rights to use, copy, modify, merge, publish, distribute, sublicense, and/or sell copies of the Software, and to permit persons to whom the Software is furnished to do so, subject to the following conditions:
The above copyright notice and this permission notice shall be included in all copies or substantial portions of the Software.
THE SOFTWARE IS PROVIDED "AS IS", WITHOUT WARRANTY OF ANY KIND, EXPRESS OR IMPLIED, INCLUDING BUT NOT LIMITED TO THE WARRANTIES OF MERCHANTABILITY, FITNESS FOR A PARTICULAR PURPOSE AND NONINFRINGEMENT. IN NO EVENT SHALL THE COPYRIGHT HOLDER(S) OR AUTHOR(S) BE LIABLE FOR ANY CLAIM, DAMAGES OR OTHER LIABILITY, WHETHER IN AN ACTION OF CONTRACT, TORT OR OTHERWISE, ARISING FROM, OUT OF OR IN CONNECTION WITH THE SOFTWARE OR THE USE OR OTHER DEALINGS IN THE SOFTWARE.
Copyright 1995 by Robin Cutshaw <robin@XFree86.Org>; Copyright 2000 by Egbert Eich; Copyright 2002 by David Dawes
Permission to use, copy, modify, distribute, and sell this software and its documentation for any purpose is hereby granted without fee, provided that the above copyright notice appear in all copies and that both that copyright notice and this permission notice appear in supporting documentation, and that the names of the above listed copyright holder(s) not be used in advertising or publicity pertaining to distribution of the software without specific, written prior permission. The above listed copyright holder(s) make(s) no representations about the suitability of this software for any purpose. It is provided "as is" without express or implied warranty.
THE ABOVE LISTED COPYRIGHT HOLDER(S) DISCLAIM(S) ALL WARRANTIES WITH REGARD TO THIS SOFTWARE, INCLUDING ALL IMPLIED WARRANTIES OF MERCHANTABILITY AND FITNESS, IN NO EVENT SHALL THE ABOVE LISTED COPYRIGHT HOLDER(S) BE LIABLE FOR ANY SPECIAL, INDIRECT OR CONSEQUENTIAL DAMAGES OR ANY DAMAGES WHATSOEVER RESULTING FROM LOSS OF USE, DATA OR PROFITS, WHETHER IN AN ACTION OF CONTRACT, NEGLIGENCE OR OTHER TORTIOUS ACTION, ARISING OUT OF OR IN CONNECTION WITH THE USE OR PERFORMANCE OF THIS SOFTWARE.
Copyright 1990, 1991 by Thomas Roell, Dinkelscherben, Germany; Copyright 1992 by David Dawes <dawes@XFree86.org>; Copyright 1992 by Jim Tsillas <jtsilla@damon.ccs.northeastern.edu>; Copyright 1992 by Rich Murphey <Rich@Rice.edu>; Copyright 1992 by Robert Baron <Robert.Baron@ernst.mach.cs.cmu.edu>; Copyright 1992 by Orest Zborowski <obz@eskimo.com>; Copyright 1993 by Vrije Universiteit, The Netherlands; Copyright 1993 by David Wexelblat <dwex@XFree86.org>; Copyright 1994, 1996 by Holger Veit <Holger.Veit@gmd.de>; Copyright 1997 by Takis Psarogiannakopoulos <takis@dpmms.cam.ac.uk>; Copyright 1994-2003 by The XFree86 Project, Inc
Permission to use, copy, modify, distribute, and sell this software and its documentation for any purpose is hereby granted without fee, provided that the above copyright notice appear in all copies and that both that copyright notice and this permission notice appear in supporting documentation, and that the names of the above listed copyright holders not be used in advertising or publicity pertaining to distribution of the software without specific, written prior permission. The above listed copyright holders make no representations about the suitability of this software for any purpose. It is provided "as is" without express or implied warranty.
THE ABOVE LISTED COPYRIGHT HOLDERS DISCLAIM ALL WARRANTIES WITH REGARD TO THIS SOFTWARE, INCLUDING ALL IMPLIED WARRANTIES OF MERCHANTABILITY AND FITNESS, IN NO EVENT SHALL THE ABOVE LISTED COPYRIGHT HOLDERS BE LIABLE FOR ANY SPECIAL, INDIRECT OR CONSEQUENTIAL DAMAGES OR ANY DAMAGES WHATSOEVER RESULTING FROM LOSS OF USE, DATA OR PROFITS, WHETHER IN AN ACTION OF CONTRACT, NEGLIGENCE OR OTHER TORTIOUS ACTION, ARISING OUT OF OR IN CONNECTION WITH THE USE OR PERFORMANCE OF THIS SOFTWARE.
Copyright (C) 2000 Keith Packard; 2004 Eric Anholt; 2005 Zack Rusin
Permission to use, copy, modify, distribute, and sell this software and its documentation for any purpose is hereby granted without fee, provided that the above copyright notice appear in all copies and that both that copyright notice and this permission notice appear in supporting documentation, and that the name of copyright holders not be used in advertising or publicity pertaining to distribution of the software without specific, written prior permission. Copyright holders make no representations about the suitability of this software for any purpose. It is provided "as is" without express or implied warranty.
THE COPYRIGHT HOLDERS DISCLAIM ALL WARRANTIES WITH REGARD TO THIS SOFTWARE, INCLUDING ALL IMPLIED WARRANTIES OF MERCHANTABILITY AND FITNESS, IN NO EVENT SHALL THE COPYRIGHT HOLDERS BE LIABLE FOR ANY SPECIAL, INDIRECT OR CONSEQUENTIAL DAMAGES OR ANY DAMAGES WHATSOEVER RESULTING FROM LOSS OF USE, DATA OR PROFITS, WHETHER IN AN ACTION OF CONTRACT, NEGLIGENCE OR OTHER TORTIOUS ACTION, ARISING OUT OF OR IN CONNECTION WITH THE USE OR PERFORMANCE OF THIS SOFTWARE.
(C) Copyright IBM Corporation 2002-2007 All Rights Reserved.
Permission is hereby granted, free of charge, to any person obtaining a copy of this software and associated documentation files (the "Software"), to deal in the Software without restriction, including without limitation on the rights to use, copy, modify, merge, publish, distribute, sub license, and/or sell copies of the Software, and to permit persons to whom the Software is furnished to do so, subject to the following conditions:
The above copyright notice and this permission notice (including the next paragraph) shall be included in all copies or substantial portions of the Software.
THE SOFTWARE IS PROVIDED "AS IS", WITHOUT WARRANTY OF ANY KIND, EXPRESS OR IMPLIED, INCLUDING BUT NOT LIMITED TO THE WARRANTIES OF MERCHANTABILITY, FITNESS FOR A PARTICULAR PURPOSE AND NON-INFRINGEMENT. IN NO EVENT SHALL THE COPYRIGHT HOLDERS AND/OR THEIR SUPPLIERS BE LIABLE FOR ANY CLAIM, DAMAGES OR OTHER LIABILITY, WHETHER IN AN ACTION OF CONTRACT, TORT OR OTHERWISE, ARISING FROM, OUT OF OR IN CONNECTION WITH THE SOFTWARE OR THE USE OR OTHER DEALINGS IN THE SOFTWARE.
Permission to use, copy, modify, distribute, and sell this software and its documentation for any purpose is hereby granted without fee, provided that this permission notice appear in supporting documentation. This permission notice shall be included in all copies or substantial portions of the Software.
THE SOFTWARE IS PROVIDED "AS IS", WITHOUT WARRANTY OF ANY KIND, EXPRESS OR IMPLIED, INCLUDING BUT NOT LIMITED TO THE WARRANTIES OF MERCHANTABILITY, FITNESS FOR A PARTICULAR PURPOSE AND NONINFRINGEMENT. IN NO EVENT SHALL THE AUTHOR BE LIABLE FOR ANY CLAIM, DAMAGES OR OTHER LIABILITY, WHETHER IN AN ACTION OF CONTRACT, TORT OR OTHERWISE, ARISING FROM, OUT OF OR IN CONNECTION WITH THE SOFTWARE OR THE USE OR OTHER DEALINGS IN THE SOFTWARE.
Copyright 1993 by Davor Matic
Permission to use, copy, modify, distribute, and sell this software and its documentation for any purpose is hereby granted without fee, provided that the above copyright notice appear in all copies and that both that copyright notice and this permission notice appear in supporting documentation. Davor Matic makes no representations about the suitability of this software for any purpose. It is provided "as is" without express or implied warranty.
Copyright (C) 2001-2004 Harold L Hunt II All Rights Reserved.; Copyright (C) Colin Harrison 2005-2008
Permission is hereby granted, free of charge, to any person obtaining a copy of this software and associated documentation files (the "Software"), to deal in the Software without restriction, including without limitation the rights to use, copy, modify, merge, publish, distribute, sublicense, and/or sell copies of the Software, and to permit persons to whom the Software is furnished to do so, subject to the following conditions:
The above copyright notice and this permission notice shall be included in all copies or substantial portions of the Software.
THE SOFTWARE IS PROVIDED "AS IS", WITHOUT WARRANTY OF ANY KIND, EXPRESS OR IMPLIED, INCLUDING BUT NOT LIMITED TO THE WARRANTIES OF MERCHANTABILITY, FITNESS FOR A PARTICULAR PURPOSE AND NONINFRINGEMENT. IN NO EVENT SHALL HAROLD L HUNT II BE LIABLE FOR ANY CLAIM, DAMAGES OR OTHER LIABILITY, WHETHER IN AN ACTION OF CONTRACT, TORT OR OTHERWISE, ARISING FROM, OUT OF OR IN CONNECTION WITH THE SOFTWARE OR THE USE OR OTHER DEALINGS IN THE SOFTWARE.
Except as contained in this notice, the name of Harold L Hunt II shall not be used in advertising or otherwise to promote the sale, use or other dealings in this Software without prior written authorization from Harold L Hunt II.
Copyright 1990,91 by Thomas Roell, Dinkelscherben, Germany.
Permission to use, copy, modify, distribute, and sell this software and its documentation for any purpose is hereby granted without fee, provided that the above copyright notice appear in all copies and that both that copyright notice and this permission notice appear in supporting documentation, and that the name of Thomas Roell not be used in advertising or publicity pertaining to distribution of the software without specific, written prior permission. Thomas Roell makes no representations about the suitability of this software for any purpose. It is provided "as is" without express or implied warranty.
THOMAS ROELL DISCLAIMS ALL WARRANTIES WITH REGARD TO THIS SOFTWARE, INCLUDING ALL IMPLIED WARRANTIES OF MERCHANTABILITY AND FITNESS, IN NO EVENT SHALL THOMAS ROELL BE LIABLE FOR ANY SPECIAL, INDIRECT OR CONSEQUENTIAL DAMAGES OR ANY DAMAGES WHATSOEVER RESULTING FROM LOSS OF USE, DATA OR PROFITS, WHETHER IN AN ACTION OF CONTRACT, NEGLIGENCE OR OTHER TORTIOUS ACTION, ARISING OUT OF OR IN CONNECTION WITH THE USE OR PERFORMANCE OF THIS SOFTWARE.
Copyright 1990,91 by Thomas Roell, Dinkelscherben, Germany; Copyright 1993 by David Wexelblat <dwex@goblin.org>
Permission to use, copy, modify, distribute, and sell this software and its documentation for any purpose is hereby granted without fee, provided that the above copyright notice appear in all copies and that both that copyright notice and this permission notice appear in supporting documentation, and that the names of Thomas Roell and David Wexelblat not be used in advertising or publicity pertaining to distribution of the software without specific, written prior permission. Thomas Roell and David Wexelblat makes no representations about the suitability of this software for any purpose. It is provided "as is" without express or implied warranty.
THOMAS ROELL AND DAVID WEXELBLAT DISCLAIMS ALL WARRANTIES WITH REGARD TO THIS SOFTWARE, INCLUDING ALL IMPLIED WARRANTIES OF MERCHANTABILITY AND FITNESS, IN NO EVENT SHALL THOMAS ROELL OR DAVID WEXELBLAT BE LIABLE FOR ANY SPECIAL, INDIRECT OR CONSEQUENTIAL DAMAGES OR ANY DAMAGES WHATSOEVER RESULTING FROM LOSS OF USE, DATA OR PROFITS, WHETHER IN AN ACTION OF CONTRACT, NEGLIGENCE OR OTHER TORTIOUS ACTION, ARISING OUT OF OR IN CONNECTION WITH THE USE OR PERFORMANCE OF THIS SOFTWARE.
Copyright 1990,91,92,93 by Thomas Roell, Germany.; Copyright 1991,92,93 by SGCS (Snitily Graphics Consulting Services), USA.
Permission to use, copy, modify, distribute, and sell this software and its documentation for any purpose is hereby granted without fee, provided that the above copyright notice appear in all copies and that both that copyright notice and this permission notice appear in supporting documentation, and that the name of Thomas Roell nor SGCS be used in advertising or publicity pertaining to distribution of the software without specific, written prior permission. Thomas Roell nor SGCS makes no representations about the suitability of this software for any purpose. It is provided "as is" without express or implied warranty.
THOMAS ROELL AND SGCS DISCLAIMS ALL WARRANTIES WITH REGARD TO THIS SOFTWARE, INCLUDING ALL IMPLIED WARRANTIES OF MERCHANTABILITY AND FITNESS, IN NO EVENT SHALL THOMAS ROELL OR SGCS BE LIABLE FOR ANY SPECIAL, INDIRECT OR CONSEQUENTIAL DAMAGES OR ANY DAMAGES WHATSOEVER RESULTING FROM LOSS OF USE, DATA OR PROFITS, WHETHER IN AN ACTION OF CONTRACT, NEGLIGENCE OR OTHER TORTIOUS ACTION, ARISING OUT OF OR IN CONNECTION WITH THE USE OR PERFORMANCE OF THIS SOFTWARE.
Copyright 1998 by Alan Hourihane, Wigan, England.; Copyright 2000-2002 by Alan Hourihane, Flint Mountain, North Wales.
Permission to use, copy, modify, distribute, and sell this software and its documentation for any purpose is hereby granted without fee, provided that the above copyright notice appear in all copies and that both that copyright notice and this permission notice appear in supporting documentation, and that the name of Alan Hourihane not be used in advertising or publicity pertaining to distribution of the software without specific, written prior permission. Alan Hourihane makes no representations about the suitability of this software for any purpose. It is provided "as is" without express or implied warranty.
ALAN HOURIHANE DISCLAIMS ALL WARRANTIES WITH REGARD TO THIS SOFTWARE, INCLUDING ALL IMPLIED WARRANTIES OF MERCHANTABILITY AND FITNESS, IN NO EVENT SHALL ALAN HOURIHANE BE LIABLE FOR ANY SPECIAL, INDIRECT OR CONSEQUENTIAL DAMAGES OR ANY DAMAGES WHATSOEVER RESULTING FROM LOSS OF USE, DATA OR PROFITS, WHETHER IN AN ACTION OF CONTRACT, NEGLIGENCE OR OTHER TORTIOUS ACTION, ARISING OUT OF OR IN CONNECTION WITH THE USE OR PERFORMANCE OF THIS SOFTWARE.
Copyright 1995 Kaleb S. KEITHLEY
Permission is hereby granted, free of charge, to any person obtaining a copy of this software and associated documentation files (the "Software"), to deal in the Software without restriction, including without limitation the rights to use, copy, modify, merge, publish, distribute, sublicense, and/or sell copies of the Software, and to permit persons to whom the Software is furnished to do so, subject to the following conditions:
The above copyright notice and this permission notice shall be included in all copies or substantial portions of the Software.
THE SOFTWARE IS PROVIDED "AS IS", WITHOUT WARRANTY OF ANY KIND, EXPRESS OR IMPLIED, INCLUDING BUT NOT LIMITED TO THE WARRANTIES OF MERCHANTABILITY, FITNESS FOR A PARTICULAR PURPOSE AND NONINFRINGEMENT. IN NO EVENT SHALL Kaleb S. KEITHLEY BE LIABLE FOR ANY CLAIM, DAMAGES OR OTHER LIABILITY, WHETHER IN AN ACTION OF CONTRACT, TORT OR OTHERWISE, ARISING FROM, OUT OF OR IN CONNECTION WITH THE SOFTWARE OR THE USE OR OTHER DEALINGS IN THE SOFTWARE.
Except as contained in this notice, the name of Kaleb S. KEITHLEY shall not be used in advertising or otherwise to promote the sale, use or other dealings in this Software without prior written authorization from Kaleb S. KEITHLEY
Copyright (c) 1997 Matthieu Herrb
Permission to use, copy, modify, distribute, and sell this software and its documentation for any purpose is hereby granted without fee, provided that the above copyright notice appear in all copies and that both that copyright notice and this permission notice appear in supporting documentation, and that the name of Matthieu Herrb not be used in advertising or publicity pertaining to distribution of the software without specific, written prior permission. Matthieu Herrb makes no representations about the suitability of this software for any purpose. It is provided "as is" without express or implied warranty.
MATTHIEU HERRB DISCLAIMS ALL WARRANTIES WITH REGARD TO THIS SOFTWARE, INCLUDING ALL IMPLIED WARRANTIES OF MERCHANTABILITY AND FITNESS, IN NO EVENT SHALL MATTHIEU HERRB BE LIABLE FOR ANY SPECIAL, INDIRECT OR CONSEQUENTIAL DAMAGES OR ANY DAMAGES WHATSOEVER RESULTING FROM LOSS OF USE, DATA OR PROFITS, WHETHER IN AN ACTION OF CONTRACT, NEGLIGENCE OR OTHER TORTIOUS ACTION, ARISING OUT OF OR IN CONNECTION WITH THE USE OR PERFORMANCE OF THIS SOFTWARE.
Copyright 2004, Egbert Eich
Permission is hereby granted, free of charge, to any person obtaining a copy of this software and associated documentation files (the "Software"), to deal in the Software without restriction, including without limitation the rights to use, copy, modify, merge, publish, distribute, sublicense, and/or sell copies of the Software, and to permit persons to whom the Software is furnished to do so, subject to the following conditions:
The above copyright notice and this permission notice shall be included in all copies or substantial portions of the Software.
THE SOFTWARE IS PROVIDED "AS IS", WITHOUT WARRANTY OF ANY KIND, EXPRESS OR IMPLIED, INCLUDING BUT NOT LIMITED TO THE WARRANTIES OF MERCHANTABILITY, FITNESS FOR A PARTICULAR PURPOSE AND NONINFRINGEMENT. IN NO EVENT SHALL EGBERT EICH BE LIABLE FOR ANY CLAIM, DAMAGES OR OTHER LIABILITY, WHETHER IN AN ACTION OF CONTRACT, TORT OR OTHERWISE, ARISING FROM, OUT OF OR IN CON- NECTION WITH THE SOFTWARE OR THE USE OR OTHER DEALINGS IN THE SOFTWARE.
Except as contained in this notice, the name of Egbert Eich shall not be used in advertising or otherwise to promote the sale, use or other dealings in this Software without prior written authorization from Egbert Eich.
Copyright 1993 by David Wexelblat <dwex@goblin.org>; Copyright 2005 by Kean Johnston <jkj@sco.com>; Copyright 1993 by David McCullough <davidm@stallion.oz.au>
Permission to use, copy, modify, distribute, and sell this software and its documentation for any purpose is hereby granted without fee, provided that the above copyright notice appear in all copies and that both that copyright notice and this permission notice appear in supporting documentation, and that the name of David Wexelblat not be used in advertising or publicity pertaining to distribution of the software without specific, written prior permission. David Wexelblat makes no representations about the suitability of this software for any purpose. It is provided "as is" without express or implied warranty.
DAVID WEXELBLAT DISCLAIMS ALL WARRANTIES WITH REGARD TO THIS SOFTWARE, INCLUDING ALL IMPLIED WARRANTIES OF MERCHANTABILITY AND FITNESS, IN NO EVENT SHALL DAVID WEXELBLAT BE LIABLE FOR ANY SPECIAL, INDIRECT OR CONSEQUENTIAL DAMAGES OR ANY DAMAGES WHATSOEVER RESULTING FROM LOSS OF USE, DATA OR PROFITS, WHETHER IN AN ACTION OF CONTRACT, NEGLIGENCE OR OTHER TORTIOUS ACTION, ARISING OUT OF OR IN CONNECTION WITH THE USE OR PERFORMANCE OF THIS SOFTWARE.
Copyright 1992 by Orest Zborowski <obz@Kodak.com>; Copyright 1993 by David Wexelblat <dwex@goblin.org>
Permission to use, copy, modify, distribute, and sell this software and its documentation for any purpose is hereby granted without fee, provided that the above copyright notice appear in all copies and that both that copyright notice and this permission notice appear in supporting documentation, and that the names of Orest Zborowski and David Wexelblat not be used in advertising or publicity pertaining to distribution of the software without specific, written prior permission. Orest Zborowski and David Wexelblat make no representations about the suitability of this software for any purpose. It is provided "as is" without express or implied warranty.
OREST ZBOROWSKI AND DAVID WEXELBLAT DISCLAIMS ALL WARRANTIES WITH REGARD TO THIS SOFTWARE, INCLUDING ALL IMPLIED WARRANTIES OF MERCHANTABILITY AND FITNESS, IN NO EVENT SHALL OREST ZBOROWSKI OR DAVID WEXELBLAT BE LIABLE FOR ANY SPECIAL, INDIRECT OR CONSEQUENTIAL DAMAGES OR ANY DAMAGES WHATSOEVER RESULTING FROM LOSS OF USE, DATA OR PROFITS, WHETHER IN AN ACTION OF CONTRACT, NEGLIGENCE OR OTHER TORTIOUS ACTION, ARISING OUT OF OR IN CONNECTION WITH THE USE OR PERFORMANCE OF THIS SOFTWARE.
Copyright 1992 by Orest Zborowski <obz@Kodak.com>; Copyright 1993 by David Dawes <dawes@xfree86.org>
Permission to use, copy, modify, distribute, and sell this software and its documentation for any purpose is hereby granted without fee, provided that the above copyright notice appear in all copies and that both that copyright notice and this permission notice appear in supporting documentation, and that the names of Orest Zborowski and David Dawes not be used in advertising or publicity pertaining to distribution of the software without specific, written prior permission. Orest Zborowski and David Dawes make no representations about the suitability of this software for any purpose. It is provided "as is" without express or implied warranty.
OREST ZBOROWSKI AND DAVID DAWES DISCLAIMS ALL WARRANTIES WITH REGARD TO THIS SOFTWARE, INCLUDING ALL IMPLIED WARRANTIES OF MERCHANTABILITY AND FITNESS, IN NO EVENT SHALL OREST ZBOROWSKI OR DAVID DAWES BE LIABLE FOR ANY SPECIAL, INDIRECT OR CONSEQUENTIAL DAMAGES OR ANY DAMAGES WHATSOEVER RESULTING FROM LOSS OF USE, DATA OR PROFITS, WHETHER IN AN ACTION OF CONTRACT, NEGLIGENCE OR OTHER TORTIOUS ACTION, ARISING OUT OF OR IN CONNECTION WITH THE USE OR PERFORMANCE OF THIS SOFTWARE.
Copyright 1995-1999 by Frederic Lepied, France. <fred@sugix.frmug.fr.net>
Permission to use, copy, modify, distribute, and sell this software and its documentation for any purpose is hereby granted without fee, provided that the above copyright notice appear in all copies and that both that copyright notice and this permission notice appear in supporting documentation, and that the name of Frederic Lepied not be used in advertising or publicity pertaining to distribution of the software without specific, written prior permission. Frederic Lepied makes no representations about the suitability of this software for any purpose. It is provided "as is" without express or implied warranty.
FREDERIC LEPIED DISCLAIMS ALL WARRANTIES WITH REGARD TO THIS SOFTWARE, INCLUDING ALL IMPLIED WARRANTIES OF MERCHANTABILITY AND FITNESS, IN NO EVENT SHALL FREDERIC LEPIED BE LIABLE FOR ANY SPECIAL, INDIRECT OR CONSEQUENTIAL DAMAGES OR ANY DAMAGES WHATSOEVER RESULTING FROM LOSS OF USE, DATA OR PROFITS, WHETHER IN AN ACTION OF CONTRACT, NEGLIGENCE OR OTHER TORTIOUS ACTION, ARISING OUT OF OR IN CONNECTION WITH THE USE OR PERFORMANCE OF THIS SOFTWARE.
Copyright 1992 by Rich Murphey <Rich@Rice.edu>; Copyright 1993 by David Wexelblat <dwex@goblin.org>
Permission to use, copy, modify, distribute, and sell this software and its documentation for any purpose is hereby granted without fee, provided that the above copyright notice appear in all copies and that both that copyright notice and this permission notice appear in supporting documentation, and that the names of Rich Murphey and David Wexelblat not be used in advertising or publicity pertaining to distribution of the software without specific, written prior permission. Rich Murphey and David Wexelblat make no representations about the suitability of this software for any purpose. It is provided "as is" without express or implied warranty.
RICH MURPHEY AND DAVID WEXELBLAT DISCLAIM ALL WARRANTIES WITH REGARD TO THIS SOFTWARE, INCLUDING ALL IMPLIED WARRANTIES OF MERCHANTABILITY AND FITNESS, IN NO EVENT SHALL RICH MURPHEY OR DAVID WEXELBLAT BE LIABLE FOR ANY SPECIAL, INDIRECT OR CONSEQUENTIAL DAMAGES OR ANY DAMAGES WHATSOEVER RESULTING FROM LOSS OF USE, DATA OR PROFITS, WHETHER IN AN ACTION OF CONTRACT, NEGLIGENCE OR OTHER TORTIOUS ACTION, ARISING OUT OF OR IN CONNECTION WITH THE USE OR PERFORMANCE OF THIS SOFTWARE.
Copyright 1992 by Rich Murphey <Rich@Rice.edu>; Copyright 1993 by David Dawes <dawes@xfree86.org>
Permission to use, copy, modify, distribute, and sell this software and its documentation for any purpose is hereby granted without fee, provided that the above copyright notice appear in all copies and that both that copyright notice and this permission notice appear in supporting documentation, and that the names of Rich Murphey and David Dawes not be used in advertising or publicity pertaining to distribution of the software without specific, written prior permission. Rich Murphey and David Dawes make no representations about the suitability of this software for any purpose. It is provided "as is" without express or implied warranty.
RICH MURPHEY AND DAVID DAWES DISCLAIM ALL WARRANTIES WITH REGARD TO THIS SOFTWARE, INCLUDING ALL IMPLIED WARRANTIES OF MERCHANTABILITY AND FITNESS, IN NO EVENT SHALL RICH MURPHEY OR DAVID DAWES BE LIABLE FOR ANY SPECIAL, INDIRECT OR CONSEQUENTIAL DAMAGES OR ANY DAMAGES WHATSOEVER RESULTING FROM LOSS OF USE, DATA OR PROFITS, WHETHER IN AN ACTION OF CONTRACT, NEGLIGENCE OR OTHER TORTIOUS ACTION, ARISING OUT OF OR IN CONNECTION WITH THE USE OR PERFORMANCE OF THIS SOFTWARE.
Copyright (c) 2003-2004 Anders Carlsson
Permission to use, copy, modify, distribute, and sell this software and its documentation for any purpose is hereby granted without fee, provided that the above copyright notice appear in all copies and that both that copyright notice and this permission notice appear in supporting documentation, and that the name of Anders Carlsson not be used in advertising or publicity pertaining to distribution of the software without specific, written prior permission. Anders Carlsson makes no representations about the suitability of this software for any purpose. It is provided "as is" without express or implied warranty.
ANDERS CARLSSON DISCLAIMS ALL WARRANTIES WITH REGARD TO THIS SOFTWARE, INCLUDING ALL IMPLIED WARRANTIES OF MERCHANTABILITY AND FITNESS, IN NO EVENT SHALL ANDERS CARLSSON BE LIABLE FOR ANY SPECIAL, INDIRECT OR CONSEQUENTIAL DAMAGES OR ANY DAMAGES WHATSOEVER RESULTING FROM LOSS OF USE, DATA OR PROFITS, WHETHER IN AN ACTION OF CONTRACT, NEGLIGENCE OR OTHER TORTIOUS ACTION, ARISING OUT OF OR IN CONNECTION WITH THE USE OR PERFORMANCE OF THIS SOFTWARE.
Copyright (C) 2003 Anders Carlsson; Copyright (c) 2003-2004 Eric Anholt; Copyright (c) 2004 Keith Packard
Permission to use, copy, modify, distribute, and sell this software and its documentation for any purpose is hereby granted without fee, provided that the above copyright notice appear in all copies and that both that copyright notice and this permission notice appear in supporting documentation, and that the name of Eric Anholt not be used in advertising or publicity pertaining to distribution of the software without specific, written prior permission. Eric Anholt makes no representations about the suitability of this software for any purpose. It is provided "as is" without express or implied warranty.
ERIC ANHOLT DISCLAIMS ALL WARRANTIES WITH REGARD TO THIS SOFTWARE, INCLUDING ALL IMPLIED WARRANTIES OF MERCHANTABILITY AND FITNESS, IN NO EVENT SHALL ERIC ANHOLT BE LIABLE FOR ANY SPECIAL, INDIRECT OR CONSEQUENTIAL DAMAGES OR ANY DAMAGES WHATSOEVER RESULTING FROM LOSS OF USE, DATA OR PROFITS, WHETHER IN AN ACTION OF CONTRACT, NEGLIGENCE OR OTHER TORTIOUS ACTION, ARISING OUT OF OR IN CONNECTION WITH THE USE OR PERFORMANCE OF THIS SOFTWARE.
Copyright (c) 1998 Todd C. Miller <Todd.Miller@courtesan.com>
Permission to use, copy, modify, and distribute this software for any purpose with or without fee is hereby granted, provided that the above copyright notice and this permission notice appear in all copies.
THE SOFTWARE IS PROVIDED "AS IS" AND TODD C. MILLER DISCLAIMS ALL WARRANTIES WITH REGARD TO THIS SOFTWARE INCLUDING ALL IMPLIED WARRANTIES OF MERCHANTABILITY AND FITNESS. IN NO EVENT SHALL TODD C. MILLER BE LIABLE FOR ANY SPECIAL, DIRECT, INDIRECT, OR CONSEQUENTIAL DAMAGES OR ANY DAMAGES WHATSOEVER RESULTING FROM LOSS OF USE, DATA OR PROFITS, WHETHER IN AN ACTION OF CONTRACT, NEGLIGENCE OR OTHER TORTIOUS ACTION, ARISING OUT OF OR IN CONNECTION WITH THE USE OR PERFORMANCE OF THIS SOFTWARE.
Copyright (c) 2003-2004 Philip Blundell
Permission to use, copy, modify, distribute, and sell this software and its documentation for any purpose is hereby granted without fee, provided that the above copyright notice appear in all copies and that both that copyright notice and this permission notice appear in supporting documentation, and that the name of Philip Blundell not be used in advertising or publicity pertaining to distribution of the software without specific, written prior permission. Philip Blundell makes no representations about the suitability of this software for any purpose. It is provided "as is" without express or implied warranty.
PHILIP BLUNDELL DISCLAIMS ALL WARRANTIES WITH REGARD TO THIS SOFTWARE, INCLUDING ALL IMPLIED WARRANTIES OF MERCHANTABILITY AND FITNESS, IN NO EVENT SHALL PHILIP BLUNDELL BE LIABLE FOR ANY SPECIAL, INDIRECT OR CONSEQUENTIAL DAMAGES OR ANY DAMAGES WHATSOEVER RESULTING FROM LOSS OF USE, DATA OR PROFITS, WHETHER IN AN ACTION OF CONTRACT, NEGLIGENCE OR OTHER TORTIOUS ACTION, ARISING OUT OF OR IN CONNECTION WITH THE USE OR PERFORMANCE OF THIS SOFTWARE.
Copyright 1997-2004 by Marc Aurele La France (TSI @ UQV), tsi@xfree86.org
Permission to use, copy, modify, distribute, and sell this software and its documentation for any purpose is hereby granted without fee, provided that the above copyright notice appear in all copies and that both that copyright notice and this permission notice appear in supporting documentation, and that the name of Marc Aurele La France not be used in advertising or publicity pertaining to distribution of the software without specific, written prior permission. Marc Aurele La France makes no representations about the suitability of this software for any purpose. It is provided "as-is" without express or implied warranty.
MARC AURELE LA FRANCE DISCLAIMS ALL WARRANTIES WITH REGARD TO THIS SOFTWARE, INCLUDING ALL IMPLIED WARRANTIES OF MERCHANTABILITY AND FITNESS. IN NO EVENT SHALL MARC AURELE LA FRANCE BE LIABLE FOR ANY SPECIAL, INDIRECT OR CONSEQUENTIAL DAMAGES OR ANY DAMAGES WHATSOEVER RESULTING FROM LOSS OF USE, DATA OR PROFITS, WHETHER IN AN ACTION OF CONTRACT, NEGLIGENCE OR OTHER TORTIOUS ACTION, ARISING OUT OF OR IN CONNECTION WITH THE USE OR PERFORMANCE OF THIS SOFTWARE.
Copyright 2001-2005 by J. Kean Johnston <jkj@sco.com>
Permission to use, copy, modify, distribute, and sell this software and its documentation for any purpose is hereby granted without fee, provided that the above copyright notice appear in all copies and that both that copyright notice and this permission notice appear in supporting documentation, and that the name J. Kean Johnston not be used in advertising or publicity pertaining to distribution of the software without specific, written prior permission. J. Kean Johnston makes no representations about the suitability of this software for any purpose. It is provided "as is" without express or implied warranty.
J. KEAN JOHNSTON DISCLAIMS ALL WARRANTIES WITH REGARD TO THIS SOFTWARE, INCLUDING ALL IMPLIED WARRANTIES OF MERCHANTABILITY AND FITNESS, IN NO EVENT SHALL J. KEAN JOHNSTON BE LIABLE FOR ANY SPECIAL, INDIRECT OR CONSEQUENTIAL DAMAGES OR ANY DAMAGES WHATSOEVER RESULTING FROM LOSS OF USE, DATA OR PROFITS, WHETHER IN AN ACTION OF CONTRACT, NEGLIGENCE OR OTHER TORTIOUS ACTION, ARISING OUT OF OR IN CONNECTION WITH THE USE OR PERFORMANCE OF THIS SOFTWARE.
Copyright (C) 2000 Jakub Jelinek (jakub@redhat.com)
Permission is hereby granted, free of charge, to any person obtaining a copy of this software and associated documentation files (the "Software"), to deal in the Software without restriction, including without limitation the rights to use, copy, modify, merge, publish, distribute, sublicense, and/or sell copies of the Software, and to permit persons to whom the Software is furnished to do so, subject to the following conditions:
The above copyright notice and this permission notice shall be included in all copies or substantial portions of the Software.
THE SOFTWARE IS PROVIDED "AS IS", WITHOUT WARRANTY OF ANY KIND, EXPRESS OR IMPLIED, INCLUDING BUT NOT LIMITED TO THE WARRANTIES OF MERCHANTABILITY, FITNESS FOR A PARTICULAR PURPOSE AND NONINFRINGEMENT. IN NO EVENT SHALL JAKUB JELINEK BE LIABLE FOR ANY CLAIM, DAMAGES OR OTHER LIABILITY, WHETHER IN AN ACTION OF CONTRACT, TORT OR OTHERWISE, ARISING FROM, OUT OF OR IN CONNECTION WITH THE SOFTWARE OR THE USE OR OTHER DEALINGS IN THE SOFTWARE.
Copyright 1997,1998 by UCHIYAMA Yasushi
Permission to use, copy, modify, distribute, and sell this software and its documentation for any purpose is hereby granted without fee, provided that the above copyright notice appear in all copies and that both that copyright notice and this permission notice appear in supporting documentation, and that the name of UCHIYAMA Yasushi not be used in advertising or publicity pertaining to distribution of the software without specific, written prior permission. UCHIYAMA Yasushi makes no representations about the suitability of this software for any purpose. It is provided "as is" without express or implied warranty.
UCHIYAMA YASUSHI DISCLAIMS ALL WARRANTIES WITH REGARD TO THIS SOFTWARE, INCLUDING ALL IMPLIED WARRANTIES OF MERCHANTABILITY AND FITNESS, IN NO EVENT SHALL UCHIYAMA YASUSHI BE LIABLE FOR ANY SPECIAL, INDIRECT OR CONSEQUENTIAL DAMAGES OR ANY DAMAGES WHATSOEVER RESULTING FROM LOSS OF USE, DATA OR PROFITS, WHETHER IN AN ACTION OF CONTRACT, NEGLIGENCE OR OTHER TORTIOUS ACTION, ARISING OUT OF OR IN CONNECTION WITH THE USE OR PERFORMANCE OF THIS SOFTWARE.
Copyright (c) 2007 OpenedHand Ltd
Permission to use, copy, modify, distribute, and sell this software and its documentation for any purpose is hereby granted without fee, provided that the above copyright notice appear in all copies and that both that copyright notice and this permission notice appear in supporting documentation, and that the name of OpenedHand Ltd not be used in advertising or publicity pertaining to distribution of the software without specific, written prior permission. OpenedHand Ltd makes no representations about the suitability of this software for any purpose. It is provided "as is" without express or implied warranty.
OpenedHand Ltd DISCLAIMS ALL WARRANTIES WITH REGARD TO THIS SOFTWARE, INCLUDING ALL IMPLIED WARRANTIES OF MERCHANTABILITY AND FITNESS, IN NO EVENT SHALL OpenedHand Ltd BE LIABLE FOR ANY SPECIAL, INDIRECT OR CONSEQUENTIAL DAMAGES OR ANY DAMAGES WHATSOEVER RESULTING FROM LOSS OF USE, DATA OR PROFITS, WHETHER IN AN ACTION OF CONTRACT, NEGLIGENCE OR OTHER TORTIOUS ACTION, ARISING OUT OF OR IN CONNECTION WITH THE USE OR PERFORMANCE OF THIS SOFTWARE.
Copyright (c) 1991, Oracle and/or its affiliates. All rights reserved.
Permission is hereby granted, free of charge, to any person obtaining a copy of this software and associated documentation files (the "Software"), to deal in the Software without restriction, including without limitation the rights to use, copy, modify, merge, publish, distribute, sublicense, and/or sell copies of the Software, and to permit persons to whom the Software is furnished to do so, subject to the following conditions:
The above copyright notice and this permission notice (including the next paragraph) shall be included in all copies or substantial portions of the Software.
THE SOFTWARE IS PROVIDED "AS IS", WITHOUT WARRANTY OF ANY KIND, EXPRESS OR IMPLIED, INCLUDING BUT NOT LIMITED TO THE WARRANTIES OF MERCHANTABILITY, FITNESS FOR A PARTICULAR PURPOSE AND NONINFRINGEMENT. IN NO EVENT SHALL THE AUTHORS OR COPYRIGHT HOLDERS BE LIABLE FOR ANY CLAIM, DAMAGES OR OTHER LIABILITY, WHETHER IN AN ACTION OF CONTRACT, TORT OR OTHERWISE, ARISING FROM, OUT OF OR IN CONNECTION WITH THE SOFTWARE OR THE USE OR OTHER DEALINGS IN THE SOFTWARE.
Copyright (c) 2002, NVIDIA Corporation.
NVIDIA Corporation("NVIDIA") supplies this software to you in consideration of your agreement to the following terms, and your use, installation, modification or redistribution of this NVIDIA software constitutes acceptance of these terms. If you do not agree with these terms, please do not use, install, modify or redistribute this NVIDIA software.
In consideration of your agreement to abide by the following terms, and subject to these terms, NVIDIA grants you a personal, non-exclusive license, under NVIDIA's copyrights in this original NVIDIA software (the "NVIDIA Software"), to use, reproduce, modify and redistribute the NVIDIA Software, with or without modifications, in source and/or binary forms; provided that if you redistribute the NVIDIA Software, you must retain the copyright notice of NVIDIA, this notice and the following text and disclaimers in all such redistributions of the NVIDIA Software. Neither the name, trademarks, service marks nor logos of NVIDIA Corporation may be used to endorse or promote products derived from the NVIDIA Software without specific prior written permission from NVIDIA. Except as expressly stated in this notice, no other rights or licenses express or implied, are granted by NVIDIA herein, including but not limited to any patent rights that may be infringed by your derivative works or by other works in which the NVIDIA Software may be incorporated. No hardware is licensed hereunder.
THE NVIDIA SOFTWARE IS BEING PROVIDED ON AN "AS IS" BASIS, WITHOUT WARRANTIES OR CONDITIONS OF ANY KIND, EITHER EXPRESS OR IMPLIED, INCLUDING WITHOUT LIMITATION, WARRANTIES OR CONDITIONS OF TITLE, NON-INFRINGEMENT, MERCHANTABILITY, FITNESS FOR A PARTICULAR PURPOSE, OR ITS USE AND OPERATION EITHER ALONE OR IN COMBINATION WITH OTHER PRODUCTS.
IN NO EVENT SHALL NVIDIA BE LIABLE FOR ANY SPECIAL, INDIRECT, INCIDENTAL, EXEMPLARY, CONSEQUENTIAL DAMAGES (INCLUDING, BUT NOT LIMITED TO, LOST PROFITS; PROCUREMENT OF SUBSTITUTE GOODS OR SERVICES; LOSS OF USE, DATA, OR PROFITS; OR BUSINESS INTERRUPTION) OR ARISING IN ANY WAY OUT OF THE USE, REPRODUCTION, MODIFICATION AND/OR DISTRIBUTION OF THE NVIDIA SOFTWARE, HOWEVER CAUSED AND WHETHER UNDER THEORY OF CONTRACT, TORT (INCLUDING NEGLIGENCE), STRICT LIABILITY OR OTHERWISE, EVEN IF NVIDIA HAS BEEN ADVISED OF THE POSSIBILITY OF SUCH DAMAGE.
Copyright (c) 2014-2016 The Khronos Group Inc.
Permission is hereby granted, free of charge, to any person obtaining a copy of this software and/or associated documentation files (the "Materials"), to deal in the Materials without restriction, including without limitation the rights to use, copy, modify, merge, publish, distribute, sublicense, and/or sell copies of the Materials, and to permit persons to whom the Materials are furnished to do so, subject to the following conditions:
The above copyright notice and this permission notice shall be included in all copies or substantial portions of the Materials.
MODIFICATIONS TO THIS FILE MAY MEAN IT NO LONGER ACCURATELY REFLECTS KHRONOS STANDARDS. THE UNMODIFIED, NORMATIVE VERSIONS OF KHRONOS SPECIFICATIONS AND HEADER INFORMATION ARE LOCATED AT https://www.khronos.org/registry/
THE MATERIALS ARE PROVIDED "AS IS", WITHOUT WARRANTY OF ANY KIND, EXPRESS OR IMPLIED, INCLUDING BUT NOT LIMITED TO THE WARRANTIES OF MERCHANTABILITY, FITNESS FOR A PARTICULAR PURPOSE AND NONINFRINGEMENT. IN NO EVENT SHALL THE AUTHORS OR COPYRIGHT HOLDERS BE LIABLE FOR ANY CLAIM, DAMAGES OR OTHER LIABILITY, WHETHER IN AN ACTION OF CONTRACT, TORT OR OTHERWISE, ARISING FROM,OUT OF OR IN CONNECTION WITH THE MATERIALS OR THE USE OR OTHER DEALINGS The above copyright notice and this permission notice shall be included in all copies or substantial portions of the Materials. IN THE MATERIALS.
Copyright (c) 2008-2018 The Khronos Group Inc.
Permission is hereby granted, free of charge, to any person obtaining a copy of this software and/or associated documentation files (the "Materials"), to deal in the Materials without restriction, including without limitation the rights to use, copy, modify, merge, publish, distribute, sublicense, and/or sell copies of the Materials, and to permit persons to whom the Materials are furnished to do so, subject to the following conditions:
The above copyright notice and this permission notice shall be included in all copies or substantial portions of the Materials.
THE MATERIALS ARE PROVIDED "AS IS", WITHOUT WARRANTY OF ANY KIND, EXPRESS OR IMPLIED, INCLUDING BUT NOT LIMITED TO THE WARRANTIES OF MERCHANTABILITY, FITNESS FOR A PARTICULAR PURPOSE AND NONINFRINGEMENT. IN NO EVENT SHALL THE AUTHORS OR COPYRIGHT HOLDERS BE LIABLE FOR ANY CLAIM, DAMAGES OR OTHER LIABILITY, WHETHER IN AN ACTION OF CONTRACT, TORT OR OTHERWISE, ARISING FROM, OUT OF OR IN CONNECTION WITH THE MATERIALS OR THE USE OR OTHER DEALINGS IN THE MATERIALS.
Copyright IBM Corporation 2006 - 2011 All rights reserved; Copyright IBM Corp. and others, 2012-2016
For the TPM 1.2 code and the library code the following license applies:
Redistribution and use in source and binary forms, with or without modification, are permitted provided that the following conditions are met: Redistributions of source code must retain the above copyright notice, this list of conditions and the following disclaimer. Redistributions in binary form must reproduce the above copyright notice, this list of conditions and the following disclaimer in the documentation and/or other materials provided with the distribution. Neither the names of the IBM Corporation nor the names of its contributors may be used to endorse or promote products derived from this software without specific prior written permission.
THIS SOFTWARE IS PROVIDED BY THE COPYRIGHT HOLDERS AND CONTRIBUTORS "AS IS" AND ANY EXPRESS OR IMPLIED WARRANTIES, INCLUDING, BUT NOT LIMITED TO, THE IMPLIED WARRANTIES OF MERCHANTABILITY AND FITNESS FOR A PARTICULAR PURPOSE ARE DISCLAIMED. IN NO EVENT SHALL THE COPYRIGHT HOLDER OR CONTRIBUTORS BE LIABLE FOR ANY DIRECT, INDIRECT, INCIDENTAL, SPECIAL, EXEMPLARY, OR CONSEQUENTIAL DAMAGES (INCLUDING, BUT NOT LIMITED TO, PROCUREMENT OF SUBSTITUTE GOODS OR SERVICES; LOSS OF USE, DATA, OR PROFITS; OR BUSINESS INTERRUPTION) HOWEVER CAUSED AND ON ANY THEORY OF LIABILITY, WHETHER IN CONTRACT, STRICT LIABILITY, OR TORT (INCLUDING NEGLIGENCE OR OTHERWISE) ARISING IN ANY WAY OUT OF THE USE OF THIS SOFTWARE, EVEN IF ADVISED OF THE POSSIBILITY OF SUCH DAMAGE.
For the TPM 2 code the following license and notices apply:
Licenses and Notices
Copyright Licenses:
Trusted Computing Group (TCG) grants to the user of the source code in this specification (the "Source Code") a worldwide, irrevocable, nonexclusive, royalty free, copyright license to reproduce, create derivative works, distribute, display and perform the Source Code and derivative works thereof, and to grant others the rights granted herein.
The TCG grants to the user of the other parts of the specification (other than the Source Code) the rights to reproduce, distribute, display, and perform the specification solely for the purpose of developing products based on such documents.
Source Code Distribution Conditions:
Redistributions of Source Code must retain the above copyright licenses, this list of conditions and the following disclaimers.
Redistributions in binary form must reproduce the above copyright licenses, this list of conditions and the following disclaimers in the documentation and/or other materials provided with the distribution.
Disclaimers:
THE COPYRIGHT LICENSES SET FORTH ABOVE DO NOT REPRESENT ANY FORM OF LICENSE OR WAIVER, EXPRESS OR IMPLIED, BY ESTOPPEL OR OTHERWISE, WITH RESPECT TO PATENT RIGHTS HELD BY TCG MEMBERS (OR OTHER THIRD PARTIES) THAT MAY BE NECESSARY TO IMPLEMENT THIS SPECIFICATION OR OTHERWISE. Contact TCG Administration (admin@trustedcomputinggroup.org) for information on specification licensing rights available through TCG membership agreements.
THIS SPECIFICATION IS PROVIDED "AS IS" WITH NO EXPRESS OR IMPLIED WARRANTIES WHATSOEVER, INCLUDING ANY WARRANTY OF MERCHANTABILITY OR FITNESS FOR A PARTICULAR PURPOSE, ACCURACY, COMPLETENESS, OR NONINFRINGEMENT OF INTELLECTUAL PROPERTY RIGHTS, OR ANY WARRANTY OTHERWISE ARISING OUT OF ANY PROPOSAL, SPECIFICATION OR SAMPLE.
Without limitation, TCG and its members and licensors disclaim all liability, including liability for infringement of any proprietary rights, relating to use of information in this specification and to the implementation of this specification, and TCG disclaims all liability for cost of procurement of substitute goods or services, lost profits, loss of use, loss of data or any incidental, consequential, direct, indirect, or special damages, whether under contract, tort, warranty or otherwise, arising in any way out of use or reliance upon this specification or any information herein.
Version 5, Dec 13, 2012
The Oracle Privacy Policies posted on https://www.oracle.com/legal/privacy/privacy-policy.html apply to your personal data collected and used by Oracle. The following privacy information describes in more detail which information is exchanged between the Oracle VM VirtualBox application and Oracle, and which information is collected by the virtualbox.org website.
§ 1 virtualbox.org. The "virtualbox.org" website logs anonymous usage information such as your IP address, geographical location, browser type, referral source, length of visit and number of page views while you visit (collectively, "anonymous data"). In addition, but only if you choose to register, the website's bug tracking and forum services store the data you choose to reveal upon registration, such as your user name and contact information.
§ 2 Cookies. The virtualbox.org website, the bug tracker and the forum services use cookies to identify and track the visiting web browser and, if you have registered, to facilitate login. Most browsers allow you to refuse to accept cookies. While you can still visit the website with cookies disabled, logging into the bug tracker and forum services will most likely not work without them.
§ 3 Oracle VM VirtualBox registration process. The Oracle VM VirtualBox application may ask that the user optionally register with Oracle. If you choose to register, your name, e-mail address, country and company will be submitted to Oracle and stored together with the IP address of the submitter as well as product version and platform being used.
§ 4 Update notifications. The Oracle VM VirtualBox application may contact Oracle to find out whether a new version of Oracle VM VirtualBox has been released and notify the user if that is the case. In the process, anonymous data such as your IP address and a non-identifying counter, together with the product version and the platform being used, is sent so that the server can find out whether an update is available. By default, this check is performed once a day. You change this interval or disable these checks altogether in the Oracle VM VirtualBox preferences.
§ 5 Usage of personal information. Oracle may use anonymous and personal data collected by the means above for statistical purposes as well as to automatically inform you about new notices related to your posts on the bug tracker and forum services, to administer the website and to contact you due to technical issues. Oracle may also inform you about new product releases related to Oracle VM VirtualBox.
In no event will personal data without your express consent be provided to any third parties, unless Oracle may be required to do so by law or in connection with legal proceedings.
§ 6 Updates. Oracle may update the privacy policy at any time by posting a new version at https://www.oracle.com/legal/privacy/privacy-policy.html and the privacy information will be kept up to date in the documentation which comes with the Oracle VM VirtualBox application. You should check these places occasionally to ensure you are happy with any changes.
A
- ACPI
Advanced Configuration and Power Interface, an industry specification for BIOS and hardware extensions to configure PC hardware and perform power management. Windows 2000 and later, as well as Linux 2.4 and later support ACPI. Windows can only enable or disable ACPI support at installation time.
- AHCI
Advanced Host Controller Interface, the interface that supports SATA devices such as hard disks. See Section 5.1, “Hard Disk Controllers”.
- AMD-V
The hardware virtualization features built into modern AMD processors. See Section 10.3, “Hardware Virtualization”.
- API
Application Programming Interface.
- APIC
Advanced Programmable Interrupt Controller, a newer version of the original PC PIC (programmable interrupt controller). Most modern CPUs contain an on-chip APIC, called a local APIC. Many systems also contain an I/O APIC (input output APIC) as a separate chip which provides more than 16 IRQs. Windows 2000 and later use a different kernel if they detect an I/O APIC during installation. Therefore, an I/O APIC must not be removed after installation.
- ATA
Advanced Technology Attachment, an industry standard for hard disk interfaces which is synonymous with IDE. See Section 5.1, “Hard Disk Controllers”.
B
- BIOS
Basic Input/Output System, the firmware built into most personal computers which is responsible of initializing the hardware after the computer has been turned on and then booting an operating system. Oracle VM VirtualBox ships with its own virtual BIOS that runs when a virtual machine is started.
C
- COM
Microsoft Component Object Model, a programming infrastructure for modular software. COM enables applications to provide application programming interfaces which can be accessed from various other programming languages and applications. Oracle VM VirtualBox makes use of COM both internally and externally to provide a comprehensive API to 3rd party developers.
D
- DHCP
Dynamic Host Configuration Protocol. This enables a networking device in a network to acquire its IP address and other networking details automatically, in order to avoid having to configure all devices in a network with fixed IP addresses. Oracle VM VirtualBox has a built-in DHCP server that delivers an IP addresses to a virtual machine when networking is configured to NAT. See Chapter 6, Virtual Networking.
E
- EFI
Extensible Firmware Interface, a firmware built into computers which is designed to replace the aging BIOS. Originally designed by Intel, most modern operating systems can now boot on computers which have EFI instead of a BIOS built into them. See Section 3.14, “Alternative Firmware (EFI)”.
- EHCI
Enhanced Host Controller Interface, the interface that implements the USB 2.0 standard.
G
- GUI
Graphical User Interface. Commonly used as an antonym to a "command line interface". In the context of Oracle VM VirtualBox, we sometimes refer to the main graphical VirtualBox program as the "GUI", to differentiate it from the VBoxManage interface.
- GUID
See UUID.
I
- IDE
Integrated Drive Electronics, an industry standard for hard disk interfaces. See Section 5.1, “Hard Disk Controllers”.
- I/O APIC
See APIC.
- iSCSI
Internet SCSI. See Section 5.10, “iSCSI Servers”.
M
- MAC
Media Access Control, a part of an Ethernet network card. A MAC address is a 6-byte number which identifies a network card. It is typically written in hexadecimal notation where the bytes are separated by colons, such as
00:17:3A:5E:CB:08.- MSI
Message Signaled Interrupts, as supported by modern chipsets such as the ICH9. See Section 3.5.1, “Motherboard Tab”. As opposed to traditional pin-based interrupts, with MSI, a small amount of data can accompany the actual interrupt message. This reduces the amount of hardware pins required and allows for more interrupts and better performance.
N
- NAT
Network Address Translation. A technique to share networking interfaces by which an interface modifies the source and/or target IP addresses of network packets according to specific rules. Commonly employed by routers and firewalls to shield an internal network from the Internet, Oracle VM VirtualBox can use NAT to easily share a host's physical networking hardware with its virtual machines. See Section 6.3, “Network Address Translation (NAT)”.
O
- OVF
Open Virtualization Format, a cross-platform industry standard to exchange virtual appliances between virtualization products. See Section 1.15, “Importing and Exporting Virtual Machines”.
P
- PAE
Physical Address Extension. This enables access to more than 4 GB of RAM, even in 32-bit environments. See Section 3.4.2, “Advanced Tab”.
- PIC
See APIC.
- PXE
Preboot Execution Environment, an industry standard for booting PC systems from remote network locations. It includes DHCP for IP configuration and TFTP for file transfer. Using UNDI, a hardware independent driver stack for accessing the network card from bootstrap code is available.
R
- RDP
Remote Desktop Protocol, a protocol developed by Microsoft as an extension to the ITU T.128 and T.124 video conferencing protocol. With RDP, a PC system can be controlled from a remote location using a network connection over which data is transferred in both directions. Typically graphics updates and audio are sent from the remote machine and keyboard and mouse input events are sent from the client. An Oracle VM VirtualBox extension package by Oracle provides VRDP, an enhanced implementation of the relevant standards which is largely compatible with Microsoft's RDP implementation. See Section 7.1, “Remote Display (VRDP Support)” for details.
S
- SAS
Serial Attached SCSI, an industry standard for hard disk interfaces. See Section 5.1, “Hard Disk Controllers”.
- SATA
Serial ATA, an industry standard for hard disk interfaces. See Section 5.1, “Hard Disk Controllers”.
- SCSI
Small Computer System Interface. An industry standard for data transfer between devices, especially for storage. See Section 5.1, “Hard Disk Controllers”.
- SMP
Symmetrical Multiprocessing, meaning that the resources of a computer are shared between several processors. These can either be several processor chips or, as is more common with modern hardware, multiple CPU cores in one processor.
- SSD
Solid-state drive, uses microchips for storing data in a computer system. Compared to classical hard-disks they are having no mechanical components like spinning disks.
T
- TAR
A widely used file format for archiving. Originally, this stood for Tape ARchive and was already supported by very early UNIX versions for backing up data on tape. The file format is still widely used today. For example, with OVF archives using an
.ovafile extension. See Section 1.15, “Importing and Exporting Virtual Machines”.
U
- UUID
A Universally Unique Identifier, often also called GUID (Globally Unique Identifier). A UUID is a string of numbers and letters which can be computed dynamically and is guaranteed to be unique. Generally, it is used as a global handle to identify entities. Oracle VM VirtualBox makes use of UUIDs to identify VMs, Virtual Disk Images (VDI files), and other entities.
V
- VM
Virtual Machine. A virtual computer that Oracle VM VirtualBox enables you to run on top of your actual hardware. See Section 1.2, “Some Terminology” for details.
- VMM
Virtual Machine Manager. The component of Oracle VM VirtualBox that controls VM execution. See Section 10.2, “Oracle VM VirtualBox Executables and Components” for a list of Oracle VM VirtualBox components.
- VRDE
VirtualBox Remote Desktop Extension. This interface is built into Oracle VM VirtualBox to allow Oracle VM VirtualBox extension packages to supply remote access to virtual machines. An Oracle VM VirtualBox extension package by Oracle provides VRDP support. See Section 7.1, “Remote Display (VRDP Support)”.
- VRDP
See RDP.
- VT-x
The hardware virtualization features built into modern Intel processors. See Section 10.3, “Hardware Virtualization”.
X
- xHCI
eXtended Host Controller Interface, the interface that implements the USB 3.0 standard.
- XML
The eXtensible Markup Language, a metastandard for all kinds of textual information. XML only specifies how data in the document is organized generally and does not prescribe how to semantically organize content.
- XPCOM
Mozilla Cross Platform Component Object Model, a programming infrastructure developed by the Mozilla browser project which is similar to Microsoft COM and enables applications to provide a modular programming interface. Oracle VM VirtualBox makes use of XPCOM on Linux both internally and externally to provide a comprehensive API to third-party developers.